
Skywagon's 2007 V8 Vantage Build Thread


Thread Starter
|
Registered User
Joined: Aug 2015
Posts: 135
From: Chandler, AZ
Rep Power: 18

Skywagon's 2007 V8 Vantage Build Thread
After almost 2 years of enjoying my 2007 Vantage I have decided to start a build thread to document all of my upgrades and changes.
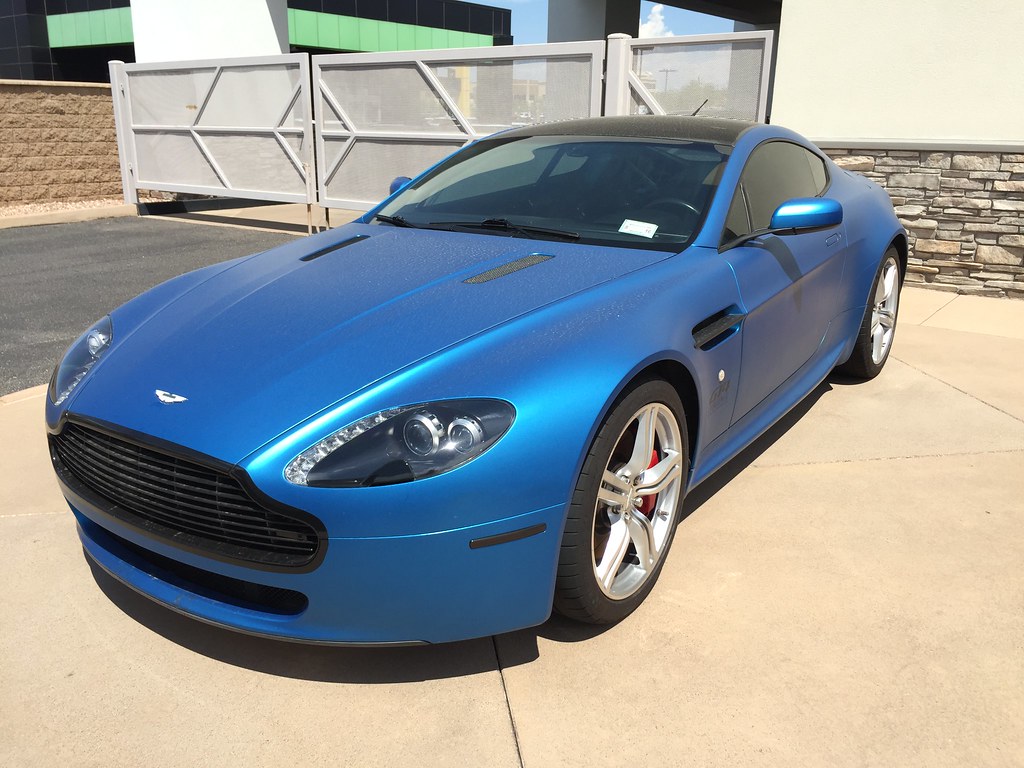
As some background, this is formerly Karl-Franz's (karlfranz on the forum) car. He sold it to a gentleman in New York who owned it for just under a year. In it's travels it ended up here in the Phoenix area. For some unknown reason he sold it to the local dealer. The dealer did not want to deal with the wrap so they decided to wholesale it. I made a buy bid on it and won. This is a photo from the first time I saw the car sitting in the back lot of the local Aston dealership.
I then proceeded to remove the wrap, fix a few minor mechanical issues, perform a major service, and enjoy it (not my McLaren).

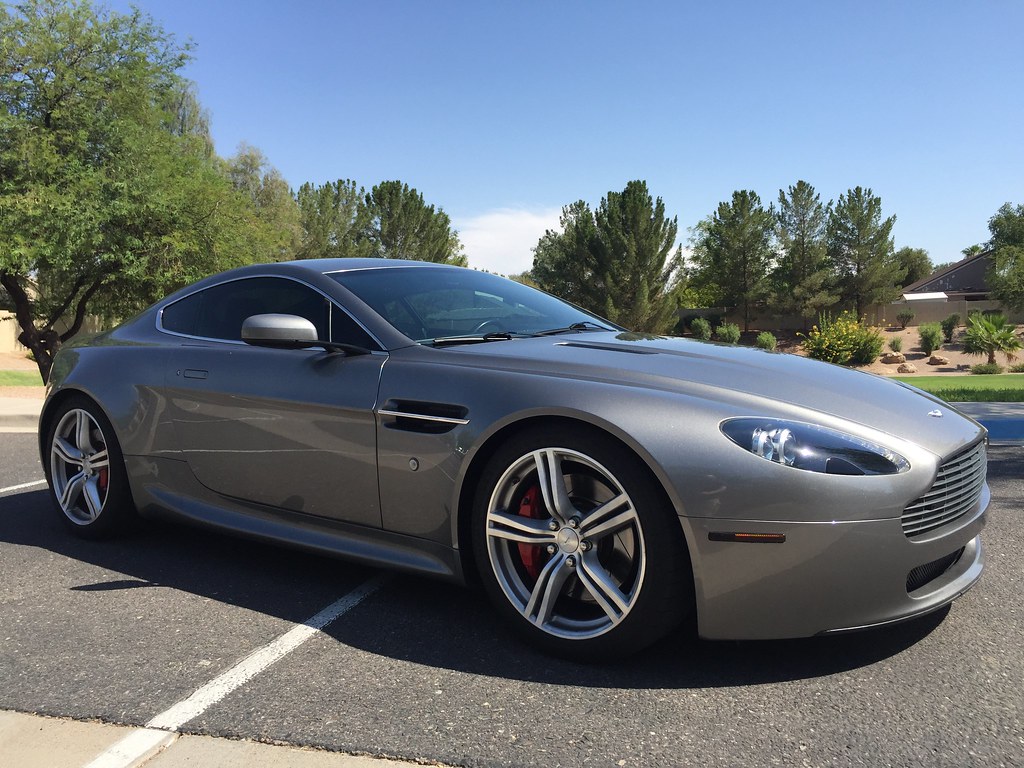
Fast forward to almost 2 years later of trouble free enjoyment and I have finally decided to keep the car for a few more years and make some upgrades and changes. The Aston is not my daily driver and I have put about 3k miles on it since purchase. The most major of the changes is the bumper upgrade kit with the optional carbon fiber splitter and diffuser. Also, I decided to swap the N400 sills for the V12/V8S ones.
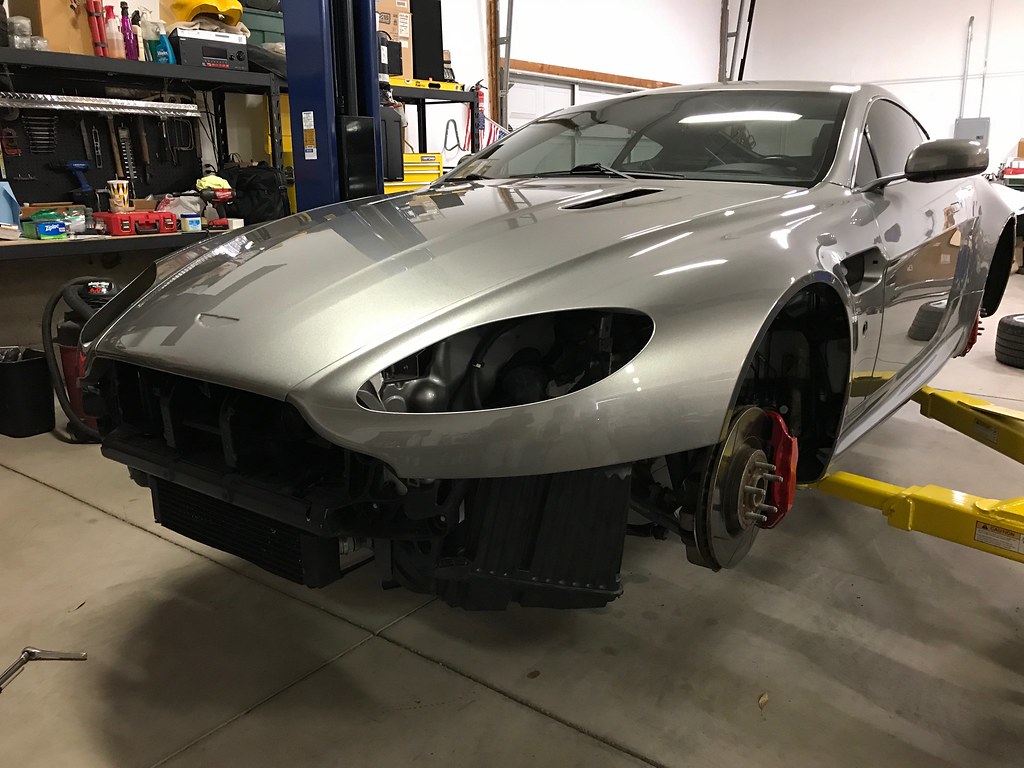
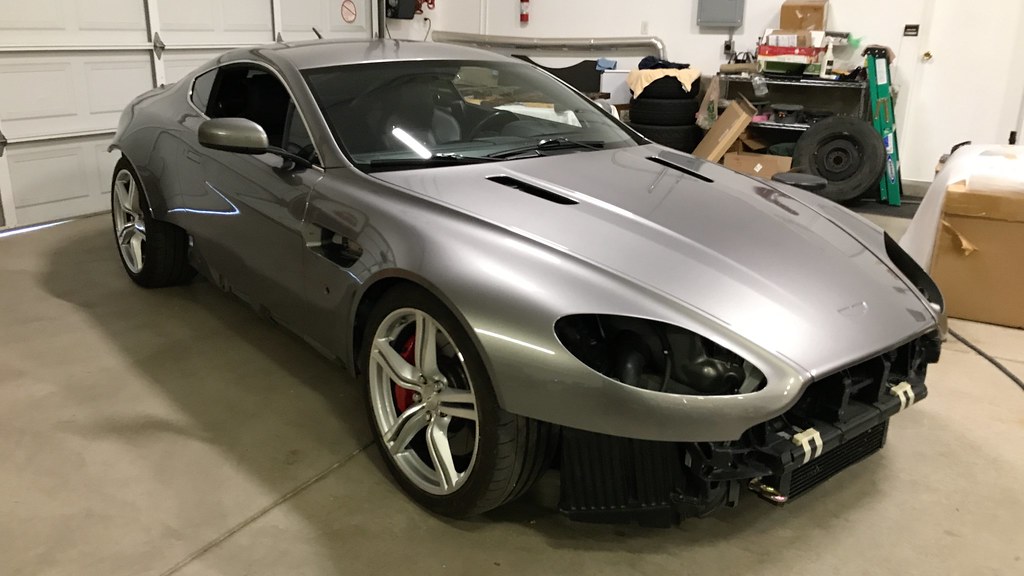
I have a local body shop that I have worked with for many years, The Finishing Touch in Fountain Hills, AZ. They have restored and or painted many award winning cars (GT40's, Shelby Cobra's, Shelby Daytona Coupes, Ferrari's, etc.). I have been talking with them scheduling this effort for a couple months and finally had a window to drop it off. To save effort on their part for scheduling, and cost for myself, I disassembled the majority of the car in my shop. Here are some photos after 15 hours of careful disassembly.
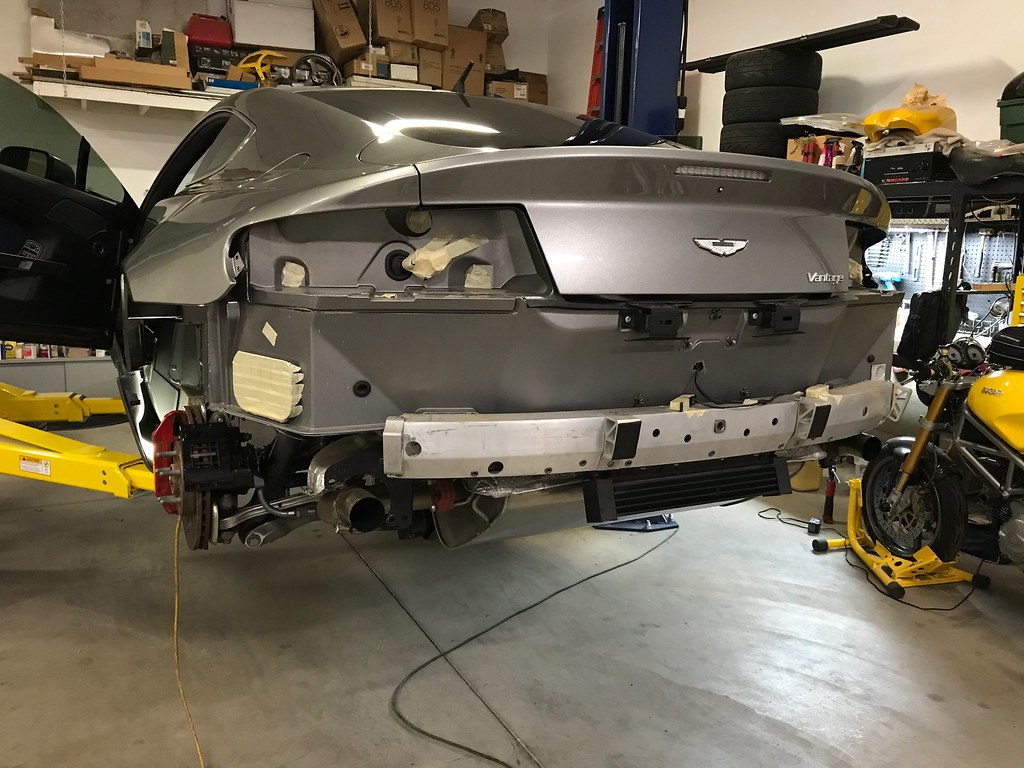
There was further disassembly after this, mainly both doors, that I neglected to get a photo of before it left for the body shop.
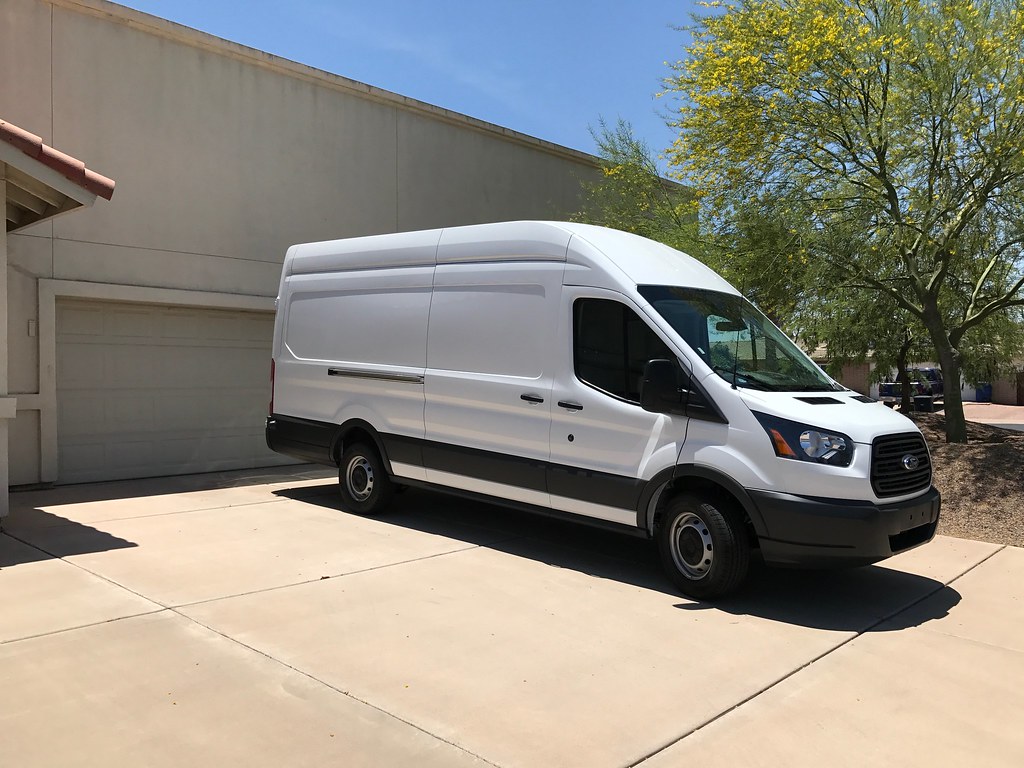
The drop off was 2 weeks ago and we fast forward to yesterday. I dropped by the shop to see the car after paint and picked up the body panels. When Enterprise says they offer an XL van they mean an XL van.
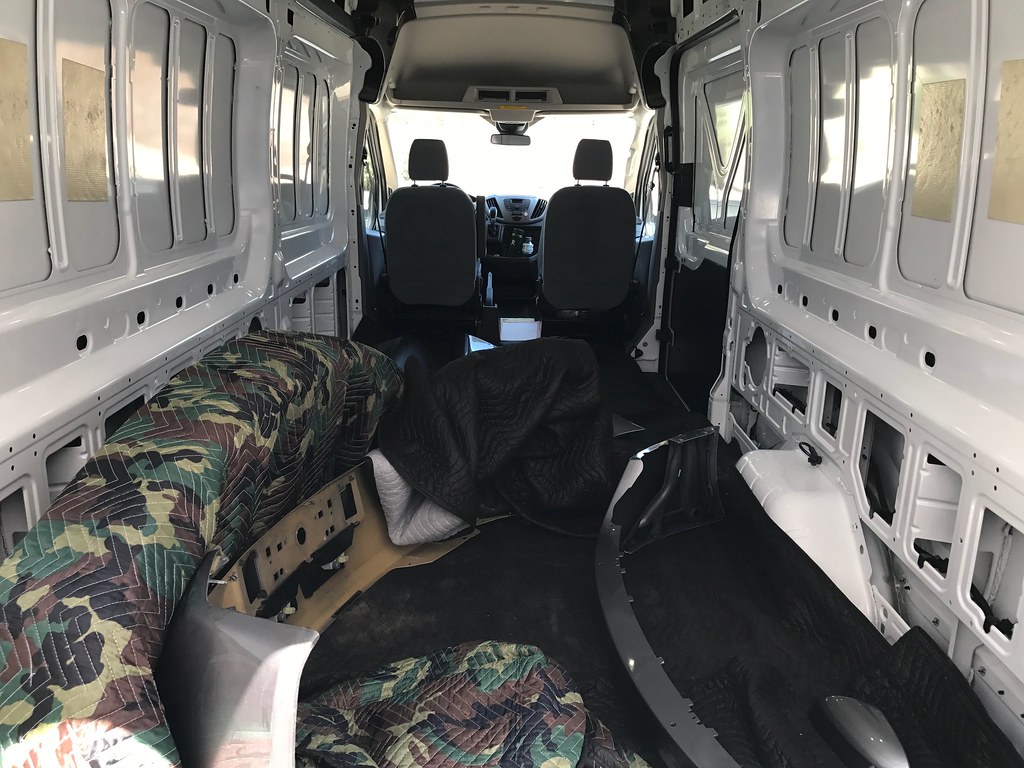
This was very handy to ensure all the parts did not get damaged/scratched after paint. They all look kind of lost inside.
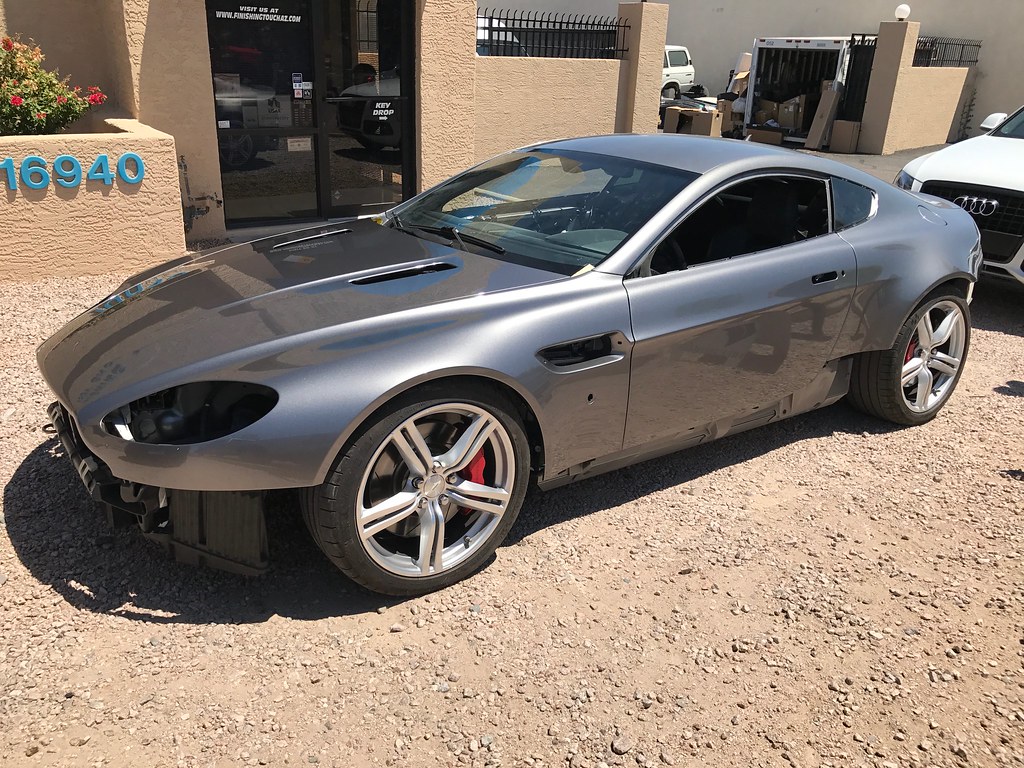
Back to the car. Some may wonder why I disassembled the car that significantly and sent it for paint. Most will change just the plastic panels, but being my typical perfectionist, I was not going to settle for that. The N400 sills that were on the car were far from a good match in my eyes. Most paint/detail people who saw the car noticed them instantly. There were also some rock chips on the nose that I wanted taken care of. To ensure a good transition from plastic to metal body panels I elected to have all neighboring panels blended and completely re-cleared. The only ones I did not do so on is the rear hatch, and of course, the roof (no neighboring new panel). There are no common angles/surfaces from the hatch to the rear bumper. There is also a decent panel gap in that location as well. Therefore, my body shop and I saw no need for paintwork on the hatch. While it was in for paintwork I purchased a new set of Volvo mirror caps and had them painted as well. Here are some photos while the car was in the booth after paint on Friday and out front of the shop for my inspection yesterday.

The car will be back in my shop later this week. The body shop did an initial cut and buff on the panels I picked up yesterday. They had not done so on the body just yet. It is very close to being perfect out of the booth due to their excellent dust control. I will complete the final paint detail after reassembly.
Other immediate plans for the car involve a full nose clear bra after the paint cures in my shop for a month or so. I also just received a V12 clutch kit from Stuart at VelocityAP that I will be installing in the upcoming weeks.
This car had some stereo upgrades performed by the last owner which were documented in a YouTube video (it is kind of corny but the info is there):
I am going to go through this system and other electronics so I better understand what was done. I am also going to search for some better matching carpet material so I can re-wrap the equipment in the truck. The material they used does not match on color or nap. There have been some changes since this video that I need to research and document. The audio is no longer directly input into the amplifier, there is a Audison digital sound processor with remote control mounted where the ashtray used to be (DSP is in trunk area, all is hidden).
I will keep this thread updated as I start reassembly and make further changes. Some ideas on the table include wheels to correct the offset I do not prefer, a custom seat re-trim along with door panel inserts, suspension changes (it currently has VelocityAP springs), rebuilding the brake calipers and painting them another color (currently leaning towards either body colored or yellow) and new 2-piece rotors, and some other ideas that will come up along the way.
I want to thank Rich at Redpants for all of his help in procuring the body upgrade kit and sills. We have sent over a hundred emails back and forth to iron out all the details. I went with the rest of world (ROW) upgrade kit to remove the corner markers. I prefer the cleaner look. I debated the carbon V12S grille and side strakes but decided to stick with the ones I have. To me, the timeless look of an Aston includes the polished stainless accents. I am also going to run my 8 bar grille for now. I may like the look with the later bumpers so I am going to try it out.
Stay tuned...
As some background, this is formerly Karl-Franz's (karlfranz on the forum) car. He sold it to a gentleman in New York who owned it for just under a year. In it's travels it ended up here in the Phoenix area. For some unknown reason he sold it to the local dealer. The dealer did not want to deal with the wrap so they decided to wholesale it. I made a buy bid on it and won. This is a photo from the first time I saw the car sitting in the back lot of the local Aston dealership.
I then proceeded to remove the wrap, fix a few minor mechanical issues, perform a major service, and enjoy it (not my McLaren).
Fast forward to almost 2 years later of trouble free enjoyment and I have finally decided to keep the car for a few more years and make some upgrades and changes. The Aston is not my daily driver and I have put about 3k miles on it since purchase. The most major of the changes is the bumper upgrade kit with the optional carbon fiber splitter and diffuser. Also, I decided to swap the N400 sills for the V12/V8S ones.
I have a local body shop that I have worked with for many years, The Finishing Touch in Fountain Hills, AZ. They have restored and or painted many award winning cars (GT40's, Shelby Cobra's, Shelby Daytona Coupes, Ferrari's, etc.). I have been talking with them scheduling this effort for a couple months and finally had a window to drop it off. To save effort on their part for scheduling, and cost for myself, I disassembled the majority of the car in my shop. Here are some photos after 15 hours of careful disassembly.
There was further disassembly after this, mainly both doors, that I neglected to get a photo of before it left for the body shop.
The drop off was 2 weeks ago and we fast forward to yesterday. I dropped by the shop to see the car after paint and picked up the body panels. When Enterprise says they offer an XL van they mean an XL van.
This was very handy to ensure all the parts did not get damaged/scratched after paint. They all look kind of lost inside.
Back to the car. Some may wonder why I disassembled the car that significantly and sent it for paint. Most will change just the plastic panels, but being my typical perfectionist, I was not going to settle for that. The N400 sills that were on the car were far from a good match in my eyes. Most paint/detail people who saw the car noticed them instantly. There were also some rock chips on the nose that I wanted taken care of. To ensure a good transition from plastic to metal body panels I elected to have all neighboring panels blended and completely re-cleared. The only ones I did not do so on is the rear hatch, and of course, the roof (no neighboring new panel). There are no common angles/surfaces from the hatch to the rear bumper. There is also a decent panel gap in that location as well. Therefore, my body shop and I saw no need for paintwork on the hatch. While it was in for paintwork I purchased a new set of Volvo mirror caps and had them painted as well. Here are some photos while the car was in the booth after paint on Friday and out front of the shop for my inspection yesterday.
The car will be back in my shop later this week. The body shop did an initial cut and buff on the panels I picked up yesterday. They had not done so on the body just yet. It is very close to being perfect out of the booth due to their excellent dust control. I will complete the final paint detail after reassembly.
Other immediate plans for the car involve a full nose clear bra after the paint cures in my shop for a month or so. I also just received a V12 clutch kit from Stuart at VelocityAP that I will be installing in the upcoming weeks.
This car had some stereo upgrades performed by the last owner which were documented in a YouTube video (it is kind of corny but the info is there):
I will keep this thread updated as I start reassembly and make further changes. Some ideas on the table include wheels to correct the offset I do not prefer, a custom seat re-trim along with door panel inserts, suspension changes (it currently has VelocityAP springs), rebuilding the brake calipers and painting them another color (currently leaning towards either body colored or yellow) and new 2-piece rotors, and some other ideas that will come up along the way.
I want to thank Rich at Redpants for all of his help in procuring the body upgrade kit and sills. We have sent over a hundred emails back and forth to iron out all the details. I went with the rest of world (ROW) upgrade kit to remove the corner markers. I prefer the cleaner look. I debated the carbon V12S grille and side strakes but decided to stick with the ones I have. To me, the timeless look of an Aston includes the polished stainless accents. I am also going to run my 8 bar grille for now. I may like the look with the later bumpers so I am going to try it out.
Stay tuned...

Registered User
Joined: Jun 2015
Posts: 168
From: Granite Bay, CA
Rep Power: 21
Very impressive and cool that you tracked down Karlfranz's Aston. I definitely prefer the classic gray paint to the matte blue wrap, but wraps are always temporary and fun to play with. If I remember correctly, he put some time into the install!
Can't wait to see the final product.
Can't wait to see the final product.
Thread Starter
|
Registered User
Joined: Aug 2015
Posts: 135
From: Chandler, AZ
Rep Power: 18
Very impressive and cool that you tracked down Karlfranz's Aston. I definitely prefer the classic gray paint to the matte blue wrap, but wraps are always temporary and fun to play with. If I remember correctly, he put some time into the install!
Can't wait to see the final product.
Can't wait to see the final product.
Karl-Franz has been a great help in identifying things on this car and providing me with copies of it's service and modification history. The only thing missing is the work shown in the YouTube video. I have a good idea on all of that so far. They wired the 12V trigger for power on to the fuse 22 location in the rear fuse box. That is the infamous exhaust valve fuse. That was smart as the audio system will not start pulling power until the engine is running. That way the system is not draining the battery with the engine off and the ignition on. And that is for all components added, including the Valentine 1. They have it all through a relay triggered from fuse 22.


Thread Starter
|
Registered User
Joined: Aug 2015
Posts: 135
From: Chandler, AZ
Rep Power: 18
Thanks all for the kind words.
The brake calipers are currently the original red color. Accent colors on cars is a huge personal preference decision. Almost all of my previous sports cars have been yellow; most recently a Lotus Elise and a Honda S2000 (sold them both to purchase the Aston).
The Aston was a departure from my normal path going with a subdued color, Tungsten Silver. Since I prefer yellow, I have decided to start with the brake calipers and see if I like that. If I do not then I will repaint them to either match the bodywork or black. If I like the yellow then I will consider yellow accents on the seats and door panel inserts when I re-trim the interior. I wish Aston would offer the factory sewn covers for a more reasonable cost. I have done interior work in the past; paid my way through college doing so. I might have to bring my commercial sewing machine out of retirement.
Trending Topics
Thread Starter
|
Registered User
Joined: Aug 2015
Posts: 135
From: Chandler, AZ
Rep Power: 18
An update. The chassis arrived back from the shop last Friday and I have completed reassembly of the doors/door seals/trim. I wanted to complete this first so I can seal up the clean interior and it is easier to do this without the posts of the lift in the way.
Tonight it goes back on the lift in preparation for reassembly of the front and rear ends. I am starting this tomorrow morning and hope to finish Saturday. This thread may get updates throughout the day as I progress along. After reassembly, I will start the final paint refinement before it goes for protection film.
I am thinking of swapping back to the stock springs for the time being. I am running a set of VelocityAP springs and am concerned about clearing the nose on speed bumps with the current tire configuration. As I purchased the car it has 245/40/19 tires on the front and 275/40/19 tires on the rear. The rear tires were 1 inch larger in diameter when new. With the tread wear at about 50% currently it might not be that bad anymore, but still a nose down situation. That is not helping my front end clearance. I am concerned about damaging the new carbon splitter. I purchased a kit from Scrape Armor that I will be installing as well. I consider that a safety in case I have a problem, not a primary reason to have the nose that low. I may decide to swap the tires for now or go with a set of wheels/tires.
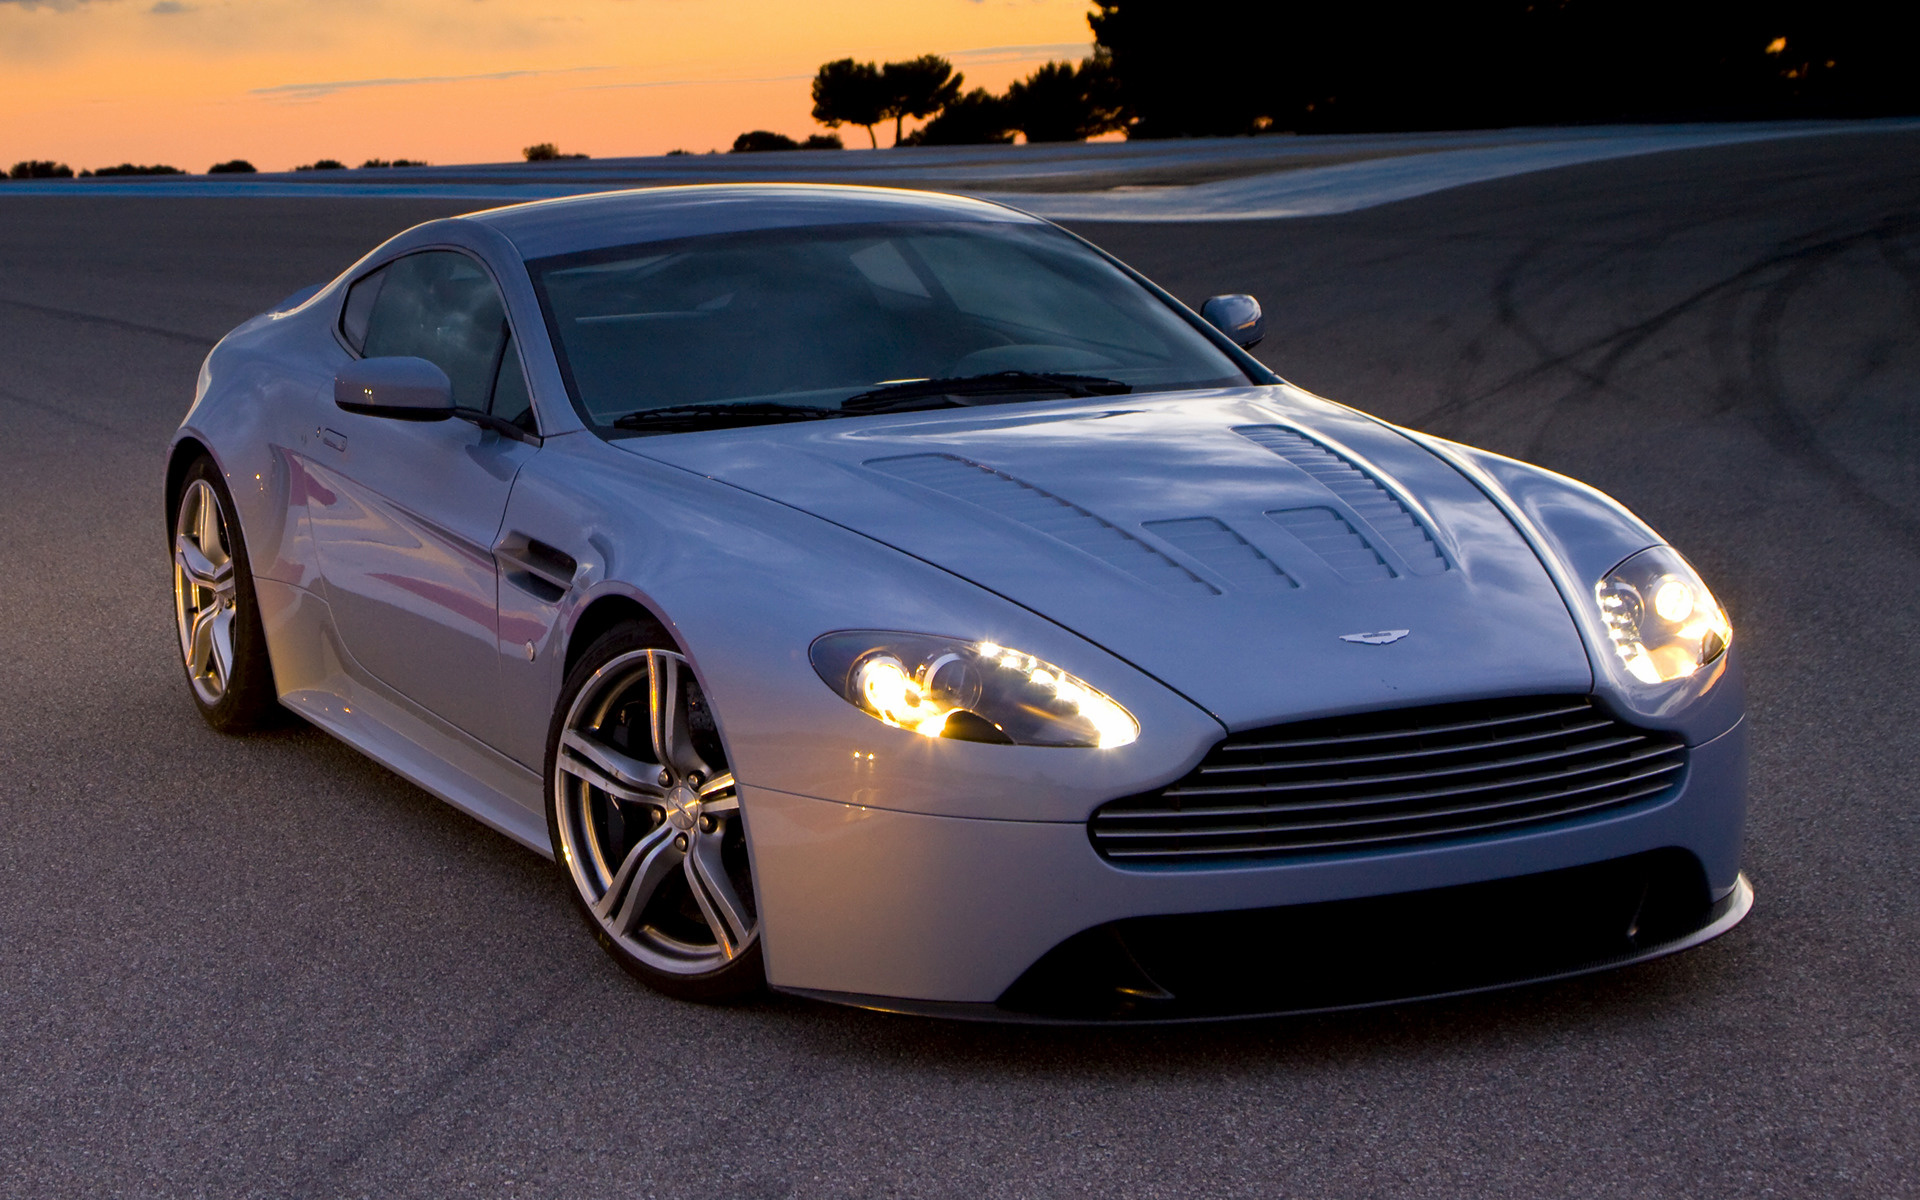
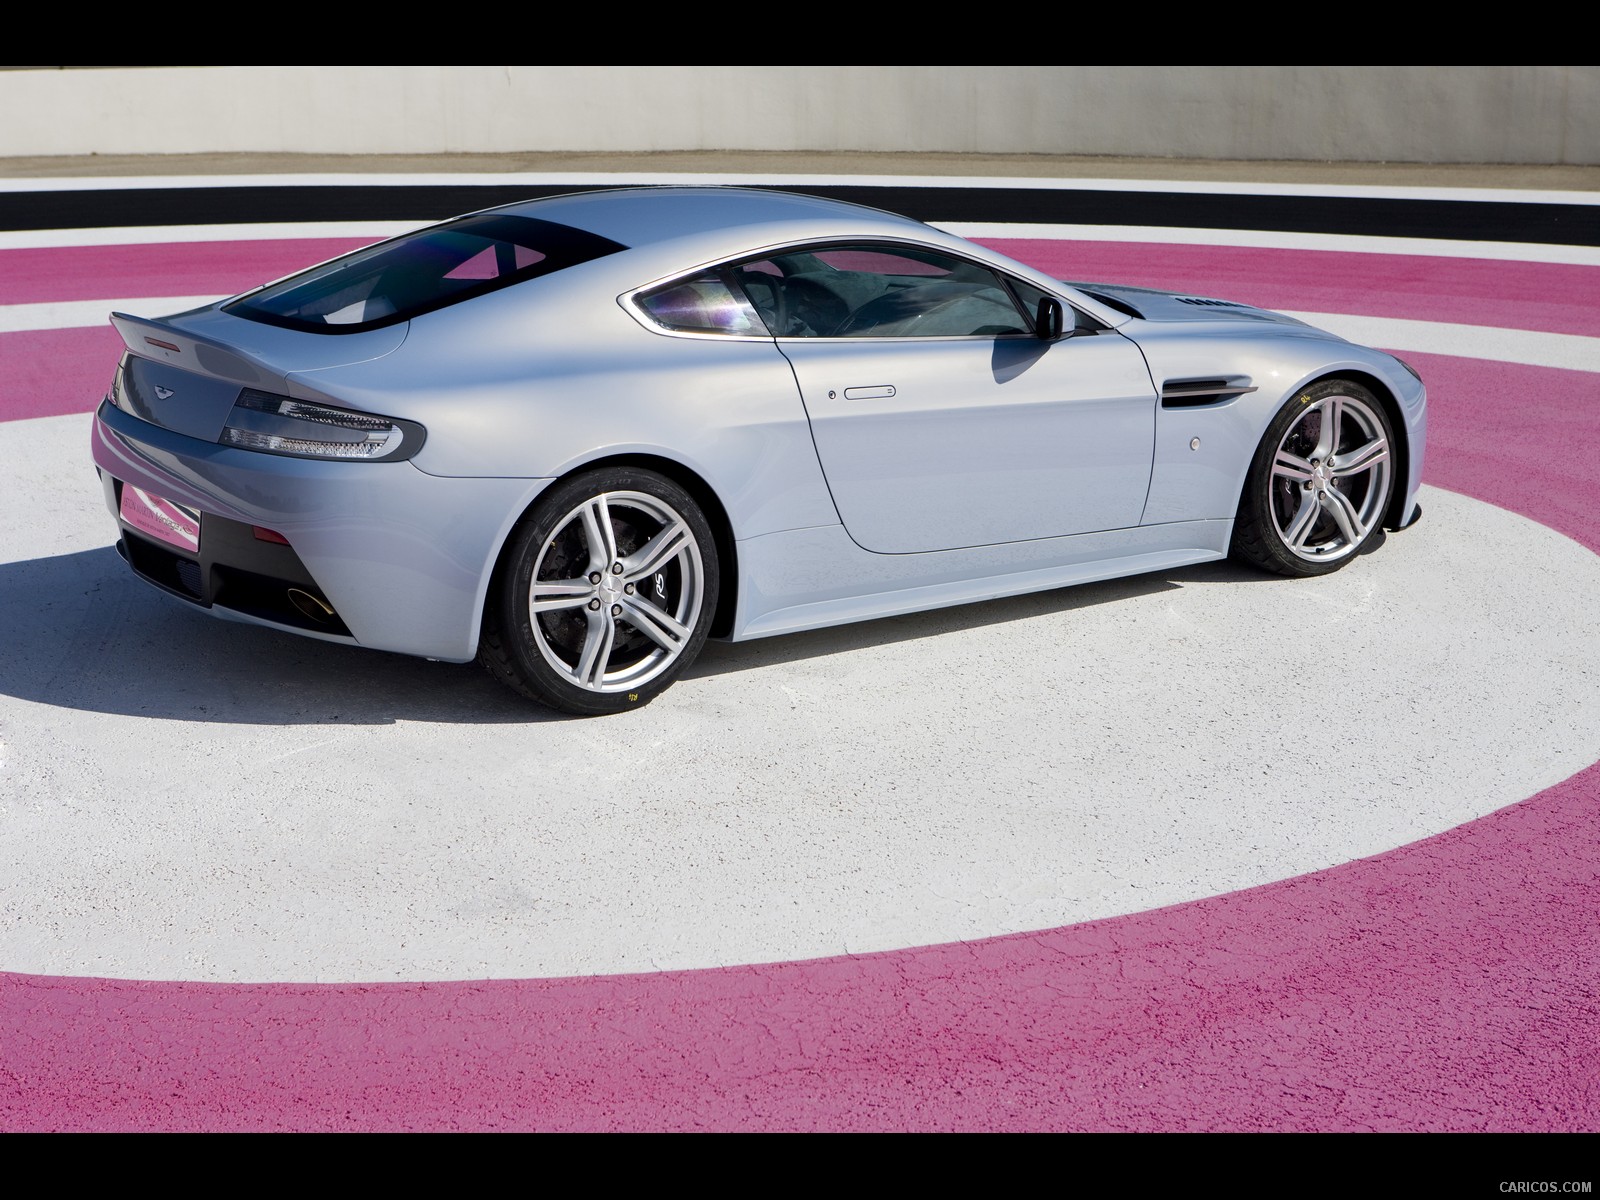
The other debate is wheels. I currently have the split 5-spoke sport pack wheels. My original visual image for this iteration of the build is the prototype V12 Vantage, the 2007 V12 Vantage RS. Especially when it was running the same sport pack wheels I have currently:
I ordered the ROW kit to remove the corner markers from the bumpers along with the V12 side sills in order to achieve this look. The only differences I will have is no hood louvers, the roof antenna, the 8-bar grille, and the V12 has the taller rear hatch tail.
I think I will run the sport pack wheels for now and see. I may consider recoating them a different/darker color and retain the diamond cut faces. Like these:

Has anyone recoated the sport pack wheels in a dark color or black and retained the diamond turned faces? I know the N400 came with the darker wheels I show above but a set done in black intrigues me a little. It would resemble the later DBS wheels without having to go with 20's. I may decide to run rear spacers at least to help with the visual offset; the front wheels do not bother me with their current offset.
I would truly like to have a set of HRE's made for the car but the budget is not there currently.
Tonight it goes back on the lift in preparation for reassembly of the front and rear ends. I am starting this tomorrow morning and hope to finish Saturday. This thread may get updates throughout the day as I progress along. After reassembly, I will start the final paint refinement before it goes for protection film.
I am thinking of swapping back to the stock springs for the time being. I am running a set of VelocityAP springs and am concerned about clearing the nose on speed bumps with the current tire configuration. As I purchased the car it has 245/40/19 tires on the front and 275/40/19 tires on the rear. The rear tires were 1 inch larger in diameter when new. With the tread wear at about 50% currently it might not be that bad anymore, but still a nose down situation. That is not helping my front end clearance. I am concerned about damaging the new carbon splitter. I purchased a kit from Scrape Armor that I will be installing as well. I consider that a safety in case I have a problem, not a primary reason to have the nose that low. I may decide to swap the tires for now or go with a set of wheels/tires.
The other debate is wheels. I currently have the split 5-spoke sport pack wheels. My original visual image for this iteration of the build is the prototype V12 Vantage, the 2007 V12 Vantage RS. Especially when it was running the same sport pack wheels I have currently:
I ordered the ROW kit to remove the corner markers from the bumpers along with the V12 side sills in order to achieve this look. The only differences I will have is no hood louvers, the roof antenna, the 8-bar grille, and the V12 has the taller rear hatch tail.
I think I will run the sport pack wheels for now and see. I may consider recoating them a different/darker color and retain the diamond cut faces. Like these:
Has anyone recoated the sport pack wheels in a dark color or black and retained the diamond turned faces? I know the N400 came with the darker wheels I show above but a set done in black intrigues me a little. It would resemble the later DBS wheels without having to go with 20's. I may decide to run rear spacers at least to help with the visual offset; the front wheels do not bother me with their current offset.
I would truly like to have a set of HRE's made for the car but the budget is not there currently.
Site Sponsor

Joined: Mar 2004
Posts: 3,406
From: Miami, Florida
Rep Power: 176

I have some in-stock options that have been around for a while so I can cut a massive deal on them for you if interested. PM me for more details.
__________________

Wheels Boutique // 786 249 0127 // Sales@wheelsboutique.com
Follow us on YouTube: www.youtube.com/user/WheelsBoutique
Largest HRE Dealer In The World / Largest ANRKY Dealer / BBS Premium Dealer / TechArt Premium Dealer / Vorsteiner / Rotiform / Akrapovic / iPE / Novitec / Brabus / AC Schnitzer / Mansory / Brembo / RENNTech / Weistec / Tubi / Hamman / KW / H&R and tons more.
Thread Starter
|
Registered User
Joined: Aug 2015
Posts: 135
From: Chandler, AZ
Rep Power: 18
Yesterday had it's challenges but success was had. Keep in mind that I am swapping to a Rest of World (ROW) bumper upgrade kit. That does not have the corner markers nor the filler pieces on either sides of the US license plate. Those filler pieces have bumper support extrusions that extend into them. They are riveted on using large pop rivets. I had to punch out the centers of those rivets, drill the heads off with a large bit, and punch out the remaining rivet. This turns a US support into a ROW version.
US rear bumper support:
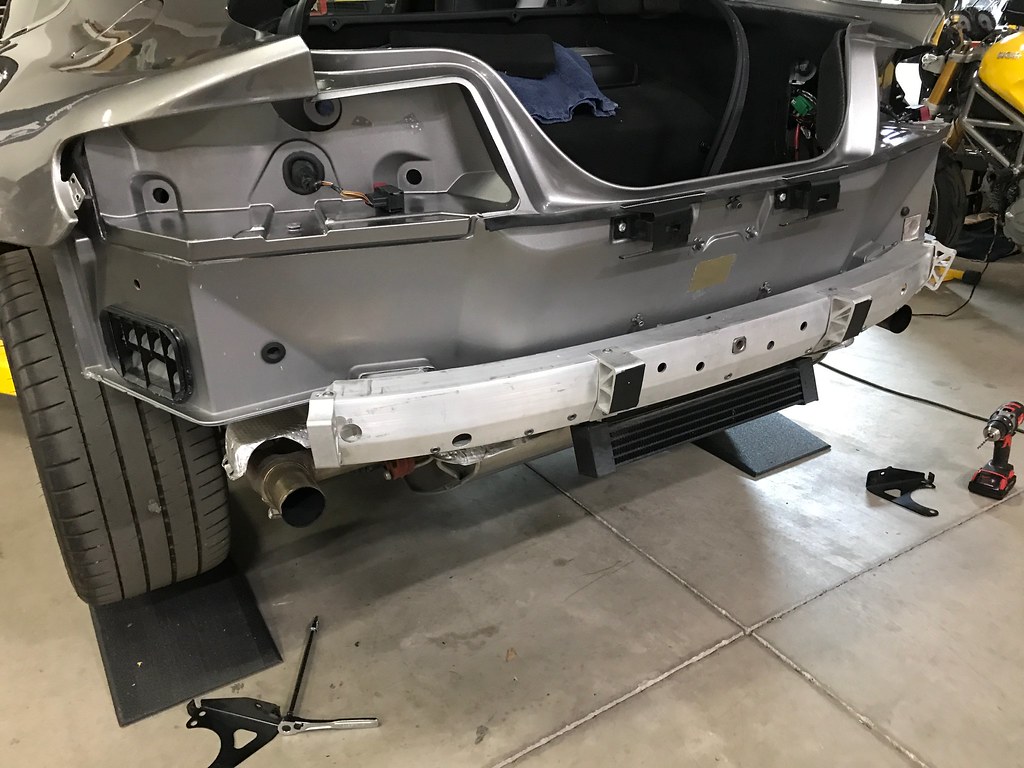
ROW rear bumper support:
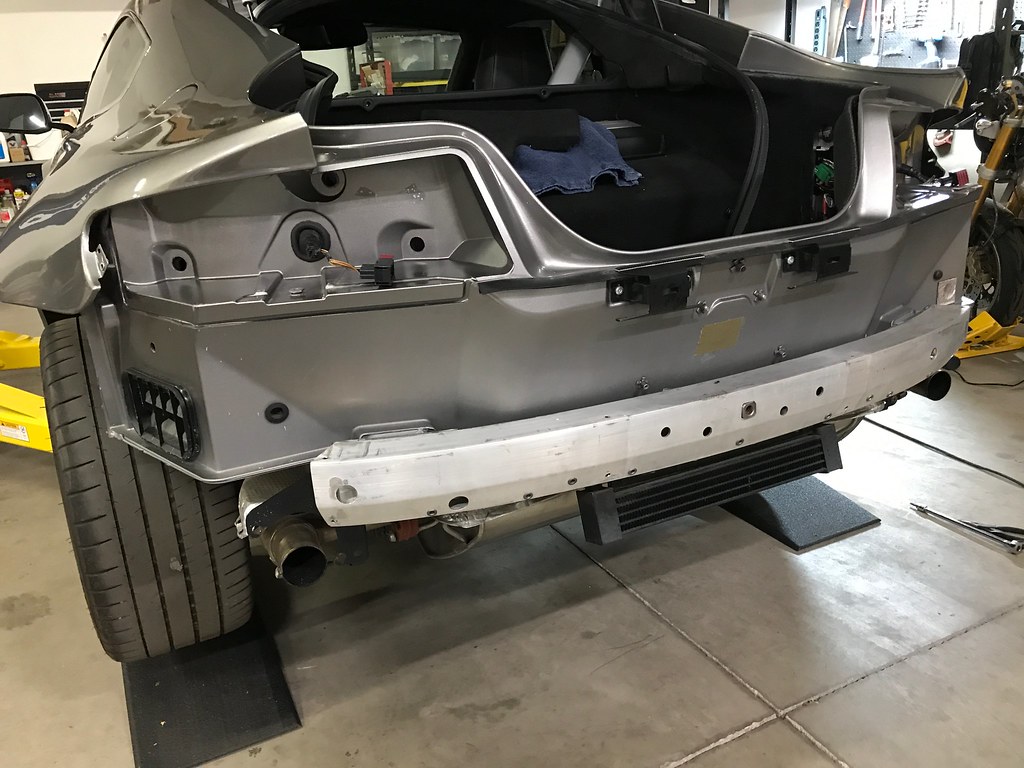
This allowed the fitment of the new ROW rear bumper assembly with the carbon diffuser.
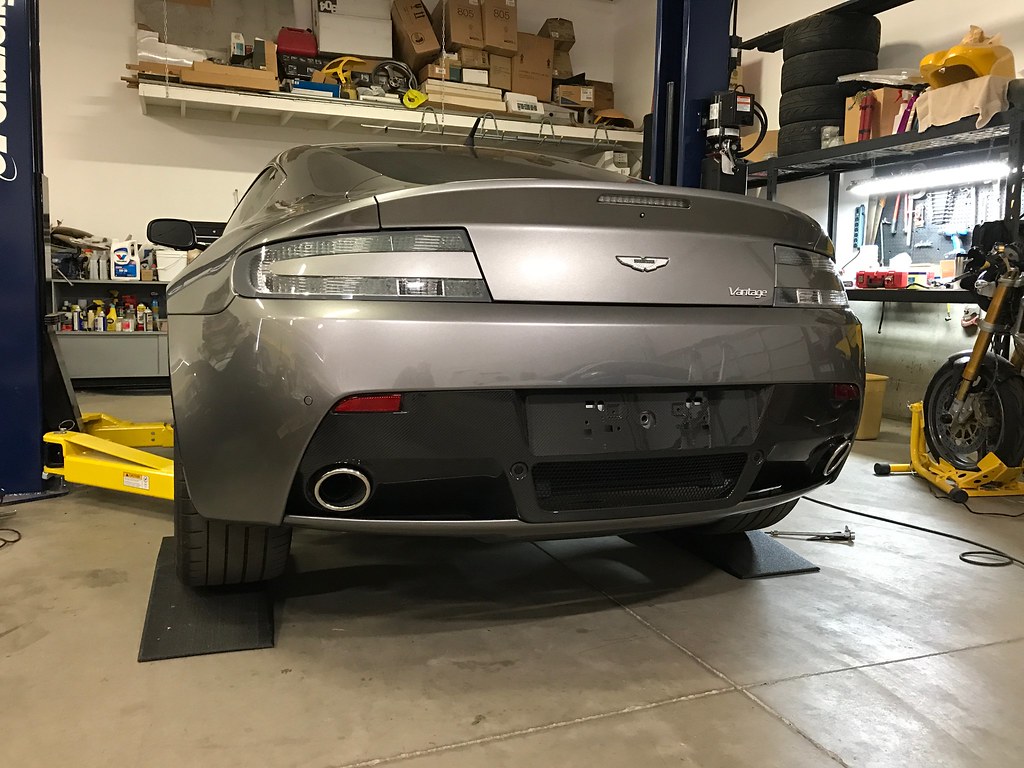
That ended my effort yesterday. This morning I resumed work and installed the front bumper cover and V8S/V12 side sills. I have taken a break for today and may resume work on it either tomorrow or next week sometime.
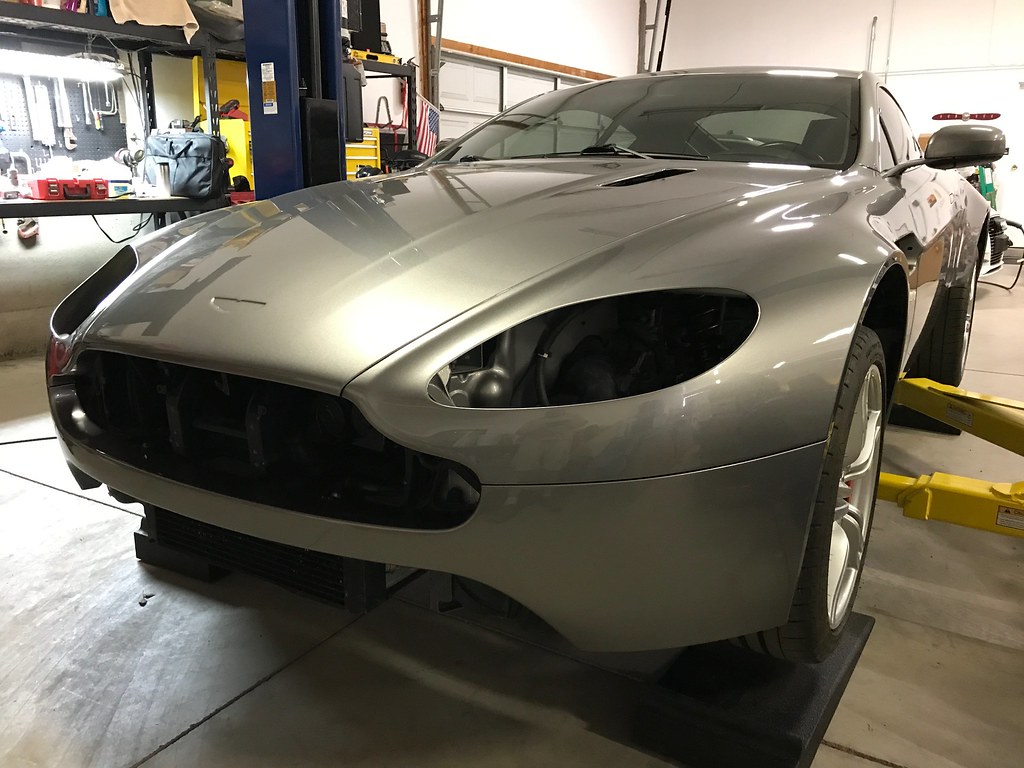
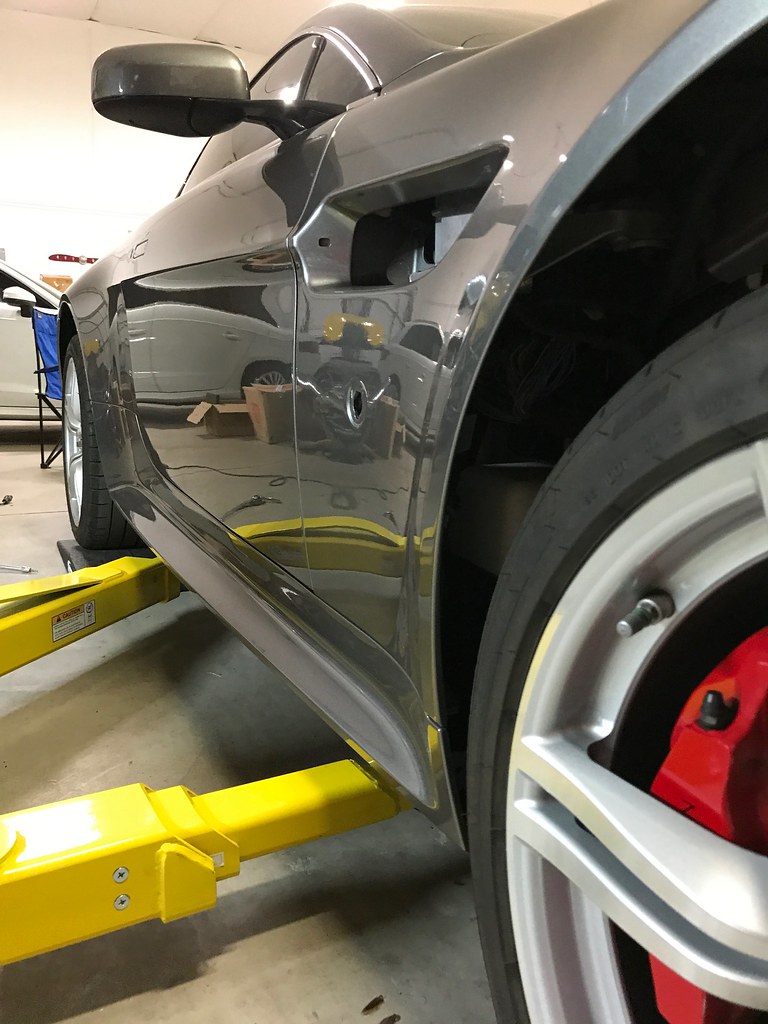
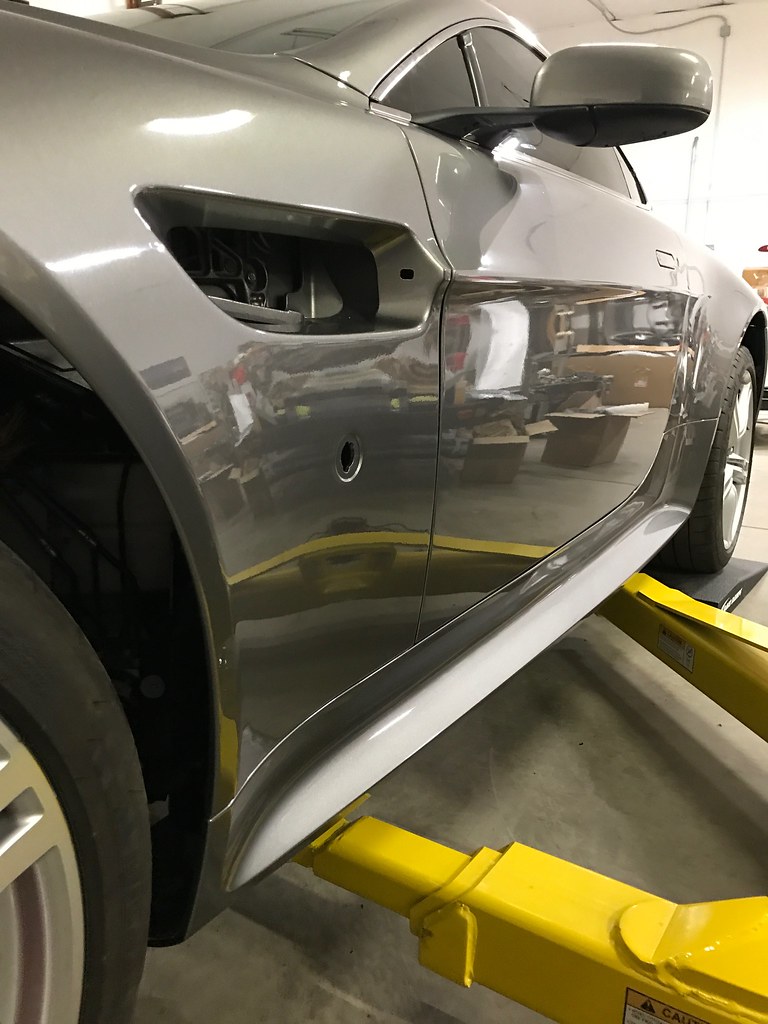
I am very impressed with the color match. I will work on the paintwork after I have completed reassembly.
US rear bumper support:
ROW rear bumper support:
This allowed the fitment of the new ROW rear bumper assembly with the carbon diffuser.
That ended my effort yesterday. This morning I resumed work and installed the front bumper cover and V8S/V12 side sills. I have taken a break for today and may resume work on it either tomorrow or next week sometime.
I am very impressed with the color match. I will work on the paintwork after I have completed reassembly.
Registered User

Joined: Jul 2007
Posts: 384
From: Washington, D.C.
Rep Power: 55
Man! I love the RoW bumpers! If I get them, though, I will have to keep my old bumpers and do the annual swap during state inspections -- there is no way Virginia will give me a passing grade otherwise!
But your car is looking great! I subscribed to the thread to follow your progress. Good luck with the rest of the build!
But your car is looking great! I subscribed to the thread to follow your progress. Good luck with the rest of the build!

