DIY to replace Cayenne front axle
#1
 02-11-2016, 12:14 AM

Join Date: Dec 2012
Location: San Francisco
Posts: 53
Rep Power: 16 
DIY to replace Cayenne front axle
I am writing this DIY as I couldn’t find anywhere that described how to DIY a front left axle replacement on a 2005 Porsche Cayenne Turbo, and the minimum quote I got was over $1000. This DIY will be more or less the same for both sides.
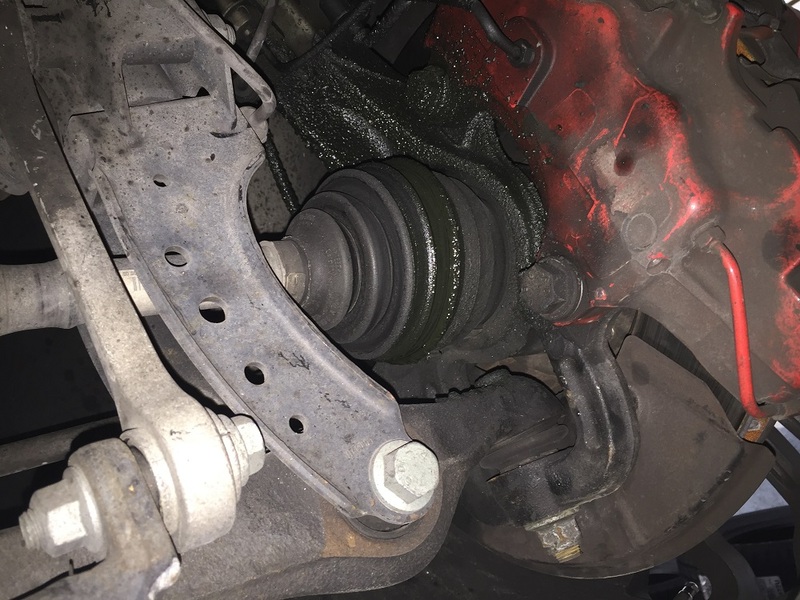
The reasons I am replacing my axle is that one of the CV boots was split when I bought the car, causing the whole corner to be coated in grease, and during some steering maneuvers I could hear grinding and moaning noises from the front left side.
I am happy to modify this DIY with feedback or other advice. This work is done at your own risk, I take no responsibility for you skinning your knuckles, damaging your car or anything else by using these instructions!
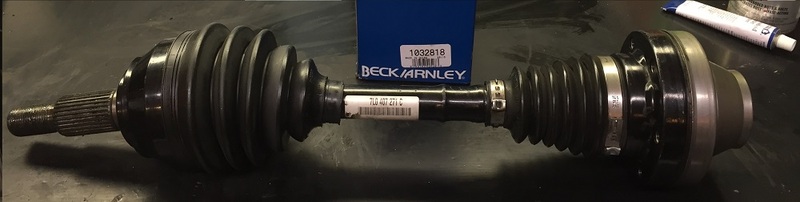
Total time taken to remove and reinstall the axle was about 3 hours and 2 beers, including taking pics and notes. The axle was a new GKN Loebro one that I got my local Porsche dealer to price match at $211
Tools needed
Sockets
8mm (for undertrays)
10mm deep socket
13mm
15mm
17mm
18mm
19mm
32mm 12 point
Size 12 triple square socket (drive shaft removal)
T30 (?) to lock ball joints when loosening/tightening
T50 torx socket (to remove rotor)
Short and long handled ratchets
Large scale torque wrench
Wrenches
19mm box wrench / ring spanner
Other tools
Ball joint separators
Flat head screwdriver
Jack stands
Jack
Lots of shop towel / rags to clean up spillages
Drain buckets
Consumables and parts
GKN Loebro complete new front axle 955-349-038-13 or 138-01187827 $211
(Autozone and Napa were offering remanufactured ones for $59 after core charge, but maybe these are lower quality.)
Caliper bolts (these are ‘use once, torque to yield’ type) N-906-854-03 $4.64 each
Axle nut (should be replaced if not with new axle already) W0133-1999019
Rotor retaining screw N-910-282-02-M1002
Penetrating oil
Step 1
Apply parking brake firmly with the car on level ground.
Put the air suspension (if fitted to your car) into 'Service Mode' by pushing the Ride Height control forward for about 5-10 seconds. You should get a message about 'Regulation Switched off'.
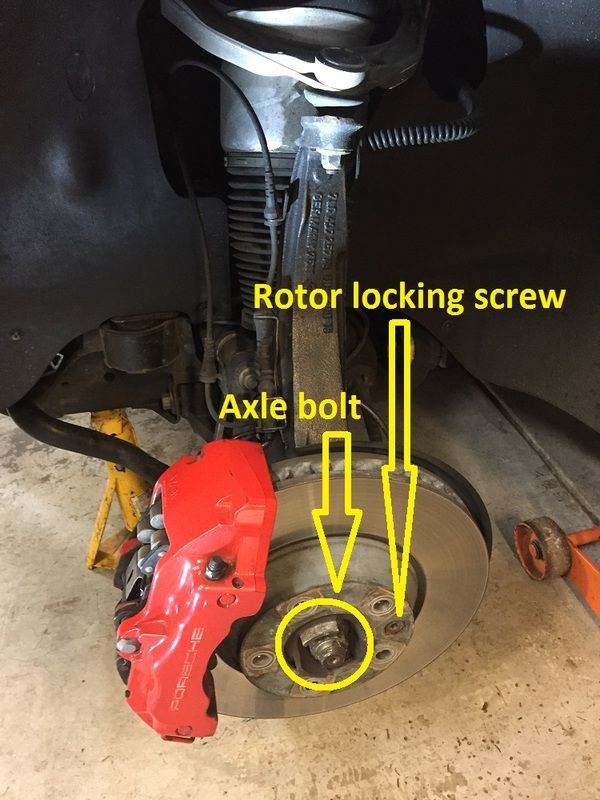
Remove the center cap from the front wheel and using a long breaker bar, loosen the axle nut and front wheel lug nuts while the wheel is still mounted and on the ground. Use penetrating lube to soak it and have access to a good impact gun, if the breaker bar won't work. Then jack up the car and put it securely on axle stands. Remove the front wheel. (I also put the wheel under the car in case the jack stands slip or break.)
Step 2
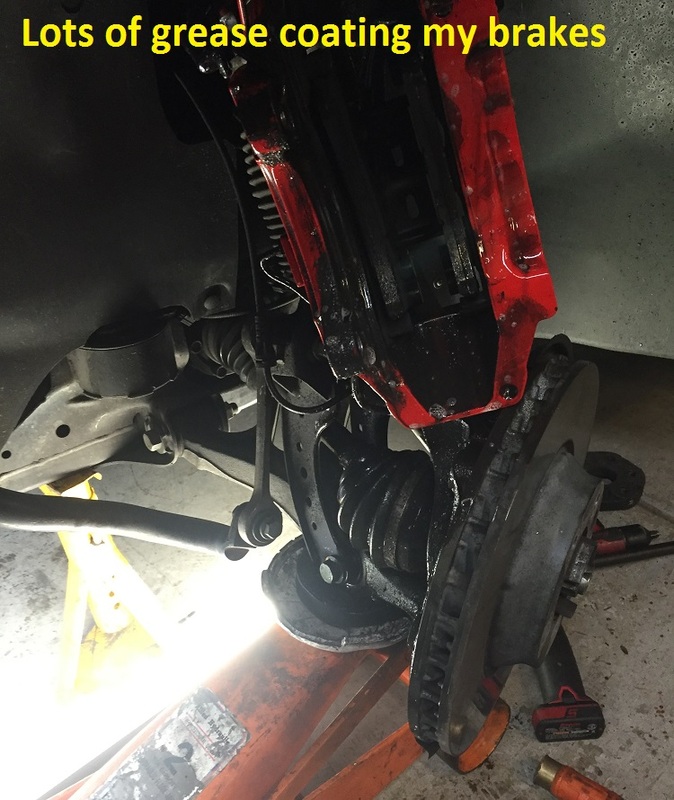
For me to access the lower steering knuckle ball joint, I had to remove the brake caliper, rotor and dust shield (I intended to do this anyway, as there was so much grease in my left front brakes). You may not need to do this step if you use the alternate ball joint tool.
This is a straightforward job using 21mm socket, 13mm socket and a T50 torx. You may need to tap the rotor off with a mallet. I used a bungee to hang the caliper out of the way from the upper control arm. Make sure you spread open the pads a little in the caliper (without damaging them) to make it easier to reinstall later. If your brake pads are coated in grease like mine were, it’s safest to replace both left and right side pads with new pads.
When you remove the rotor, do it before you separate steering knuckle from tie rod/lower control and upper control arms ball joints.
- Remove brake pads (unclip sensor connector, then remove sensors from each pad, move to side)
- Loosen 2 caliper bolts (21mm), then remove the lower one
- While holding caliper, remove upper bolt. Do not leave unsupported as the only thing holding caliper up will be the thin steel line going to steering knuckle. If that breaks, you have a new brake line job on your hands.
Once caliper bolts are out, keep holding with one hand, and with the other loosen and remove rotor.
Now, use caliper bolts to thread them back into the holes to keep the caliper stationary. This way the caliper wont put too much pressure on the line.
- Remove rotor shield
Step 3
Now, use impact gun to (I recommend this order)
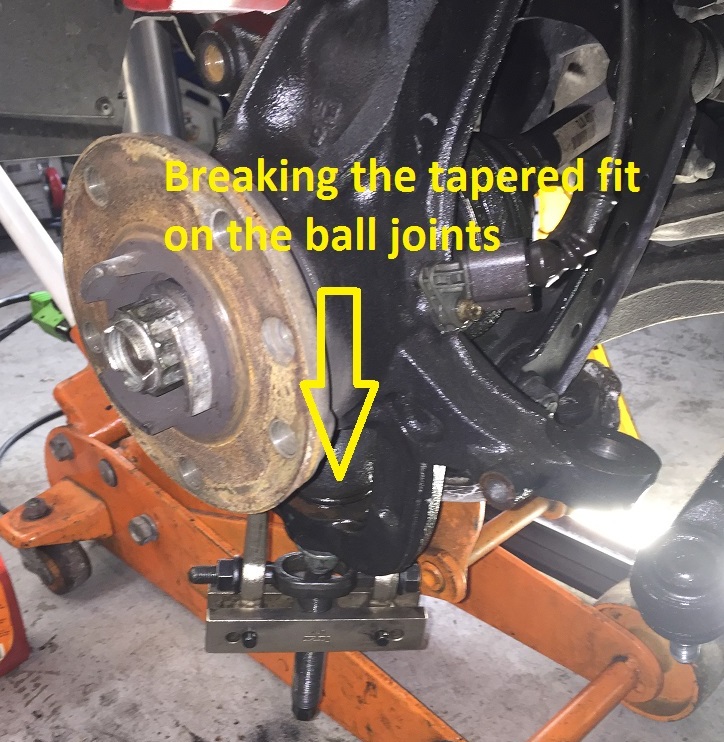
- Unbolt tie rod then use ball joint puller to separate tie rod from steering knuckle
- Unbolt lower control arm ball joint, use puller to separate lower ball joint from knuckle
- CAUTION...Unbolt upper control arm, use puller to separate from upper control arm. Before you separate upper control arm, have a bungee cord handy and clip into upper control arm and some part of shock/knuckle, etc to prevent upper control arm from shooting up towards car. There are plastic sensors in upper control arm, and it is under pressure from side bolts. This can save you additional work
- CAUTION 2...as soon as you separate from upper control arm, you should be supporting the knuckle by hand.
FOR NEXT STEP ONLY, use upper control arm bolt to thread onto upper control arm ball joint (so you can have support when loosening axle with hammer). After next step remove the nut again.
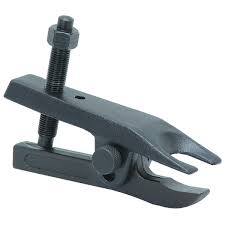
You may prefer to use this kind of tool, available cheaply from Harbor Freight.
Step 4
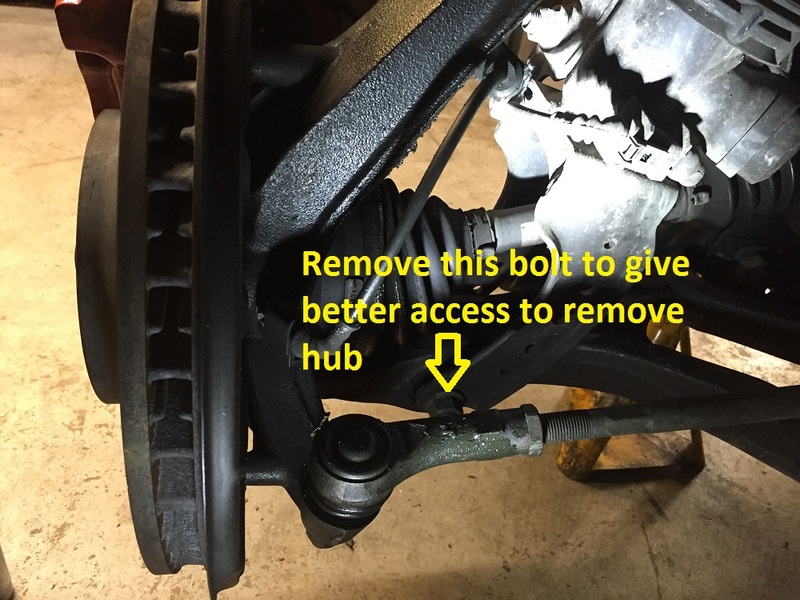
Remove the long bolt that holds the middle of lower control arm to the mounting bracket in order to give enough wiggle room and clearance to pull the upright off the lower ball joint. You should now be able to pull the upright off the end of the axle.
USE WOOD PIECE and sledge hammer to loosen the axle from steering knuckle. Unless you were doing stuff on it recently, the rust will have it stuck. A 5lb sledge hammer smacking into axle end while covered by piece of wood will do the job. When I say smack I mean it. Not a tap or a gentle blow. Real force has to be used here.
You will see the axle move back into knuckle hub as a sign it has been loosened
Caution - As the hub upright has a number of brake hoses, electrical lines etc clipped to it, you need to either remove them or be very careful not to damage them when you hang the removed upright from the upper control arm.
Step 5
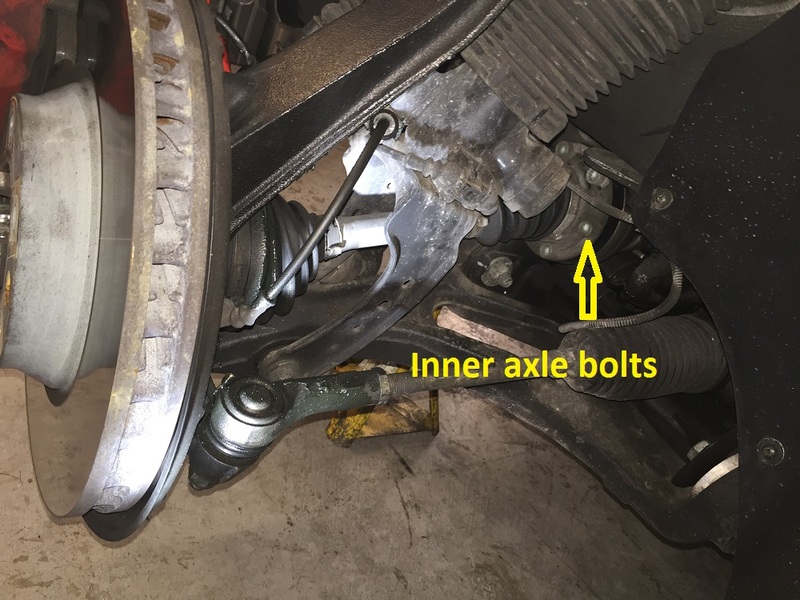
Undo the 6x size 12 triple square bolts holding the inner end of the axle to the front diff. (I did not need to rotate the axle in order to remove all the bolts.)
Loosen then remove the cross bolt from mid lower control arm. Use caution as there is pressure applied to the bolt, sometimes extra car jack is needed to lift the lower control arm slightly, and sometimes one has to push down on the control arm to make it easy for bolt to come out. Inspect before you decide what to do.
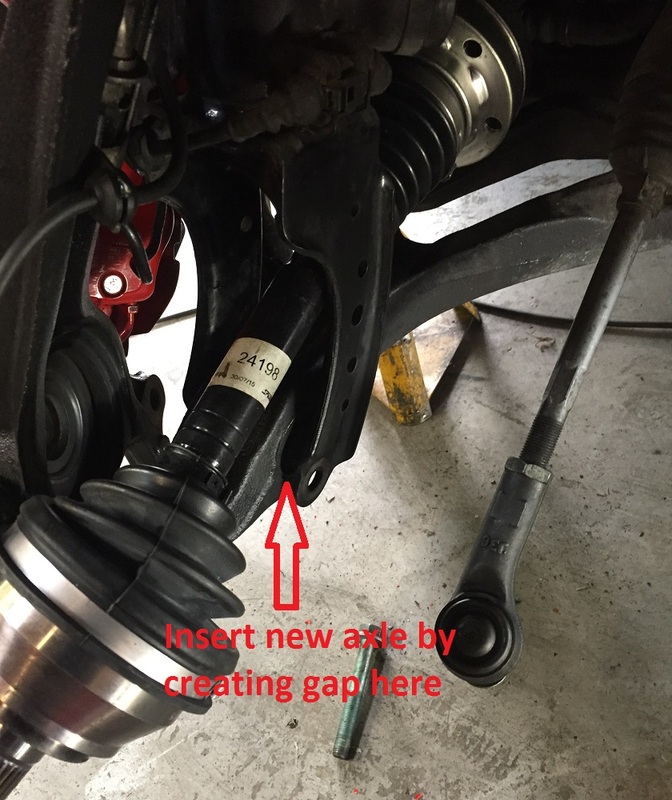
You can now slide the axle out and down through the rear gap between the lower control arm and mounting bracket. This will require a bit of jiggling the lower control arm around to create a gap but is not too tricky. (See step 7 for a pic.)
Step 6
Clean up all of the area from grease and brake dust. Pay special attention to getting all the grease off the brake caliper, rotor and pads using lots of brake cleaner and degreaser. Check the condition of the brakes and pads. Now is a good time to replace them if needed. As a rule of thumb, if you drag your fingernail across the rotor and it catches, or there is a large lip at the edge, you should replace the rotor. You can get them resurfaced if they will be more than 32mm thick after the work.
If the pads are less than 3mm or greasy from a split CV boot, you should replace them.
Step 7
Install the new axle back through the rear gap, make sure you put it in the right way around! (They are very different at each end, the splined shaft is the outer end.)
Maneuver lower control arm ball joint into hole at same time as you place axle through steering knuckle hub. Once that is done, you should be able to reinstall and tighten the upper control arm, lower control arm and tie rod bolts. Now you have entire steering knuckle supported and can focus on making sure all 6 axle bolts are tight as needed, all ball joint bolts are tightened as needed (the 3 joint bolts - upper, lower, tie rod)
Feed the spline into the upright, then locate the inner end to position in the differential flange. Rotate the shaft to line up the holes, then put the 6 triple square bolts back in with a drop of Loctite on each. Torque to 80 ft lb ? (I was unable to find the factory specs)
Left side faces the hub, right side to the diff.
Step 8
Reconnect the hub to the 3 ball joints and tighten the nuts. Torque to 65 ft/lb ? (I was unable to find the factory specs)
Replace the long bolt through the lower control arm and apply a little blue Loctite. Torque to 65 ft/lb ? (I was unable to find the factory specs)
Refit the dust shield to the hub, then the brake rotor. Do not get any grease on the freshly cleaned rotor. Torque the new rotor retaining bolt to 30 ft/lb ? (I was unable to find the factory specs). Optionally you can put anti-seize compound on the surface of the hub where it bolts to the wheel to prevent wheel from sticking to the rotor when next removed.
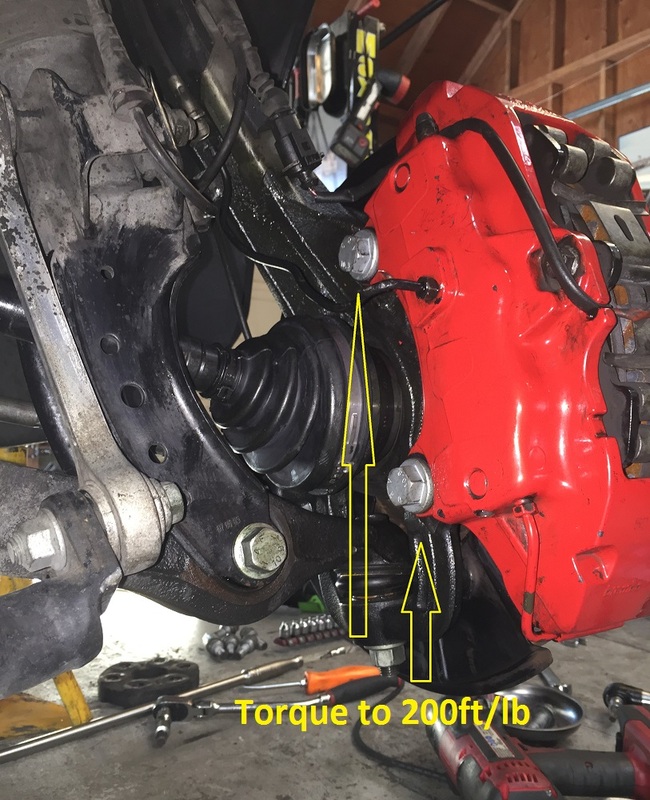
Bolt the caliper back onto the hub using new caliper bolts (*do not reuse old ones*). Torque the caliper bolts to 200 ft/lbs.
Refit the new axle nut until it doesn’t turn freely by hand ratchet.
Refit the wheel and lower the car to the ground.
Tighten the nut securing axle shaft to wheel hub, M24 X 1.5 and torque to 340 ft/lb. If you don't have a torque wrench that goes this high, use a 24 inch breaker bar and put your whole weight on it. Assuming you are around 170lb, you just applied 340 ft/lb to the bolt ;-)
Refit the wheel center cap.
Torque the wheel lug nuts to 118 ft/lb.
The reasons I am replacing my axle is that one of the CV boots was split when I bought the car, causing the whole corner to be coated in grease, and during some steering maneuvers I could hear grinding and moaning noises from the front left side.
I am happy to modify this DIY with feedback or other advice. This work is done at your own risk, I take no responsibility for you skinning your knuckles, damaging your car or anything else by using these instructions!
Total time taken to remove and reinstall the axle was about 3 hours and 2 beers, including taking pics and notes. The axle was a new GKN Loebro one that I got my local Porsche dealer to price match at $211
Tools needed
Sockets
8mm (for undertrays)
10mm deep socket
13mm
15mm
17mm
18mm
19mm
32mm 12 point
Size 12 triple square socket (drive shaft removal)
T30 (?) to lock ball joints when loosening/tightening
T50 torx socket (to remove rotor)
Short and long handled ratchets
Large scale torque wrench
Wrenches
19mm box wrench / ring spanner
Other tools
Ball joint separators
Flat head screwdriver
Jack stands
Jack
Lots of shop towel / rags to clean up spillages
Drain buckets
Consumables and parts
GKN Loebro complete new front axle 955-349-038-13 or 138-01187827 $211
(Autozone and Napa were offering remanufactured ones for $59 after core charge, but maybe these are lower quality.)
Caliper bolts (these are ‘use once, torque to yield’ type) N-906-854-03 $4.64 each
Axle nut (should be replaced if not with new axle already) W0133-1999019
Rotor retaining screw N-910-282-02-M1002
Penetrating oil
Step 1
Apply parking brake firmly with the car on level ground.
Put the air suspension (if fitted to your car) into 'Service Mode' by pushing the Ride Height control forward for about 5-10 seconds. You should get a message about 'Regulation Switched off'.
Remove the center cap from the front wheel and using a long breaker bar, loosen the axle nut and front wheel lug nuts while the wheel is still mounted and on the ground. Use penetrating lube to soak it and have access to a good impact gun, if the breaker bar won't work. Then jack up the car and put it securely on axle stands. Remove the front wheel. (I also put the wheel under the car in case the jack stands slip or break.)
Step 2
For me to access the lower steering knuckle ball joint, I had to remove the brake caliper, rotor and dust shield (I intended to do this anyway, as there was so much grease in my left front brakes). You may not need to do this step if you use the alternate ball joint tool.
This is a straightforward job using 21mm socket, 13mm socket and a T50 torx. You may need to tap the rotor off with a mallet. I used a bungee to hang the caliper out of the way from the upper control arm. Make sure you spread open the pads a little in the caliper (without damaging them) to make it easier to reinstall later. If your brake pads are coated in grease like mine were, it’s safest to replace both left and right side pads with new pads.
When you remove the rotor, do it before you separate steering knuckle from tie rod/lower control and upper control arms ball joints.
- Remove brake pads (unclip sensor connector, then remove sensors from each pad, move to side)
- Loosen 2 caliper bolts (21mm), then remove the lower one
- While holding caliper, remove upper bolt. Do not leave unsupported as the only thing holding caliper up will be the thin steel line going to steering knuckle. If that breaks, you have a new brake line job on your hands.
Once caliper bolts are out, keep holding with one hand, and with the other loosen and remove rotor.
Now, use caliper bolts to thread them back into the holes to keep the caliper stationary. This way the caliper wont put too much pressure on the line.
- Remove rotor shield
Step 3
Now, use impact gun to (I recommend this order)
- Unbolt tie rod then use ball joint puller to separate tie rod from steering knuckle
- Unbolt lower control arm ball joint, use puller to separate lower ball joint from knuckle
- CAUTION...Unbolt upper control arm, use puller to separate from upper control arm. Before you separate upper control arm, have a bungee cord handy and clip into upper control arm and some part of shock/knuckle, etc to prevent upper control arm from shooting up towards car. There are plastic sensors in upper control arm, and it is under pressure from side bolts. This can save you additional work
- CAUTION 2...as soon as you separate from upper control arm, you should be supporting the knuckle by hand.
FOR NEXT STEP ONLY, use upper control arm bolt to thread onto upper control arm ball joint (so you can have support when loosening axle with hammer). After next step remove the nut again.
You may prefer to use this kind of tool, available cheaply from Harbor Freight.
Step 4
Remove the long bolt that holds the middle of lower control arm to the mounting bracket in order to give enough wiggle room and clearance to pull the upright off the lower ball joint. You should now be able to pull the upright off the end of the axle.
USE WOOD PIECE and sledge hammer to loosen the axle from steering knuckle. Unless you were doing stuff on it recently, the rust will have it stuck. A 5lb sledge hammer smacking into axle end while covered by piece of wood will do the job. When I say smack I mean it. Not a tap or a gentle blow. Real force has to be used here.
You will see the axle move back into knuckle hub as a sign it has been loosened
Caution - As the hub upright has a number of brake hoses, electrical lines etc clipped to it, you need to either remove them or be very careful not to damage them when you hang the removed upright from the upper control arm.
Step 5
Undo the 6x size 12 triple square bolts holding the inner end of the axle to the front diff. (I did not need to rotate the axle in order to remove all the bolts.)
Loosen then remove the cross bolt from mid lower control arm. Use caution as there is pressure applied to the bolt, sometimes extra car jack is needed to lift the lower control arm slightly, and sometimes one has to push down on the control arm to make it easy for bolt to come out. Inspect before you decide what to do.
You can now slide the axle out and down through the rear gap between the lower control arm and mounting bracket. This will require a bit of jiggling the lower control arm around to create a gap but is not too tricky. (See step 7 for a pic.)
Step 6
Clean up all of the area from grease and brake dust. Pay special attention to getting all the grease off the brake caliper, rotor and pads using lots of brake cleaner and degreaser. Check the condition of the brakes and pads. Now is a good time to replace them if needed. As a rule of thumb, if you drag your fingernail across the rotor and it catches, or there is a large lip at the edge, you should replace the rotor. You can get them resurfaced if they will be more than 32mm thick after the work.
If the pads are less than 3mm or greasy from a split CV boot, you should replace them.
Step 7
Install the new axle back through the rear gap, make sure you put it in the right way around! (They are very different at each end, the splined shaft is the outer end.)
Maneuver lower control arm ball joint into hole at same time as you place axle through steering knuckle hub. Once that is done, you should be able to reinstall and tighten the upper control arm, lower control arm and tie rod bolts. Now you have entire steering knuckle supported and can focus on making sure all 6 axle bolts are tight as needed, all ball joint bolts are tightened as needed (the 3 joint bolts - upper, lower, tie rod)
Feed the spline into the upright, then locate the inner end to position in the differential flange. Rotate the shaft to line up the holes, then put the 6 triple square bolts back in with a drop of Loctite on each. Torque to 80 ft lb ? (I was unable to find the factory specs)
Left side faces the hub, right side to the diff.
Step 8
Reconnect the hub to the 3 ball joints and tighten the nuts. Torque to 65 ft/lb ? (I was unable to find the factory specs)
Replace the long bolt through the lower control arm and apply a little blue Loctite. Torque to 65 ft/lb ? (I was unable to find the factory specs)
Refit the dust shield to the hub, then the brake rotor. Do not get any grease on the freshly cleaned rotor. Torque the new rotor retaining bolt to 30 ft/lb ? (I was unable to find the factory specs). Optionally you can put anti-seize compound on the surface of the hub where it bolts to the wheel to prevent wheel from sticking to the rotor when next removed.
Bolt the caliper back onto the hub using new caliper bolts (*do not reuse old ones*). Torque the caliper bolts to 200 ft/lbs.
Refit the new axle nut until it doesn’t turn freely by hand ratchet.
Refit the wheel and lower the car to the ground.
Tighten the nut securing axle shaft to wheel hub, M24 X 1.5 and torque to 340 ft/lb. If you don't have a torque wrench that goes this high, use a 24 inch breaker bar and put your whole weight on it. Assuming you are around 170lb, you just applied 340 ft/lb to the bolt ;-)
Refit the wheel center cap.
Torque the wheel lug nuts to 118 ft/lb.
Last edited by spawnywhippet; 11-16-2017 at 02:23 PM.

#5
11-16-2017, 08:21 AM

I would like to provide some additions, maybe the OP can incorporate into the write up. I think they are important for a smooth job.
1. Unless you have been taking off the axle nut before, it is likely going to be stuck to the axle. Rust, etc. Use penetrating lube to soak it and have a good impact gun, as sometimes even breaker bar wont work. MAKE SURE you loosen the axle nut while tire is on and car is on ground. When elevated, axle rotates a little so your impact gun work will be minimized. Take tire off, remove center cap, put tire back on, then go to town on the nut. DONT GIVE UP.
2. When you remove the rotor, do it before you separate steering knuckle from tie rod/lower control and upper control arms ball joints.
- Remove brake pads (unclip sensor connector, then remove sensors from each pad, move to side)
- Loosen 2 caliper bolts (21mm), then remove the lower one
- While holding caliper, remove upper bolt. Do not leave unsupported as the only thing holding caliper up will be the thin steel line going to steering knuckle. If that breaks, you have a new brake line job on your hands.
Once caliper bolts are out, keep holding with one hand, and with the other loosen and remove rotor.
Now, use caliper bolts to thread them back into the holes to keep the caliper stationary. This way the caliper wont put too much pressure on the line.
- Remove rotor shield
3. Now, use impact gun to (I recommend this order)
- Unbolt tie rod then use ball joint puller to separate tie rod from steering knuckle
- Unbolt lower control arm ball joint, use puller to separate lower ball joint from knuckle
- CAUTION...Unbolt upper control arm, use puller to separate from upper control arm. Before you separate upper control arm, have a bungee cord handy and clip into upper control arm and some part of shock/knuckle, etc to prevent upper control arm from shooting up towards car. There are plastic sensors in upper control arm, and it is under pressure from side bolts. This can save you additional work
- CAUTION 2...as soon as you separate from upper control arm, you should be supporting the knuckle by hand.
FOR NEXT STEP ONLY, use upper control arm bolt to thread onto upper control arm ball joint (so you can have support when loosening axle with hammer). After next step remove the nut again.
4. USE WOOD PIECE and sledge hammer to loosen the axle from steering knuckle. Unless you were doing stuff on it recently, the rust will have it stuck. 5lb sledge hammer smacking into axle end while covered by piece of wood will do the job. When I say smack I mean it. Not a tap or a gentle blow. Real force has to be used here.
You will see axle back into knuckle hub as sign it has been loosened
5. Now is good time to remove the axle triple star bolts (all 6 of them)
6. Loosen then remove the cross bolt from mid lower control arm. Use caution as there is pressure applied to the bolt, sometimes extra car jack is needed to lift the lower control arm slightly, and sometimes one has to push down on the control arm to make it easy for bolt to come out. Inspect before you decide what to do.
7. At this time, you should be able to maneuver the steering knuckle away from axle end (maneuver so that you remove the lower control arm ball joint out of hole and pull axle away from knuckle).
8. Position the axle towards the rear side of lower control arm (line the skinny part of axle so it lies on the control arm). Use some muscle to push down on lower control arm, to create enough space for skinny part of axle to slip by lower control arm and shock mounts. You will have to have same positioning and do steps in reverse to put new axle back into same place through this opening.
9. Use muscle again to create same opening and slip skinny part of new axle, on top of lower control arm. Once that is done, affix bolt to upper control arm through steering knuckle for support (do not tighten now).
10. Tighten up axle inner 6 bolts
11. Maneuver lower control arm ball joint into hole at same time as you place axle through steering knuckle hub. Once that is done, you should be able to reinstall and tighten the upper control arm, lower control arm and tie rod bolts. Now you have entire steering knuckle supported and can focus on making sure all 6 axle bolts are tight as needed, all ball joint bolts are tightened as needed (the 3 joint bolts - upper, lower, tie rod).
12. Once you have all three nuts in place, reinstall the rotor shield, make sure all connections to sensors are back in place, rotor back in, brake pads, etc. Tighten up the axle nut before putting tire back on, but have cap off to really tighten after car is on ground.
Hope this helps to clarify if folks have more questions. Biggest hurdle you will have is taking that axle nut off, followed by loosening axle out of hub. Treat this as a job for earlier in the day.
Good luck.
#7
04-21-2018, 10:08 AM
I have just completed this task on my 04 CS. The write up above was a great help, so many thanks to Spawnywhippet for the original post.
Just to add from my experience:
1. Don't underestimate the tightness of the axle nut! I'm sure this was the first time mine was removed and I thought I was going to twist my power bar! but it came off fine eventually.
2. Get a decent press tool to push out the axle from the steering knuckle. It is safer and easier than trying to hammer it out, for as the posts above say, it takes a real amount of force to remove it. Also it didn't just loosen and pop of, it had to be pressed right till it was clear of the knuckle. I could not imagine hammering this out.
3. Once all the bolts are loosened and the axle is free, it is 2 or 3 man job to actually get the axle out and fit the new one into position.
4. It is not necessary to remove the brake calipers or rotors (on my CS anyway) to perform the task.
For information I have attached the excerpt form the 03-06 Cayenne Repair manual on the drive shaft removal and the list of Torques
Trending Topics
#8
08-31-2019, 10:43 PM

Registered User
Join Date: Jun 2019
Location: Milky Way Galaxy
Age: 36
Posts: 1
Rep Power: 0
I performed this tonight on my Cayenne Turbo. My axle shaft had actually snapped at the CV and was in two pieces. I was able to remove it and install the new one without removing the caliper or rotor, the lower ball joint, or the tie-rod. I placed the car in max-height mode and disabled regulation, not sure if it being that high helped or hurt me when dealing with the suspension. I did not have a horrible time of it, all things considered. It is a challenging job. I replaced the axle with a lower mile OEM used piece from a local recycler. It was nice and flexible which probably helped.
I was able to "hang" the wheel carrier from the upper control arm using zip ties, while the lower ball joint was still in place holding it from the bottom. This kept the weight off the brake line. Before zip-tying, I removed the brake line retaining bracket on the back of the upper wheel carrier. This allowed a lot more room before the slack on the line was taken up. I used the zip ties to ensure that the line would not be damaged. I of course removed the sway bar end link, the upper bolt is a bit of a pain. Being able to control the wheel carrier's position with a jack was key. I set steering to full lock to the left, and was able to squeeze the narrow bit of the axle past the strut fork on the front side of the lower control arm. Then I backed it up to the flange at the stubby axle, held it "UP". Then I bent the CV as far as it would go, and muscled the splined shaft past the caliper and into the wheel carrier's receiver.
I don't know if I would recommend anyone try this. I'm not sure how this would work for removing an intact axle, and I will say it was not easy to find the balance between the brake line and the hanging angles of the wheel carrier. Having steering at full left and the carrier hanging "back" ish allowed me to point the axle toward the rear, hard, and slip the axle in to the hub. Then I lifted it slightly and slipped in some anti-seize. (did not want it on the snout while trying to manipulate the axle). Then it was just a matter of bolting it up. As a last resort I felt I could have popped the lower ball joint off, but it did not seem necessary. Good luck to anyone attempting this job on their Cayenne! It is definitely do-able one way or another.
#9
10-30-2020, 12:17 AM

A warning!
When removing the CV Axle, a good thing to keep in mind is to always have a hoist for your vehicle. If you are unable to use one, then be sure that your jack & jack stands extend high enough to allow clearance to remove the lower control arm ball joint from the spindle. I have come to this problem a few times. Also, I never seen it mentioned to be wary of remounting your bolts to the control arm and suspension without reminding that with the all wheel drive setup, you have to make sure that you level your front end or rear end to align your bolts or you would end up forcing them to fit. Resulting in damage to the suspension components.