When you click on links to various merchants on this site and make a purchase, this can result in this site earning a commission. Affiliate programs and affiliations include, but are not limited to, the eBay Partner Network.
I've read up and have been informed that when changing batteries in a Bentley Continental, you need to disconnect the right battery neg terminal first, then the left.
Can anybody tell me why you have to do it this way?
I've read up and have been informed that when changing batteries in a Bentley Continental, you need to disconnect the right battery neg terminal first, then the left.
Can anybody tell me why you have to do it this way?
Thanks.
Are you replacing both batteries, if so yes disconnect both negatives & then the positives, the reason for that just in case you touch any parts with the positive while the negative are still connected to the battery. Before you do disconnect both batteries you need to do a few things like keeping the steering wheel straight and so on , I would personally change one battery at a time, starting with the one on the right, make sure the positive terminal dose not have any contact with any other part of the vehicle ...
The procedure for battery disconnection/reconnection is a strict process. It is this way because Bentley used a bizarre small charge (explosive) device, called a battery isolater, that is wired into the battery circuits. It was designed this way so, in the event of an accident, the charge would initialize and cause a hard break in the battery + circuit thus preventing a spark/fuel fire. If the battery process below is not followed one runs the risk of discharging this device and it would need to be replaced before being able to reconnect to batteries. Below is a cut paste from my factory notes:
Disconnecting and connecting batteries
-------------------------------------------------------------------------------------------------
Procedure for disconnecting batteries
This procedure must be strictly followed.
1. Switch off ignition and all electrical consumers and remove ignition key.
2. Wait 60 seconds - Disconnect starter battery in luggage compartment on right (see below).
3. Disconnect main system battery in luggage compartment on left (see below).
Caution:
If the sequence is not followed, the pyrotechnical battery isolator may be triggered and the electrical equipment in the vehicle
damaged.
The battery isolation igniter for Continental GT and Continental Flying Spur is shown on the left hand side, and for Continental GTC on
the right.
091501w0060
-------------------------------------------------------------------------------------------------
Disconnecting starter battery in luggage compartment on right
Warning:
To increase crash safety, the starter battery in the luggage compartment on the right is equipped with a battery isolator. In an
accident, the air bag control module triggers a charge disconnecting the voltage supply wire to the starter.
Battery isolation is performed pyrotechnically, with a very small explosive charge. To avoid accidentally triggering the charge when
working on the battery or the battery isolator, you must always disconnect the battery earth on the negative terminal of the starter
battery first.
Remove right hand luggage compartment carpet panel. (refer to bin: 0867)
Continental GT and Continental Flying Spur
Disconnect battery clamp (1) from battery negative terminal post.
Disconnect battery clamp (2) from battery positive terminal post.
091501w0005
Continental GTC
Disconnect the negative terminal (1) of the starter battery.
Warning:
On Continental GTC cars a separate positive cable (3) from the starter battery to the starter battery fusebox is fitted. This cable
remains live when disconnected from the starter battery until the main battery is also disconnected. When disconnected take care not
to cause a short circuit or allow the cable to come in contact with the air bag connector (7).
Remove the fixing (2) and disconnect the red starter battery fusebox cable (3) from the battery near to the positive terminal.
Lift up the plastic cover (4) to access the positive battery terminal, and loosen the clamping nut.
Lift off the battery isolation igniter (5) and attached starter cable (6).
091501w0057
-------------------------------------------------------------------------------------------------
Disconnecting main system battery in luggage compartment on left
Disconnect starter battery in luggage compartment on right (see above).
Remove left hand luggage compartment carpet panel. (refer to bin: 0867)
Disconnect battery earth lead (1) at battery negative terminal.
Disconnect the battery positive cable (2) at battery positive terminal. Remove main system fusebox. (refer to bin: 0937)
091501w0006
-------------------------------------------------------------------------------------------------
Connecting batteries
This procedure must be strictly followed.
1. Connect main system battery in luggage compartment on left.
2. Connect starter battery in luggage compartment on right.
Caution:
If the sequence is not followed, the pyrotechnical battery isolator may be triggered and the electrical equipment in the vehicle
damaged. The procedure for connecting batteries must be strictly followed.
-------------------------------------------------------------------------------------------------
16/12/11 WT 01000 09-2011 [English] / Disconnecting and connecting batteries Page 2
(OID = <33597_4_1_1> UID = <3344> Dataset = <WT 01000 09-2011 [English]>)
Connecting main system battery in luggage compartment on left
This procedure must be strictly followed
1. Switch off ignition and all electrical consumers and remove ignition key.
2. Fit positive terminal clamp onto battery positive terminal.
3. Only after securing positive terminal clamp, fit negative terminal clamp to negative terminal on battery.
Warning:
On Continental GTC cars, the positive cable from the starter battery to the starter battery fusebox will be live once the main systems
battery is connected.
Installation:
Tighten battery positive terminal clamp securing bolt.
Tighten securing bolt of battery negative terminal. (refer to table: torq_091501_by614_01)
Caution:
Battery terminal clamps must only be fitted by hand without force, this prevents damage to battery housing. (Do not use mallet or
hammer).
Battery terminals must not be greased.
-------------------------------------------------------------------------------------------------
Connecting starter battery in luggage compartment on right
1. First switch off ignition and all electrical consumers and remove ignition key.
2. Connect battery in luggage compartment on left. (refer to bin: 0915)
3. Fit positive terminal clamp onto battery positive terminal and the cable to the starter battery fusebox on Continental GTC cars.
4. Only after securing positive terminal clamp, fit negative terminal clamp to negative terminal on battery.
Installation:
Tighten battery positive terminal clamp securing bolt.
Tighten battery negative terminal clamp securing bolt. (refer to table: torq_091501_by614_01)
Caution:
Battery terminal clamps must only be fitted by hand without force, this prevents damage to battery housing.
Battery terminals must not be greased.
-------------------------------------------------------------------------------------------------
Steps after connecting batteries
1. Switch Ignition on and off again with ignition key - Read fault memory.
2. Perform Guided functions/Component replacement using VAS 5052. Read, interrogate and clead fault codes. (refer to bin: 0909)
3. Initialise Electric windows. Refer to side glass - To initialise. (refer to bin: 0845)
4. Initialise sunroof (if fitted). (refer to bin: 0877)
5a.(2 door cars) Initialise front seats. (refer to bin: 0881)
5b.(4 door cars) Check seat memories have been retained. Reinitialise individual seats as necessary.
- Front seats (refer to bin: 0881)
- Rear seats (refer to bin: 0885)
6. Perform zero calibration on steering angle sensor using [VAS 5052], Refer to Diagnostic system - Guided functions. (refer to bin:
0909)
7. Check all electrical consumers are functioning correctly.
Wow now thats what I call info, nice one BWings ...
Background - Unfortunately I had a battery drain (now fixed), but prior to fixing the battery drain, I replaced the batteries (a couple of times) and did not follow this procedure.
Now my car won't start . . .
So I have some follow up questions.
1. Would this battery isolater (when activated) prevent my car from cranking? - everything else works 2. If so, where is it located / what does it look like, so I can replace it
Thanks again!
Oh boy.....
Ok, I'll try to help, but I have no experience diagnosing or replacing one of these isolators. There was a warning in the procedure that further concerns me. It is this one:
If the sequence is not followed, the pyrotechnical battery isolator may be triggered and the electrical equipment in the vehicle
damaged.
So, beyond the isolator, there could be other electrical damage. I MIGHT know what some of that is, but we're ahead of ourselves.
First, some Qs to you:
1. Please describe completely what the car is doing?
a. What happens when you put the key in the ignition? Does the dash and electronics wake up?
2. Are you completely dead when you try to crank start? If you have electronics on and try to start, does everything go dark, or just no crank?
3. Are other electronics on, but just no crank? Or completely dead in any mode?
4. What diagnostic equipment do you have? (Please say you have a VCDS)
5. Please describe the actual process you used to replace the batteries
6. Describe the batteries you replaced. Is the LS battery an AGM?
The isolator IS designed to disconnect the RS battery completely, so if you have live electronics when you insert the key then you at least have a a live LS battery. If you have nothing, then we first have to try to get to the main batt fuses and relays, check those.
EDIT: I reread, and looks like you do have power from the LS, but if you can answer any of the other Qs.
First, some Qs to you: 1. Please describe completely what the car is doing? So the car responds completely as normal in every way, all works, when I insert the key the steering lock disengages and all the dash lights come up as per normal.
a. What happens when you put the key in the ignition? Does the dash and electronics wake up? When I go to start the car (turn key) literally nothing changes in any way. It's like i'm not even turning the key. I tried the CCW turn then CW turn, and no changes, all lights are there on dash, but doesn't crank.
2. Are you completely dead when you try to crank start? If you have electronics on and try to start, does everything go dark, or just no crank? Just no crank, dash lights all stay on as if there is a hard break between the RHS battery and the starter motor.
3. Are other electronics on, but just no crank? Or completely dead in any mode? LHS battery seems to be working fine, all radio, keyless entry, seats, etc. are working fine. Immobilizer is happy, so yeah, silence.
4. What diagnostic equipment do you have? (Please say you have a VCDS) Yes I have VCDS, but am holding fire for now, after work today i'm going to do a hardware check, fuses, etc. And see if I find anything first. Then if I do not find a fault there, i'll do a pull from the VCDS reader and see what codes I get. Then do a clear down (as per the Bentley instructions you posted) and try to start again.
5. Please describe the actual process you used to replace the batteries Literally the opposite. So power drain was on LHS bat, it went flat. So I disconnected that bat only and replaced with new (thought it was the old battery that was at fault). Car was running at this point post replacement. Then battery died again, so I knew it wasn't just and old battery that was the issue. So I changed the bat under warranty and changed again (then put that battery on charge with trickle charger. Car still running at this point. Took car out of garage and parked on drive, (not on charge), battery died in less than 24hours. Bridged batterres to start (via key), then both batteries were dead, smart eh? So couldn't drive to Bentley to fix as dead, so bought 2 new batteries LH & RH. Found and fixed the bat drain and replaced both batteries LHS first (difficult one) then the RHS. Batteries now not draining yay, but car won't crank. So has been sat for a couple of weeks now and batteries still at full health, so have definitely fixed the route cause, but have unknowingly walked into another issue.
6. Describe the batteries you replaced. Is the LS battery an AGM? It was the recommended battery from my local part supplier (Brand: Yuasa), don't quite know what AGM means tbh? I bought the most expensive battery they supplied (for both), so didn't cheap out.
The isolator IS designed to disconnect the RS battery completely, so if you have live electronics when you insert the key then you at least have a a live LS battery. If you have nothing, then we first have to try to get to the main batt fuses and relays, check those. Are the main bat fuses under the leaf screen/engine bay?
OK, thanks. So you possibly DID blow the pyro device. I'll do a data dump here on what I know. And, before I get there, with a VCDS, do a complete module scan. Look for a fault(s) in address 15 (Air Bags) and or the battery module address 71, but also any faults in addresses - 05, 07, 09, 17, 19.
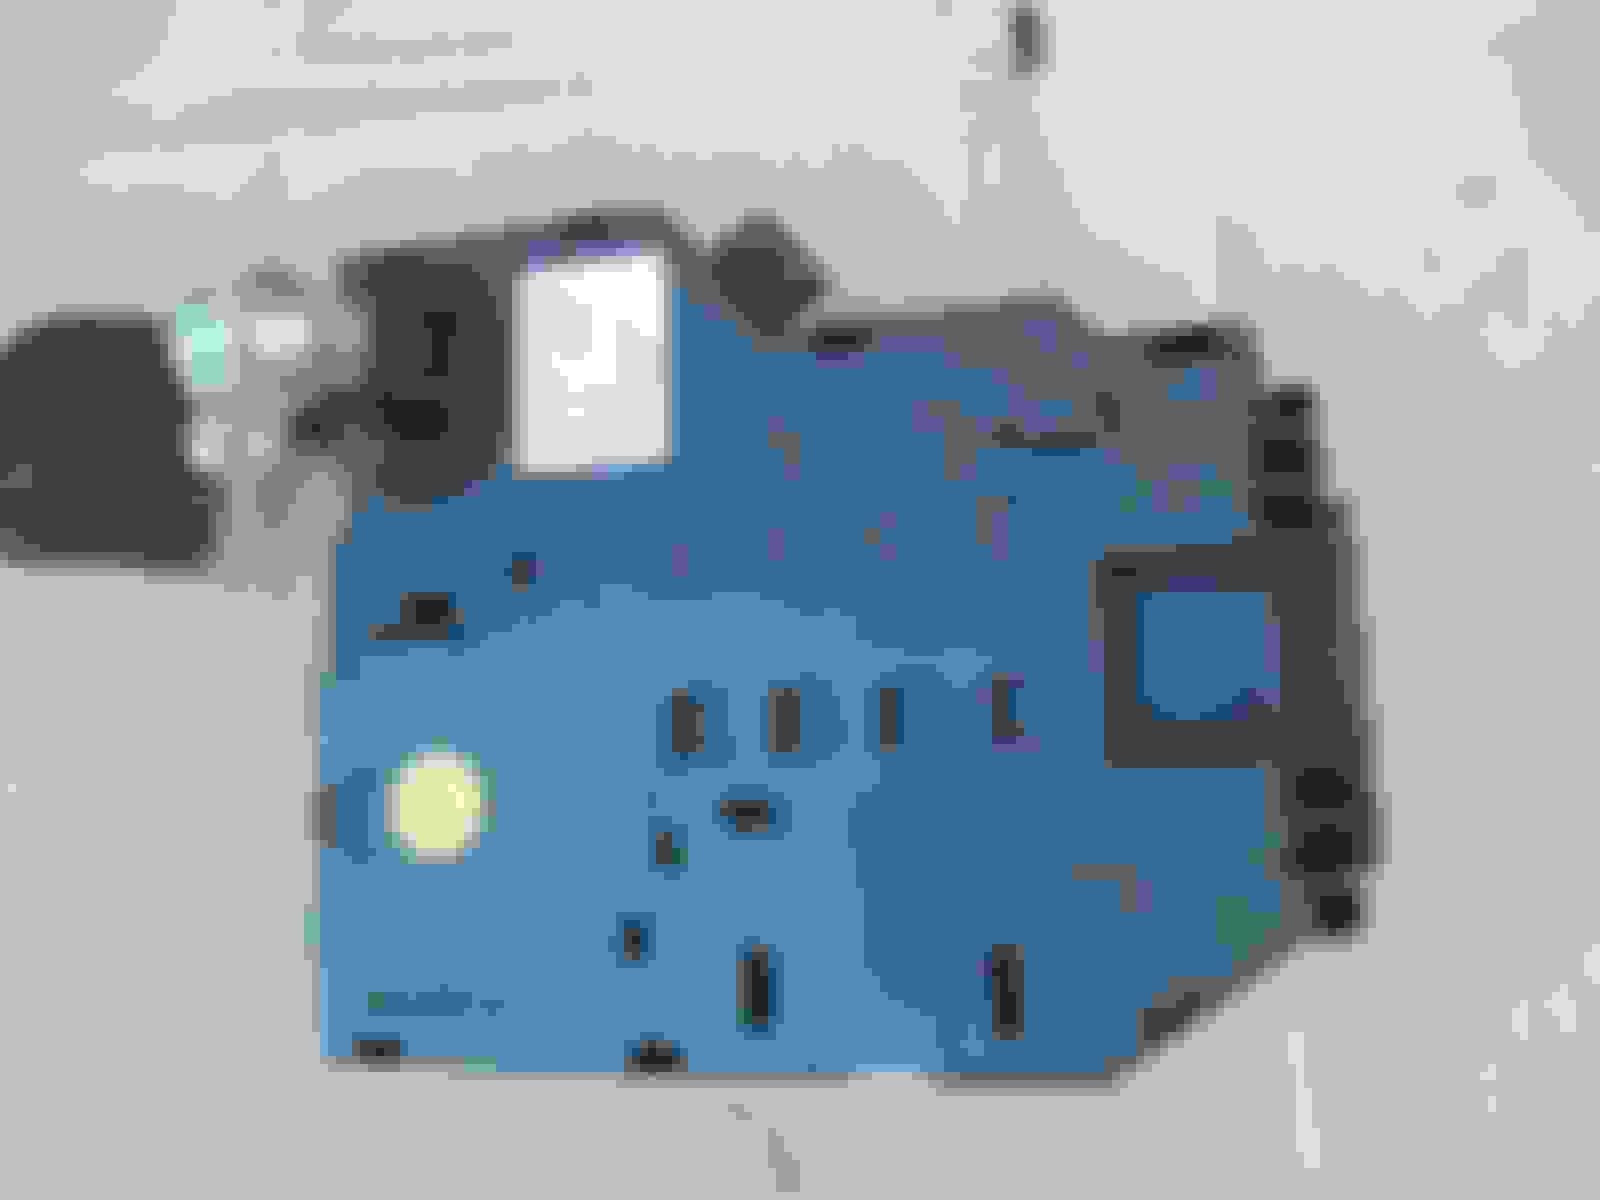
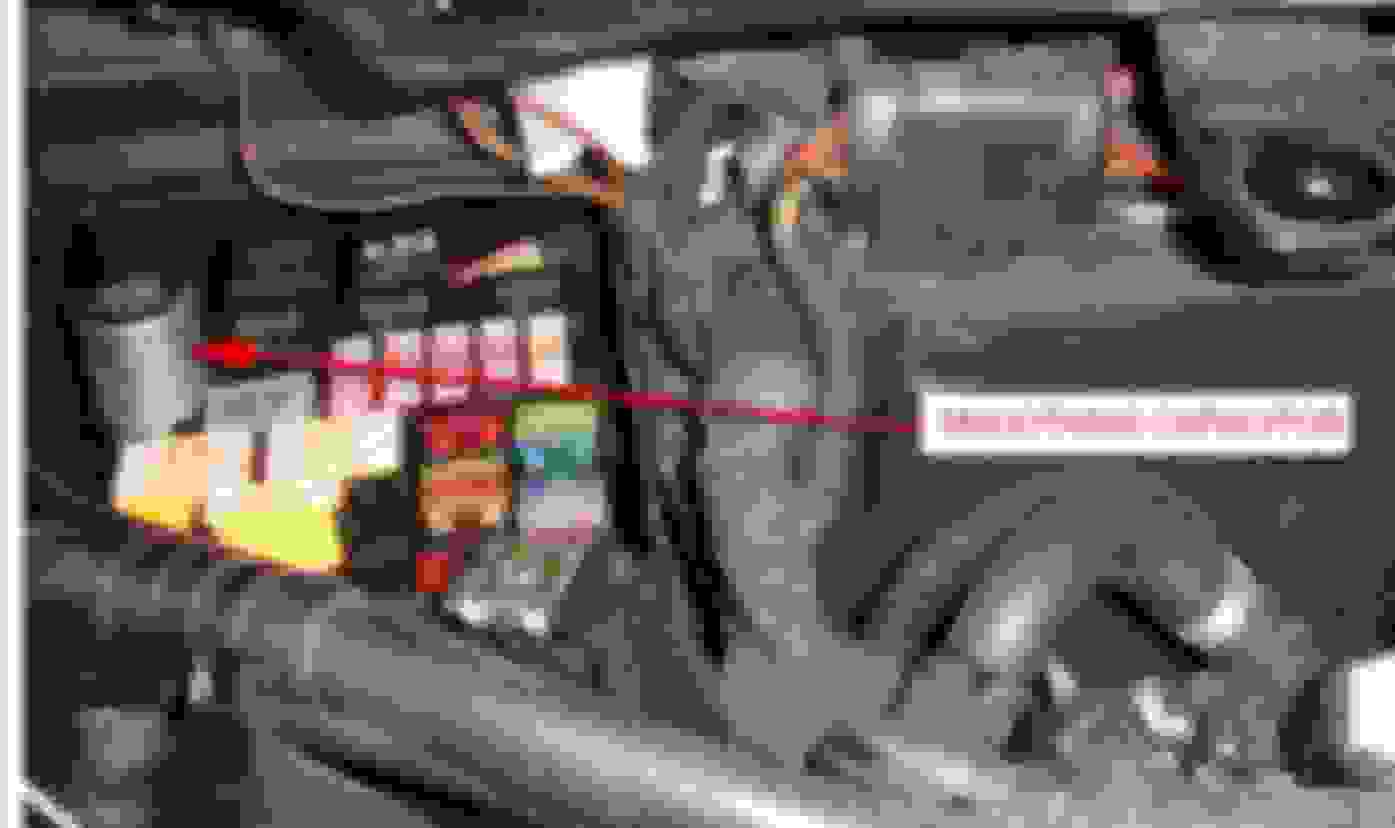
The pyro module is located right off the + post of the starter battery. Here is a pic of mine, then a pic of another VAG pyro module. I don't know wherewhen changes might have been made, but mine is an 05 GT.
It is the black box behind the yellow fuse and with a large solid connection terminal directly on the + term. Ignore the battery cables for my batt tender.
Another style that VAG used might look like this:
If the pyro module deployed, some of the other components that could be suspect are:
1. The J367 battery control module
2. the Parallel battery connection relay J581
3. the smoothing capacitor.
Here is a generic pic of where the first two items can be located and probably accurate for Bentley.
The smoothing capacitor which is suspect to failure too is located under the cowl, engine compartment RS in the fuse box. It is easy to find as it is large. It is polarized and MUST go in only one way. It will look something like this:
First step, run the VCDS and see where it points you. Hopefully you only have the pyro device gone, or simple a batt main fuse or relay. You should be able to probe and do some simple continuity checks on around the pyro module. If that looks OK then start down the path of any of these other devices.
Again, I want to stress, I've not personally diagnosed and fixed a blown Pyro module. I'm operating in theory here, but if you post the faults found in the VCDS dig, I'll try to help you more.
Ok, i'll run the VCDS first and see what's what, and then go from there.
Crazy question, but can I not just bypass the pyro isolator, see if it starts, to check if that is actually the fault?
If it is (i.e., engine starts), then i'll order another one.
If not, then i'll look elsewhere.
I cannot answer that question. Might work, but might not either. It depends how sophisticated the electronics are. Everything with CanBus designed modules is check and crosschecks. So, if a certain circuit has to first send a go signal and you've bypassed it, you might find that something else down the line did not allow the Kessey key to work. Still guessing here. It'll will have some level of risk trying, but it's yours to decide. Gook luck, keep posting please...would like to see you running again.
 04-15-2019, 02:48 PM