996 Turbo / GT2 Turbo discussion on previous model 2000-2005 Porsche 911 Twin Turbo and 911 GT2.

DIY: Removing the FPR

Thread Tools
 
Search this Thread
 
Rate Thread
 
  #1  
Old 06-14-2008, 11:54 PM
ZIP22's Avatar
Registered User
Thread Starter
Join Date: Dec 2007
Location: Bay Area, CA
Posts: 556
Rep Power: 61
ZIP22 has a reputation beyond reputeZIP22 has a reputation beyond reputeZIP22 has a reputation beyond reputeZIP22 has a reputation beyond reputeZIP22 has a reputation beyond reputeZIP22 has a reputation beyond reputeZIP22 has a reputation beyond reputeZIP22 has a reputation beyond reputeZIP22 has a reputation beyond reputeZIP22 has a reputation beyond reputeZIP22 has a reputation beyond repute
DIY: Removing the FPR

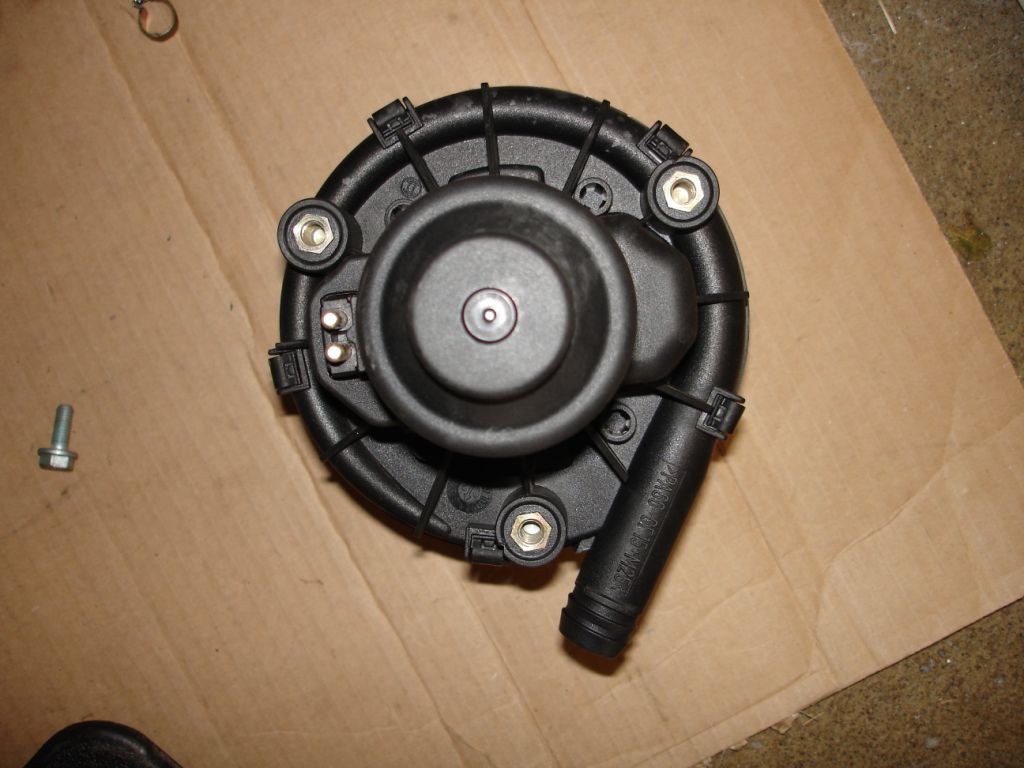
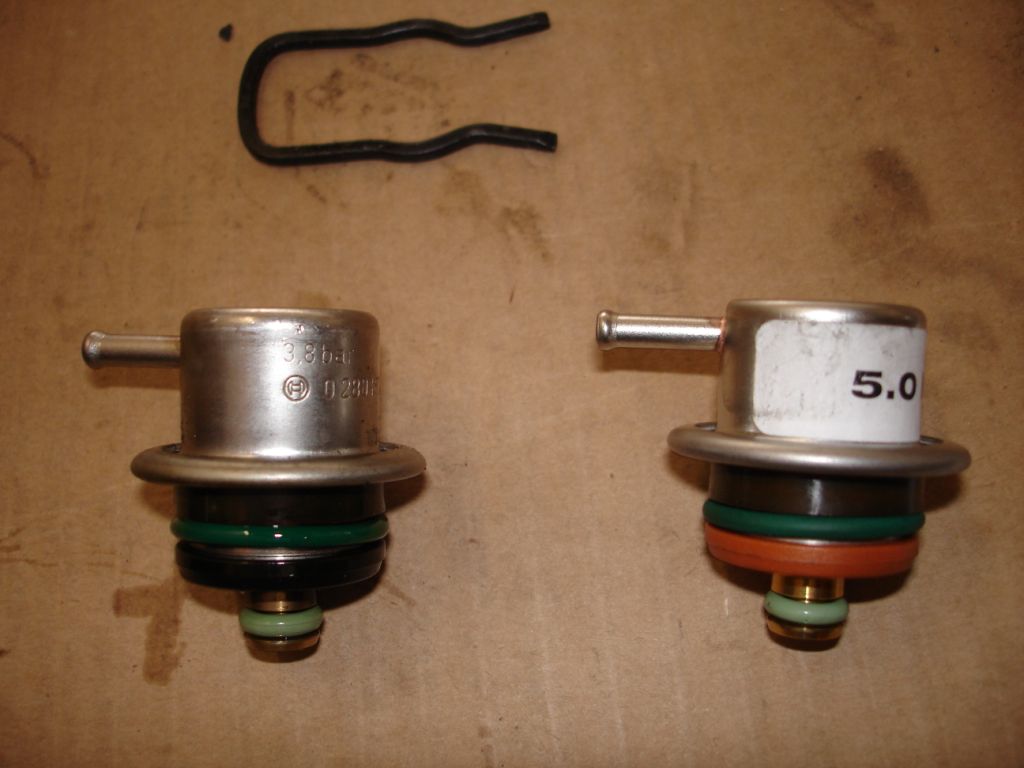
This DIY are for those switching your OEM FPR to a 5 bar FPR as specified by some of the 600 to 700 level turbo kits in the market. To obtain access to the FPR from the engine bay the OBDII air pump must be removed.

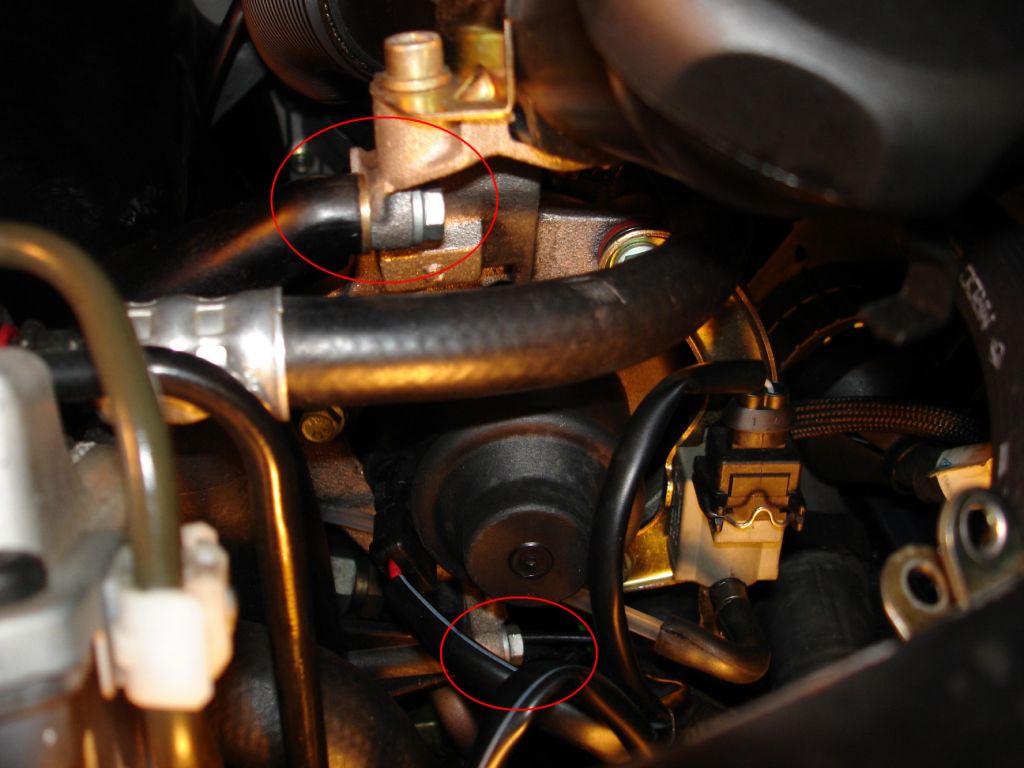
Remove the bolts below to dislodge the air pump frame:


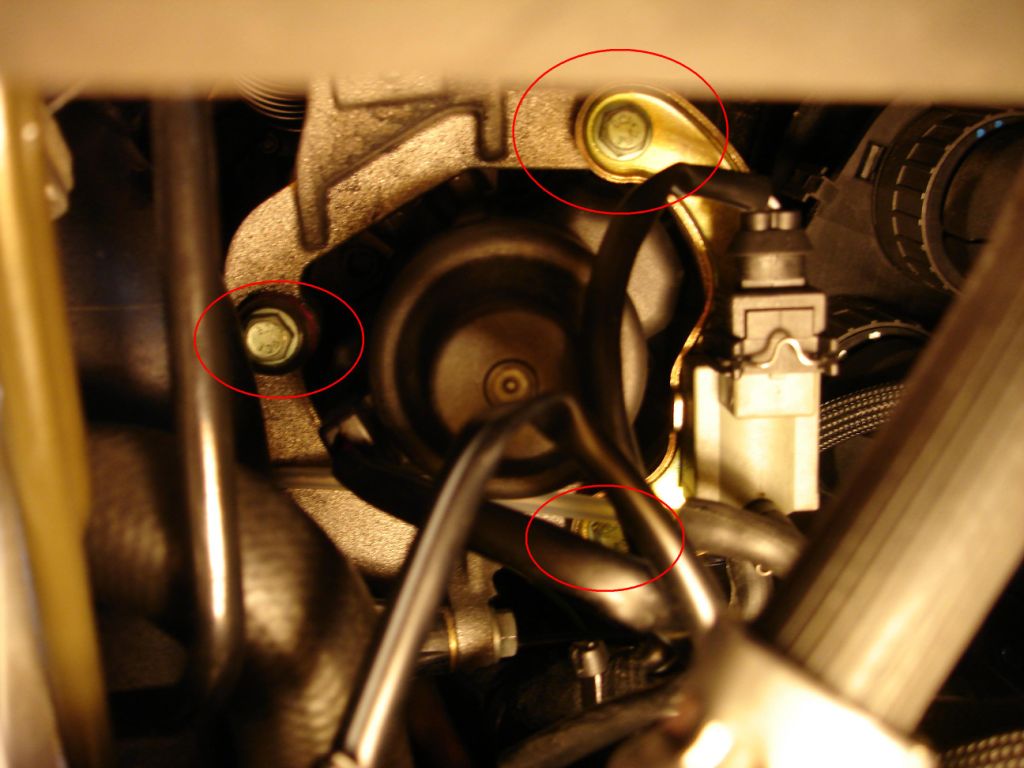
Remove the bolts that hold the pump on the frame:


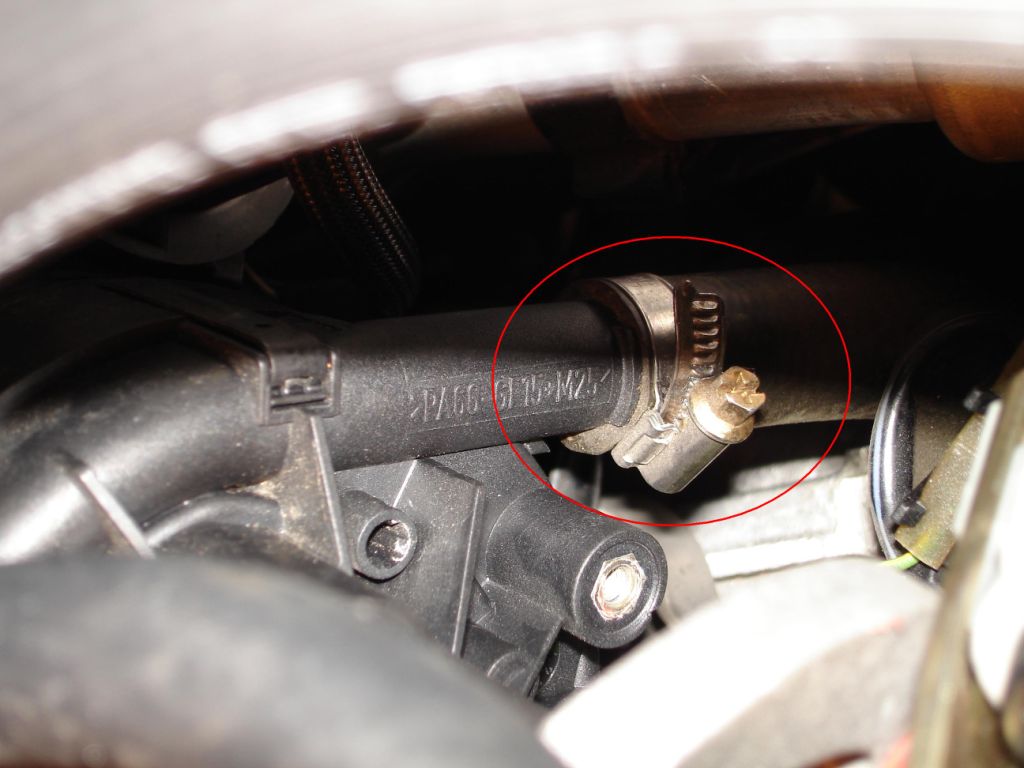
Take off the hose clamp from the airpump:


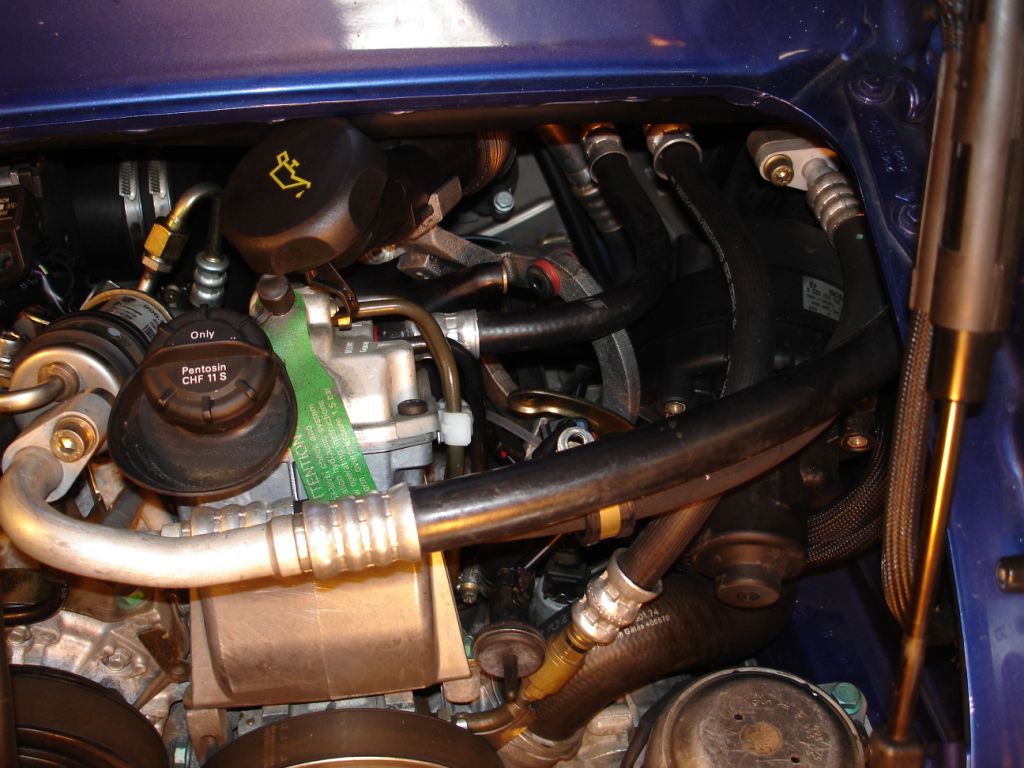
Move the airpump frame along with oil tube the left most side, disconnect the connector from the airpump and then slowly take the airpump out of the maze of wires and hoses:


Last edited by ZIP22; 06-15-2008 at 12:23 PM.
  #2  
Old 06-15-2008, 12:03 AM
ZIP22's Avatar
Registered User
Thread Starter
Join Date: Dec 2007
Location: Bay Area, CA
Posts: 556
Rep Power: 61
ZIP22 has a reputation beyond reputeZIP22 has a reputation beyond reputeZIP22 has a reputation beyond reputeZIP22 has a reputation beyond reputeZIP22 has a reputation beyond reputeZIP22 has a reputation beyond reputeZIP22 has a reputation beyond reputeZIP22 has a reputation beyond reputeZIP22 has a reputation beyond reputeZIP22 has a reputation beyond reputeZIP22 has a reputation beyond repute


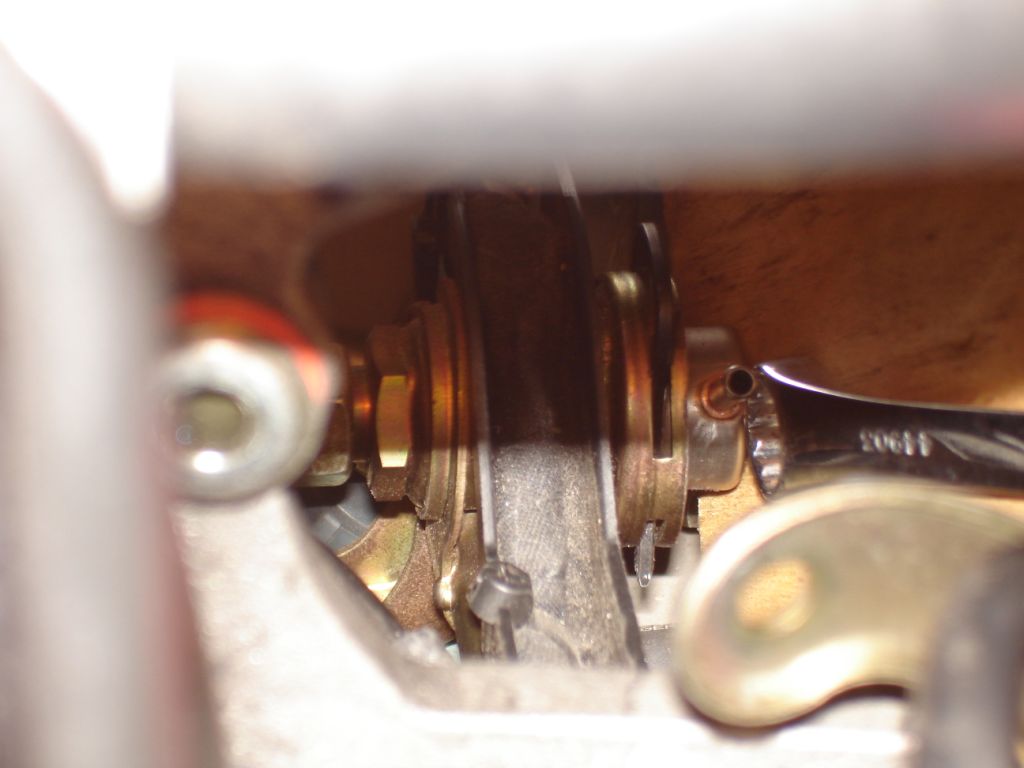
Now you can see the FPR!


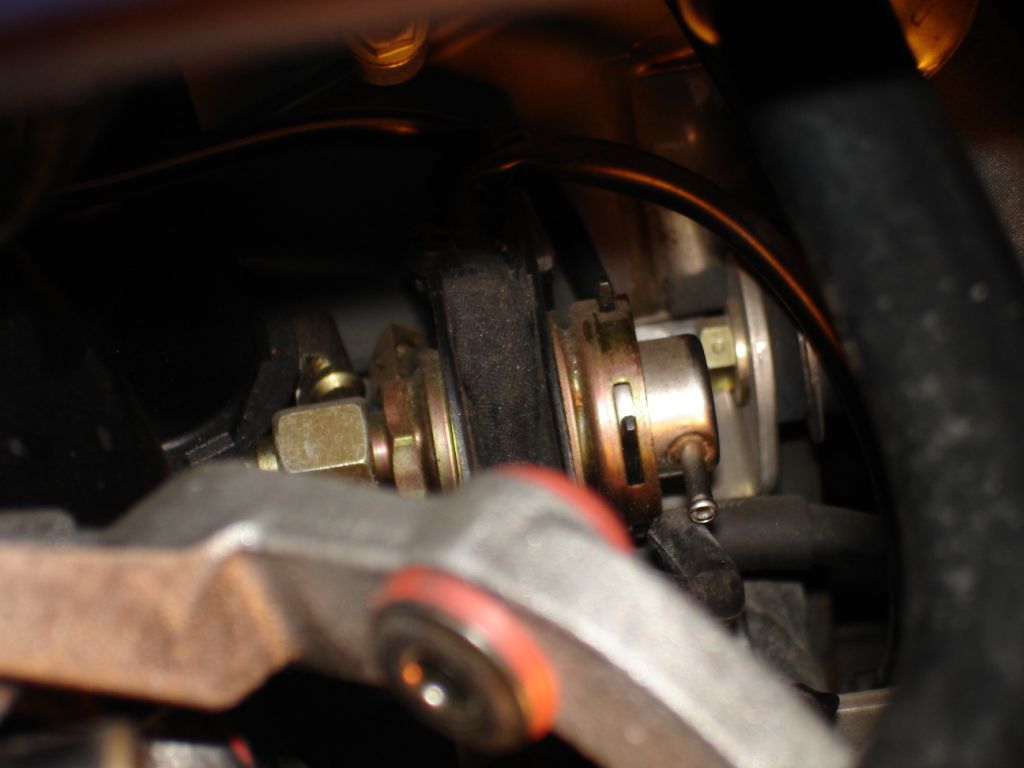
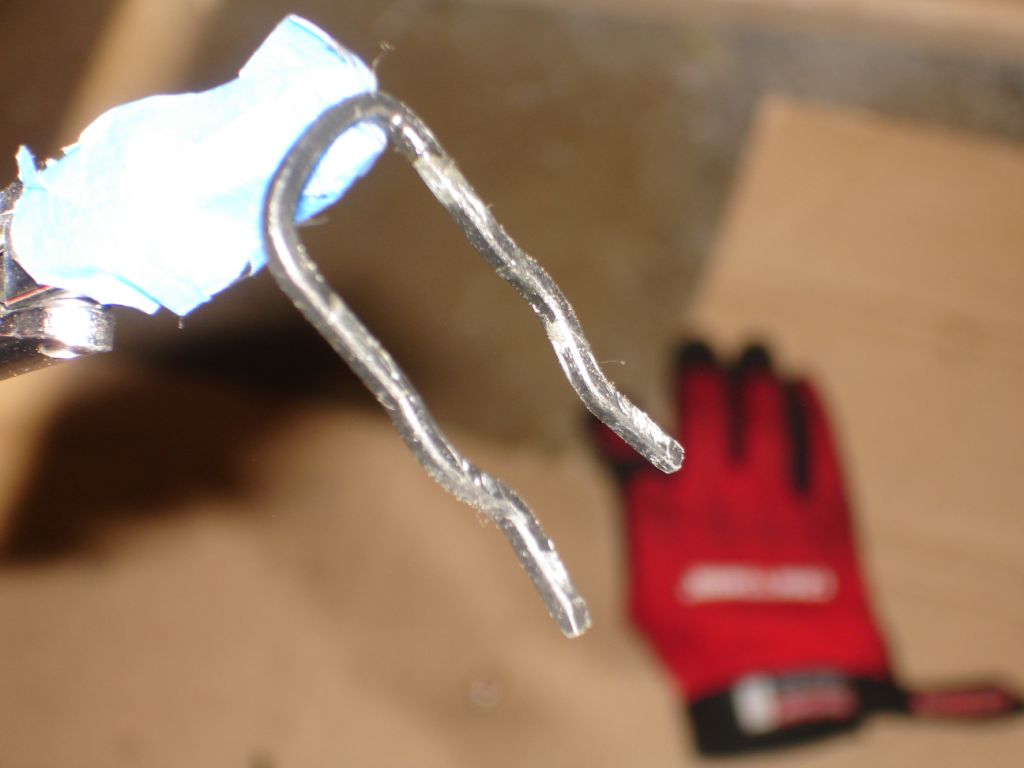
Take a pair of angled pliers and remove the FPR retaining clip. In this case the clip is upside down and you need to push down on the clip to remove. Make sure you have a firm grip on the FPR clip or it'll fall to the abyss.


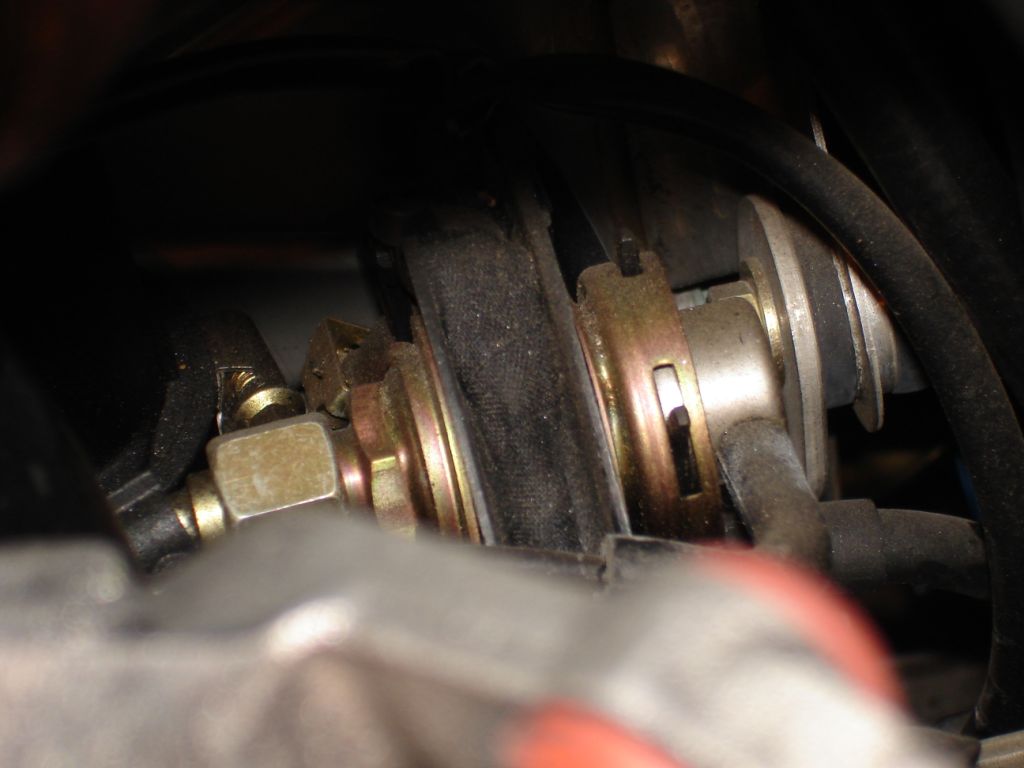
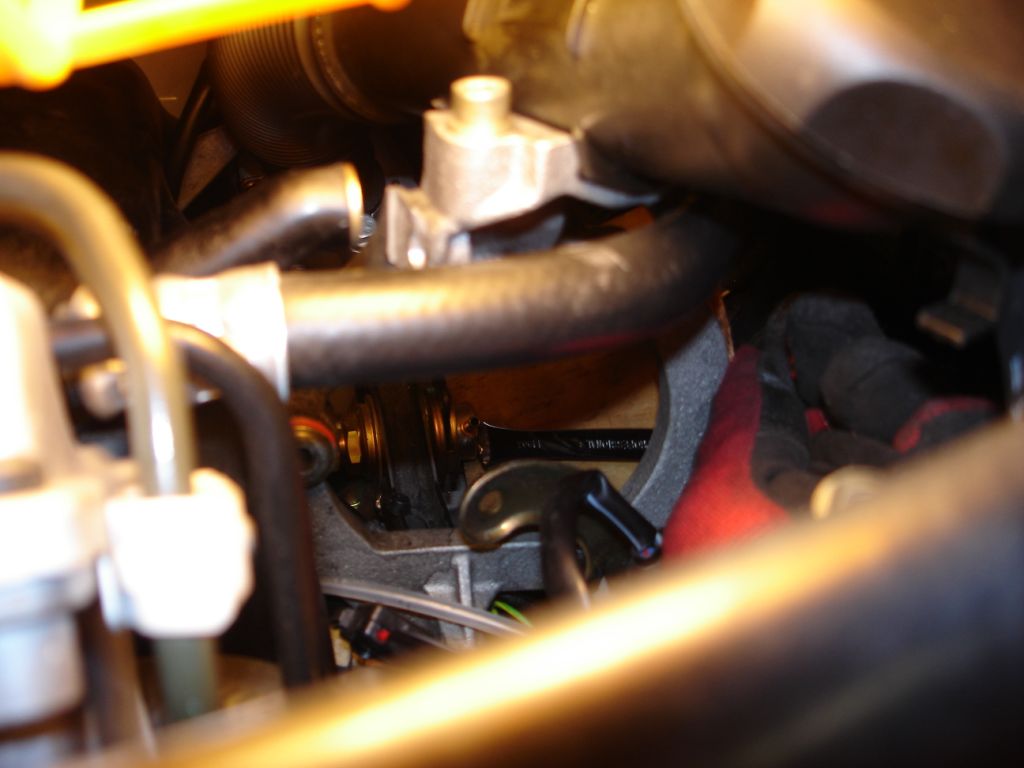
Remove the old FPR. Mine was really stuck in there and used a wrench to leverage it out against the FPR barb. Once the old FPR is removed install the new FPR. Reattach the FPR clip:


In my case it was difficult to push back the FPR back into the rail. So I used a block of wood and leveraged a wrench against the FPR to slide it in.


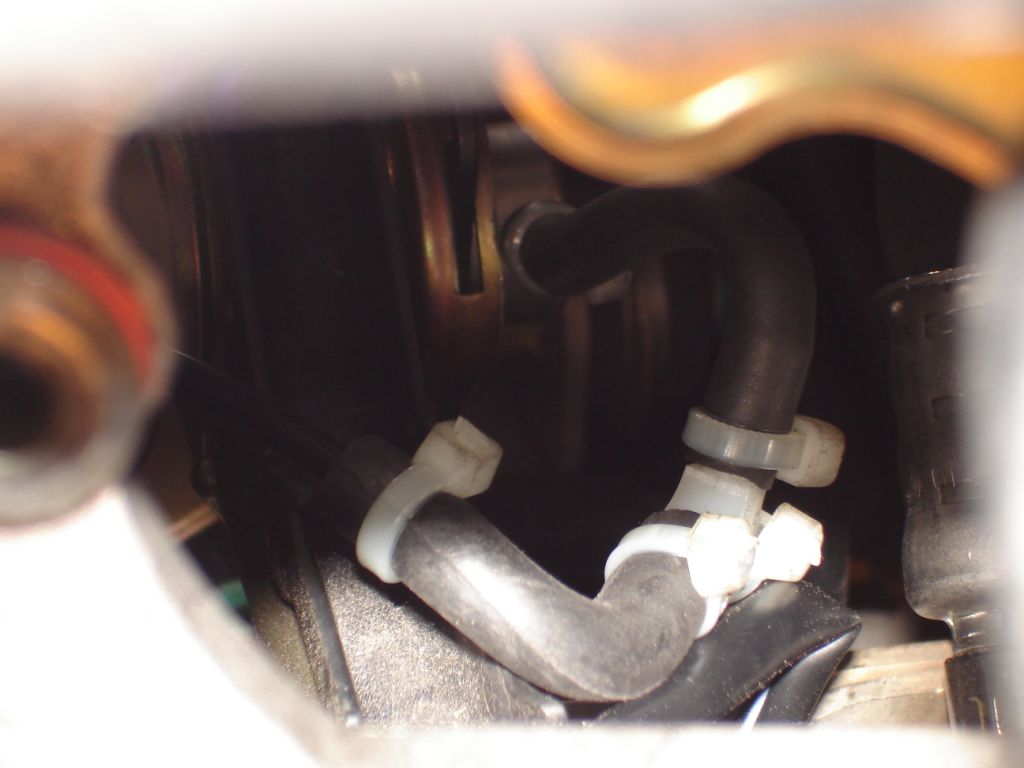
All done...if you are installing an EBC and need a vac/boost source, now is the time to "tee" off the FPR vac/boost line.


Install everything reverse of dissassembly. Hope that helps. It would have helped me if I had these picts before I did the install.
 

Last edited by ZIP22; 06-15-2008 at 12:07 AM.
  #3  
Old 06-15-2008, 02:21 AM
Speedshaq's Avatar
Banned
Join Date: Jan 2008
Location: EU
Posts: 4,103
Rep Power: 221
Speedshaq Is a GOD !Speedshaq Is a GOD !Speedshaq Is a GOD !Speedshaq Is a GOD !Speedshaq Is a GOD !Speedshaq Is a GOD !Speedshaq Is a GOD !Speedshaq Is a GOD !Speedshaq Is a GOD !Speedshaq Is a GOD !Speedshaq Is a GOD !
Usefull thread
 
  #4  
Old 06-15-2008, 08:48 AM
ard's Avatar
ard
ard is offline
Registered User
Join Date: Jan 2007
Location: N. California
Posts: 2,981
Rep Power: 296
ard Is a GOD !ard Is a GOD !ard Is a GOD !ard Is a GOD !ard Is a GOD !ard Is a GOD !ard Is a GOD !ard Is a GOD !ard Is a GOD !ard Is a GOD !ard Is a GOD !
THANKS for doing this. Taking pics while 'in the thick of it' is sometimes a challenge- you tend to forget to snap pics at the right times. Well done.

A
 
  #5  
Old 06-15-2008, 09:14 AM
alex55's Avatar
Registered User
Join Date: Nov 2006
Location: Romania, Bucharest
Posts: 2,533
Rep Power: 165
alex55 Is a GOD !alex55 Is a GOD !alex55 Is a GOD !alex55 Is a GOD !alex55 Is a GOD !alex55 Is a GOD !alex55 Is a GOD !alex55 Is a GOD !alex55 Is a GOD !alex55 Is a GOD !alex55 Is a GOD !
woow very nice job, thank you !
 
  #6  
Old 06-15-2008, 09:15 AM
$manager's Avatar
Registered User
Join Date: Jun 2007
Location: NC
Age: 61
Posts: 771
Rep Power: 120
$manager Is a GOD !$manager Is a GOD !$manager Is a GOD !$manager Is a GOD !$manager Is a GOD !$manager Is a GOD !$manager Is a GOD !$manager Is a GOD !$manager Is a GOD !$manager Is a GOD !$manager Is a GOD !
Nice. The biggest pain I had, as you noted, was getting the new one seated. It took forever to get that thing popped in.

Great pics! Did you get our Greddy hooked up?
 
  #7  
Old 06-15-2008, 09:21 AM
RCH's Avatar
RCH
RCH is offline
Banned
Join Date: Jun 2004
Posts: 1,705
Rep Power: 92
RCH is just really niceRCH is just really niceRCH is just really niceRCH is just really niceRCH is just really nice
What are you switching this with please ??
 
  #8  
Old 06-15-2008, 06:46 PM
bimmer81's Avatar
Registered User
Join Date: Mar 2007
Location: los angeles
Posts: 891
Rep Power: 61
bimmer81 is a splendid one to beholdbimmer81 is a splendid one to beholdbimmer81 is a splendid one to beholdbimmer81 is a splendid one to beholdbimmer81 is a splendid one to beholdbimmer81 is a splendid one to beholdbimmer81 is a splendid one to behold
awsome diy, thanks!
 
  #9  
Old 06-15-2008, 09:01 PM
BlackBear's Avatar
Banned
Join Date: Nov 2003
Location: On the beach
Posts: 1,054
Rep Power: 74
BlackBear has much to be proud ofBlackBear has much to be proud ofBlackBear has much to be proud ofBlackBear has much to be proud ofBlackBear has much to be proud ofBlackBear has much to be proud ofBlackBear has much to be proud ofBlackBear has much to be proud ofBlackBear has much to be proud of
How long did this swap take you?
 
  #10  
Old 06-16-2008, 02:11 AM
smistry007's Avatar
Registered User
Join Date: Jul 2005
Location: Palos Verdes, California
Age: 58
Posts: 550
Rep Power: 70
smistry007 has a reputation beyond reputesmistry007 has a reputation beyond reputesmistry007 has a reputation beyond reputesmistry007 has a reputation beyond reputesmistry007 has a reputation beyond reputesmistry007 has a reputation beyond reputesmistry007 has a reputation beyond reputesmistry007 has a reputation beyond reputesmistry007 has a reputation beyond reputesmistry007 has a reputation beyond reputesmistry007 has a reputation beyond repute
excellent DIY and thanks for posting. I'll copy this for later reference...
 
  #11  
Old 06-16-2008, 03:27 AM
Mikelly's Avatar
Registered User
Join Date: Mar 2007
Location: Spotsylvania, Va
Age: 57
Posts: 3,813
Rep Power: 320
Mikelly Is a GOD !Mikelly Is a GOD !Mikelly Is a GOD !Mikelly Is a GOD !Mikelly Is a GOD !Mikelly Is a GOD !Mikelly Is a GOD !Mikelly Is a GOD !Mikelly Is a GOD !Mikelly Is a GOD !Mikelly Is a GOD !
In the DIY I posted here a while back (over the winter) I didn't remove the air pump, just unbolted it and moved it to the extreme right side...

This is a 45 minute job, so long as you don't drop the clip and spend another 30 minutes trying to find it!

Mike
 
  #12  
Old 06-16-2008, 07:22 AM
heavychevy's Avatar
Registered User
Join Date: Jul 2006
Location: ga
Posts: 8,934
Rep Power: 550
heavychevy Is a GOD !heavychevy Is a GOD !heavychevy Is a GOD !heavychevy Is a GOD !heavychevy Is a GOD !heavychevy Is a GOD !heavychevy Is a GOD !heavychevy Is a GOD !heavychevy Is a GOD !heavychevy Is a GOD !heavychevy Is a GOD !
I've had some bolts and stuff dissapear into the abyss as well.
 
  #13  
Old 06-16-2008, 08:50 AM
WOODTSTER's Avatar
Registered User
Join Date: Jan 2006
Location: MPLS, MN USA
Age: 63
Posts: 5,710
Rep Power: 464
WOODTSTER Is a GOD !WOODTSTER Is a GOD !WOODTSTER Is a GOD !WOODTSTER Is a GOD !WOODTSTER Is a GOD !WOODTSTER Is a GOD !WOODTSTER Is a GOD !WOODTSTER Is a GOD !WOODTSTER Is a GOD !WOODTSTER Is a GOD !WOODTSTER Is a GOD !
^^^^ LOL

Heavy, your hands are just too big for this type of thing!

MK
 
  #14  
Old 06-16-2008, 10:35 AM
$manager's Avatar
Registered User
Join Date: Jun 2007
Location: NC
Age: 61
Posts: 771
Rep Power: 120
$manager Is a GOD !$manager Is a GOD !$manager Is a GOD !$manager Is a GOD !$manager Is a GOD !$manager Is a GOD !$manager Is a GOD !$manager Is a GOD !$manager Is a GOD !$manager Is a GOD !$manager Is a GOD !
Guys-
If anyone is doing it make sure to get Mikelly's picts as well. They are shot a little further back than these and between the two sets it is a no brainer.

I did not pull the air pump- I just removed two of the bolts and pushed it out of the way....
 
  #15  
Old 06-16-2008, 11:42 AM
heavychevy's Avatar
Registered User
Join Date: Jul 2006
Location: ga
Posts: 8,934
Rep Power: 550
heavychevy Is a GOD !heavychevy Is a GOD !heavychevy Is a GOD !heavychevy Is a GOD !heavychevy Is a GOD !heavychevy Is a GOD !heavychevy Is a GOD !heavychevy Is a GOD !heavychevy Is a GOD !heavychevy Is a GOD !heavychevy Is a GOD !
Originally Posted by WOODTSTER
^^^^ LOL

Heavy, your hands are just too big for this type of thing!

MK

I managed with the DV's. Had a lot of scrapes though. Sure was not fun trying to reach some of the stuff.


You have already rated this thread Rating: Thread Rating: 0 votes,  average.

Quick Reply: DIY: Removing the FPR


All times are GMT -6. The time now is 09:07 PM.