
DIY Coilover Install Thread (with Pics!)


Registered User
Joined: Nov 2005
Posts: 43
From: California
Rep Power: 24

Great info, thanks for the perspective, it certainly helps.
From my research it looks like folks doing PSS9/10 are lowering the fronts .75" and the rears .5". Anyone want to chime in on those values? So I will probably set the PSS10s around half that to try first, see how the car settles and then adjust accordingly.
Hope to work on it this week.
One other thing - is the special tool for torquing the top nut while holding the inside allen (on the top of the suspension) necessary? Seems like I should be able to tighten nut with wrench while holding allen if I can estimate the appropriate torque.
Finally, any Loctite needed on reassembly?
Registered User
Joined: Nov 2005
Posts: 43
From: California
Rep Power: 24
I'm also putting eibach sway bars on which are 3 position adjustable front and back. Any suggestions on which settings to start with?
Registered User
Joined: Jul 2010
Posts: 4,848
Rep Power: 457

Great info, thanks for the perspective, it certainly helps.
From my research it looks like folks doing PSS9/10 are lowering the fronts .75" and the rears .5". Anyone want to chime in on those values? So I will probably set the PSS10s around half that to try first, see how the car settles and then adjust accordingly.
Hope to work on it this week.
One other thing - is the special tool for torquing the top nut while holding the inside allen (on the top of the suspension) necessary? Seems like I should be able to tighten nut with wrench while holding allen if I can estimate the appropriate torque.
Finally, any Loctite needed on reassembly?
From my research it looks like folks doing PSS9/10 are lowering the fronts .75" and the rears .5". Anyone want to chime in on those values? So I will probably set the PSS10s around half that to try first, see how the car settles and then adjust accordingly.
Hope to work on it this week.
One other thing - is the special tool for torquing the top nut while holding the inside allen (on the top of the suspension) necessary? Seems like I should be able to tighten nut with wrench while holding allen if I can estimate the appropriate torque.
Finally, any Loctite needed on reassembly?
Last edited by pwdrhound; Feb 11, 2013 at 05:04 PM.
Registered User
Joined: Nov 2005
Posts: 43
From: California
Rep Power: 24
There is very little leeway in ride height when using the PSS10 kit. If you read the PSS10 installation instructions you will find out that Bilstein is very specific in requiring that front ride height be set at 85-95mm from the center of the mid strut mounting bolt to the top of the lower spring perch and in the rear 205-210mm. In other words, you have a 10mm adjustment range in the front and 5mm range in the rear. If you go lower you will generally bottom out the bump stops and get a lot of porpoising which is what people commonly complain about here. SET THE RIDE HEIGHT ACCORDING TO BILSTEIN SPECIFICATION FOR BEST PERFORMANCE...
Doing the fronts today (hopefully). My mechanic suggested a forward lean, if the Bilsteins are set within their ranges front and back is that possible? Is it even desired? I do track the car occasionally, I'm interested in overall handling improvement as I feel the car pushes (under steer) a lot.
Registered User
Joined: Jul 2010
Posts: 4,848
Rep Power: 457
Got it. I found that out when I did the rears yesterday. I set it at the bottom of the range which resulted in a floor to fender height of about 25.5". I will probably raise it a bit once it settles.
Doing the fronts today (hopefully). My mechanic suggested a forward lean, if the Bilsteins are set within their ranges front and back is that possible? Is it even desired? I do track the car occasionally, I'm interested in overall handling improvement as I feel the car pushes (under steer) a lot.
Doing the fronts today (hopefully). My mechanic suggested a forward lean, if the Bilsteins are set within their ranges front and back is that possible? Is it even desired? I do track the car occasionally, I'm interested in overall handling improvement as I feel the car pushes (under steer) a lot.
Last edited by pwdrhound; Feb 12, 2013 at 08:00 AM.
Registered User
Joined: Nov 2005
Posts: 43
From: California
Rep Power: 24
For max forward rake set the front adjustment at the min of the Bilstein range (85mm) and the rear at the max of the range (210mm). With the PSS10 kit if you want more rake, than raising the rear slightly above the recommended setting is preferable over setting the front lower due to bump stop issues, if that makes sense....
Registered User
Joined: Jul 2010
Posts: 4,848
Rep Power: 457
I think most are obsessed with GT2 ride height and the "look" rather than setting the ride height which Bilstein specifies and which they designed the kit to perform optimally at. Just my opinion, fwiw.. Just read all the posts, everyone always talks about "I set it to GT2 ride height this and that" but you don't ever hear anyone say they set it to the height specified by Bilstein. For grocery getters or cars and coffee cars its probably not too critical but if you plan to track it make sure it's set right. Than again, if you plan to track it with any frequency than the PSS10 kit is probably not the right product anyway as its pretty soft.
Last edited by pwdrhound; Feb 12, 2013 at 08:45 AM.
Registered User
Joined: Jul 2010
Posts: 4,848
Rep Power: 457
I prefer to set the car up with a touch of rake to start. It's all a trade off between sway bar settings, camber, tire width and compound, etc. It all depends what you are trying to achieve.
Last edited by pwdrhound; Feb 12, 2013 at 08:40 PM.
Registered User
Joined: Nov 2005
Posts: 43
From: California
Rep Power: 24
I got the rear PSS10s installed yesterday and the fronts more or less done today. I utilized a hybrid approach to getting the fronts installed.
To remove the strut tower I used a hybrid approach utilizing method shows in this thread as well as this one: https://www.6speedonline.com/forums/...ompressor.html
My basic approach was to loosten the spring carrier (the aluminum or magnesium casting the spring sits on) and rotate it around to pry the spring over it and spin it down. This worked beautifully and is outlined in the other thread with pics. I then proceeded to unbolt the drop link from the sway bar, unbolt the strut from the wheel carrier, remove the brake and ABS lines from the wheel carrier and unbolt the 6 allen bolts from the differential. Once the 3 bolts were out of the top of the strunt (into the trunk) the whole assembly pivoted down and I was able to compress it to get it out from the wheel well.
Note that I DID NOT undo the steering linkage/tie rod as outlined in the other thread. I couldn't/didn't want to pop the ball joint out so I resorted to removing the 6 allens so the half shaft could come out of the diff. I was a bit nervous about this but it was super easy and provided the necessary play for the wheel carrier to pivot down. I didn't pull the half shaft out, it really just came away from the diff about 4 to 6 inches. Reassembly was easy too.
Once down I was able to remove the strut assembly.
Here's where I ran into some trouble. The Bilstein instructions show the use of the OE thrust bearing. As you can see in the pic, it shows a flat assembly and, if you disassemble enough of the OE assembly you can get down to this. But if you assemble the new strut this way there will be lateral movement. Now maybe this is obvious to everyone but I was going by the instructions provided by Bilstein. I had sense enough to call them before I reassembled the car. They confirmed that the whole OE assembly from the rubber spring hat up through the mounting plate is reused BUT IT'S NOT SHOWN. Once assembled this way it's solid, no lateral movement.
The only other tricky part was getting it all lined up. I dry fitted the top assembly (what sits on the main spring) in the car with the aluminum spring hat supplied by Bilstein. This way I was able to get the correct orientation of all this stuff. Note that the mount plates are side specific (marked with Re and L) and the arrow must point towards the front of the car.
So it's mostly back together. I just have to install the new sway bar. To do so it looks like I have to remove a bolt from a ball joint that goes into a control arm. Does anyone know if this is easy to do or if I'm going to need some special tool to get it out?
Included below are some pics:
Half shaft removed from differential:

Bilstein incorrectly assembled, looking up from the bottom:

OE Parts Bilstein customer support said need to be included (not pictured in Bilstein install instructions):

Top of OE assembly:

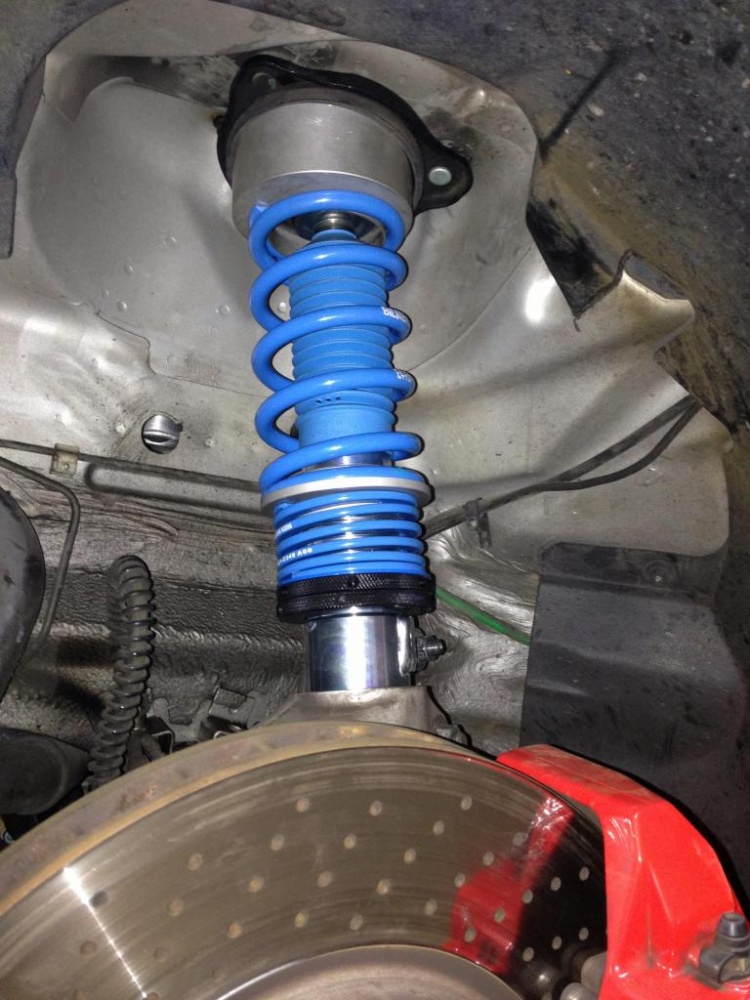
Installed!:
To remove the strut tower I used a hybrid approach utilizing method shows in this thread as well as this one: https://www.6speedonline.com/forums/...ompressor.html
My basic approach was to loosten the spring carrier (the aluminum or magnesium casting the spring sits on) and rotate it around to pry the spring over it and spin it down. This worked beautifully and is outlined in the other thread with pics. I then proceeded to unbolt the drop link from the sway bar, unbolt the strut from the wheel carrier, remove the brake and ABS lines from the wheel carrier and unbolt the 6 allen bolts from the differential. Once the 3 bolts were out of the top of the strunt (into the trunk) the whole assembly pivoted down and I was able to compress it to get it out from the wheel well.
Note that I DID NOT undo the steering linkage/tie rod as outlined in the other thread. I couldn't/didn't want to pop the ball joint out so I resorted to removing the 6 allens so the half shaft could come out of the diff. I was a bit nervous about this but it was super easy and provided the necessary play for the wheel carrier to pivot down. I didn't pull the half shaft out, it really just came away from the diff about 4 to 6 inches. Reassembly was easy too.
Once down I was able to remove the strut assembly.
Here's where I ran into some trouble. The Bilstein instructions show the use of the OE thrust bearing. As you can see in the pic, it shows a flat assembly and, if you disassemble enough of the OE assembly you can get down to this. But if you assemble the new strut this way there will be lateral movement. Now maybe this is obvious to everyone but I was going by the instructions provided by Bilstein. I had sense enough to call them before I reassembled the car. They confirmed that the whole OE assembly from the rubber spring hat up through the mounting plate is reused BUT IT'S NOT SHOWN. Once assembled this way it's solid, no lateral movement.
The only other tricky part was getting it all lined up. I dry fitted the top assembly (what sits on the main spring) in the car with the aluminum spring hat supplied by Bilstein. This way I was able to get the correct orientation of all this stuff. Note that the mount plates are side specific (marked with Re and L) and the arrow must point towards the front of the car.
So it's mostly back together. I just have to install the new sway bar. To do so it looks like I have to remove a bolt from a ball joint that goes into a control arm. Does anyone know if this is easy to do or if I'm going to need some special tool to get it out?
Included below are some pics:
Half shaft removed from differential:
Bilstein incorrectly assembled, looking up from the bottom:
OE Parts Bilstein customer support said need to be included (not pictured in Bilstein install instructions):
Top of OE assembly:
Installed!:
Registered User
Joined: Nov 2005
Posts: 43
From: California
Rep Power: 24
I found this one and read through it ahead of getting my set. I saw no appreciable difference in the instructions included in my kit, which had a rev date in 2010. I believe my kit was made in 2011 (based on datestamp on springs).
http://www.truckspring.com/installat...M5-Y342A00.pdf
http://www.truckspring.com/installat...M5-Y342A00.pdf
Registered User
Joined: Jul 2010
Posts: 4,848
Rep Power: 457
This is a link to the latest 2010 PSS10 Installation revision for the 996 Turbo. The only difference from the previous one is that they have revised the front height range from 80-90mm to 85-95mm (page 5 and 10), probably due to the complaints people had with bump stop issues at the lower height.
http://autoteilebox.de/gm5d536.pdf
http://autoteilebox.de/gm5d536.pdf
Last edited by pwdrhound; Feb 13, 2013 at 11:16 AM.
Registered User
Joined: May 2015
Posts: 121
From: AZzzz
Rep Power: 20
Wanted to thank Scottslaw and Skermese for doing this DIY info.
I did a complete strut replacement to Bilstein B6 with new mounts all around and new front bearings. Reuse of stock springs.
I followed the Sharkwerks guide for getting the Bose system out of the way to get to rear tops. Nowhere near as much work as I thought it was going to be.
The rears were fairly straight forward. I am not sure if it was mentioned, but we used a floor jack to put upward pressure on strut bottom, to allow us to move it inboard away from attachment. We also loosened up rear sway bar bolts, which gave us some room to rotate it out of the way for easier drop down, then remove strut and spring from above hub.
On the fronts, we used the spring rotation method to solve that issue.
I think where we deviated is that after some trial and error, and re-thinking, we did the following.
1- removed bolt holding strut at wheel carrier
2- removed bolt holding lower spring carrier to strut
3- removed front belly tray. This gives easy access to half shafts.
4- removed 6- half shaft bolts to front diff.
5- removed sway bar link from strut
6- loosened bolts holding sway bar to frame
7- loosened forward bolt that holds plate for inboard control arm. This is also retaining sway bar.
8- remove 3 nuts on top holding strut mount
9- removed bolt for inboard control arm. This allowed enough movement to carefully pressure the assy down and rotate the strut out side of fender. Use all precaution of painters tape.
10- removed steering linkage at wheel carrier
11- unplug brake sensors
12- carefully apply downward pressure on wheel carrier and rotate it outboard of fender, then slide strut up and out of wheel carrier.
Be very careful of half shafts. They can bind if not fully drawn out of diff.
And, this is a 2 person effort to re-install, to get these back in correctly. One person can maneuver the wheel carrier/strut while the other person assures half shaft coupler inserts correctly.
For re-installation, we reassembled strut and spring complete on the bench.
We then used the spring compressor from Pelican, and ran them down pretty tight. This gave us the added room to reverse the process and reassemble.
Once installed all hand tight, we were able to release spring compressor with a closed end ratcheting wrench.
Some things, I think we learned along the way:
1- We didn�t need to remove the brake calipers or the brake sensor plug mount. Just unplug.
2- Make sure you have the torque specs handy, you have a wide variety of stuff to put back.
3- When installing strut thru wheel carrier, make sure to get sensor wires in correct position.
4- Take a lot of pictures before and after.
5- We did get a small amount of gear oil leakage from transaxle. Maybe � ounce a side? But, we left it dis-assembled overnight, so if you did one side straight thru, I don�t think this would amount to much.
6- Be careful torqueing the strut top nuts. They are nylock insert nuts, and have a low torque. We over tightened one, slightly and could see the hex key bind and damage the internal of the shaft.
Once all back together, I went to Front End Alignment. They provided a before and after data read out. It was good to see that the before was very close to factory spec. Minor adjustments and 1 hr later all complete.
Looking at it now, I think it could all be done in 4-6 hrs with 1-2 people.
Thanks again to all the DIYers who wrote this up so I would know what to do.