
window cable regulator motor remove replace DIY

Thread Starter
|
Registered User

Joined: Jul 2005
Posts: 550
From: Palos Verdes, California
Rep Power: 72


window cable regulator motor remove replace DIY
so when ever I pulled the outside door handle, I would hear a groaning/ creeking noise and the window would not dip down when opening and closing the door.
[URL="[ame=http://www.flickr.com/photos/7755426@N04/7984047399/]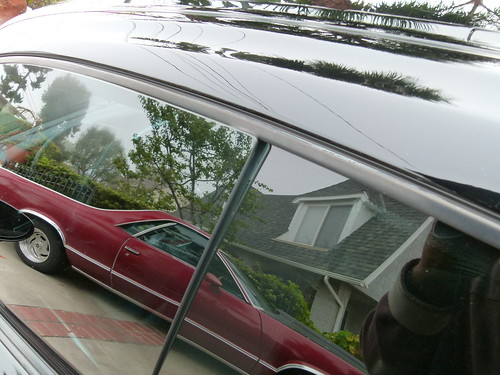 [/ame] [ame=http://www.flickr.com/photos/7755426@N04/7984047399/]Window regulator RR[/ame] by [ame=http://www.flickr.com/people/7755426@N04/]smistry007[/ame], on Flickr"]http://www.flickr.com/photos/7755426@N04/7984047399/ http://www.flickr.com/photos/7755426@N04/7984047399/ by http://www.flickr.com/people/7755426@N04/, on Flickr[/ame]
I diagnosed the problem as a stretched window cable and bought a new one from Sunset. In the pic above, you can see that the window pane was on dipping into the body channel.
Here we go:
1- disconnect battery
2- insert trim removal tool and pop off door panel
[URL="[ame=http://www.flickr.com/photos/7755426@N04/7984046761/]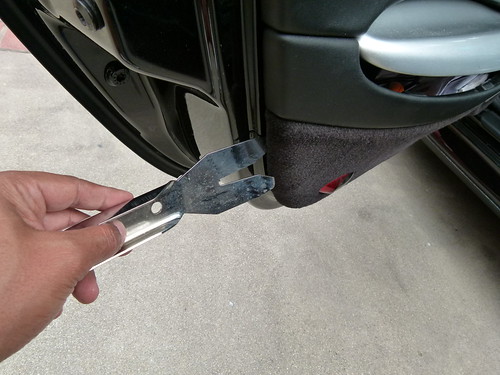 [/ame] [ame=http://www.flickr.com/photos/7755426@N04/7984046761/]Window regulator RR[/ame] by [ame=http://www.flickr.com/people/7755426@N04/]smistry007[/ame], on Flickr"]http://www.flickr.com/photos/7755426@N04/7984046761/ http://www.flickr.com/photos/7755426@N04/7984046761/ by http://www.flickr.com/people/7755426@N04/, on Flickr[/ame]
5- remove one screw under door map lid and 2 long bolts under door pull
[URL="[ame=http://www.flickr.com/photos/7755426@N04/7984052772/]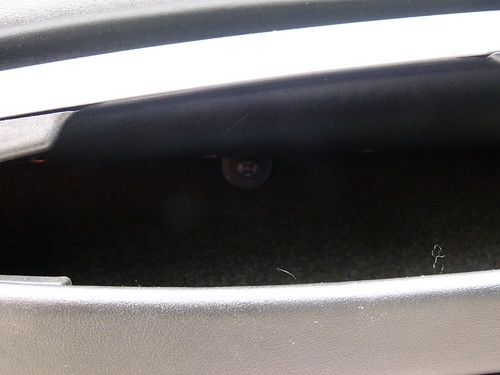 [/ame] [ame=http://www.flickr.com/photos/7755426@N04/7984052772/]Window regulator RR[/ame] by [ame=http://www.flickr.com/people/7755426@N04/]smistry007[/ame], on Flickr"]http://www.flickr.com/photos/7755426@N04/7984052772/ http://www.flickr.com/photos/7755426@N04/7984052772/ by http://www.flickr.com/people/7755426@N04/, on Flickr[/ame]
[URL="[ame=http://www.flickr.com/photos/7755426@N04/7984051730/]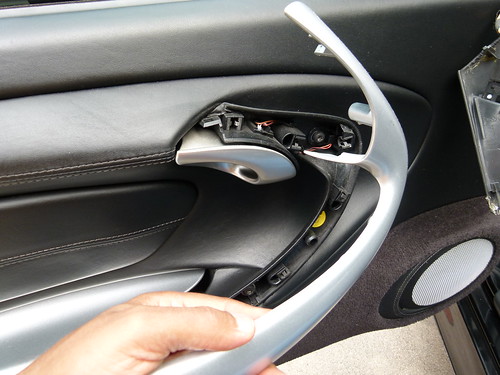 [/ame] [ame=http://www.flickr.com/photos/7755426@N04/7984051730/]Window regulator RR[/ame] by [ame=http://www.flickr.com/people/7755426@N04/]smistry007[/ame], on Flickr"]http://www.flickr.com/photos/7755426@N04/7984051730/ http://www.flickr.com/photos/7755426@N04/7984051730/ by http://www.flickr.com/people/7755426@N04/, on Flickr[/ame]
6- pop off "airbag" tag and remove screw deep inside
[URL="[ame=http://www.flickr.com/photos/7755426@N04/7984045431/]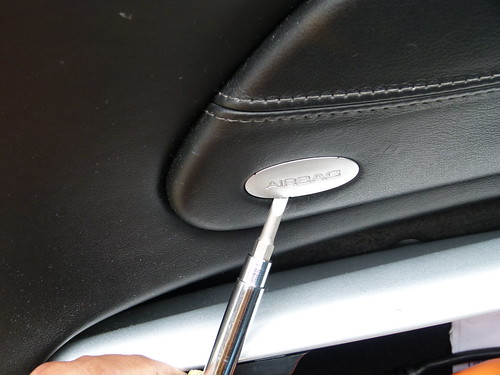 [/ame] [ame=http://www.flickr.com/photos/7755426@N04/7984045431/]Window regulator RR[/ame] by [ame=http://www.flickr.com/people/7755426@N04/]smistry007[/ame], on Flickr"]http://www.flickr.com/photos/7755426@N04/7984045431/ http://www.flickr.com/photos/7755426@N04/7984045431/ by http://www.flickr.com/people/7755426@N04/, on Flickr[/ame]
7- remove triangular side mirror piece by pulling medially and then superiorly
[URL="[ame=http://www.flickr.com/photos/7755426@N04/7984045663/]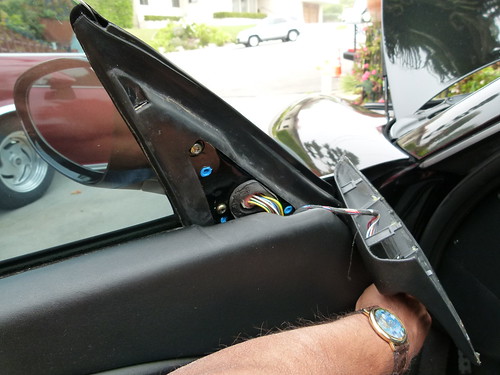 [/ame] [ame=http://www.flickr.com/photos/7755426@N04/7984045663/]Window regulator RR[/ame] by [ame=http://www.flickr.com/people/7755426@N04/]smistry007[/ame], on Flickr"]http://www.flickr.com/photos/7755426@N04/7984045663/ http://www.flickr.com/photos/7755426@N04/7984045663/ by http://www.flickr.com/people/7755426@N04/, on Flickr[/ame]
8- push door panel vertically/ superiorly- careful since wires still attached to inside of panel
9- disconnect wires to courtesy lights
[URL="[ame=http://www.flickr.com/photos/7755426@N04/7984045085/]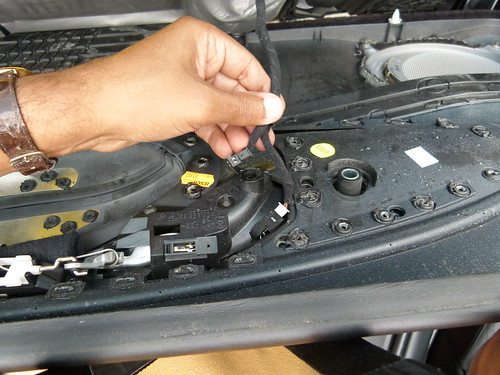 [/ame] [ame=http://www.flickr.com/photos/7755426@N04/7984045085/]Window regulator RR[/ame] by [ame=http://www.flickr.com/people/7755426@N04/]smistry007[/ame], on Flickr"]http://www.flickr.com/photos/7755426@N04/7984045085/ http://www.flickr.com/photos/7755426@N04/7984045085/ by http://www.flickr.com/people/7755426@N04/, on Flickr[/ame]
10- I didn't want to disconned whole latch mechanism so I just set door panel off to side- still connected however
[URL="[ame=http://www.flickr.com/photos/7755426@N04/7984044289/]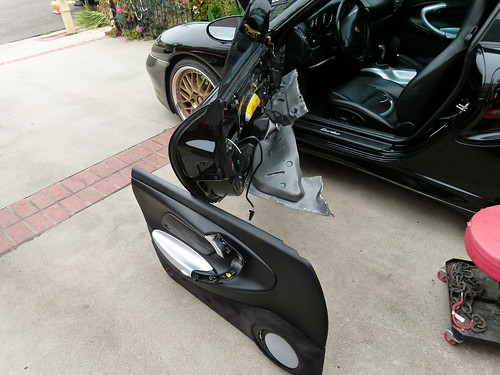 [/ame] [ame=http://www.flickr.com/photos/7755426@N04/7984044289/]Window regulator RR[/ame] by [ame=http://www.flickr.com/people/7755426@N04/]smistry007[/ame], on Flickr"]http://www.flickr.com/photos/7755426@N04/7984044289/ http://www.flickr.com/photos/7755426@N04/7984044289/ by http://www.flickr.com/people/7755426@N04/, on Flickr[/ame]
[URL="[ame=http://www.flickr.com/photos/7755426@N04/7984047399/]
[/ame] [ame=http://www.flickr.com/photos/7755426@N04/7984047399/]Window regulator RR[/ame] by [ame=http://www.flickr.com/people/7755426@N04/]smistry007[/ame], on Flickr"]http://www.flickr.com/photos/7755426@N04/7984047399/ http://www.flickr.com/photos/7755426@N04/7984047399/ by http://www.flickr.com/people/7755426@N04/, on Flickr[/ame]I diagnosed the problem as a stretched window cable and bought a new one from Sunset. In the pic above, you can see that the window pane was on dipping into the body channel.
Here we go:
1- disconnect battery
2- insert trim removal tool and pop off door panel
[URL="[ame=http://www.flickr.com/photos/7755426@N04/7984046761/]
[/ame] [ame=http://www.flickr.com/photos/7755426@N04/7984046761/]Window regulator RR[/ame] by [ame=http://www.flickr.com/people/7755426@N04/]smistry007[/ame], on Flickr"]http://www.flickr.com/photos/7755426@N04/7984046761/ http://www.flickr.com/photos/7755426@N04/7984046761/ by http://www.flickr.com/people/7755426@N04/, on Flickr[/ame]5- remove one screw under door map lid and 2 long bolts under door pull
[URL="[ame=http://www.flickr.com/photos/7755426@N04/7984052772/]
[/ame] [ame=http://www.flickr.com/photos/7755426@N04/7984052772/]Window regulator RR[/ame] by [ame=http://www.flickr.com/people/7755426@N04/]smistry007[/ame], on Flickr"]http://www.flickr.com/photos/7755426@N04/7984052772/ http://www.flickr.com/photos/7755426@N04/7984052772/ by http://www.flickr.com/people/7755426@N04/, on Flickr[/ame][URL="[ame=http://www.flickr.com/photos/7755426@N04/7984051730/]
[/ame] [ame=http://www.flickr.com/photos/7755426@N04/7984051730/]Window regulator RR[/ame] by [ame=http://www.flickr.com/people/7755426@N04/]smistry007[/ame], on Flickr"]http://www.flickr.com/photos/7755426@N04/7984051730/ http://www.flickr.com/photos/7755426@N04/7984051730/ by http://www.flickr.com/people/7755426@N04/, on Flickr[/ame]6- pop off "airbag" tag and remove screw deep inside
[URL="[ame=http://www.flickr.com/photos/7755426@N04/7984045431/]
[/ame] [ame=http://www.flickr.com/photos/7755426@N04/7984045431/]Window regulator RR[/ame] by [ame=http://www.flickr.com/people/7755426@N04/]smistry007[/ame], on Flickr"]http://www.flickr.com/photos/7755426@N04/7984045431/ http://www.flickr.com/photos/7755426@N04/7984045431/ by http://www.flickr.com/people/7755426@N04/, on Flickr[/ame]7- remove triangular side mirror piece by pulling medially and then superiorly
[URL="[ame=http://www.flickr.com/photos/7755426@N04/7984045663/]
[/ame] [ame=http://www.flickr.com/photos/7755426@N04/7984045663/]Window regulator RR[/ame] by [ame=http://www.flickr.com/people/7755426@N04/]smistry007[/ame], on Flickr"]http://www.flickr.com/photos/7755426@N04/7984045663/ http://www.flickr.com/photos/7755426@N04/7984045663/ by http://www.flickr.com/people/7755426@N04/, on Flickr[/ame]8- push door panel vertically/ superiorly- careful since wires still attached to inside of panel
9- disconnect wires to courtesy lights
[URL="[ame=http://www.flickr.com/photos/7755426@N04/7984045085/]
[/ame] [ame=http://www.flickr.com/photos/7755426@N04/7984045085/]Window regulator RR[/ame] by [ame=http://www.flickr.com/people/7755426@N04/]smistry007[/ame], on Flickr"]http://www.flickr.com/photos/7755426@N04/7984045085/ http://www.flickr.com/photos/7755426@N04/7984045085/ by http://www.flickr.com/people/7755426@N04/, on Flickr[/ame]10- I didn't want to disconned whole latch mechanism so I just set door panel off to side- still connected however
[URL="[ame=http://www.flickr.com/photos/7755426@N04/7984044289/]
[/ame] [ame=http://www.flickr.com/photos/7755426@N04/7984044289/]Window regulator RR[/ame] by [ame=http://www.flickr.com/people/7755426@N04/]smistry007[/ame], on Flickr"]http://www.flickr.com/photos/7755426@N04/7984044289/ http://www.flickr.com/photos/7755426@N04/7984044289/ by http://www.flickr.com/people/7755426@N04/, on Flickr[/ame]
Thread Starter
|
Registered User
Joined: Jul 2005
Posts: 550
From: Palos Verdes, California
Rep Power: 72
11- remove door speaker box
[URL="http://[ame=http://www.flickr.com/photos/7755426@N04/7984047624/]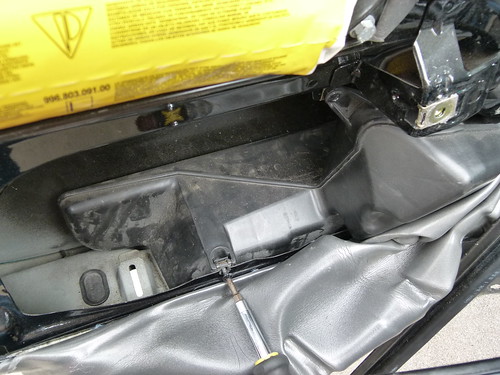 [/ame] [ame=http://www.flickr.com/photos/7755426@N04/7984047624/]Window regulator RR[/ame] by [ame=http://www.flickr.com/people/7755426@N04/]smistry007[/ame], on Flickr"]http://http://www.flickr.com/photos/7755426@N04/7984047624/ http://www.flickr.com/photos/7755426@N04/7984047624/ by http://www.flickr.com/people/7755426@N04/, on Flickr[/ame]
12- remove hex nut at top left quadrant of door
[URL="[ame=http://www.flickr.com/photos/7755426@N04/7984042917/] [/ame] [ame=http://www.flickr.com/photos/7755426@N04/7984042917/]Window regulator RR[/ame] by [ame=http://www.flickr.com/people/7755426@N04/]smistry007[/ame], on Flickr"]http://www.flickr.com/photos/7755426@N04/7984042917/ http://www.flickr.com/photos/7755426@N04/7984042917/ by http://www.flickr.com/people/7755426@N04/, on Flickr[/ame]
13- remove hex nut at top right quadrant of door
[URL="[ame=http://www.flickr.com/photos/7755426@N04/7984042731/]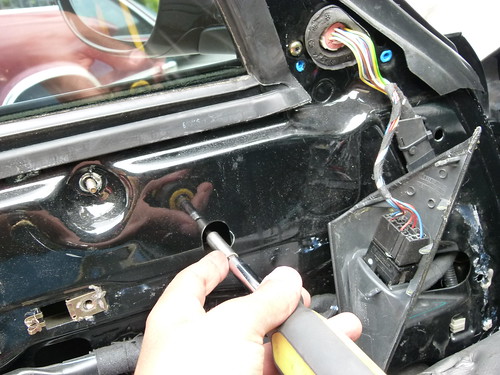 [/ame] [ame=http://www.flickr.com/photos/7755426@N04/7984042731/]Window regulator RR[/ame] by [ame=http://www.flickr.com/people/7755426@N04/]smistry007[/ame], on Flickr"]http://www.flickr.com/photos/7755426@N04/7984042731/ http://www.flickr.com/photos/7755426@N04/7984042731/ by http://www.flickr.com/people/7755426@N04/, on Flickr[/ame]
14- remove 2 hex nuts from underneath door
[URL="[ame=http://www.flickr.com/photos/7755426@N04/7984049384/]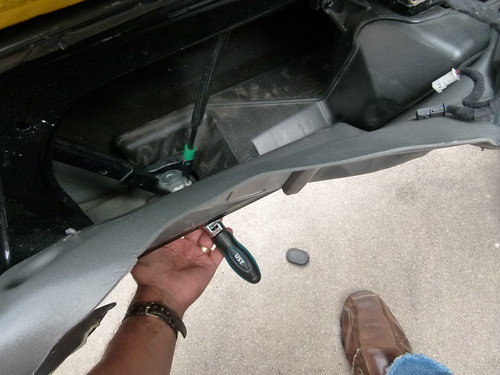 [/ame] [ame=http://www.flickr.com/photos/7755426@N04/7984049384/]Window regulator RR[/ame] by [ame=http://www.flickr.com/people/7755426@N04/]smistry007[/ame], on Flickr"]http://www.flickr.com/photos/7755426@N04/7984049384/ http://www.flickr.com/photos/7755426@N04/7984049384/ by http://www.flickr.com/people/7755426@N04/, on Flickr[/ame]
15- remove 3 hex nuts at window motor housing
[URL="[ame=http://www.flickr.com/photos/7755426@N04/7984048790/]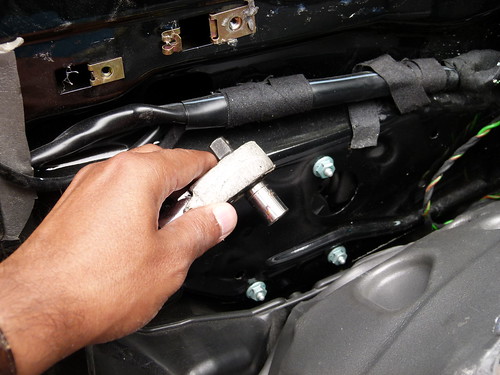 [/ame] [ame=http://www.flickr.com/photos/7755426@N04/7984048790/]Window regulator RR[/ame] by [ame=http://www.flickr.com/people/7755426@N04/]smistry007[/ame], on Flickr"]http://www.flickr.com/photos/7755426@N04/7984048790/ http://www.flickr.com/photos/7755426@N04/7984048790/ by http://www.flickr.com/people/7755426@N04/, on Flickr[/ame]
16- loosen power cable to window motor
[URL="[ame=http://www.flickr.com/photos/7755426@N04/7984047122/]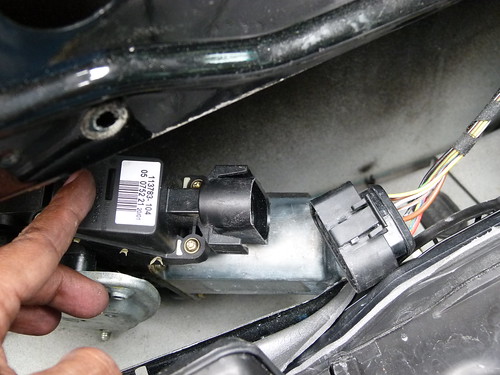 [/ame] [ame=http://www.flickr.com/photos/7755426@N04/7984047122/]Window regulator RR[/ame] by [ame=http://www.flickr.com/people/7755426@N04/]smistry007[/ame], on Flickr"]http://www.flickr.com/photos/7755426@N04/7984047122/ http://www.flickr.com/photos/7755426@N04/7984047122/ by http://www.flickr.com/people/7755426@N04/, on Flickr[/ame]
17- remove top window felt- just pull straight up
[URL="[ame=http://www.flickr.com/photos/7755426@N04/7984048254/]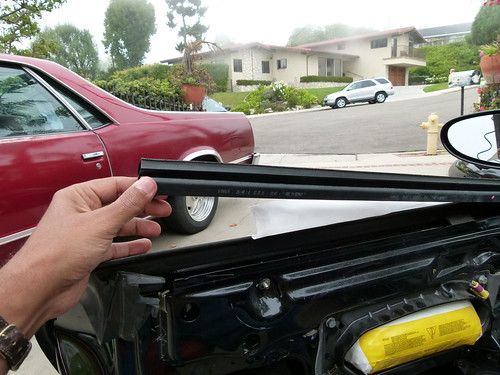 [/ame] [ame=http://www.flickr.com/photos/7755426@N04/7984048254/]Window regulator RR[/ame] by [ame=http://www.flickr.com/people/7755426@N04/]smistry007[/ame], on Flickr"]http://www.flickr.com/photos/7755426@N04/7984048254/ http://www.flickr.com/photos/7755426@N04/7984048254/ by http://www.flickr.com/people/7755426@N04/, on Flickr[/ame]
[URL="http://[ame=http://www.flickr.com/photos/7755426@N04/7984047624/]
[/ame] [ame=http://www.flickr.com/photos/7755426@N04/7984047624/]Window regulator RR[/ame] by [ame=http://www.flickr.com/people/7755426@N04/]smistry007[/ame], on Flickr"]http://http://www.flickr.com/photos/7755426@N04/7984047624/ http://www.flickr.com/photos/7755426@N04/7984047624/ by http://www.flickr.com/people/7755426@N04/, on Flickr[/ame]12- remove hex nut at top left quadrant of door
[URL="[ame=http://www.flickr.com/photos/7755426@N04/7984042917/]
[/ame] [ame=http://www.flickr.com/photos/7755426@N04/7984042917/]Window regulator RR[/ame] by [ame=http://www.flickr.com/people/7755426@N04/]smistry007[/ame], on Flickr"]http://www.flickr.com/photos/7755426@N04/7984042917/ http://www.flickr.com/photos/7755426@N04/7984042917/ by http://www.flickr.com/people/7755426@N04/, on Flickr[/ame]13- remove hex nut at top right quadrant of door
[URL="[ame=http://www.flickr.com/photos/7755426@N04/7984042731/]
[/ame] [ame=http://www.flickr.com/photos/7755426@N04/7984042731/]Window regulator RR[/ame] by [ame=http://www.flickr.com/people/7755426@N04/]smistry007[/ame], on Flickr"]http://www.flickr.com/photos/7755426@N04/7984042731/ http://www.flickr.com/photos/7755426@N04/7984042731/ by http://www.flickr.com/people/7755426@N04/, on Flickr[/ame]14- remove 2 hex nuts from underneath door
[URL="[ame=http://www.flickr.com/photos/7755426@N04/7984049384/]
[/ame] [ame=http://www.flickr.com/photos/7755426@N04/7984049384/]Window regulator RR[/ame] by [ame=http://www.flickr.com/people/7755426@N04/]smistry007[/ame], on Flickr"]http://www.flickr.com/photos/7755426@N04/7984049384/ http://www.flickr.com/photos/7755426@N04/7984049384/ by http://www.flickr.com/people/7755426@N04/, on Flickr[/ame]15- remove 3 hex nuts at window motor housing
[URL="[ame=http://www.flickr.com/photos/7755426@N04/7984048790/]
[/ame] [ame=http://www.flickr.com/photos/7755426@N04/7984048790/]Window regulator RR[/ame] by [ame=http://www.flickr.com/people/7755426@N04/]smistry007[/ame], on Flickr"]http://www.flickr.com/photos/7755426@N04/7984048790/ http://www.flickr.com/photos/7755426@N04/7984048790/ by http://www.flickr.com/people/7755426@N04/, on Flickr[/ame]16- loosen power cable to window motor
[URL="[ame=http://www.flickr.com/photos/7755426@N04/7984047122/]
[/ame] [ame=http://www.flickr.com/photos/7755426@N04/7984047122/]Window regulator RR[/ame] by [ame=http://www.flickr.com/people/7755426@N04/]smistry007[/ame], on Flickr"]http://www.flickr.com/photos/7755426@N04/7984047122/ http://www.flickr.com/photos/7755426@N04/7984047122/ by http://www.flickr.com/people/7755426@N04/, on Flickr[/ame]17- remove top window felt- just pull straight up
[URL="[ame=http://www.flickr.com/photos/7755426@N04/7984048254/]
[/ame] [ame=http://www.flickr.com/photos/7755426@N04/7984048254/]Window regulator RR[/ame] by [ame=http://www.flickr.com/people/7755426@N04/]smistry007[/ame], on Flickr"]http://www.flickr.com/photos/7755426@N04/7984048254/ http://www.flickr.com/photos/7755426@N04/7984048254/ by http://www.flickr.com/people/7755426@N04/, on Flickr[/ame]
Thread Starter
|
Registered User
Joined: Jul 2005
Posts: 550
From: Palos Verdes, California
Rep Power: 72
18- loosen screws at window clips- note- top bolt is for window cable attachment- hidden screw behind metal is where window clip is located- there's 2- one forward and one aft
[URL="[ame=http://www.flickr.com/photos/7755426@N04/7984042917/][/ame] [ame=http://www.flickr.com/photos/7755426@N04/7984042917/]Window regulator RR[/ame] by [ame=http://www.flickr.com/people/7755426@N04/]smistry007[/ame], on Flickr"]http://www.flickr.com/photos/7755426@N04/7984042917/ http://www.flickr.com/photos/7755426@N04/7984042917/ by http://www.flickr.com/people/7755426@N04/, on Flickr[/ame]
19- pull window straight up and out of internal window clips
20- unbolt window cable apparatus from window motor- three long bolts
[URL="http://[ame=http://www.flickr.com/photos/7755426@N04/7984046958/] [/ame] [ame=http://www.flickr.com/photos/7755426@N04/7984046958/]Window regulator RR[/ame] by [ame=http://www.flickr.com/people/7755426@N04/]smistry007[/ame], on Flickr"]http://http://www.flickr.com/photos/7755426@N04/7984046958/ http://www.flickr.com/photos/7755426@N04/7984046958/ by http://www.flickr.com/people/7755426@N04/, on Flickr[/ame]
[URL="http://[ame=http://www.flickr.com/photos/7755426@N04/7984046810/]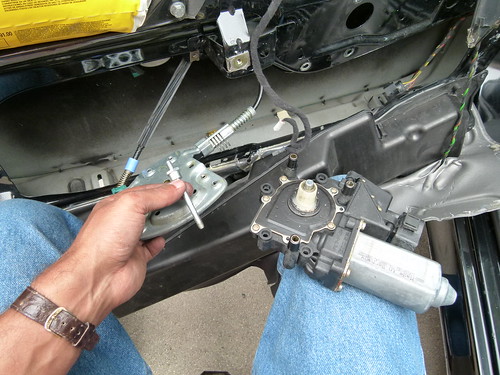 [/ame] [ame=http://www.flickr.com/photos/7755426@N04/7984046810/]Window regulator RR[/ame] by [ame=http://www.flickr.com/people/7755426@N04/]smistry007[/ame], on Flickr"]http://http://www.flickr.com/photos/7755426@N04/7984046810/ http://www.flickr.com/photos/7755426@N04/7984046810/ by http://www.flickr.com/people/7755426@N04/, on Flickr[/ame]
21- remove window cable vertically through window slit at top of door- may help to remove window holding clips completely- don't scratch the paint!
[URL="[ame=http://www.flickr.com/photos/7755426@N04/7984041953/]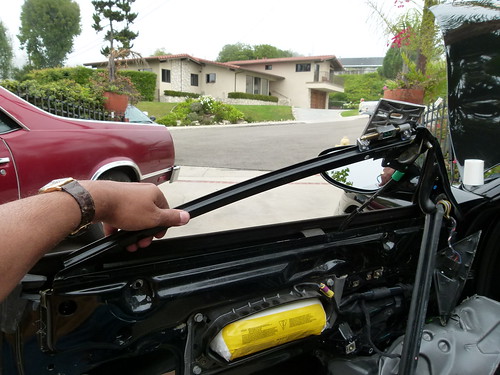 [/ame] [ame=http://www.flickr.com/photos/7755426@N04/7984041953/]Window regulator RR[/ame] by [ame=http://www.flickr.com/people/7755426@N04/]smistry007[/ame], on Flickr"]http://www.flickr.com/photos/7755426@N04/7984041953/ http://www.flickr.com/photos/7755426@N04/7984041953/ by http://www.flickr.com/people/7755426@N04/, on Flickr[/ame]
[URL="[ame=http://www.flickr.com/photos/7755426@N04/7984046568/] [/ame] [ame=http://www.flickr.com/photos/7755426@N04/7984046568/]Window regulator RR[/ame] by [ame=http://www.flickr.com/people/7755426@N04/]smistry007[/ame], on Flickr"]http://www.flickr.com/photos/7755426@N04/7984046568/ http://www.flickr.com/photos/7755426@N04/7984046568/ by http://www.flickr.com/people/7755426@N04/, on Flickr[/ame]
22-put in new window cable through top window slit- remember it is installed in an "X" configuration- may need to remove window clips for it to slip in
[URL="[ame=http://www.flickr.com/photos/7755426@N04/7984049242/] [/ame] [ame=http://www.flickr.com/photos/7755426@N04/7984049242/]Window regulator RR[/ame] by [ame=http://www.flickr.com/people/7755426@N04/]smistry007[/ame], on Flickr"]http://www.flickr.com/photos/7755426@N04/7984049242/ http://www.flickr.com/photos/7755426@N04/7984049242/ by http://www.flickr.com/people/7755426@N04/, on Flickr[/ame]
[URL="[ame=http://www.flickr.com/photos/7755426@N04/7984046354/] [/ame] [ame=http://www.flickr.com/photos/7755426@N04/7984046354/]Window regulator RR[/ame] by [ame=http://www.flickr.com/people/7755426@N04/]smistry007[/ame], on Flickr"]http://www.flickr.com/photos/7755426@N04/7984046354/ http://www.flickr.com/photos/7755426@N04/7984046354/ by http://www.flickr.com/people/7755426@N04/, on Flickr[/ame]
23-reconnect window clips and window motor to window cable apparatus
[URL="[ame=http://www.flickr.com/photos/7755426@N04/7984046146/] [/ame] [ame=http://www.flickr.com/photos/7755426@N04/7984046146/]Window regulator RR[/ame] by [ame=http://www.flickr.com/people/7755426@N04/]smistry007[/ame], on Flickr"]http://www.flickr.com/photos/7755426@N04/7984046146/ http://www.flickr.com/photos/7755426@N04/7984046146/ by http://www.flickr.com/people/7755426@N04/, on Flickr[/ame]
[URL="[ame=http://www.flickr.com/photos/7755426@N04/7984045970/] [/ame] [ame=http://www.flickr.com/photos/7755426@N04/7984045970/]Window regulator RR[/ame] by [ame=http://www.flickr.com/people/7755426@N04/]smistry007[/ame], on Flickr"]http://www.flickr.com/photos/7755426@N04/7984045970/ http://www.flickr.com/photos/7755426@N04/7984045970/ by http://www.flickr.com/people/7755426@N04/, on Flickr[/ame]
[URL="[ame=http://www.flickr.com/photos/7755426@N04/7984042917/]
[/ame] [ame=http://www.flickr.com/photos/7755426@N04/7984042917/]Window regulator RR[/ame] by [ame=http://www.flickr.com/people/7755426@N04/]smistry007[/ame], on Flickr"]http://www.flickr.com/photos/7755426@N04/7984042917/ http://www.flickr.com/photos/7755426@N04/7984042917/ by http://www.flickr.com/people/7755426@N04/, on Flickr[/ame]19- pull window straight up and out of internal window clips
20- unbolt window cable apparatus from window motor- three long bolts
[URL="http://[ame=http://www.flickr.com/photos/7755426@N04/7984046958/]
[/ame] [ame=http://www.flickr.com/photos/7755426@N04/7984046958/]Window regulator RR[/ame] by [ame=http://www.flickr.com/people/7755426@N04/]smistry007[/ame], on Flickr"]http://http://www.flickr.com/photos/7755426@N04/7984046958/ http://www.flickr.com/photos/7755426@N04/7984046958/ by http://www.flickr.com/people/7755426@N04/, on Flickr[/ame][URL="http://[ame=http://www.flickr.com/photos/7755426@N04/7984046810/]
[/ame] [ame=http://www.flickr.com/photos/7755426@N04/7984046810/]Window regulator RR[/ame] by [ame=http://www.flickr.com/people/7755426@N04/]smistry007[/ame], on Flickr"]http://http://www.flickr.com/photos/7755426@N04/7984046810/ http://www.flickr.com/photos/7755426@N04/7984046810/ by http://www.flickr.com/people/7755426@N04/, on Flickr[/ame]21- remove window cable vertically through window slit at top of door- may help to remove window holding clips completely- don't scratch the paint!
[URL="[ame=http://www.flickr.com/photos/7755426@N04/7984041953/]
[/ame] [ame=http://www.flickr.com/photos/7755426@N04/7984041953/]Window regulator RR[/ame] by [ame=http://www.flickr.com/people/7755426@N04/]smistry007[/ame], on Flickr"]http://www.flickr.com/photos/7755426@N04/7984041953/ http://www.flickr.com/photos/7755426@N04/7984041953/ by http://www.flickr.com/people/7755426@N04/, on Flickr[/ame][URL="[ame=http://www.flickr.com/photos/7755426@N04/7984046568/]
[/ame] [ame=http://www.flickr.com/photos/7755426@N04/7984046568/]Window regulator RR[/ame] by [ame=http://www.flickr.com/people/7755426@N04/]smistry007[/ame], on Flickr"]http://www.flickr.com/photos/7755426@N04/7984046568/ http://www.flickr.com/photos/7755426@N04/7984046568/ by http://www.flickr.com/people/7755426@N04/, on Flickr[/ame]22-put in new window cable through top window slit- remember it is installed in an "X" configuration- may need to remove window clips for it to slip in
[URL="[ame=http://www.flickr.com/photos/7755426@N04/7984049242/]
[/ame] [ame=http://www.flickr.com/photos/7755426@N04/7984049242/]Window regulator RR[/ame] by [ame=http://www.flickr.com/people/7755426@N04/]smistry007[/ame], on Flickr"]http://www.flickr.com/photos/7755426@N04/7984049242/ http://www.flickr.com/photos/7755426@N04/7984049242/ by http://www.flickr.com/people/7755426@N04/, on Flickr[/ame][URL="[ame=http://www.flickr.com/photos/7755426@N04/7984046354/]
[/ame] [ame=http://www.flickr.com/photos/7755426@N04/7984046354/]Window regulator RR[/ame] by [ame=http://www.flickr.com/people/7755426@N04/]smistry007[/ame], on Flickr"]http://www.flickr.com/photos/7755426@N04/7984046354/ http://www.flickr.com/photos/7755426@N04/7984046354/ by http://www.flickr.com/people/7755426@N04/, on Flickr[/ame]23-reconnect window clips and window motor to window cable apparatus
[URL="[ame=http://www.flickr.com/photos/7755426@N04/7984046146/]
[/ame] [ame=http://www.flickr.com/photos/7755426@N04/7984046146/]Window regulator RR[/ame] by [ame=http://www.flickr.com/people/7755426@N04/]smistry007[/ame], on Flickr"]http://www.flickr.com/photos/7755426@N04/7984046146/ http://www.flickr.com/photos/7755426@N04/7984046146/ by http://www.flickr.com/people/7755426@N04/, on Flickr[/ame][URL="[ame=http://www.flickr.com/photos/7755426@N04/7984045970/]
[/ame] [ame=http://www.flickr.com/photos/7755426@N04/7984045970/]Window regulator RR[/ame] by [ame=http://www.flickr.com/people/7755426@N04/]smistry007[/ame], on Flickr"]http://www.flickr.com/photos/7755426@N04/7984045970/ http://www.flickr.com/photos/7755426@N04/7984045970/ by http://www.flickr.com/people/7755426@N04/, on Flickr[/ame]
Thread Starter
|
Registered User
Joined: Jul 2005
Posts: 550
From: Palos Verdes, California
Rep Power: 72
24- reconnect window motor combo to door via three bolts and nuts
[URL="[ame=http://www.flickr.com/photos/7755426@N04/7984044938/] [/ame] [ame=http://www.flickr.com/photos/7755426@N04/7984044938/]Window regulator RR[/ame] by [ame=http://www.flickr.com/people/7755426@N04/]smistry007[/ame], on Flickr"]http://www.flickr.com/photos/7755426@N04/7984044938/ http://www.flickr.com/photos/7755426@N04/7984044938/ by http://www.flickr.com/people/7755426@N04/, on Flickr[/ame]
25- reconnect window cable to door via two nuts at bottom of door and two at top
[URL="[ame=http://www.flickr.com/photos/7755426@N04/7984045620/]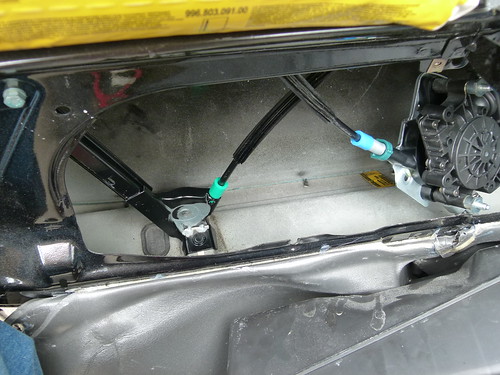 [/ame] [ame=http://www.flickr.com/photos/7755426@N04/7984045620/]Window regulator RR[/ame] by [ame=http://www.flickr.com/people/7755426@N04/]smistry007[/ame], on Flickr"]http://www.flickr.com/photos/7755426@N04/7984045620/ http://www.flickr.com/photos/7755426@N04/7984045620/ by http://www.flickr.com/people/7755426@N04/, on Flickr[/ame]
26-reinstall window felt
27- reattach window clips to cable and then slid in window into interal clips
[URL="[ame=http://www.flickr.com/photos/7755426@N04/7984038903/]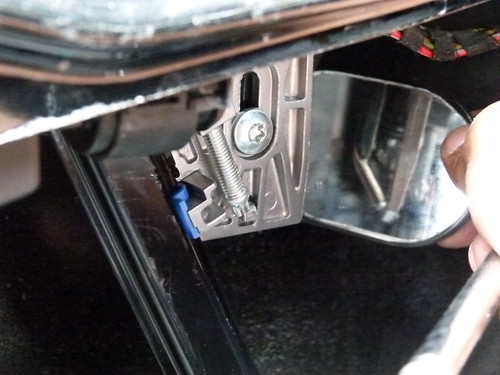 [/ame] [ame=http://www.flickr.com/photos/7755426@N04/7984038903/]Window regulator RR[/ame] by [ame=http://www.flickr.com/people/7755426@N04/]smistry007[/ame], on Flickr"]http://www.flickr.com/photos/7755426@N04/7984038903/ http://www.flickr.com/photos/7755426@N04/7984038903/ by http://www.flickr.com/people/7755426@N04/, on Flickr[/ame]
28-put speaker box back in
[URL="[ame=http://www.flickr.com/photos/7755426@N04/7984038715/]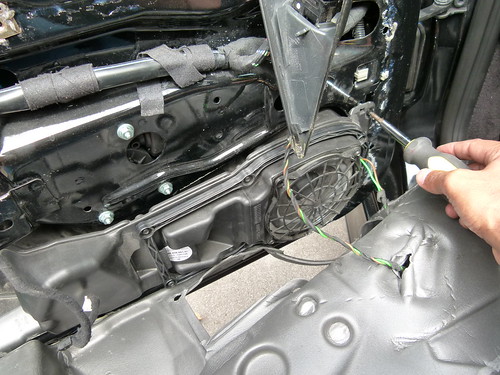 [/ame] [ame=http://www.flickr.com/photos/7755426@N04/7984038715/]Window regulator RR[/ame] by [ame=http://www.flickr.com/people/7755426@N04/]smistry007[/ame], on Flickr"]http://www.flickr.com/photos/7755426@N04/7984038715/ http://www.flickr.com/photos/7755426@N04/7984038715/ by http://www.flickr.com/people/7755426@N04/, on Flickr[/ame]
29- reconnect wires for lighting
30- put door panel back on- start at top of door and push panel inferiorly until white plastic prongs line up with holes in door
[URL="[ame=http://www.flickr.com/photos/7755426@N04/7984038265/] [/ame] [ame=http://www.flickr.com/photos/7755426@N04/7984038265/]Window regulator RR[/ame] by [ame=http://www.flickr.com/people/7755426@N04/]smistry007[/ame], on Flickr"]http://www.flickr.com/photos/7755426@N04/7984038265/ http://www.flickr.com/photos/7755426@N04/7984038265/ by http://www.flickr.com/people/7755426@N04/, on Flickr[/ame]
31- put in 2 long bolts into door pull and one small screw into airbag hole
[URL="[ame=http://www.flickr.com/photos/7755426@N04/7984038077/]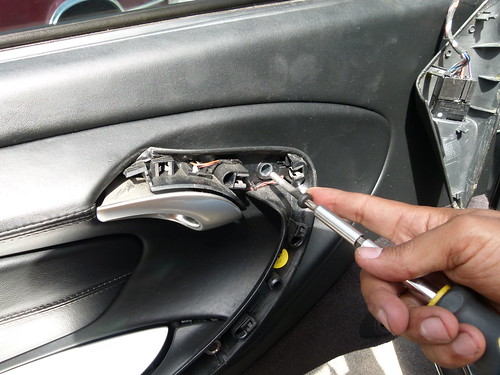 [/ame] [ame=http://www.flickr.com/photos/7755426@N04/7984038077/]Window regulator RR[/ame] by [ame=http://www.flickr.com/people/7755426@N04/]smistry007[/ame], on Flickr"]http://www.flickr.com/photos/7755426@N04/7984038077/ http://www.flickr.com/photos/7755426@N04/7984038077/ by http://www.flickr.com/people/7755426@N04/, on Flickr[/ame]
32- tap door panel gently into place and replace trim
[URL="[ame=http://www.flickr.com/photos/7755426@N04/7984037865/]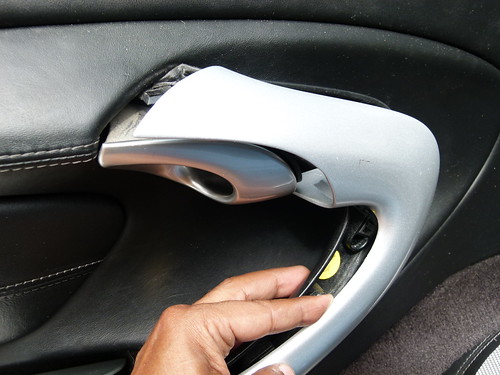 [/ame] [ame=http://www.flickr.com/photos/7755426@N04/7984037865/]Window regulator RR[/ame] by [ame=http://www.flickr.com/people/7755426@N04/]smistry007[/ame], on Flickr"]http://www.flickr.com/photos/7755426@N04/7984037865/ http://www.flickr.com/photos/7755426@N04/7984037865/ by http://www.flickr.com/people/7755426@N04/, on Flickr[/ame]
33- reconect battery and test window
34- boast to neighbors, friends, wife or anybody else who will listen, how you just saved yourself some $$ and again proved yourself a bad *** DIY mo fo!
35- in case you were wondering- "84 El Camino with 383 stroker- for the Home Depot/ CostCo runs.
[URL="http://[ame=http://www.flickr.com/photos/7755426@N04/7984179503/] [/ame] [ame=http://www.flickr.com/photos/7755426@N04/7984179503/]P1080068[/ame] by [ame=http://www.flickr.com/people/7755426@N04/]smistry007[/ame], on Flickr"]http://http://www.flickr.com/photos/7755426@N04/7984179503/ http://www.flickr.com/photos/7755426@N04/7984179503/ by http://www.flickr.com/people/7755426@N04/, on Flickr[/ame]
[URL="[ame=http://www.flickr.com/photos/7755426@N04/7984179239/] [/ame] [ame=http://www.flickr.com/photos/7755426@N04/7984179239/]P1080069[/ame] by [ame=http://www.flickr.com/people/7755426@N04/]smistry007[/ame], on Flickr"]http://www.flickr.com/photos/7755426@N04/7984179239/ http://www.flickr.com/photos/7755426@N04/7984179239/ by http://www.flickr.com/people/7755426@N04/, on Flickr[/ame]
[URL="[ame=http://www.flickr.com/photos/7755426@N04/7984044938/]
[/ame] [ame=http://www.flickr.com/photos/7755426@N04/7984044938/]Window regulator RR[/ame] by [ame=http://www.flickr.com/people/7755426@N04/]smistry007[/ame], on Flickr"]http://www.flickr.com/photos/7755426@N04/7984044938/ http://www.flickr.com/photos/7755426@N04/7984044938/ by http://www.flickr.com/people/7755426@N04/, on Flickr[/ame]25- reconnect window cable to door via two nuts at bottom of door and two at top
[URL="[ame=http://www.flickr.com/photos/7755426@N04/7984045620/]
[/ame] [ame=http://www.flickr.com/photos/7755426@N04/7984045620/]Window regulator RR[/ame] by [ame=http://www.flickr.com/people/7755426@N04/]smistry007[/ame], on Flickr"]http://www.flickr.com/photos/7755426@N04/7984045620/ http://www.flickr.com/photos/7755426@N04/7984045620/ by http://www.flickr.com/people/7755426@N04/, on Flickr[/ame]26-reinstall window felt
27- reattach window clips to cable and then slid in window into interal clips
[URL="[ame=http://www.flickr.com/photos/7755426@N04/7984038903/]
[/ame] [ame=http://www.flickr.com/photos/7755426@N04/7984038903/]Window regulator RR[/ame] by [ame=http://www.flickr.com/people/7755426@N04/]smistry007[/ame], on Flickr"]http://www.flickr.com/photos/7755426@N04/7984038903/ http://www.flickr.com/photos/7755426@N04/7984038903/ by http://www.flickr.com/people/7755426@N04/, on Flickr[/ame]28-put speaker box back in
[URL="[ame=http://www.flickr.com/photos/7755426@N04/7984038715/]
[/ame] [ame=http://www.flickr.com/photos/7755426@N04/7984038715/]Window regulator RR[/ame] by [ame=http://www.flickr.com/people/7755426@N04/]smistry007[/ame], on Flickr"]http://www.flickr.com/photos/7755426@N04/7984038715/ http://www.flickr.com/photos/7755426@N04/7984038715/ by http://www.flickr.com/people/7755426@N04/, on Flickr[/ame]29- reconnect wires for lighting
30- put door panel back on- start at top of door and push panel inferiorly until white plastic prongs line up with holes in door
[URL="[ame=http://www.flickr.com/photos/7755426@N04/7984038265/]
[/ame] [ame=http://www.flickr.com/photos/7755426@N04/7984038265/]Window regulator RR[/ame] by [ame=http://www.flickr.com/people/7755426@N04/]smistry007[/ame], on Flickr"]http://www.flickr.com/photos/7755426@N04/7984038265/ http://www.flickr.com/photos/7755426@N04/7984038265/ by http://www.flickr.com/people/7755426@N04/, on Flickr[/ame]31- put in 2 long bolts into door pull and one small screw into airbag hole
[URL="[ame=http://www.flickr.com/photos/7755426@N04/7984038077/]
[/ame] [ame=http://www.flickr.com/photos/7755426@N04/7984038077/]Window regulator RR[/ame] by [ame=http://www.flickr.com/people/7755426@N04/]smistry007[/ame], on Flickr"]http://www.flickr.com/photos/7755426@N04/7984038077/ http://www.flickr.com/photos/7755426@N04/7984038077/ by http://www.flickr.com/people/7755426@N04/, on Flickr[/ame]32- tap door panel gently into place and replace trim
[URL="[ame=http://www.flickr.com/photos/7755426@N04/7984037865/]
[/ame] [ame=http://www.flickr.com/photos/7755426@N04/7984037865/]Window regulator RR[/ame] by [ame=http://www.flickr.com/people/7755426@N04/]smistry007[/ame], on Flickr"]http://www.flickr.com/photos/7755426@N04/7984037865/ http://www.flickr.com/photos/7755426@N04/7984037865/ by http://www.flickr.com/people/7755426@N04/, on Flickr[/ame]33- reconect battery and test window
34- boast to neighbors, friends, wife or anybody else who will listen, how you just saved yourself some $$ and again proved yourself a bad *** DIY mo fo!
35- in case you were wondering- "84 El Camino with 383 stroker- for the Home Depot/ CostCo runs.
[URL="http://[ame=http://www.flickr.com/photos/7755426@N04/7984179503/]
[/ame] [ame=http://www.flickr.com/photos/7755426@N04/7984179503/]P1080068[/ame] by [ame=http://www.flickr.com/people/7755426@N04/]smistry007[/ame], on Flickr"]http://http://www.flickr.com/photos/7755426@N04/7984179503/ http://www.flickr.com/photos/7755426@N04/7984179503/ by http://www.flickr.com/people/7755426@N04/, on Flickr[/ame][URL="[ame=http://www.flickr.com/photos/7755426@N04/7984179239/]
[/ame] [ame=http://www.flickr.com/photos/7755426@N04/7984179239/]P1080069[/ame] by [ame=http://www.flickr.com/people/7755426@N04/]smistry007[/ame], on Flickr"]http://www.flickr.com/photos/7755426@N04/7984179239/ http://www.flickr.com/photos/7755426@N04/7984179239/ by http://www.flickr.com/people/7755426@N04/, on Flickr[/ame]


That's a great DIY !! The window regulators are usually a pain to get out and you made it look easy. Thank you for the post.
Trending Topics

Registered User
Joined: Aug 2009
Posts: 65
From: usa
Rep Power: 19
What a great step-by-step DIY! One thing I noticed is that you removed the window regulator from the top. When I did mine a couple months ago, I was able to remove the window regulator from the bottom with the motor still attached. I think you have much less chance of scratching the paint if you do it that way.
Registered User
Joined: Oct 2009
Posts: 347
From: New York
Rep Power: 38
groan creak, scrapey sound
I am experiencing a similar sound, but mine occurs throughout the range of up/down. It came on suddenly. Everything was working fine and suddenly this noise. I was actually affraid the glass was getting scratched. It wasn't, but the noise is bad and the window won't go up and down properly -- when trying to put it up, it goes up a bit, seems to bind, and then comes back down, probably because it thinks it is getting resistance aka someone's hand or head in the path of the window. If I help pull the window up, it will come all the way up. Do you think this is a stretched cable, or somehthing needing adjustment or something (i.e., regulator motor) needing replacement.
Anyone been there done that?
Anyone been there done that?
Registered User
Joined: Oct 2009
Posts: 347
From: New York
Rep Power: 38
Cable
So, I pulled mine out and the blue plastic cable housing going into the spooler had broken off and gone into the spooler, causing it to bind up.
OP, you mention that you replaced your stretched cable. Did you buy a whole new regulator frame and spool without the motor, or just replace the cable. As is often the case with Porsche, they tend not to sell the little part that is broken, but require that you replace the whole assembly. I found part # 996-542-076-04-M100 for $230, but that' the whole assembly with new spooler, rails, pulleys, cable, etc. All for a two dollar part.
Is there a separate part number for just the cable?

Registered User

Joined: May 2010
Posts: 444
From: SC
Rep Power: 58
So, I pulled mine out and the blue plastic cable housing going into the spooler had broken off and gone into the spooler, causing it to bind up.
OP, you mention that you replaced your stretched cable. Did you buy a whole new regulator frame and spool without the motor, or just replace the cable. As is often the case with Porsche, they tend not to sell the little part that is broken, but require that you replace the whole assembly. I found part # 996-542-076-04-M100 for $230, but that' the whole assembly with new spooler, rails, pulleys, cable, etc. All for a two dollar part.
Is there a separate part number for just the cable?
OP, you mention that you replaced your stretched cable. Did you buy a whole new regulator frame and spool without the motor, or just replace the cable. As is often the case with Porsche, they tend not to sell the little part that is broken, but require that you replace the whole assembly. I found part # 996-542-076-04-M100 for $230, but that' the whole assembly with new spooler, rails, pulleys, cable, etc. All for a two dollar part.
Is there a separate part number for just the cable?
