
Forge Diverter Valve Install


Thread Starter
|
Registered User
Joined: May 2008
Posts: 156
From: Orlando
Rep Power: 33


Forge Diverter Valve Install
So I ordered some forged motorsports diverter valves through TitanMotorsports and received them yesterday. I dropped my wife off at the airport early and decided to tackle this before work today. Actually, ended up going very smoothly. Even with me taking the pictures it took about 45 minutes. I think the key is having the right tools and I used common tools that you may already have in your toolbox. I have to say that I utilized the AWE Tuning instructions that were good until the clamps on the diverter valves.
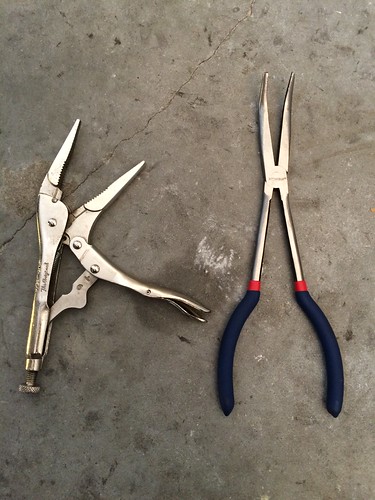
Tools:
Needle Nose locking pliers (I liked these because it gave me a chance to manuever around while the clamp was loosened)
Slanted Needle nose pliers (Necessary for the diverter towards the front of the car)
10MM socket
Flathead Screwdriver
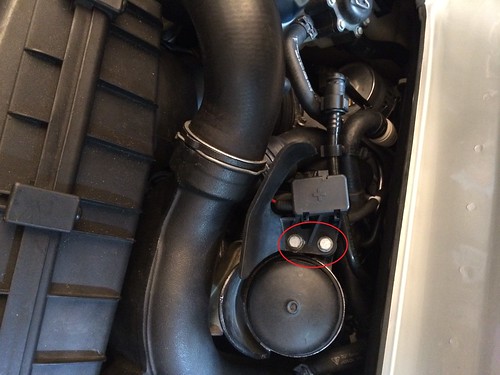
Step 1:
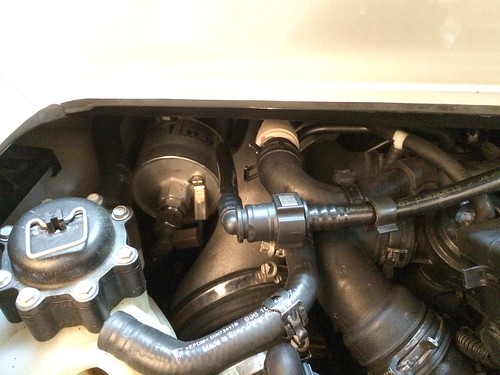
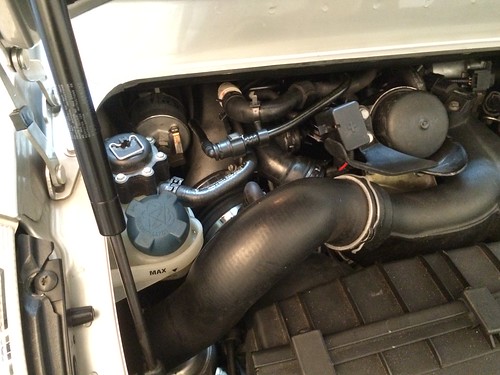
Remove the 2 10mm bolts holding the positive terminal to free up room to get at the diverter valves
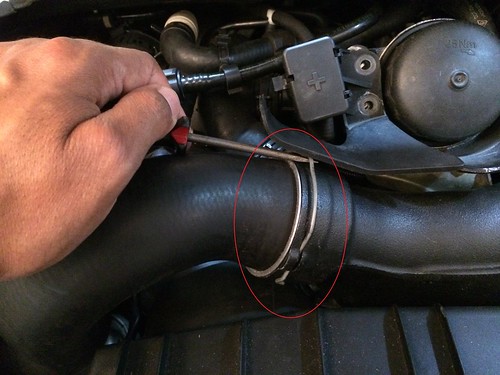
Step 2:
Remove the left intercooler hose by utilizing a flathead screwdriver to pry up the clip
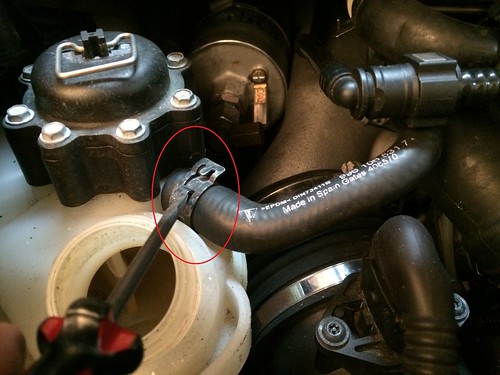
Step 3:
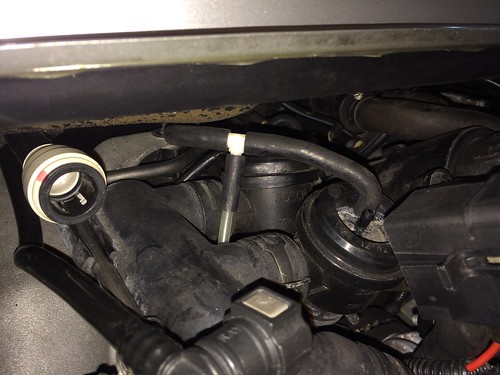
Remove the coolant cap and the coolant hose
Step 4:
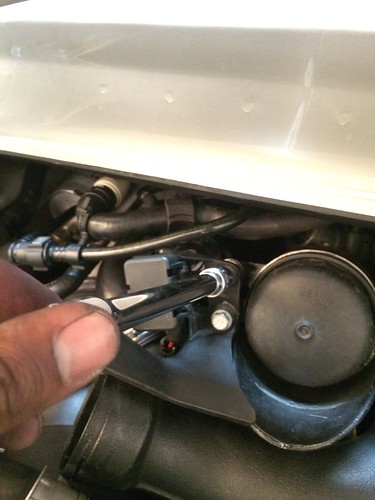
Unclip the vaccuum hose by pressing on the grey clip and pulling apart

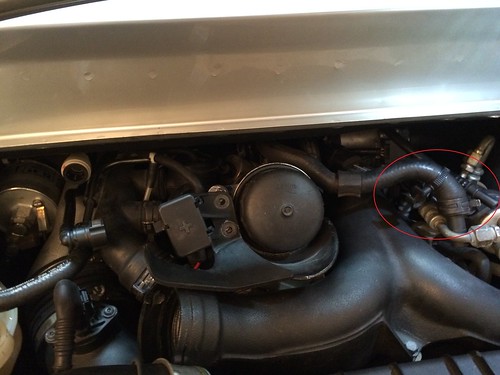
Step 5:
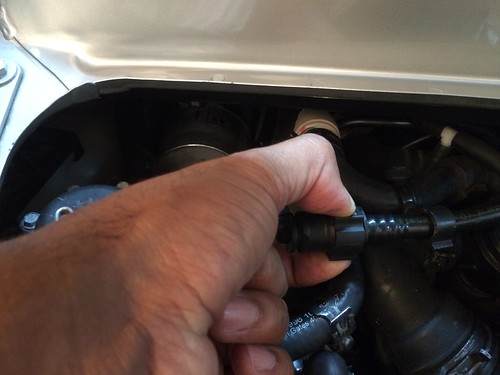
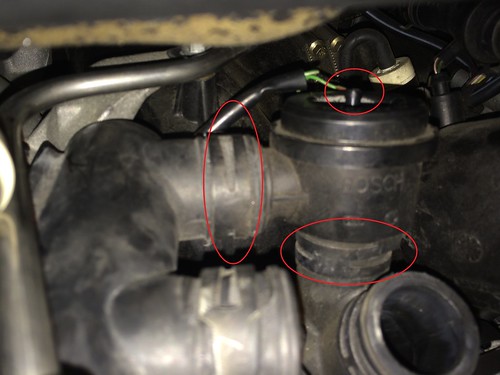
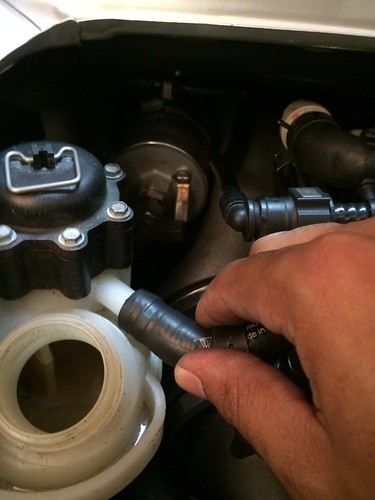
In front of the hose just removed will be a bigger hose connected to a plastic, white piece. Remove the grey C clip on the white plastic piece using a flat head screwdriver then pull back on the hose while using the screwdriver to keep the other end in position. Pull those hoses gently over to the right side of the engine bay.
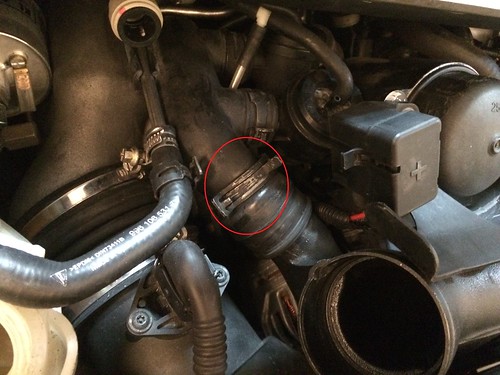
Step 6:
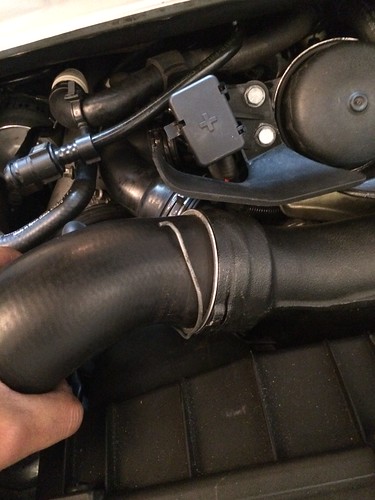
Unclip the big hose on the F pipe (I used the locking pliers here) and separate
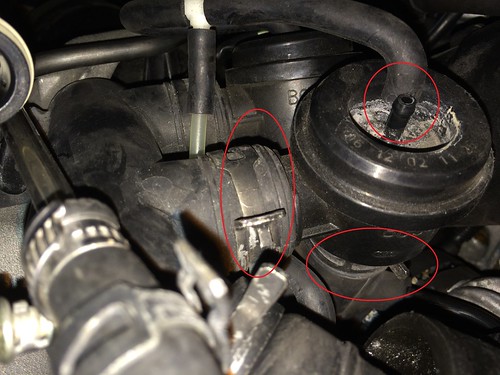
Step 7:
Remove the diverter valve closest to the rear by removing the top vaccuum line, and the 2 clamps
Step 8:
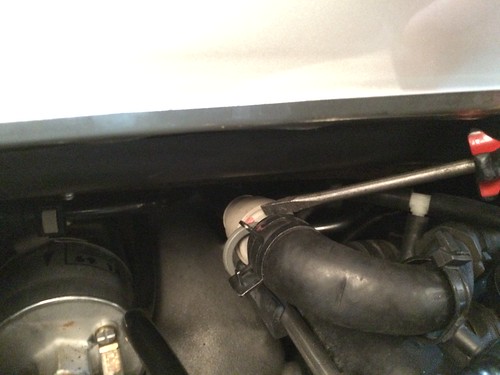
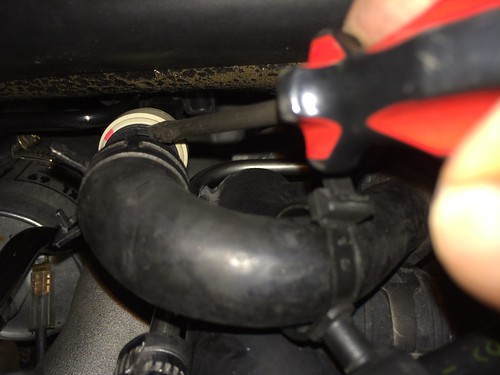
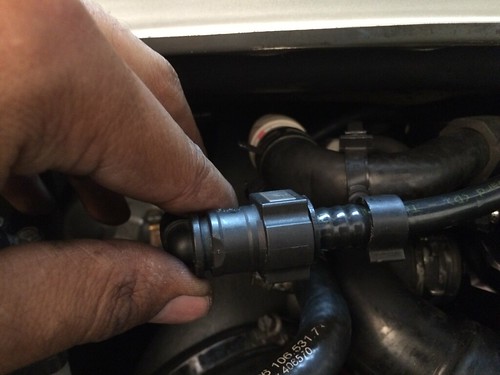
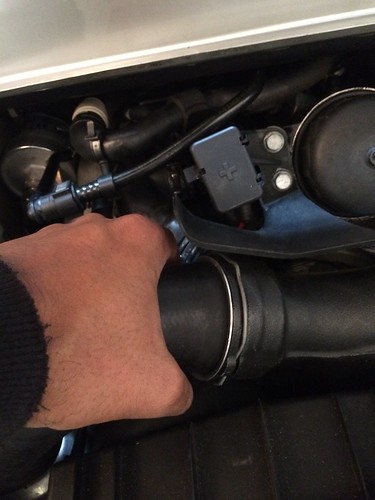
Removal of the diverter valve closest to the front of the car is hardest. The clip releases are facing the front of the car and here is where it gets tricky. Remove the bottom clip so you can pull the F pipe and diverter assembly out of the car. To do so I used the angled pliers with slight pressure on the diverter valve pulling it to the rear of the car gently. The goal here is not to remove the clamp at first but swing it to the rear of the car where you can get a better grip on the clamp. I included a picture of how I used the angled pliers to get the clamp towards the rear of the car
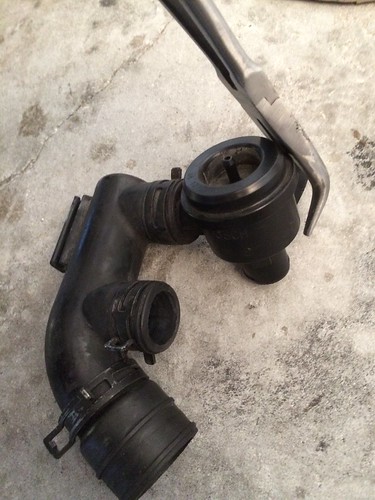
Step 9:
Replace with the new Forged diverter valves and follow backwards to install. Note the placement of the nipples on the new valves. The one closest to the front of the car will be in a 10 o'clock position and the one in the rear of the car will be in a 9 o'clock position. I zip tied the nipple vacuum hoses. Also, when placing the diverter valve in the front of the car you now have the opportunity to place the clamps in a better position to be reached. One final word of advice is to yank a little on the intercooler hose to make sure that clip is secure.
I have to say that I am very happy with the Forge Diverter Valves. I notice quicker response between shifts. Just overall better performance. I also am happy that they included stiffer springs for when I move towards turbo upgrades.
Some people stated having to drop the engine a little bit. I know that takes a little bit of time but I could have this job almost done in the time it would take me to place the car on jackstands and drop the engine. This job can easily be done using these steps. The key is having the right tools to get at the clamps.
Ping me if you have questions.
Hope this helps,
Tools:
Needle Nose locking pliers (I liked these because it gave me a chance to manuever around while the clamp was loosened)
Slanted Needle nose pliers (Necessary for the diverter towards the front of the car)
10MM socket
Flathead Screwdriver
Step 1:
Remove the 2 10mm bolts holding the positive terminal to free up room to get at the diverter valves
Step 2:
Remove the left intercooler hose by utilizing a flathead screwdriver to pry up the clip
Step 3:
Remove the coolant cap and the coolant hose
Step 4:
Unclip the vaccuum hose by pressing on the grey clip and pulling apart
Step 5:
In front of the hose just removed will be a bigger hose connected to a plastic, white piece. Remove the grey C clip on the white plastic piece using a flat head screwdriver then pull back on the hose while using the screwdriver to keep the other end in position. Pull those hoses gently over to the right side of the engine bay.
Step 6:
Unclip the big hose on the F pipe (I used the locking pliers here) and separate
Step 7:
Remove the diverter valve closest to the rear by removing the top vaccuum line, and the 2 clamps
Step 8:
Removal of the diverter valve closest to the front of the car is hardest. The clip releases are facing the front of the car and here is where it gets tricky. Remove the bottom clip so you can pull the F pipe and diverter assembly out of the car. To do so I used the angled pliers with slight pressure on the diverter valve pulling it to the rear of the car gently. The goal here is not to remove the clamp at first but swing it to the rear of the car where you can get a better grip on the clamp. I included a picture of how I used the angled pliers to get the clamp towards the rear of the car
Step 9:
Replace with the new Forged diverter valves and follow backwards to install. Note the placement of the nipples on the new valves. The one closest to the front of the car will be in a 10 o'clock position and the one in the rear of the car will be in a 9 o'clock position. I zip tied the nipple vacuum hoses. Also, when placing the diverter valve in the front of the car you now have the opportunity to place the clamps in a better position to be reached. One final word of advice is to yank a little on the intercooler hose to make sure that clip is secure.
I have to say that I am very happy with the Forge Diverter Valves. I notice quicker response between shifts. Just overall better performance. I also am happy that they included stiffer springs for when I move towards turbo upgrades.
Some people stated having to drop the engine a little bit. I know that takes a little bit of time but I could have this job almost done in the time it would take me to place the car on jackstands and drop the engine. This job can easily be done using these steps. The key is having the right tools to get at the clamps.
Ping me if you have questions.
Hope this helps,
Last edited by onenrg1; Oct 24, 2014 at 12:33 PM. Reason: Pics didn't come through
Registered User
Joined: Jan 2014
Posts: 16
From: Full throttle
Rep Power: 0
I did the job same as you did, it was not easy but I managed to do it !
I would recommand to check and secure the oil pressure transmitter electrical connections while doing this mod, you gain perfect access with both valves removed.
I would recommand to check and secure the oil pressure transmitter electrical connections while doing this mod, you gain perfect access with both valves removed.

Registered User

Joined: Jul 2004
Posts: 2,172
From: Alexandria, VA
Rep Power: 254
Graet write up! Make sure to soap water test for boost leaks. My forged diverters need to be tighted every few months due to leaking.
Trending Topics
Registered User
Joined: Jan 2014
Posts: 16
From: Full throttle
Rep Power: 0
When I removed my stock diverter valves, I checked the oil pressure transm. screws on the connections and they were not really tightened...
Last edited by GeeTee2; Oct 27, 2014 at 05:04 AM.
Registered User
Joined: Mar 2014
Posts: 58
From: Someplace else
Rep Power: 20
Am I the only one to think they are in the wrong direction?
I mean, with Forges DV, the boost pressure is supposed to pusch the piston against the spring's strength!!!
Why would different springs with different strengthes be available?
I mean, with Forges DV, the boost pressure is supposed to pusch the piston against the spring's strength!!!
Why would different springs with different strengthes be available?
Thread Starter
|
Registered User
Joined: May 2008
Posts: 156
From: Orlando
Rep Power: 33
When you run higher boost then you need a stiffer spring to avoid the valves from opening too soon. Most of us probably wouldn't need that spring change.
Registered User
Joined: Mar 2014
Posts: 58
From: Someplace else
Rep Power: 20
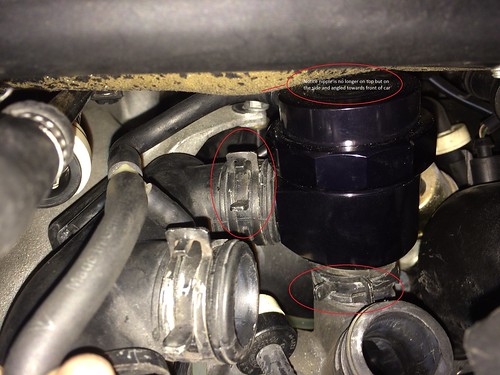
I speak about this:


So I placed the DV in the right direction.
I think that the risk with your instalation is that the spring close the piston too soon and before all the air is out. You lose the real advantage of the good product that is the DV Forge. ;-)


Thread Starter
|
Registered User
Joined: May 2008
Posts: 156
From: Orlando
Rep Power: 33
I run 1 bar. With a tune the green or yellow would be fine. You are probably right, I should have switched to the yellow since I know that once I change my intercoolers that I will run a bit more boost on race gas.
Valve Spring color coding
Green - 5-15 PSI
Yellow - 15-23 PSI
Blue - 23-30 PSI
Red - 30 + PSI
Valve Spring color coding
Green - 5-15 PSI
Yellow - 15-23 PSI
Blue - 23-30 PSI
Red - 30 + PSI
Registered User
Joined: Mar 2014
Posts: 58
From: Someplace else
Rep Power: 20
Yes the green spring is just enough for 1b. But there is no reason that your piston open itself too soon the way you put your DV.
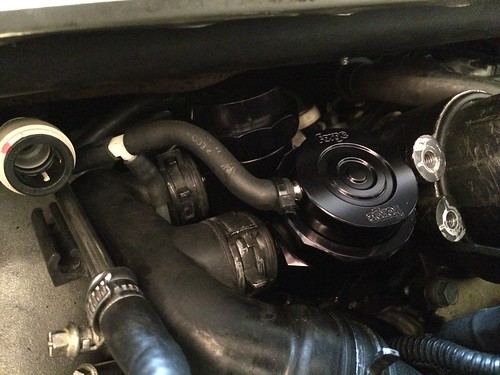
Putting my DV the way forge does, and runing more than 1.2b, the guy from Forge proposed to me:
"I think that for the boost pressure you are running, you would need to run our yellow springs if you have access to them."
So that's what I did , with the hold.
The original green spring created a leak in my system.
Putting my DV the way forge does, and runing more than 1.2b, the guy from Forge proposed to me:
"I think that for the boost pressure you are running, you would need to run our yellow springs if you have access to them."
So that's what I did
, with the hold.The original green spring created a leak in my system.
Thread Starter
|
Registered User
Joined: May 2008
Posts: 156
From: Orlando
Rep Power: 33
Yes the green spring is just enough for 1b. But there is no reason that your piston open itself too soon the way you put your DV.
Putting my DV the way forge does, and runing more than 1.2b, the guy from Forge proposed to me:
"I think that for the boost pressure you are running, you would need to run our yellow springs if you have access to them."
So that's what I did, with the hold.
The original green spring created a leak in my system.
Putting my DV the way forge does, and runing more than 1.2b, the guy from Forge proposed to me:
"I think that for the boost pressure you are running, you would need to run our yellow springs if you have access to them."
So that's what I did
, with the hold.The original green spring created a leak in my system.