

Any Interest on a 997.1TT GT2 Slave Conversion DIY???


Thread Starter
|
Registered User
Joined: Oct 2011
Posts: 157
From: Wherever the military says...
Rep Power: 35


Any Interest on a 997.1TT GT2 Slave Conversion DIY???
I am in the initial throws of my DIY GT2 Slave Conversion and have taken a few pics. I have already removed the hydraulic pump (Power Steering Pump) and the drive coupler that pushes Pentosin to the slave. I am going to start with removing the slave and then master, spring assist and so on, but wasn't sure if anyone was interested in this DIY since the time to stop and take pics is somewhat consuming. Although, I am not affiliated, I will definately provide credit to those that made the kit and helped out with instruction. The kit is much less than what most have seen and the directions provided are very straight forward. I have seen this for multiple 996s but never anything for the 997. This would also include how to remove the serpentine belt and PS Pump and AC Compressor.

Registered User
Joined: Sep 2010
Posts: 68
From: TN
Rep Power: 19
I have been searching for a DIY install for this kit and would certainly appreciate any pictures and information you can provide plus a followup on how it performs in comparison to the OEM. Such as clutch depression pressure without assist, engagement, etc. Also, do you have a stock clutch?
Registered User
Joined: Feb 2004
Posts: 1,484
Rep Power: 93
I can tell you that I am very interested as this is the next item on my list and have not been able to have a shop explain to me how they are going to go about it. zippsub9, whereabouts are you nowadays?
As an aside, if anyone in the Northern NJ area has done this conversion (let's say within 100 miles of NYC) and are willing to let me try the feel of the clutch, I would definitely appreciate it and will make it worth your while. Please PM me.
Thank you.
Bob
As an aside, if anyone in the Northern NJ area has done this conversion (let's say within 100 miles of NYC) and are willing to let me try the feel of the clutch, I would definitely appreciate it and will make it worth your while. Please PM me.
Thank you.
Bob
Thread Starter
|
Registered User
Joined: Oct 2011
Posts: 157
From: Wherever the military says...
Rep Power: 35
Okay, that's all I need to hear. I have been utilizing an old set of directions for the 996 and been able to overcome minor changes along the way. There are definitely some tips that I would do differently. I will take note and share with all as well as the kit.
I have a burned out stock clutch and committed to this "since I was in there." I am completely stock right now with the exception of a FABSPEED intake. I have an OEM RS Lightweight flywheel going in with a sprung matching clutch disc from Sachs. I picked up a "999" 764 Pressure Plate or the Sachs Sport/Race Pressure Plate as well with the associated RS Throw Out bearing and Guide Sleeve. BTW, I will post this DIY as what anyone can do without a lift or dropping the engine/tranny. I am not going to bite the bullet on changing the clutch without using a lift. This will wait until later.
I plan on coninuing down this destructive path once I get the drivetrain straight, then suspension, then flash and GOD willing an EP1 or 2 someday. I will be more than happy to provide thoughts on variations in feel and performance, but this is very personal and I don't maintain the mental capacity to datalog or provide hard measured differences in engagement points or trap times on a 1/4 mile strip.
I am currenlty in Savannah, GA and more than willing to meet up or have anyone stop by to test out the setup if interested and I would also be willing to help out with any advice. I am heading back overseas at the end of July and will be radio silent for a while until I can get back up on the internet in theater.
More to follow...
Trending Topics
Thread Starter
|
Registered User
Joined: Oct 2011
Posts: 157
From: Wherever the military says...
Rep Power: 35
Gentlemen,
I just drove the conversion last night after completion of the R&D with Moto on this site and the DIY for the GT2 Slave Conversion. Bob, is converting the file to PDF and posting probably later today. Let me know if there is something unclear, needs better pics, or explanation as it becomes difficult to assume what the reader understands. Hope this helps and Martin is feverishly finalizing production run to ensure a complete bolt on kit for the 997.1 TT without mods or dropping the transmission. BTW, I am not affiliated and paid full price for the kit so I am not bad mouthing others out there. I just know first hand this will work and it is validated now.
I just drove the conversion last night after completion of the R&D with Moto on this site and the DIY for the GT2 Slave Conversion. Bob, is converting the file to PDF and posting probably later today. Let me know if there is something unclear, needs better pics, or explanation as it becomes difficult to assume what the reader understands. Hope this helps and Martin is feverishly finalizing production run to ensure a complete bolt on kit for the 997.1 TT without mods or dropping the transmission. BTW, I am not affiliated and paid full price for the kit so I am not bad mouthing others out there. I just know first hand this will work and it is validated now.
Registered User
Joined: Jan 2007
Posts: 10,774
From: OR Room 5
Rep Power: 1007
DIY 997.1 TT to GT2 slave conversion
Member zippsub9 created this incredibly detailed DIY for a GT2 slave conversion. Please give him + rep points for all his hard work for this exceptional write up!
997.1 TT to GT2 Slave Conversion
**SOME OF THESE PHOTOS WERE TAKEN FROM ANOTHER VEHICLE BUT SHOW THE PERTINENT INSTRUCTION. IF THESE PICTURES ARE YOURS AND I AM IN VIOLATION OF SOME COPYRIGHT LAW THEN LET ME KNOW SO THAT I CAN REMOVE THEM**
THE KIT: I purchased my kit from Motowheels.com (full price of the original 996TT kit, so no affiliation). I cannot speak for the other kits currently being advertised, but if they are as pictured then they will NOT bolt on and require modification to either the bracket or the top of the transmission (not a big deal if you drop it). However, I wanted to do this so the average Porsche owner (haha) could do the DIY in their garage without a lift or special tools. The other kits may bolt on without issue and perhaps they are not picturing the actual items so as to protect their hard work in R&D so I am not trying to talk bad about them. I spoke with many individuals prior to committing to this and many stated their kits would work, but I can only assure you that the kit from Motowheels.com or Martin on 6speedonline is validated and blue collar TT owner approved to bolt on without modification. We spent about two weeks working through the kinks and differences between the 996TT and the 997.1TT variations. I have not yet seen or crawled underneath a 997.2TT so I have no idea, but would be glad to talk through anything with you. The guys at Motowheels.com have been extremely helpful and were outstanding to work with; I would not hesitate to recommend them to anyone.
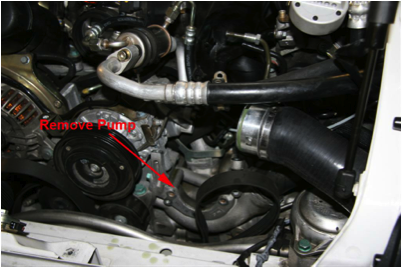
I. Hydraulic Pump Removal
997.1 TT to GT2 Slave Conversion
**SOME OF THESE PHOTOS WERE TAKEN FROM ANOTHER VEHICLE BUT SHOW THE PERTINENT INSTRUCTION. IF THESE PICTURES ARE YOURS AND I AM IN VIOLATION OF SOME COPYRIGHT LAW THEN LET ME KNOW SO THAT I CAN REMOVE THEM**
THE KIT: I purchased my kit from Motowheels.com (full price of the original 996TT kit, so no affiliation). I cannot speak for the other kits currently being advertised, but if they are as pictured then they will NOT bolt on and require modification to either the bracket or the top of the transmission (not a big deal if you drop it). However, I wanted to do this so the average Porsche owner (haha) could do the DIY in their garage without a lift or special tools. The other kits may bolt on without issue and perhaps they are not picturing the actual items so as to protect their hard work in R&D so I am not trying to talk bad about them. I spoke with many individuals prior to committing to this and many stated their kits would work, but I can only assure you that the kit from Motowheels.com or Martin on 6speedonline is validated and blue collar TT owner approved to bolt on without modification. We spent about two weeks working through the kinks and differences between the 996TT and the 997.1TT variations. I have not yet seen or crawled underneath a 997.2TT so I have no idea, but would be glad to talk through anything with you. The guys at Motowheels.com have been extremely helpful and were outstanding to work with; I would not hesitate to recommend them to anyone.
I. Hydraulic Pump Removal
- The car can remain off stands for this portion and you should not have to be under the car. This task also leads to a gateway of other DIYs.
- Remove air intake system to include airbox, y-pipe and throttle body. (I don’t have any pics for this portion, but if you are unsure then perhaps this is not the best DIY project to start into.) I know you are probably wondering why to remove all of the kit I am listing, but this was my technique/way. There are other and probably better ways, but I spent a lot of time trying to “cut” corners and I either did not have the tools to shorten the job or the mental capacity.
- Remove the passenger side intake pipe (with MAF sensor) to allow for additional room in and around the hydraulic pump. (Also a great time to install those sweet RSS Tarmac Performance Engine Mounts if you have them.)
- Loosen the three pulley bolts on the hydraulic pump pulley (power steering pump) before you remove the belt since the tension will allow you to break the bolts loose. This calls for a Torx socket which I bought from the local NAPA store. You could probably get away with twelve or six points sockets, but I avoided taking as much risk as possible.
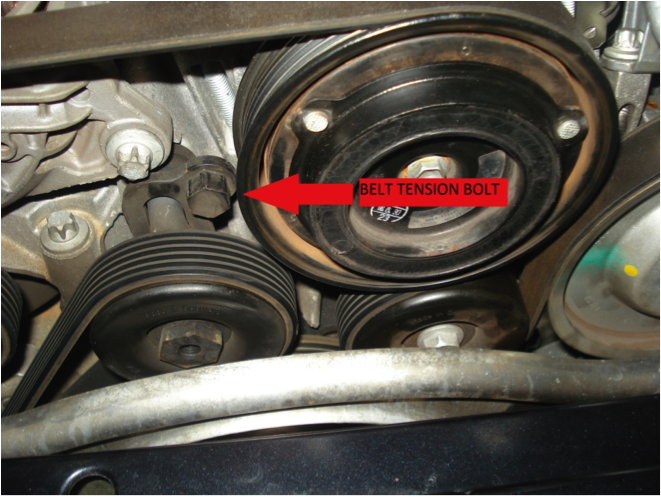
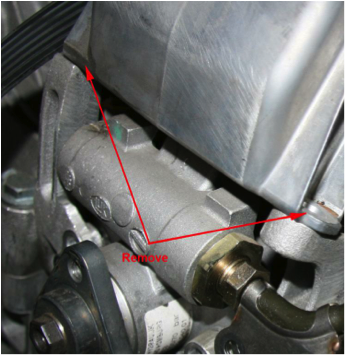
- Remove the serpentine belt by applying clockwise tension on the bolt in the picture (15mm I believe). Bottom line: This is a sweet design and as you apply tension on the bolt it flexes the tension wheel about 1/2 inch to allow for just enough slack to slide belt off the other wheels. You just release the pressure and the tension goes right back into place. What better way to ensure proper tension and ease of changing the belt. Now, don’t go tearing the belt off since I took pics so that if it fell off some of the other pulleys then I would have the routing correct when it goes back. (Easy Serpentine DIY in the future when you see wear, plus a generic belt goes for about $15 at O’reilly Auto Parts) You actually have to get down underneath to work the belt around the all the pulleys, but none of that is necessary for this project, just get it off of the hydraulic pump pulley and push it down out of the way.
- Remove the three bolts and remove the hydraulic pulley
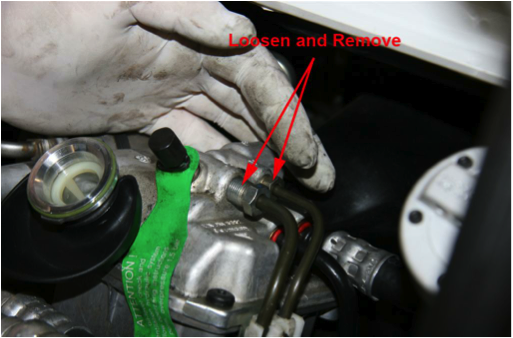
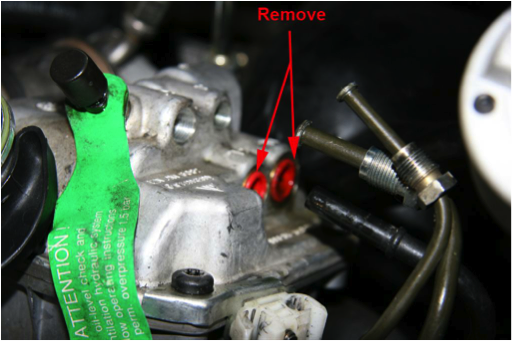
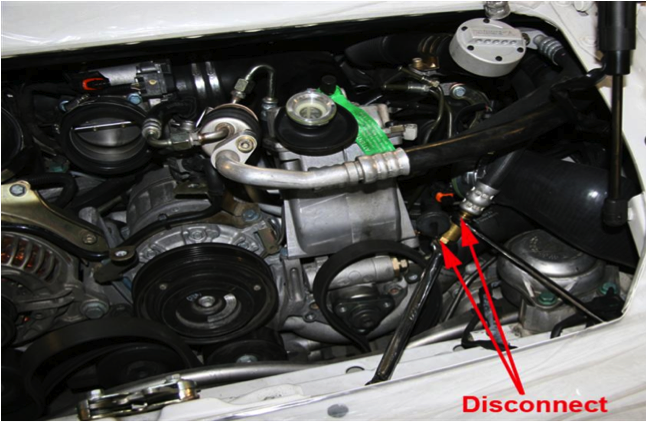
- Now for the messy part. I could not figure out how to remove the filter screen from the hydraulic pump reservoir and was therefore unable to siphon out as much fluid as possible. The Pentosin is apparently quite corrosive for rubber products and probably removes paint similar to Brake Fluid. I used Ziploc bags to catch as much fluid as possible and stuffed rags below that to catch anything residual. I had about a half a cup total fall down onto the engine block total which I figured wasn’t too bad. So, without further adieu, loosen and remove the four lines feeding the hydraulic pump on the top passenger side. The top two produced the most fluid so it gets better. I used a fuel disconnect tool ($10 piece of plastic for O’reilly Auto Parts) to remove the rear most bottom line. The forward line will not work with the fuel line removal tool and I used a door panel removal tool/spanner/fork tool to hold the red plastic piece into the pump while I pulled on the line. I’m sure there is a Porsche specialty tool, but I never entertained attempting to buy one. All you need is a way to push the red ring in will you pull the line. It isn’t that sexy and I even used a set of right angle pliers opened up around the line to push in the ring. You will probably need to remove the plastic line bracket held onto the top of the pump on the rear most passenger side corner into to get the lines out of the way.
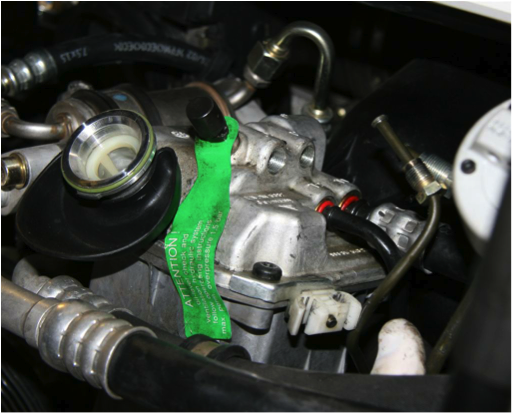
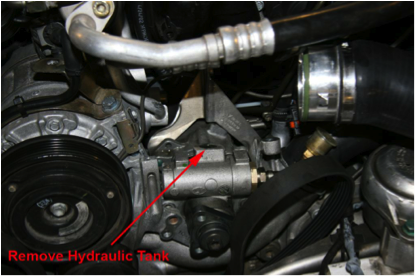
- Now to the driver side of the pump, remove the three bolts holding the A/C compressor down. (Consider yourself lucky for once if you don’t have A/C because this makes the job much easier) The biggest PITA was getting around the A/C lines and compressor. Remove the bracket securing the compressor line on the side of the pump and also remove the probe (I assume thermal) facing the rear of the vehicle in the picture. The probe simply pulls out by hand and is held in place via a rubber grommet. You will need to remove the metal bracket that keeps it in place as well.
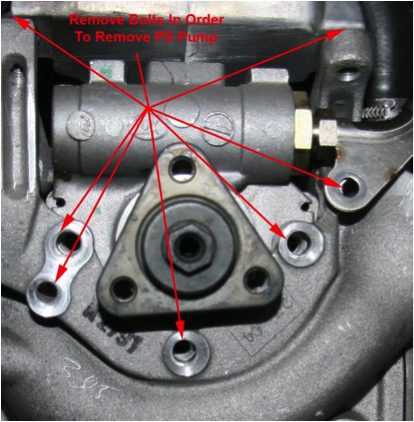
- Now you are ready to remove the seven bolts holding the pump and reservoir in place. BE CAREFUL not to get in a hurry since dropping any of these bolts will result in an exponential increase on the A$$ pain meter. Some are different sizes so don’t just dump them in a big pile. The top two are the most difficult to access.
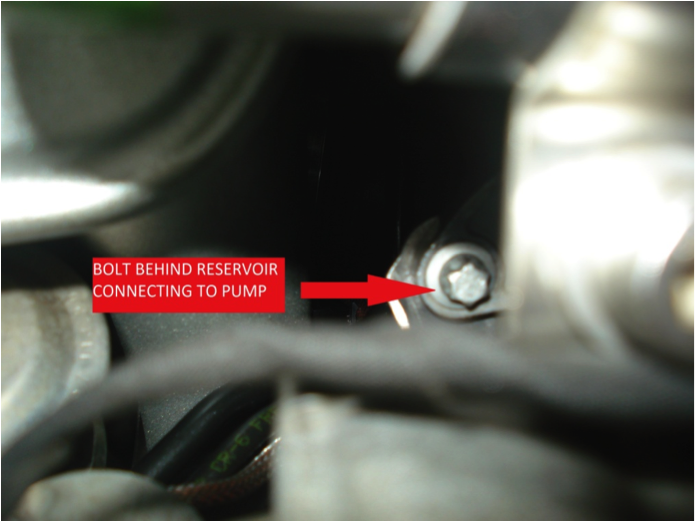
- DON’T start yanking on the reservoir just yet. You must disconnect one final line and there is yet one more bolt. The line on the passenger side at the base of the pump where it meets the reservoir must be removed. Remove the plastic grey clip and then utilize a (15mm I believe) to separate the fitting. This connection is tight and difficult to take apart, but it will separate. You must apply counter torque and get the best leverage possible. This is not a quick disconnect line. There will be fluid so be prepared with rags and bags, hopefully no blood.
- The final bolt before you begin the gentle massage of removing the pump is located on the back of the pump (this is the portion closest to the front of the car). The only way I could reach it was using a � drive with extension and a 10mm socket going from driver to passenger side over top of the A/C Compressor. The bolt is threaded into the bracket adjoining the pump and reservoir so there is no nut to catch, but don’t drop the bolt.
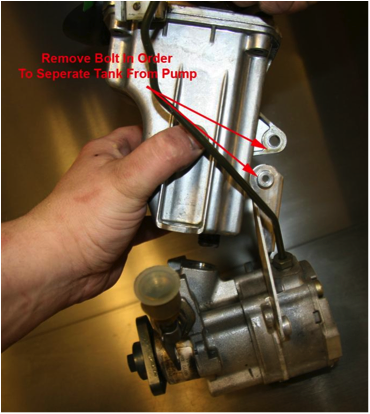
- Removing the pump is insane and takes a little while trying to maneuver it around the A/C lines that run between it and rear of the car. I accomplished this first by lifting the A/C compressor lines and wobbling (technical term) the A/C Compressor up just slightly (1/2 inch maybe). This should allow you enough room to get the reservoir out (it is the one on top with the cap and green label). The pump is held onto the reservoir only by an O-ring at this point I gently pried with a screwdriver to break the seal and deal with the pump only. You won’t be able to remove the two combined. Of course, there will be some fluid split once you separate these two as well. One of the top two fluid lines removed from the pump earlier is connected to the reservoir so be gentle and don’t lose track in the midst of your rage. I also separated the oil fill pipe from its bracket and pushed it out of the way. I found it easiest for the pump to come out lifting the rear most portion first over its mounting position and then tilted back end high towards the rear of the car and out (mind the hard line still attached). The further up you get the compressor lines out of the way the easier this will be. Also, mind the bracket that held on the reservoir and try not to deform it as much as possible. This bracket won’t line up correctly with multiple bolts you removed and once again cause a significant emotional event as you must remove it all over again (ask me how I know).
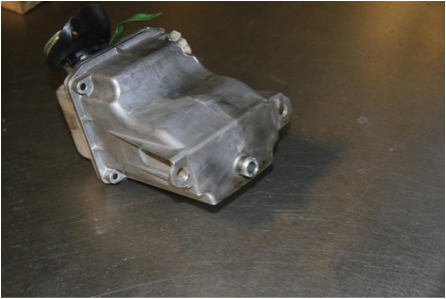
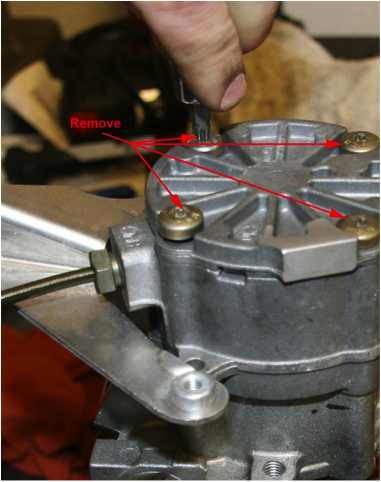
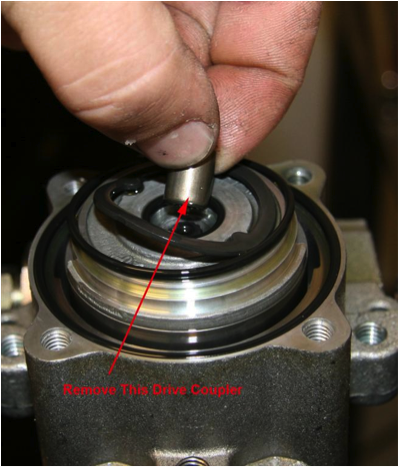
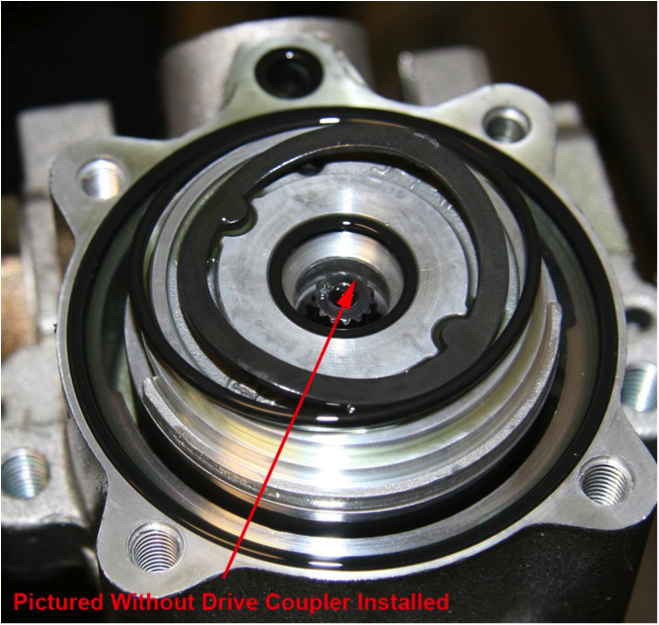
- Now that you have the heart out, remove the four (T-30) screws on the back of the pump. Finally, remove the drive coupler in the middle and put the pump back together. Now just reassemble everything back together (this was painful and perhaps the worst portion of the whole DIY). There is no easy way about this and may God have mercy on your soul.
Last edited by bbywu; Jun 19, 2012 at 02:44 PM.
Registered User
Joined: Jan 2007
Posts: 10,774
From: OR Room 5
Rep Power: 1007
II. Slave Cylinder

- Lift up the rear of the car as high as possible. I have seen and heard numerous variations of this just be careful. I used two by fours under the front tires and placed jack stands as high as I could get under the control arms (not sure if that is the right term).
- Remove two rows of panels underneath and the cross member.
- Remove the driver side half shaft (T-55) and push it out of the way (you will move it back and forth, but I never had to completely remove it away from the wheel only slide around from front and rear and just let it rest on the sub-frame underneath. Just because I didn’t think about this before, your parking brake is your friend here. Put the car in neutral and release the parking brake to roll the driver side rear wheel. This will allow much easier access to all of the halfshaft bolts. You will need to reengage the parking brake before you start to torque anything though.
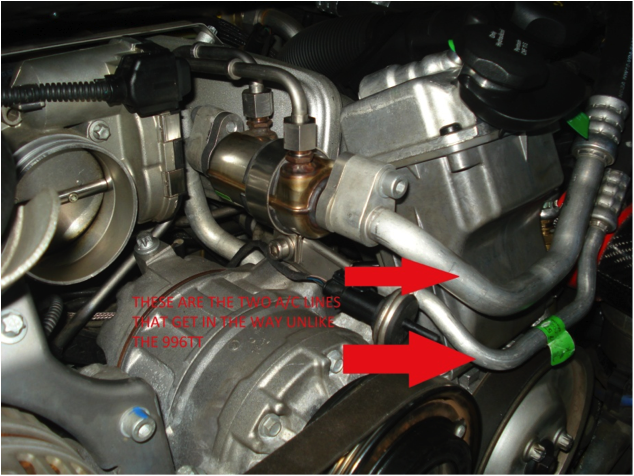
- Remove the two water lines that cross underneath and go up the driver side of the transmission. On the 996TT you apparently can just move these out of the way, but I couldn’t make this happen and was ready to gnaw my way through them after many painful hours. (Just in case you get carried away, there will fluid here so I used a brand new oil catch pan and just trapped all of the fluid for recycling back into the system once complete). There are three bolts that hold the lines to the transmission.
- At this point, I bled as much fluid from the slave as possible. Many have praised the use of a MOTIV Power Bleeder, but I was too inpatient and couldn’t find one locally. In hindsight it would have probably been the best way to go. I had to pull via crappy vacuum from the bleed valve instead of push compressed air from the FRONT reservoir located on the driver side of the battery under the plastic panel just next to the upper driver side shock mount. Remove the panel that surrounds the blue windshield washer fluid cap. Bottom line: You want to get the line as clean and dry as possible from all the Pentosin.
- Get back under the car; the hard green line coming from the front of the car located along the driver side rail comes from the master cylinder and front reservoir. Disconnect this line by removing the plastic grey piece again and then two 15mm wrenches to counter torque and disconnect. There should not be much fluid at this point, but there will be residue throughout.
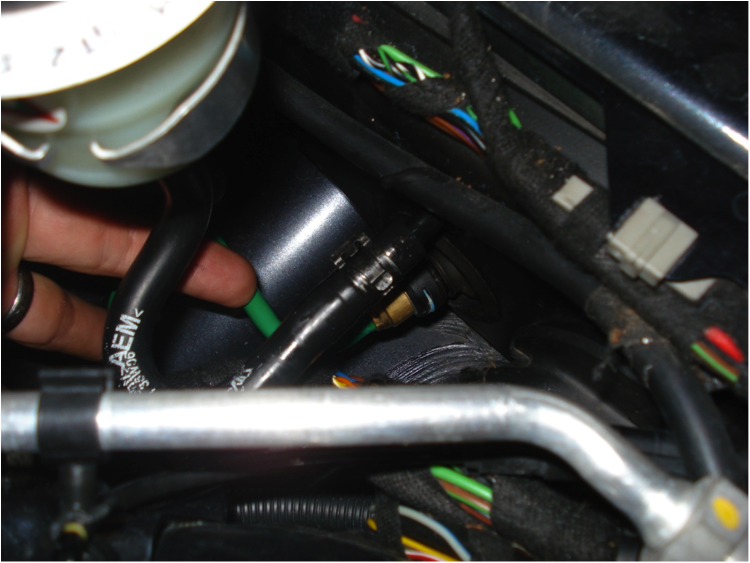
- Remove the accumulator. I used a filter strap style wrench I picked up at Northern Tool Supply. You can cut a 22mm wrench in half, but I didn’t have one and the belt was easy to work around it. Have your Ziploc bag ready for this one as well and be prepared for decent workout since it is fairly snug on there.
- Remove the bracket that supports the ear where the accumulator plugged into.
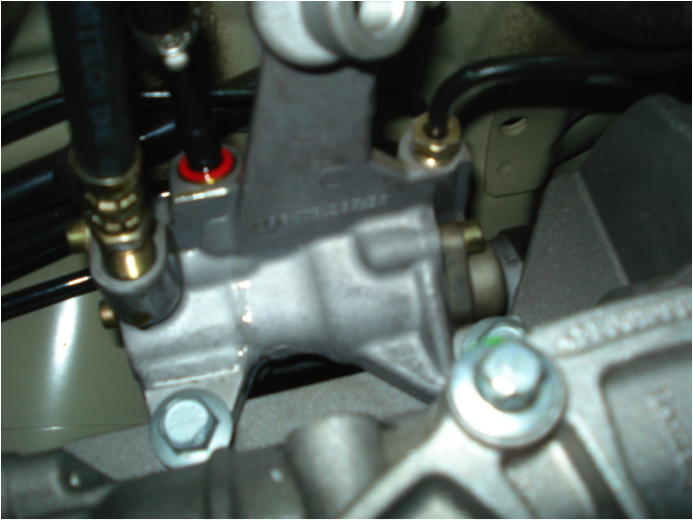
- Remove the three hydraulic lines feeding the OEM slave. One is the feed line from the front master cylinder located closest to the front of the car on the slave (not too difficult but you will need to remove the brass collar on the end of this line, more later on), the second is a return line to the rear reservoir in the middle of the other two on top almost of the OEM slave (once again your fuel line removal plastic tool works well here), and lastly the hard input line from the rear of the vehicle connects to the OEM slave at the rear most portion (this line was the worst and I recommend you leave the slave somewhat mounted on the transmission while removing this line because of the awkward angles. It is a 13mm brass nipple and just takes some maneuvering since the ear that the accumulator mounts onto gets in the way.)
- Remove the OEM Hydraulic slave from the top of the transmission. There are two 15mm bolts that enter from driver side and you should be able to feel them. Don’t worry about losing the actuator rod, it will not fall out. Once out, remove the actuator rod from the rubber sleeve and retain for use with your GT2 Slave.
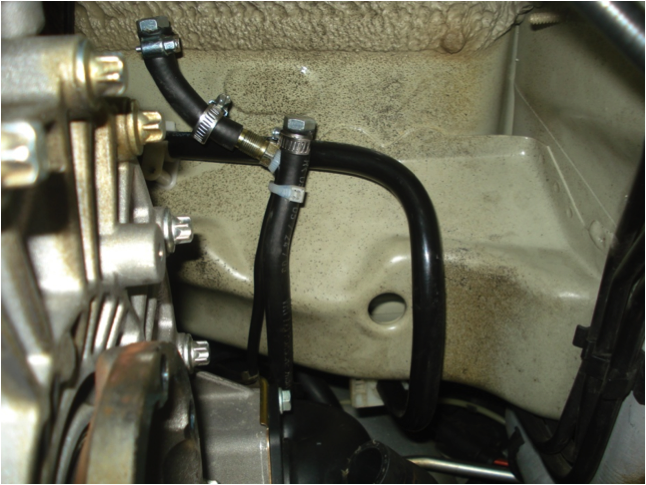
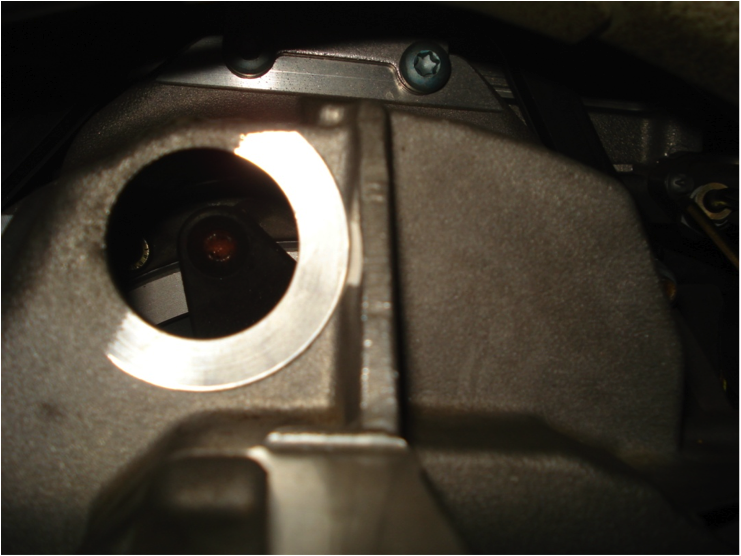
- Now you need to kill the feed lines that come from the rear of the car. They are dead since you removed the drive coupler from the hydraulic pump and will only hold residual fluid. I first cut off the fuel line style quick connect plastic piece from the soft line and then cut off another 2” from this line for later use. I plugged the soft line with a 3/8” bolt and a hose clamp. I took the excess 2” line that I cut and slid it over the hard line coming from the rear. I secured it with a hose clamp and plugged the other end with another 3/8” bolt and hose clamp. Don’t worry about the brass fitting on the hard line, just push it back and secure the hose over the flared tip. You have now isolated the slave completely. Any bolt will do from the picture below augmented with a hose clamp and zip tie to keep out of the way. Below should be your view with your feet under the engine looking up under the back seat on the driver side of the transmission.
Last edited by bbywu; Jun 19, 2012 at 02:45 PM.
Registered User
Joined: Jan 2007
Posts: 10,774
From: OR Room 5
Rep Power: 1007
III. Master Cylinder and Spring Assist
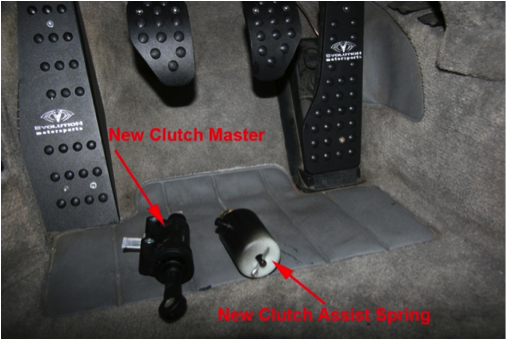
- Warm up with some Yoga first since this is a little painful. I pushed the driver seat all the way back and removed the floor mat. I laid down a towel to prevent scratching anything with tools and catch any residual fluid.
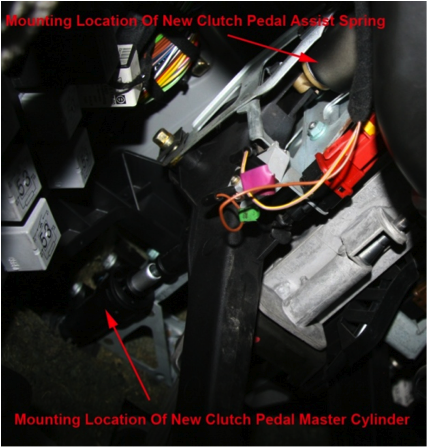
- Remove the C-Clip retaining pin behind the clutch pedal and the pin attaching the master cylinder to the pedal. Nothing sexy just a screwdriver will do and then remove the two 10mm bolts that go from driver to passenger side from the top of the master cylinder just as it comes through the firewall. You won’t see them so use the force or your hands.
- I only unplugged the light initially down here as it blinds you and becomes extremely irritating. You will also need to twist the clutch pedal sensing switch 90 degrees to remove it from the bracket. I initially removed the bracket and it was a royal pain in the rear so I wouldn’t recommend it as I don’t believe it was necessary.
- The clutch spring assist is attached to the front arm of the clutch pedal and is held in place by friction only. DO NOT USE THE SAME PROCEDURE AS THE MASTER CYLINDER. The spring assist C-Clip retainer and pin stay attached since it will snap out of the mounting position on the pedal. This hosed me big time and I didn’t figure this out after a while. Once it is off, there is some magic maneuvering involved to get it out but that is the only connection.
- Go under the front hood/bonnet and remove the plastic surrounding the blue windshield wiper fluid reservoir. This is on the driver side from the battery compartment. The green capped reservoir and infamous green line will be right underneath it.
- Remove the reservoir and bracket. Remove the blue retaining clip on the master cylinder from the green line. I worked the green line off from this point as well. The rubber seal in the firewall can be a huge pain so it would behoove you to try and leave it in place in lieu of removing it with the master cylinder. Just push the master cylinder through it at this point. The top line that the reservoir was attached to will push through as well, so go ahead and get back under the dash and pull it out.
- I dry fitted the GT2 master cylinder to the green line up front prior to crawling under the dash and pushing it through to make sure everything was good to go. I recommend only putting in one bolt on the master cylinder and then go under the bonnet to attach the lines and replace the reservoir. I replaced the green cap with the black DOT 4 cap at this time and flipped the plastic ring over wrote “DOT 4 ONLY GT2 SLAVE” around the ring in three places so if Porsche does maintenance then there will more than just the cap to prevent someone adding Pentosin to the mix.
- The GT2 clutch spring assist has a cotter pin on it to preload everything. DO NOT REMOVE AT THIS POINT. Do yourself a favor and pull until almost removed to make it easier later. I would also recommend perhaps some lacing wire threaded through to pull on an increased opening to make it easier to remove the pin once mounted. Make sure when you install that the cotter pin will pull downward since it will be quite difficult to get access above it. The spring goes in fairly easily and just snaps into place. At this point I remove the cotter pin with pliers or you could just yank the lacing wire and string.
- DO NOT PUT any fluid into the reservoir yet.
Last edited by bbywu; Jun 19, 2012 at 02:46 PM.
Registered User
Joined: Jan 2007
Posts: 10,774
From: OR Room 5
Rep Power: 1007
IV. GT2 Slave Mounting
- Tap the GT2 Slave with a M10x1.5 tap and then mount to the bracket.
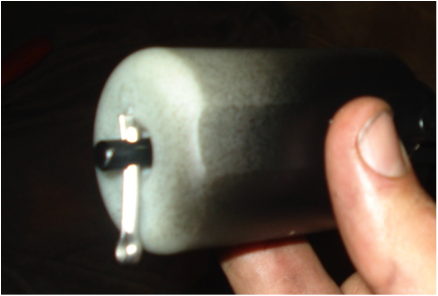
- Attach the GT2 Line that came with the kit after you attach the old OEM brass collar. To remove the collar from the old OEM line, you will need a pick to reach down inside and pull on the black spider collar holding the collar in place. Slide the collar down on the line as you do this to relieve pressure on the clip and pry out. The clip is split and will come off revealing the bare needle looking fitting on the hose that comes in the kit, just slide the collar on and place the spider clip inside to snap in place. Now attach the GT2 hose and a bleeder line to the GT2 Slave cylinder.
- Replace the GT2 actuator arm with your OEM Slave actuator arm. (it won’t fit as snug, but the pressure will keep it in place…more to follow)
- Lay on the ground with your head closest to the front of the car as if you were hugging the transmission. Your left hand can go around the starter and you shouldn’t have any clearance issue for the right. I first held the actuator arm with my left fingers like a cigarette up against the clutch fork so that I knew it was aligned properly (the red dot below is the cup that the rod sits in so there is no possibility of it sliding off, you will know when it is in the cup). I placed the bracket with slave mounted on top with my right hand and lined up the other end of the actuator arm in the rubber indention on the GT2 Slave. Once I felt the arm was pinched in between the slave and the clutch fork, I maintained pressure with my left as I fed in the mounting bolts with my right. This is probably the trickiest part and not to scare anyone, but you don’t want to drop the actuator arm down into the bell housing. Your forearms are going to be more smoked than the first time you were introduced to a Playboy so prepare well for this move. There is a significant amount of tension on the arm from the fork and the slave so thread the bolts as best you can and then you will need a ratchet (8mm allen) to completely seat them in the bracket. I fought with an allen key for awhile so as to make sure everything was lined up, but it will not go in all the way with the tension on the bracket.
- Connect the hydraulic line to the frame rail hard green line and add DOT 4 fluid to the front reservoir.
- Bleed accordingly and don’t forget to top off all of the other fluids (Pentonsin for the PS pump and the Coolant from the line removal) Also don’t forget to bleed the hydraulic pump as well (just fill and turn the wheel lock to lock multiple times after starting the engine to burp the system and then recheck fluid level). Note: On the coolant, if you kept what came out it won’t all fit back in until you reopen the thermostat, so get what you can in and then enjoy the drive before trying to fill it up completely.
- Now enjoy the appropriate adult beverage of choice, but only after your test drive.
Last edited by bbywu; Jun 19, 2012 at 02:47 PM.