

High Mileage '06 Carrera S Journal [Equinox]


Registered User
Joined: May 2012
Posts: 8
From: Fairfield, CT
Rep Power: 0

This thread is pretty inspiring. I've been a little reluctant to take a tool to any of my cars; Equinox's experience and the input from the rest of the members on the forum (not to mention the annoying repair shop diagnostic fees and wait times) have changed my mind.
Somebody fix the forum so Sir Equinox can post as many pictures as he needs!
Somebody fix the forum so Sir Equinox can post as many pictures as he needs!
Thread Starter
|
Registered User
Joined: Dec 2011
Posts: 123
From: Beaumont, TX
Rep Power: 28

lol erikig, thanks for the support.
To be honest, working on the car is my stress relief. I have a high stress job, and in half a year I move to an even busier version of it, so working with my hands and having a beer in the garage is my relaxation. Everything is just a part, and it goes somewhere. If it's broke, fix it, can you fix it? No? Replace it, goes on the opposite of how it came off. Lol. I used to be scared of working on my car, but paying people to screw my car up (dealerships) made me realize, I can screw my car up on my own, for free.
Worst Car DIY
Last edited by Equinox; May 20, 2012 at 12:42 AM.
Thread Starter
|
Registered User
Joined: Dec 2011
Posts: 123
From: Beaumont, TX
Rep Power: 28
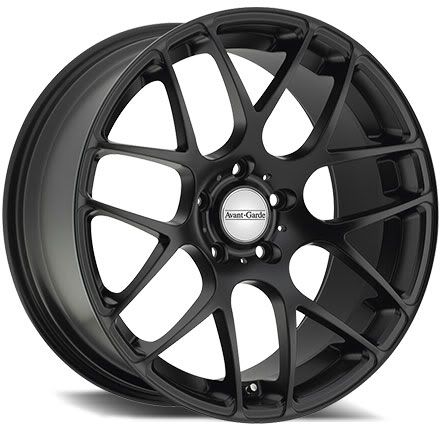
Need some new tires soon (~3000 miles imho) as the rears are older than the fronts; according to car fax, and my depth gauge. I took the opportunity to look at wheels, and decided to get HRE P40 Replicas that I'm sure everyone is familiar with, the Avant Garde Ruger Mesh wheels. Decided on matte black.
Real HRE's

Avant Garde Ruger Mesh (Replicas of the HREs)
Also went with Hankook VNS V12 evo K110 tires.
Basically because they are cheap, fit, I drive my car almost exclusively on the highway, and they aren't ****. Set of four hankook tires has an 80$ mail in rebate too. Cool.

Through my entire car modding career, I've always used one online tool to look up tire size information. It still helps to this day, despite it's web domain. Using their tool, I can report that the new rear tire (305/30) will still give me an accurate speedometer reading. I will have a .9% slow reading. When my speedo reads 60mph, I will actually be going 60.5mph due to the new tire being 82.3" circumference, compared to stock 81.6". Over the life of the car, I wonder if that will shave of a couple of miles on the Odometer, lol.
For those who don't know, a lot of times, tire shops will give you what you ask for, like "a wider tire, or lower profile side wall, or bigger wheels" but what they don't tell you is the new tire they match you up with doesn't have to be exactly the same outside circumference. They may give you something that is 5% bigger or smaller, making your speedometer inaccurate. Something like, you're going 65mph, and your speedo says 60mph. That's why I always check, since this tool tells you exactly how far off it may be: http://www.miata.net/garage/tirecalc.html
Chose the Ruger Mesh wheels because I love how the HRE P40B's look, but I DD my car, and my town of 120,000 people is mostly trucks throwing rocks at my windshield, and 5 inch tall side wall tire having camry's. They don't mind the potholes, but if I shoe'd the car in 1500 a wheel rims, I would legislate for their removal rather aggressively. I figure I can ruin 5 Ruger Mesh's before I have bought a single HRE. Why do Porsche owners buy replica wheels so much, you figure we'd all be the biggest HRE owners on the planet - hmm?
OEM Carrera S Wheels (Lobster Fork Wheels)
19" x 8" +57 front, 19" x 11" +67 rear
Avant Garde Ruger Mesh Wheels (Matte Black)
19" x 8.5" +45 front, and 19" x 11" +52 rear
Using 1010tires.com 's offset guide, you can see how the wheels will position differently under the car.
http://www.1010tires.com/WheelOffsetCalculator.asp
Front wheels will have 6mm more room from the rim to the inner struts, and stick out 18mm toward the outside of the car:
Front: +6mm inner clearance, +18mm Outer position
Basically, my wheels are going to stick out ~0.71" more in front(effectively an 18mm spacer as far as looks)
Rear: +15mm inner clearance, +15mm outer position
~0.6" farther out
I have a feeling I will need to lower this car soon because of how the wheels will look. Other report it isn't bad, we'll see.
making the fronts stock size, and and rears are 10mm wider than OEM. I know people ask what is the widest tire you can fit on the 11" wide rear tire, and the short answer is, 325.
Purchased the set of wheels, tires, valve stems, black lug nuts, porsche color crest center caps, mounted and balanced, and nitrogen filled from board sponsor GetYourWheels. He has a website, but if you go through the board, it would seem he may be able to give you a considerable(imho) discount.
Retail on the website is: $2,575 at time of post.
http://www.getyourwheels.com/

Real HRE's
Avant Garde Ruger Mesh (Replicas of the HREs)
Also went with Hankook VNS V12 evo K110 tires.
Basically because they are cheap, fit, I drive my car almost exclusively on the highway, and they aren't ****. Set of four hankook tires has an 80$ mail in rebate too. Cool.
- Size: 305/30ZR19
Sidewall Style: Blackwall
Serv. Desc: 102Y
Load Range: XL
UTQG: 280 AA A
- Size: 235/35ZR19
Sidewall Style: Blackwall
Serv. Desc: 91Y
Load Range: XL
UTQG: 280 AA A
Through my entire car modding career, I've always used one online tool to look up tire size information. It still helps to this day, despite it's web domain. Using their tool, I can report that the new rear tire (305/30) will still give me an accurate speedometer reading. I will have a .9% slow reading. When my speedo reads 60mph, I will actually be going 60.5mph due to the new tire being 82.3" circumference, compared to stock 81.6". Over the life of the car, I wonder if that will shave of a couple of miles on the Odometer, lol.
For those who don't know, a lot of times, tire shops will give you what you ask for, like "a wider tire, or lower profile side wall, or bigger wheels" but what they don't tell you is the new tire they match you up with doesn't have to be exactly the same outside circumference. They may give you something that is 5% bigger or smaller, making your speedometer inaccurate. Something like, you're going 65mph, and your speedo says 60mph. That's why I always check, since this tool tells you exactly how far off it may be: http://www.miata.net/garage/tirecalc.html
Chose the Ruger Mesh wheels because I love how the HRE P40B's look, but I DD my car, and my town of 120,000 people is mostly trucks throwing rocks at my windshield, and 5 inch tall side wall tire having camry's. They don't mind the potholes, but if I shoe'd the car in 1500 a wheel rims, I would legislate for their removal rather aggressively. I figure I can ruin 5 Ruger Mesh's before I have bought a single HRE. Why do Porsche owners buy replica wheels so much, you figure we'd all be the biggest HRE owners on the planet - hmm?
OEM Carrera S Wheels (Lobster Fork Wheels)
19" x 8" +57 front, 19" x 11" +67 rear
Avant Garde Ruger Mesh Wheels (Matte Black)
19" x 8.5" +45 front, and 19" x 11" +52 rear
Using 1010tires.com 's offset guide, you can see how the wheels will position differently under the car.
http://www.1010tires.com/WheelOffsetCalculator.asp
Front wheels will have 6mm more room from the rim to the inner struts, and stick out 18mm toward the outside of the car:
Front: +6mm inner clearance, +18mm Outer position
Basically, my wheels are going to stick out ~0.71" more in front(effectively an 18mm spacer as far as looks)
Rear: +15mm inner clearance, +15mm outer position
~0.6" farther out
I have a feeling I will need to lower this car soon because of how the wheels will look. Other report it isn't bad, we'll see.
making the fronts stock size, and and rears are 10mm wider than OEM. I know people ask what is the widest tire you can fit on the 11" wide rear tire, and the short answer is, 325.
Purchased the set of wheels, tires, valve stems, black lug nuts, porsche color crest center caps, mounted and balanced, and nitrogen filled from board sponsor GetYourWheels. He has a website, but if you go through the board, it would seem he may be able to give you a considerable(imho) discount.
Retail on the website is: $2,575 at time of post.
http://www.getyourwheels.com/
Last edited by Equinox; May 18, 2012 at 07:54 PM.
Thread Starter
|
Registered User
Joined: Dec 2011
Posts: 123
From: Beaumont, TX
Rep Power: 28
Playing with numbers, lol. I realized, using the tire size tool at miata.net, that my odometer ticks off a mile every 777 revolutions of the tire, but my new tire actual does a mile in 770 revs. With my ****ty math, I've figured out that every 110 miles, I've actually traveled 111 miles. This means if I put on 50,000 miles, I've actually gone 50,454.5 miles, "shaving" 454.5 miles off the odometer. Negligible in my opinion, but funny!
In other news, things that I've bought recently, and plan on installing as I get them all together.
Fabspeed (used) catalytic convertor bypass pipe ~ $185 [marketplace]
02 Spacers 90 degree ~$35 [ebay]
Lug nut key ~$45 [ebay, wasn't with the car when I bought it]
GT3 Shift **** and eBrake ~$650 [marketplace, alcantara]
Wheels and Tires ~$2400 [GetYourWheels]
Headlight Vinyl Surround ~$75 [kistudios.com]
A/C Control unit ~$550 [SunCoastparts.com, my ***** were all scratched]
Rear Caliper Spring Kit ~$26 [suncoastparts.com]
(2) Rear brake rotors ~$220 [DCAuto.com]
(2) Rear Brake Pads ~$110 [DCAuto.com]
(2) Front brake pads ~$120 [DCAuto.com]
the fabspeed cat pipe spent life first as a high flow cat pipe, but was chopped by the previous owner making it catless, hence the price and welds.
I think that's it..................
Last edited by Equinox; May 19, 2012 at 11:25 PM.
Thread Starter
|
Registered User
Joined: Dec 2011
Posts: 123
From: Beaumont, TX
Rep Power: 28
So I mentioned I would chronicle how I fixed the loose door handle. Well, I'm going to half *** it here, as I'm at work, and I have a moment. Basically my little silver door handle on the interior of the driver's door would not pull back tight to the car door, it would just hang about a quarter inch from the door. As I would describe it, "all limp dicked." I guess that comes from my Army vocabulary. Anyhow. What was happening is the spring behind the door panel that pulls the handle back in, had come off the plastic retainer attached to the handle. I found a pretty clever fix for this, EVEN IF THE RETENTION CLIP BROKE.
Looking at the pictures below, you can see there is a little assembly that holds the spring in, and puts tension on the door handle. This is on the back of the door panel, and is held on with three little torx bolts. If you've read previously in the thread, you should be able to take off the door panel to find yours, and might have even gained the courage (with a couple of beers, j/k) to take this little plastic piece off as well.
Now, the problem sometimes comes from the little plastic tab that holds the heavy duty spring, becomes weak and bends when you open the door - leading to the spring coming off intermittently. You don't want to take apart your door every 3 months to "bandaid" fix the thing, so the good as new fix is to take off the three screw bracket assembly itself, and you will notice it has an un-used spring retention clip on the bottom of it, but it's mirrored. Apparently Porsche made one part for both doors, and they just flip it around, depending on which side of the car it is going on. What this means is, you can take off your passenger side clip, and put it on the driver door, effectively using the part of the assembly that is still un used and brand new, because you flipped it around, and you can swap the driver side one to passenger side as well. Of course you know... this means you also have to take off the passenger door panel as well.
The hardest part of this entire install is possiblly man-handling the heavy duty *** spring that clips onto the assembly. I just used some good old elbow grease and some pliers to get it onto the new assembly. Have patience, and don't pinch your fingers. (That's why you're drinking a pint while doing this.)
I'm sorry I don't have any more pictures to help describe what is happening, but trust me, you'll see what I'm talking about when you get into the door panel. Feel free to post pics in this thread if you attempt it, and take some pictures for us!
Btw, on the pictures, one of the red arrows, if not two, are pointing to the bolts that are BEHIND what is seen. The white plastic pull cord piece actually attaches to our troublesome bracket, and is shown pulled off.
Last edited by Equinox; May 20, 2012 at 12:25 AM.
Thread Starter
|
Registered User
Joined: Dec 2011
Posts: 123
From: Beaumont, TX
Rep Power: 28
Question for my board friends:
Spoilers/Decklid - I see great looking spoilers on the backs of some of the board member's cars that are not OEM for their Carrera S. Am I to believe that most people shell out the $3,000 for a GT3 deck lid?
Searching, it seems that you either buy a GT3 deck lid, Techart (just as expensive), Misha GTM or GT2M (not a bad price, are these even good quality, do they bolt to you stock rear deck?). Is this the case?
Ultimately I'd be looking for a large fixed wing that would pass for OEM. Sport classic duck tail would be amazing, but the OEM one is 4500, and Porsche has scared everyone else from making it. Aero cup kit rear wing anyone? Suncoast won't list it separately due to aero dynamics. YOU MAY DIE.
Mashaw
Getty
Suncoast
Wicked
Misha
Precision Porsche
NR Auto
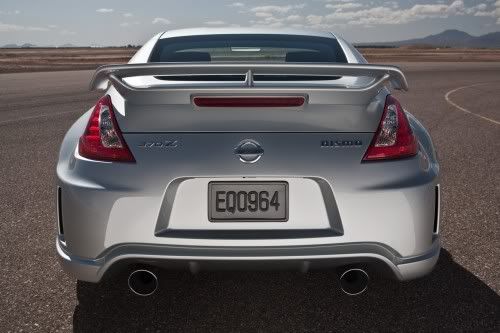
Here's my last car's OEM spoiler.
Spoilers/Decklid - I see great looking spoilers on the backs of some of the board member's cars that are not OEM for their Carrera S. Am I to believe that most people shell out the $3,000 for a GT3 deck lid?
Searching, it seems that you either buy a GT3 deck lid, Techart (just as expensive), Misha GTM or GT2M (not a bad price, are these even good quality, do they bolt to you stock rear deck?). Is this the case?
Ultimately I'd be looking for a large fixed wing that would pass for OEM. Sport classic duck tail would be amazing, but the OEM one is 4500, and Porsche has scared everyone else from making it. Aero cup kit rear wing anyone? Suncoast won't list it separately due to aero dynamics. YOU MAY DIE.
Mashaw
Getty
Suncoast
Wicked
Misha
Precision Porsche
NR Auto
Here's my last car's OEM spoiler.
Last edited by Equinox; May 20, 2012 at 01:27 AM.
Registered User
Joined: Aug 2007
Posts: 1,364
From: Hawaii
Rep Power: 116
Equinox,
For the Misha GT2M or GTM wings, they are direct replacements for the deck lid part only, and not the entire trunk like their GT3 deck lid wing replica. I currently have a Misha Ducktail variant, and I can vouchsafe the quality and fitment of their product. I don't think you will be disappointed by their work.
For the Misha GT2M or GTM wings, they are direct replacements for the deck lid part only, and not the entire trunk like their GT3 deck lid wing replica. I currently have a Misha Ducktail variant, and I can vouchsafe the quality and fitment of their product. I don't think you will be disappointed by their work.
Thread Starter
|
Registered User
Joined: Dec 2011
Posts: 123
From: Beaumont, TX
Rep Power: 28
Your album looks very nice, and I appreciate the input; the subtle duck tail looks great! I do love the duck tail variant, and I can't seem to like the GT2 based wings though- I do love the fact it only replaces the deck lid insert and not the whole tail gate. Hmm. Misha = good quality. Check. Lol

Registered User
Joined: May 2012
Posts: 4
From: Seal Beach
Rep Power: 0
997 broken driver side door handle (interior)
My door handle needs replacing, the local Porsche Dealer wants $410 to replace and install it. How much was the part and did you replace yourself?
Thread Starter
|
Registered User
Joined: Dec 2011
Posts: 123
From: Beaumont, TX
Rep Power: 28
Just the spring was off the little retention bracket behind the door panel. I didn't have to buy any parts. I just opened the door panel and put the spring back on the bracket assembly. The how to is in this thread if you go a back a little.
As far as 410... I'm not sure, they may be ordering the interior mechanisms as well, because just a replacement door handle costs
http://www.suncoastparts.com/product...y_Code=997silv 128$
or,
Do it yourself and convert to RS door pull straps for about $498
http://www.suncoastparts.com/product...ry_Code=997int
Last edited by Equinox; Sep 14, 2012 at 03:49 AM.
Thread Starter
|
Registered User
Joined: Dec 2011
Posts: 123
From: Beaumont, TX
Rep Power: 28
Replace A/C Unit Controls ( air condition control unit ) replacement
It would seem a pretty common problem, the A/C controls losing their paint and generally looking like shiet. Well I went ahead and bought a replacement from Suncoast. I tried DCAuto but all of theirs had the same problem - paint coming off, as they are all used. They offered to paint it at their body shop, but I figured I'd just buy new for a couple hundred more. (~550 @ Suncoast)
I have a seemingly unique problem, however. I don't live anywhere near a Porsche dealership, and when you put a new one of these units in, you have to have the dealership use their PIWIS to match the unit to the car. I guess you'll get a CEL or something? I'm not sure. Anyways, to avoid this, and a 2 hour trip to a dealership, I decided to go another route.
Basically, I ripped the whole face of controls off the new unit, as well as the display cooling fan, and put it onto the old one. Replacing all the painted and moving parts. Here is how I went about it.
NOTE: IF YOU LIVE NEAR A DEALERSHIP, YOU CAN JUST UNINSTALL THE OLD UNIT, PUT IN THE NEW ONE, AND HAVE THE DEALERSHIP MATCH THE PART TO THE CAR. I DO NOT LIVE NEAR A DEALER, SO I HAD TO SWAP PARTS FROM THE NEW UNIT INTO THE OLD ONE.
You need a T-30, T-20, and a T-6(for disassemble of control unit face).

Use your T-30 to unbolt the carpeted side panels on either side of your center console. The bolt heads are recessed into the carpet, but are not too hard to find. There is one on each side on the console.

Now, use your T-20 to remove two more bolts revealed, 2 on either side of the console just behind your upholstered side panels. Once all four bolts total have been removed, pull straight back towards the rear of the car on the upholstered pieces, and they will release from the console.

Don't forget to un clip your 12v charger plug from the carpeted panel from earlier. I just released by squeezing the clips on either side of the harness with your fingers.

Now, the A/C control module is held in on either sides with little metal clips. the picture shows my finger poking through the hole the clip once sat in. On either side of the console, you can press the clip in with a flat head screw driver, or something similar, and tug lightly on the a/c module to jam the clip in the unlocked position, move to the opposite side to release the entire assembly.

Remove the two wiring harnesses from the rear of the module using your thumb to press on each retention clip on the tops of each.

Side by side of my two units. Left old, right new. Notice the old has an "ECO" button, and new has "AC OFF"

Old one is V9.8, and has a different part number than the...

new one. V10. Unique part number.

Now, to swap faces, use your T-6 (here in the picture I'm using a T-7 to friction unscrew the bolts, because my T-6 broke on another project) to unscrew the four small screws on the back of the face of the unit, holding the face on.

With the four screws off, the face should pull apart with a light tug, revealing one of the circuit boards. un screw all the silver screws on the back of this to release the face.

Here, all the screws have been removed, the face will now come off.

Although it's easy to put back together, leave the face buttons down, so the display and rear rubber won't fall out. The display is glass, and can break if you drop it.

On the rear is a small round module containing a cooling fan for the A/C display. It is held on by two small T-6 screws, and then just pulls off.

Now all you have to do is split your old A/C unit, put the new face and fan on, and reinstall into the car. None of this is technically difficult, just takes some guts, and a tiny T-6. No soldering or electrical knowledge, just unscrewing, and screwing.

Cool
It would seem a pretty common problem, the A/C controls losing their paint and generally looking like shiet. Well I went ahead and bought a replacement from Suncoast. I tried DCAuto but all of theirs had the same problem - paint coming off, as they are all used. They offered to paint it at their body shop, but I figured I'd just buy new for a couple hundred more. (~550 @ Suncoast)
I have a seemingly unique problem, however. I don't live anywhere near a Porsche dealership, and when you put a new one of these units in, you have to have the dealership use their PIWIS to match the unit to the car. I guess you'll get a CEL or something? I'm not sure. Anyways, to avoid this, and a 2 hour trip to a dealership, I decided to go another route.
Basically, I ripped the whole face of controls off the new unit, as well as the display cooling fan, and put it onto the old one. Replacing all the painted and moving parts. Here is how I went about it.
NOTE: IF YOU LIVE NEAR A DEALERSHIP, YOU CAN JUST UNINSTALL THE OLD UNIT, PUT IN THE NEW ONE, AND HAVE THE DEALERSHIP MATCH THE PART TO THE CAR. I DO NOT LIVE NEAR A DEALER, SO I HAD TO SWAP PARTS FROM THE NEW UNIT INTO THE OLD ONE.
You need a T-30, T-20, and a T-6(for disassemble of control unit face).
Use your T-30 to unbolt the carpeted side panels on either side of your center console. The bolt heads are recessed into the carpet, but are not too hard to find. There is one on each side on the console.
Now, use your T-20 to remove two more bolts revealed, 2 on either side of the console just behind your upholstered side panels. Once all four bolts total have been removed, pull straight back towards the rear of the car on the upholstered pieces, and they will release from the console.
Don't forget to un clip your 12v charger plug from the carpeted panel from earlier. I just released by squeezing the clips on either side of the harness with your fingers.
Now, the A/C control module is held in on either sides with little metal clips. the picture shows my finger poking through the hole the clip once sat in. On either side of the console, you can press the clip in with a flat head screw driver, or something similar, and tug lightly on the a/c module to jam the clip in the unlocked position, move to the opposite side to release the entire assembly.
Remove the two wiring harnesses from the rear of the module using your thumb to press on each retention clip on the tops of each.
Side by side of my two units. Left old, right new. Notice the old has an "ECO" button, and new has "AC OFF"
Old one is V9.8, and has a different part number than the...
new one. V10. Unique part number.
Now, to swap faces, use your T-6 (here in the picture I'm using a T-7 to friction unscrew the bolts, because my T-6 broke on another project) to unscrew the four small screws on the back of the face of the unit, holding the face on.
With the four screws off, the face should pull apart with a light tug, revealing one of the circuit boards. un screw all the silver screws on the back of this to release the face.
Here, all the screws have been removed, the face will now come off.
Although it's easy to put back together, leave the face buttons down, so the display and rear rubber won't fall out. The display is glass, and can break if you drop it.
On the rear is a small round module containing a cooling fan for the A/C display. It is held on by two small T-6 screws, and then just pulls off.
Now all you have to do is split your old A/C unit, put the new face and fan on, and reinstall into the car. None of this is technically difficult, just takes some guts, and a tiny T-6. No soldering or electrical knowledge, just unscrewing, and screwing.
Cool
Last edited by Equinox; Sep 14, 2012 at 03:51 AM.
Thread Starter
|
Registered User
Joined: Dec 2011
Posts: 123
From: Beaumont, TX
Rep Power: 28
Remove lock lug nuts
When I bought the car back in December, I never noticed, but the car has wheel lock lug nuts on the rims. This isn't a big deal, but when looking in the car's tool box under the hood, there isn't a key. Problem.
So, I called Suncoast and asked about buying a key, and they said that you are required to go to your porsche dealership, where they will remove the lock nuts off your car, and then sell you a new set. I assume this is to avoid people calling and ordering a lock nut key that they see will fit their neighbor's car, and then steal their wheels next week. Anyhow, I need a key, and the local dealership once again, is actually 2 hours away.
I scoured the internet, and thought I found what I was looking for. My lock nuts are a 30 point star, and I saw someone selling the same thing on eBay. Only to find out when I bought them used off eBay, theirs were actually slightly smaller than mine, although the same thread - but their key won't fit mine; putting me no closer to removing my lock nuts.
Here you will see my lock nut(left) is larger than the ones I bought online(right). Oops. Key will not work - but at least I now have a new set of lock nuts with a key I can use; once I remove my old ones.


Tools you will need. Hammer, 7/8" impact deep (1/2" drive) socket, 1/4" drive extension longer than your impact socket, 1/2" drive torque bar, and a 3/4" socket to tighten on your new lug and key.
Now the intention here is to get an impact socket as they are usually harder than your lug nuts, and is sized slightly smaller than your wheel lock. Basically I found that my rim's hole around the lug nuts is 1" across, so I started at just under 1" sized impact sockets, and tried to see which one almost fit, but was just slightly too small for the lock. 7/8" did the trick.

Above you will see I took my socket, lined it up with the wheel lock, and hammered it on with my regular claw hammer. I didn't have to use much force; only that which I would use to hammer a nail into a non-hardwood tree. You can tell when your socket is all the way on because the socket will sound/feel different. (it will not ring out as long as it was while you were first hammering it)

Above: use your 1/2" drive torque bar to loosen your wheel lock nut off.

Above: Now you have a wheel lock nut stuck in your impact socket.

Slip your 1/4" drive extension into the back of the socket, and hold the socket in one hand, and hammer on the extension with the other hand. It didn't take much for my lug nuts to come out. Some may need to put the socket in a vice, or bang the extension against the cement (just don't ruin your garage floor silly).

Replace your old wheel locks with something you have a key for, and don't forget to store your wheel lock key safely where the owner's manual says to put it. Under the hood, in the tool storage area, on the far left side, when looking down into the luggage space.
When I bought the car back in December, I never noticed, but the car has wheel lock lug nuts on the rims. This isn't a big deal, but when looking in the car's tool box under the hood, there isn't a key. Problem.
So, I called Suncoast and asked about buying a key, and they said that you are required to go to your porsche dealership, where they will remove the lock nuts off your car, and then sell you a new set. I assume this is to avoid people calling and ordering a lock nut key that they see will fit their neighbor's car, and then steal their wheels next week. Anyhow, I need a key, and the local dealership once again, is actually 2 hours away.
I scoured the internet, and thought I found what I was looking for. My lock nuts are a 30 point star, and I saw someone selling the same thing on eBay. Only to find out when I bought them used off eBay, theirs were actually slightly smaller than mine, although the same thread - but their key won't fit mine; putting me no closer to removing my lock nuts.
Here you will see my lock nut(left) is larger than the ones I bought online(right). Oops. Key will not work - but at least I now have a new set of lock nuts with a key I can use; once I remove my old ones.
Tools you will need. Hammer, 7/8" impact deep (1/2" drive) socket, 1/4" drive extension longer than your impact socket, 1/2" drive torque bar, and a 3/4" socket to tighten on your new lug and key.
Now the intention here is to get an impact socket as they are usually harder than your lug nuts, and is sized slightly smaller than your wheel lock. Basically I found that my rim's hole around the lug nuts is 1" across, so I started at just under 1" sized impact sockets, and tried to see which one almost fit, but was just slightly too small for the lock. 7/8" did the trick.
Above you will see I took my socket, lined it up with the wheel lock, and hammered it on with my regular claw hammer. I didn't have to use much force; only that which I would use to hammer a nail into a non-hardwood tree. You can tell when your socket is all the way on because the socket will sound/feel different. (it will not ring out as long as it was while you were first hammering it)
Above: use your 1/2" drive torque bar to loosen your wheel lock nut off.
Above: Now you have a wheel lock nut stuck in your impact socket.
Slip your 1/4" drive extension into the back of the socket, and hold the socket in one hand, and hammer on the extension with the other hand. It didn't take much for my lug nuts to come out. Some may need to put the socket in a vice, or bang the extension against the cement (just don't ruin your garage floor silly).
Replace your old wheel locks with something you have a key for, and don't forget to store your wheel lock key safely where the owner's manual says to put it. Under the hood, in the tool storage area, on the far left side, when looking down into the luggage space.
Last edited by Equinox; May 23, 2012 at 11:11 AM.

Registered User
Joined: Jul 2011
Posts: 51
From: Saint Louis
Rep Power: 17
This is a great thread. I bought a 06 997S convertible (silver with a black top and interior) a month ago (61,500) and use it as a daily driver. I broke off the trunk lid switch (I need to be more careful). This has great information. I plan on changing the switch and center consul.
Thanks
Thanks
Thread Starter
|
Registered User
Joined: Dec 2011
Posts: 123
From: Beaumont, TX
Rep Power: 28
This is a great thread. I bought a 06 997S convertible (silver with a black top and interior) a month ago (61,500) and use it as a daily driver. I broke off the trunk lid switch (I need to be more careful). This has great information. I plan on changing the switch and center consul.
Thanks
Thanks
Yeah, it's a weak little thing of a switch. Operators require training before use, including myself. As far as the center console, when I feel like blowing the money on a new one, or just feel like painting it myself (although I'm partial to alcantara) I'll post a how to. I'm sure it's nothing new though and there may be a few out there. I would love to see a link to a thread of pics of your new purchase
