
DIY Air Oil Separator


Thread Starter
|
Registered User

Joined: Apr 2009
Posts: 4,366
From: NoVa
Rep Power: 295


DIY Air Oil Separator
Disclaimer: I am not a professional mechanic and am not liable for what you do! I'm offering this information as a way to help guide you and do not guarantee in any way that it is the proper method of performing this work, nor do I guarantee that it will solve any problem that you have.
Lately our leaky air-oil separators (AOS) have been a hot topic, so here's a quick guide to replacing it.
Quick note: I have to apologize as I've been saying that I bought an AOS from a dealership for $26. I don't know where I got that number, because I just checked my invoice and it was $48.36.
What you'll need:
New AOS
8mm socket
1/4"-drive ratchet
Short extension
Blunt-nose pliers (or similar)
Paper towels (maybe)
10-15 minutes
First, make sure you let your engine bay cool off if you've just been out driving. It is also a good idea to have a paper towel or two handy in case you drip any oil. I did not need one when I installed my new AOS, nor did I need one just now when I pulled it to take the pics below. But it's better to be safe than sorry!
Here's the location of the AOS:
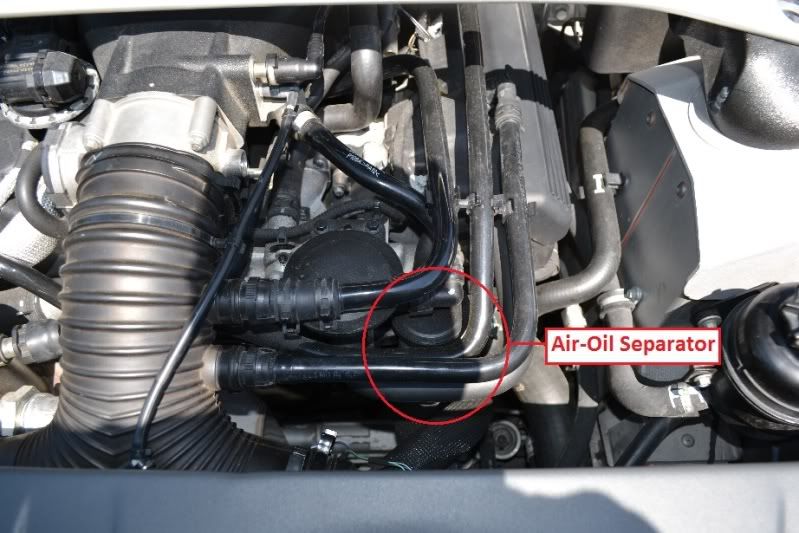
If you pull up on the hoses above it, you can look at it from the driver's side of the car and see the whole AOS and the 8mm bolt that is holding it in place.
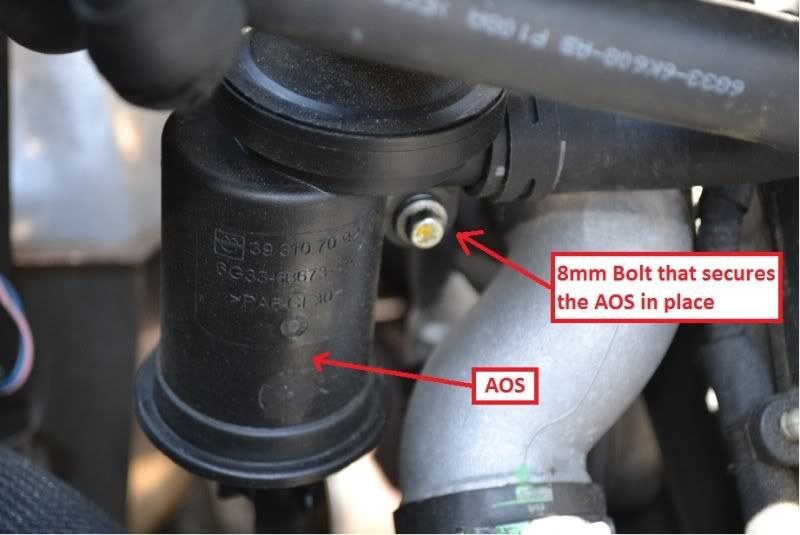
Next, remove the 8mm bolt entirely and set it aside.
With the bolt removed, you can move the AOS around quite a bit - the hoses have lots of flex in them. This will allow you to move the AOS however you need to so you can use your pliers to remove the two hoses that are attached to it.
Use the pliers to squeeze together the tabs on the hose clamps and work the clamps an inch or two down the hose.
Pull the two hoses off the AOS. Tip: before pulling on the hoses, rotate the hoses back and forth to break the seal of the rubber-on-plastic that has been created over time. As you're pulling the hoses off, keep twisting the hose back and forth as you pull. This will make removal much easier. Do the same as you push them back on.
Install your new AOS in the reverse order of what you just did.
Put on the new hoses and put the hose clamps back in place.
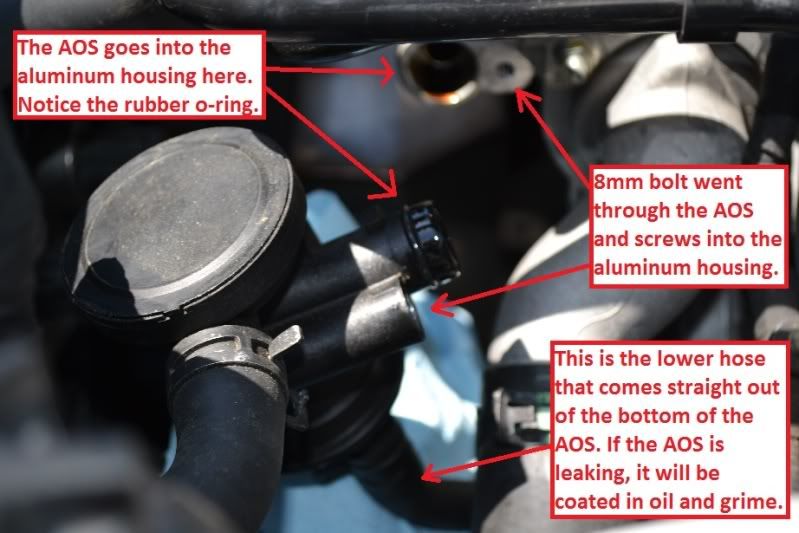
Make sure there in an o-ring on the new AOS (see above image).
Put the AOS in place and bolt it in with the 8mm bolt. NOTE: I do not know the torque specs for this bolt. Do not over-tighten as it is going into an aluminum housing. Maybe one of our resident gurus can chime in on the proper torque spec.
That's pretty much it. Just make sure everything is fastened and secure and you should be good to go.
I'm in a rush so if I missed anything, let me know and I'll edit this accordingly.
Lately our leaky air-oil separators (AOS) have been a hot topic, so here's a quick guide to replacing it.
Quick note: I have to apologize as I've been saying that I bought an AOS from a dealership for $26. I don't know where I got that number, because I just checked my invoice and it was $48.36.
What you'll need:
New AOS
8mm socket
1/4"-drive ratchet
Short extension
Blunt-nose pliers (or similar)
Paper towels (maybe)
10-15 minutes
First, make sure you let your engine bay cool off if you've just been out driving. It is also a good idea to have a paper towel or two handy in case you drip any oil. I did not need one when I installed my new AOS, nor did I need one just now when I pulled it to take the pics below. But it's better to be safe than sorry!
Here's the location of the AOS:
If you pull up on the hoses above it, you can look at it from the driver's side of the car and see the whole AOS and the 8mm bolt that is holding it in place.
Next, remove the 8mm bolt entirely and set it aside.
With the bolt removed, you can move the AOS around quite a bit - the hoses have lots of flex in them. This will allow you to move the AOS however you need to so you can use your pliers to remove the two hoses that are attached to it.
Use the pliers to squeeze together the tabs on the hose clamps and work the clamps an inch or two down the hose.
Pull the two hoses off the AOS. Tip: before pulling on the hoses, rotate the hoses back and forth to break the seal of the rubber-on-plastic that has been created over time. As you're pulling the hoses off, keep twisting the hose back and forth as you pull. This will make removal much easier. Do the same as you push them back on.
Install your new AOS in the reverse order of what you just did.
Put on the new hoses and put the hose clamps back in place.
Make sure there in an o-ring on the new AOS (see above image).
Put the AOS in place and bolt it in with the 8mm bolt. NOTE: I do not know the torque specs for this bolt. Do not over-tighten as it is going into an aluminum housing. Maybe one of our resident gurus can chime in on the proper torque spec.
That's pretty much it. Just make sure everything is fastened and secure and you should be good to go.
I'm in a rush so if I missed anything, let me know and I'll edit this accordingly.
Thread Starter
|
Registered User
Joined: Apr 2009
Posts: 4,366
From: NoVa
Rep Power: 295
no problem! it took longer to do the write-up than it did to do the AOS swap lol!
i'm willing to bet that the weak point in this system is the single-bolt mounting that holds the AOS to the aluminum housing. with a setup like this, only one side of the o-ring is being held in place, and the opposite side can move and allow oil to get through. if a car is old enough, the o-ring will be unable to keep a proper seal as it moves around (think road vibrations), allowing oil to get by and leak from the AOS.
if that's the case.... i wonder if just the o-ring needs to be replaced. i think i threw away my original AOS, but looking back i should have kept it to cut it open and see if there's anything else that could be causing the issue.
so if someone's got a leaking AOS and wants to give this a shot... replace ONLY the o-ring, and clean up everything so you can see if the leak continues. if it's just the o-ring that needs to be replaced, that's a $0.50 fix instead of a $50 fix.
edit: i wish i had thought of this earlier

Registered User
Joined: Oct 2006
Posts: 293
From: NJ
Rep Power: 33
Seems like the issue with this art is indeed the O-ring. As per Chris (irish07), they had remedied the issue by updating the O-ring to make it a little thicker. I too ordered and replaced the entire unit, but I also got the new updated O-ring. I dont think replacing anything aside from the O-ring was really necessary though.
Thank you for the write up! And thanks to irish07 for the info!
Thank you for the write up! And thanks to irish07 for the info!
Basic Sponsor


Joined: Sep 2011
Posts: 2,981
From: British Columbia
Rep Power: 208
Just so you guys know, the new unit does not come with the updated thicker o-ring..so the concern will come back if you replace a unit due to a leak..the cause is the o-ring not the unit..replace just the o-ring and the concern will be 100% solved
O-ring part#: AD23-3B9623-AA, suggested resale is $1.96 and you just need 1. Same repair process, just you are replacing the o-ring on the unit that is in the 3rd above image. If I remember right, this updated O-ring was released early in this year(2012)..
O-ring part#: AD23-3B9623-AA, suggested resale is $1.96 and you just need 1. Same repair process, just you are replacing the o-ring on the unit that is in the 3rd above image. If I remember right, this updated O-ring was released early in this year(2012)..
__________________
__________________
Technical Director
Christopher Edgett
Velocity Automotive Performance Limited
214 Maple Ave.
Oliver, B.C
Canada V0H 1T9
Office: (1)250-485-5126
Email: Tuning@VelocityAP.com
www.velocityap.com
__________________
Technical Director
Christopher Edgett
Velocity Automotive Performance Limited
214 Maple Ave.
Oliver, B.C
Canada V0H 1T9
Office: (1)250-485-5126
Email: Tuning@VelocityAP.com
www.velocityap.com
Registered User
Joined: Feb 2010
Posts: 1,024
From: Austin
Rep Power: 67
Thanks for posting. I finally got around to installing the new thinker O-Ring and that solves the problem without having to replace the whole thing as Irish suggested.
2 things I noticed:
1) The old O-Ring is very hard to get off. I used a very small flat head to pry under it.
2) Once you get the new, thicker 0-Ring on it is very hard to get the Air Oil seperator back against the aluminum housing. I put oil all over it and worked it back and forth pushing as hard as I could until it connected against it.
Trending Topics
Registered User
Joined: Jan 2013
Posts: 807
Rep Power: 54
Fantastic article!!! Telum01 can you do one like this on the air filter replacement? I have just received new air filters from AM Bits and am unsure of what and where to remove your photo and explanations make things a bit more simple to tackle.
Thanks again for a great article
Thanks again for a great article
Thread Starter
|
Registered User
Joined: Apr 2009
Posts: 4,366
From: NoVa
Rep Power: 295
Fantastic article!!! Telum01 can you do one like this on the air filter replacement? I have just received new air filters from AM Bits and am unsure of what and where to remove your photo and explanations make things a bit more simple to tackle.
Thanks again for a great article
Thanks again for a great article
lift up the front end of the car (preferably use a car lift).
take off the front wheels.
take off the front undertray.
unfastened the front of the plastic wheel well liners, let them hang down out of the way.
this should expose the air boxes (one on each side, between the front bumper cover and the tires).
open up the air intake boxes (if i remember correctly, there are bolts around the air boxes)
pull out the old filters, put in the new ones.
put everything back in reverse order.
i might be missing something, but that is the gist of it. the main issues you have to deal with are getting the front of the car off the ground, and the space around the air boxes is very tight.
i'm glad it helped!
Registered User
Joined: Jul 2010
Posts: 273
From: Los Altos, CA
Rep Power: 26
So I have a leaking AOS; probably been leaking for a while. My dealer has order the part and will do the repair son (still under extended warranty). I've continued to drive my car regularly. Is that a bad idea? Am I causing potential harm to other parts of the engine by continuing to drive it?
Thread Starter
|
Registered User
Joined: Apr 2009
Posts: 4,366
From: NoVa
Rep Power: 295
you're probably only leaking a very small amount, so unless you're leaving oil on your garage floor, you'll be fine.
what parts did you order? you should have only needed the o-ring.
what parts did you order? you should have only needed the o-ring.
Just so you guys know, the new unit does not come with the updated thicker o-ring..so the concern will come back if you replace a unit due to a leak..the cause is the o-ring not the unit..replace just the o-ring and the concern will be 100% solved
O-ring part#: AD23-3B9623-AA, suggested resale is $1.96 and you just need 1. Same repair process, just you are replacing the o-ring on the unit that is in the 3rd above image. If I remember right, this updated O-ring was released early in this year(2012)..
O-ring part#: AD23-3B9623-AA, suggested resale is $1.96 and you just need 1. Same repair process, just you are replacing the o-ring on the unit that is in the 3rd above image. If I remember right, this updated O-ring was released early in this year(2012)..
Registered User
Joined: Jul 2010
Posts: 273
From: Los Altos, CA
Rep Power: 26
Thanks Telem - Since my car is under the extended warranty, the service department wanted to replace the entire AOS unit and hose. I also told them about the updated O-ring, so they ordered that part as well.
Thread Starter
|
Registered User
Joined: Apr 2009
Posts: 4,366
From: NoVa
Rep Power: 295
Bumping this thread! I've had a couple people ask me about the oil catch can kit and the AOS so I wanted to revive this to help out with explaining it.
The air-oil separator (AOS) is a factory unit that is designed to keep oil from entering the intake manifold. It doesn't do a very good job of this. Plus, it can leak. It's easy to see if it's leaking because there will be oil and grime on the drain hose coming from the bottom of it. The posts above cover the details for fixing it.
The AOS feeds into the PCV (positive crankcase ventilation or valve or something like that), which then feeds into the intake manifold. The oil catch can kit replaces the hose going from the PCV to the intake manifold and collects the oil that gets through the AOS and PCV to prevent it from entering the intake manifold. The AOS, PCV, and everything else are all still intact. Here's the installation guide for the oil catch can kit for comparison:
https://www.6speedonline.com/forums/...tallation.html
Hope that helps!
Last edited by telum01; Mar 18, 2015 at 05:49 PM.
I had PPI done on my car today and they found some oil on the engine and it looks like two bolts had worked their way loose on one the cover behind the pulleys. I think its is the AOS that is leaking, it does have oil on it. Is there a better way to be sure?
Thanks
Alex
Thanks
Alex