
Looking to install LED's in Signal Mirrors Any Info?


Thread Starter
|
Registered User

Joined: Aug 2012
Posts: 657
From: CA
Rep Power: 172


Looking to install LED's in Signal Mirrors Any Info?
I would like to upgrade the lighting in my 2007 GTC to LEDs as to me the Incandescents in the signal/Puddle lights look dated. Would like info on removing the clear plastic lense below the mirror. Looks to be secured with clips and possibly snaps in place? Also any info on the bulb type at the side mirrors?
TIA
TIA

Registered User
Joined: May 2012
Posts: 44
From: Yorkshire, ENGLAND.
Rep Power: 17
Tilt the glass down using switch, then using a flat screwdriver (I wrap mine in tape to prevent damage) slowly and gently prise the plastic clips that are directly behind glass whilst gently applying pressure and pulling at the glass, I suppose you have to pull a bit harder the comfortable with but patience is key here, take your time and get somebody to shine a torch in there for a clear view of whats going on, sounds patronising but it really helps if you have never done this before.
The lens itself may be quite brittle now like mine was so dont over tighten the screws on refit.
Bulb type is 501.
Regards.
The lens itself may be quite brittle now like mine was so dont over tighten the screws on refit.
Bulb type is 501.
Regards.
Thread Starter
|
Registered User
Joined: Aug 2012
Posts: 657
From: CA
Rep Power: 172
Trending Topics

Registered User
Joined: Jan 2013
Posts: 52
From: New Orleans
Rep Power: 17
Never heard back from OP to see if he did this, but when the lights are on at night walking up to car, I don't like the color difference between mirror lights and headlights so I too will probably be changing my bulbs. Here is a link to one of the most reputable LED bulb replacement companies that has error free bulbs compatible with car so that it won't give you an error message.
Every bulb on the page in link with T10 base should work depending how much length of space is available. The 501 bulb in mirrors is 10 wide and 26.7 long.
http://store.ijdmtoy.com/W5W-158-161...Bulbs-s/35.htm
Every bulb on the page in link with T10 base should work depending how much length of space is available. The 501 bulb in mirrors is 10 wide and 26.7 long.
http://store.ijdmtoy.com/W5W-158-161...Bulbs-s/35.htm
Registered User
Joined: Jan 2013
Posts: 52
From: New Orleans
Rep Power: 17
An thread from VW forum where they changed mirror puddle lights also to LED. Mirror is slightly different, but wiring and bulb are all same
http://forums.vwvortex.com/showthrea...-Upgrade-(pics)
http://forums.vwvortex.com/showthrea...-Upgrade-(pics)
Registered User
Joined: Jan 2013
Posts: 52
From: New Orleans
Rep Power: 17
Just to update, I ordered bulbs from ijdmtoy.
The bulb closest in dimension to factory 501 bulb and also identical 194 bulb was this one. It is an error free bulb with built in resistor so that it doesn't give an reading of out from car
http://store.ijdmtoy.com/Mercedes-Er...ree_t10_2r.htm
I also ordered this other error free LED bulb that has many more LED and is thus much brighter and is about half an inch longer. I will see if it fits when I open up mirror and return the one I don't use.
http://store.ijdmtoy.com/Mercedes-C-...ree_t10_2q.htm
Thread Starter
|
Registered User
Joined: Aug 2012
Posts: 657
From: CA
Rep Power: 172
Thanks. I tried installing some 194 led wedge bulbs at the trunk and the entire lighting circuit shut off. To reset the circuit I had to insert the key at the ignition and turn. Im sure the reason was due to the type of bulb used- standard non canbus leds. Also was a bit hesitant to tackle the puddle/ mirror lights as I am unsure how to disassemble the plastic mirror lenses. Looking forward to your input. Any help is appreciated.
The bulb closest in dimension to factory 501 bulb and also identical 194 bulb was this one. It is an error free bulb with built in resistor so that it doesn't give an reading of out from car
http://store.ijdmtoy.com/Mercedes-Er...ree_t10_2r.htm
I also ordered this other error free LED bulb that has many more LED and is thus much brighter and is about half an inch longer. I will see if it fits when I open up mirror and return the one I don't use.
http://store.ijdmtoy.com/Mercedes-C-...ree_t10_2q.htm[/QUOTE]
Registered User
Joined: Jan 2013
Posts: 52
From: New Orleans
Rep Power: 17
Bulbs came in and ready to update! Job was so much easier than what the Phaeton mirror thread requires. Same mirror, same motor, but once you pop out mirror, two screws to release lens from bottom of mirror. Literally less than 5 minute job.
To take out mirror, I turned it all the way in and down. I used a oversized flat head wrapped in little towel and put behind mirror at top outside corner and slowly pryed it out with light pressure till it popped off. The 3 wires to remove all just pull off.
Up to this point, it's exactly the same as above Phaeton thread. You actually can move mirror to side without taking off wires and get to two screws to remove bottom lens, but they came off easily so I just unplugged them an put mirror to side. The two screws are a torx screw at bottom middle and small Phillips screw to outside of mirror motor.
I bought two bulbs and wanted to use slightly longer one and luckily it fit easily. The white color was really nice and was pretty close to color of headlights and slightly brighter than stock bulb. I took pictures of driver side with stock bulb and passenger side new LED bulb.
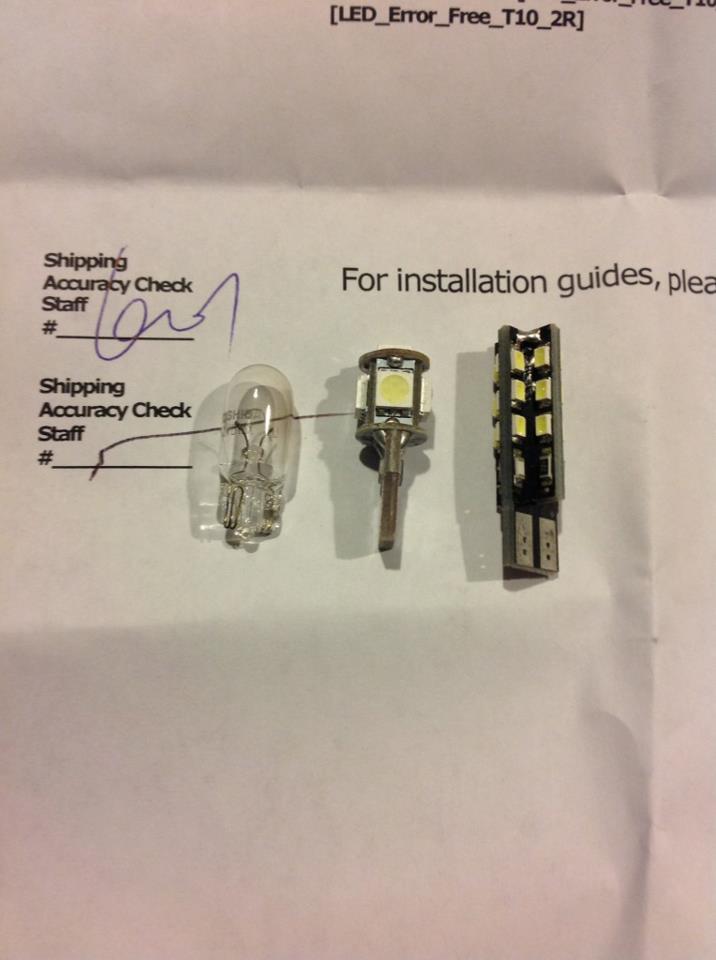
Stock bulb and two bulbs purchased, longer fit easily so went with that one

Location of two screws after removing mirror
To take out mirror, I turned it all the way in and down. I used a oversized flat head wrapped in little towel and put behind mirror at top outside corner and slowly pryed it out with light pressure till it popped off. The 3 wires to remove all just pull off.
Up to this point, it's exactly the same as above Phaeton thread. You actually can move mirror to side without taking off wires and get to two screws to remove bottom lens, but they came off easily so I just unplugged them an put mirror to side. The two screws are a torx screw at bottom middle and small Phillips screw to outside of mirror motor.
I bought two bulbs and wanted to use slightly longer one and luckily it fit easily. The white color was really nice and was pretty close to color of headlights and slightly brighter than stock bulb. I took pictures of driver side with stock bulb and passenger side new LED bulb.
Stock bulb and two bulbs purchased, longer fit easily so went with that one
Location of two screws after removing mirror
Last edited by BigA3533; Feb 6, 2013 at 01:36 AM.
Registered User
Joined: Jan 2013
Posts: 52
From: New Orleans
Rep Power: 17
New LED bulb, nice white color and slightly brighter
Another view, LED is close to headlight although I used iPad for pic and headlight has ore orange look to it in pic.
For comparison, here is pic of stock bulb

