
Tutorial: How to lower your Cayenne Air Suspension w/ only a Durametric [DIY]


Thread Starter
|
Moderator

Joined: Jan 2011
Posts: 1,504
From: (in my garage welding something vicious)
Rep Power: 105


As promised, here is a full write-up on how to lower your Cayenne factory air suspension with only a Durametric cable. You do not need a lowering module or lowering links to do this mod. So if you already have a Durametric cable, then this is the cheapest and easiest way to lower your Cayenne.
Since there are over 30 pages of detailed steps, it is not conducive to attaching the images to this thread. Instead, I generated a full page PDF.
You can download the full document here: Durametric Cayenne Lowering Tutorial V2
If you find this document or thread useful, please leave +rep points.
For the "on-the-go" version, here is the brief text format:
Using the Durametric v.6 (download the lastest), it is pretty easy to recalibrate the suspension once your have your independent wheel measurements - although it is not intuitive.
I have used this method a few times before since I lowered my OEM module in a similar manner.
As a overview from memory:
1) connect your ODB-USB cable and open up your Durametric program.
2) browse down the tree on the left side to "Level Control" and select it
3) then select "Adaptation" to be on the calibration screen
4) select "read" . The box below the channel number will say "wait..." Your air suspension will go up and down.
5) when the suspension stops moving and the box changes from "wait.." to "enter". Enter the measurement (in mm) from the wheel displayed. Believe first is "FL" or Front, Driver. Then hit "save". If it accepted your entry, the value in the box will change from "enter" to "learned". If not, then will have to reenter or restart the program/laptop.
6) click the channel "up" button to move on to calibrate the next wheel.
7) do this same step to the other 3 wheels
8) Once all 4 wheels have confirmed "learned", press the channel "up" button one more time to channel "5". Enter "1" to save changes. If the system accepts your changes, it will say "control position learned" in under a minute. If it just sits there and does nothing, you may have to start over from scratch. Sometimes it takes a few times to stick.
9) You will then hear the air suspension adjusting to your new settings - hopefully that means air purging. Enjoy.
Last edited by Johnny Hotspur GT; Apr 30, 2023 at 12:20 PM.
Thread Starter
|
Moderator
Joined: Jan 2011
Posts: 1,504
From: (in my garage welding something vicious)
Rep Power: 105
Here is the "correct" way (as per Porsche) to measure the points on your chassis and then enter them into the calibration fields. You should use these points and the values as measured, when calibrating a Techart lowering module since it already compensates for a lower ride height .
You can download the full document here: Cayenne Level Control Calibration Points

You can download the full document here: Cayenne Level Control Calibration Points
Last edited by Johnny Hotspur GT; Apr 30, 2023 at 12:22 PM. Reason: Link to

Registered User
Joined: May 2009
Posts: 162
From: ny
Rep Power: 27
I did this about a year ago. The height change is minimal. I would say 1/2 inch at the most. I measured the before and after on all four wheels. Definitely worth it for free, but not the same drop as the lowering module by any stretch. Great write up!
Last edited by carreracup03; Mar 17, 2013 at 08:53 AM.
Thread Starter
|
Moderator
Joined: Jan 2011
Posts: 1,504
From: (in my garage welding something vicious)
Rep Power: 105
Cool! Maybe you can save me $1K+ in the near future. How about those free TIG classes? 

Thanks for the props! I knew their had to be other people who did this factory lowering. I was somewhat dumbfounded when others seem to doubt that this was possible- despite this being well documented on the Touareg with the same air suspension setup.
I wonder why you wouldn't get the full drop if you entered in an additional 25mm on the calibration? I was actually able to drop it "too much" and ended up with a tuna-boat sort of ride and had to bump it back up 3-5 mm with some fine tuning. FWIW, I have seen a glitch in the factory module, where it randomly decides that it does not like the correct values and changes the range.
Since I just got my Techart module last October, you can view my demo video floating around since it was dropped using this method and judge for yourself.
Last edited by Renaissance.Man; Mar 17, 2013 at 01:48 PM.

Registered User
Joined: May 2009
Posts: 162
From: ny
Rep Power: 27
RM, I did it again tonight. Worked great. You made my day ... thanks very much for taking the time to post.
Now for the next project. I am going to try to convert my headlight switch to auto. The switch swap is easy .. but I have to program to interior luxury lights I believe. It is listed under electrical .. I just do not know how to change the code.
Now for the next project. I am going to try to convert my headlight switch to auto. The switch swap is easy .. but I have to program to interior luxury lights I believe. It is listed under electrical .. I just do not know how to change the code.
Trending Topics
Thread Starter
|
Moderator
Joined: Jan 2011
Posts: 1,504
From: (in my garage welding something vicious)
Rep Power: 105
The coding is the trickiest part. If it is not listed under "Adaptation", not sure how much help I will be. Taking this to PM to see what we can figure out.

Registered User
Joined: Oct 2012
Posts: 136
From: Atlanta, GA
Rep Power: 19
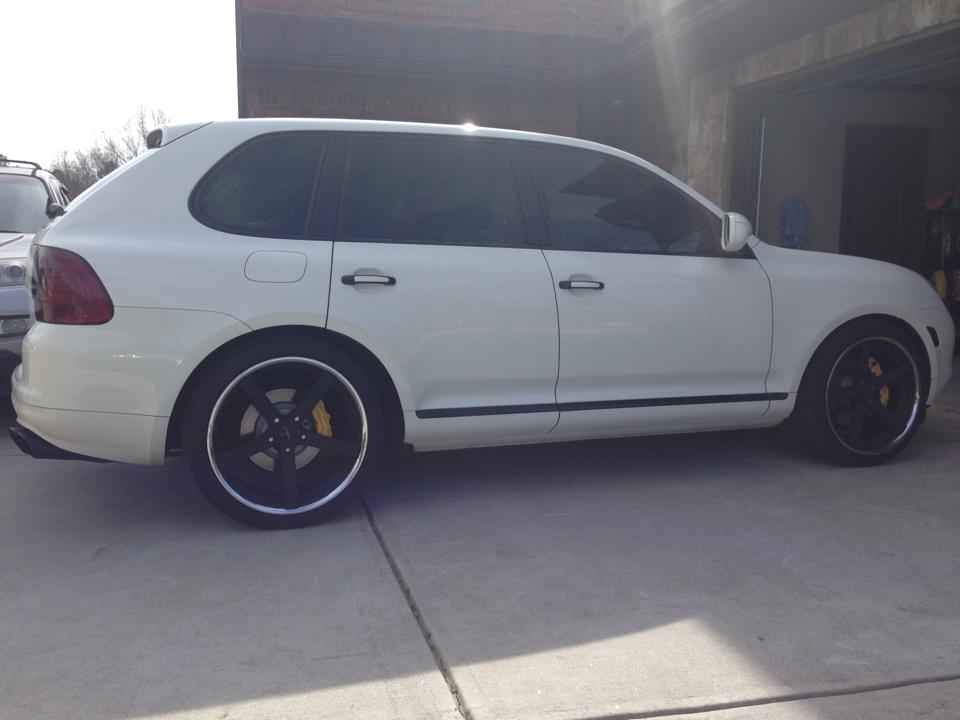
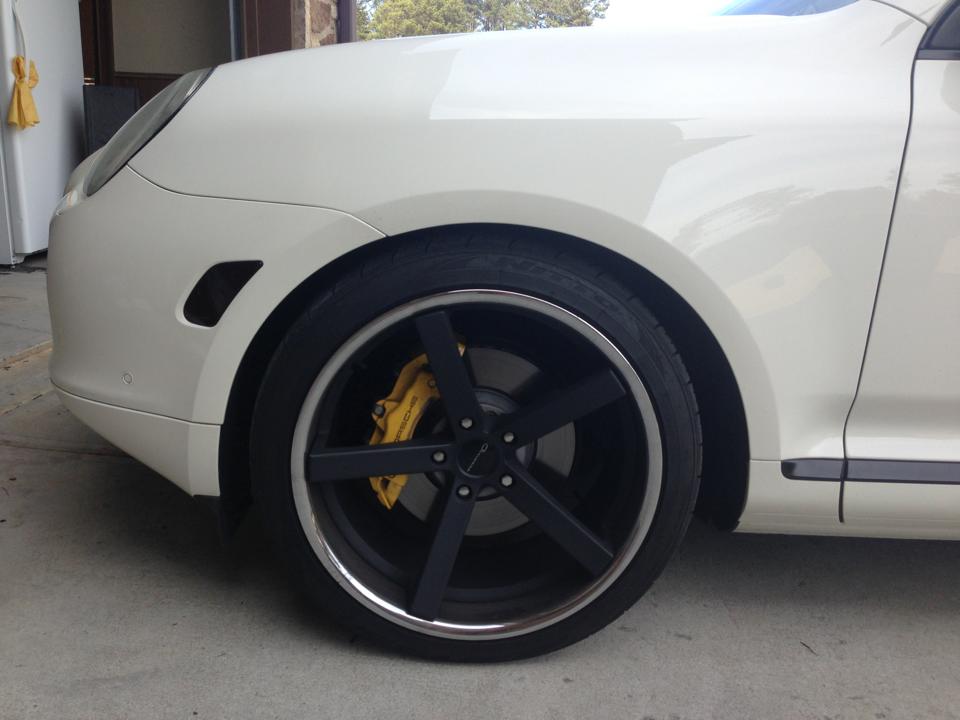
Thanks man for this information. I lowered the car even more with this guide now. I went ahead and added another 25mm and also I have a lowering module so it went even lower.
I have attached some pictures in loading mode.

I have attached some pictures in loading mode.


Thread Starter
|
Moderator
Joined: Jan 2011
Posts: 1,504
From: (in my garage welding something vicious)
Rep Power: 105
By the way, how do you like those Nitto tires?
Cool! Glad to hear it helped. I try to only give solid information.

Registered User
Joined: Mar 2012
Posts: 2,298
From: TX
Rep Power: 123
how does this lowering affect suspension performance though?
Is there a deterioration of performance in either of the modes (comfort, normal, sport)?
Wondering what (if any) are the down sides of doing this.
Thanks.
Is there a deterioration of performance in either of the modes (comfort, normal, sport)?
Wondering what (if any) are the down sides of doing this.
Thanks.

Registered User
Joined: Dec 2008
Posts: 30
From: Denver, Co
Rep Power: 19
There is another way I have been working on. You have to use Vag-com via a VW toureg then swap suspension ecu's. This way lowers a lot further. Not a fan of durametric compared to Vag-com.