
Updated Headlights


Registered User

Joined: May 2010
Posts: 1,062
From: Utah
Rep Power: 107


This whole thing is crazy!
Two years ago I passed purchasing a very nice '05 Turbo S Cabriolet with 35K miles that passed a PPI very well because of headlight lenses damaged by the Florida sun. The owner has the lenes polished out but I knew it to be a temporary fix. I just now checked and the litronic headlights lights for the Turbo are $6250 a pair. I knew they were a lot but forgot just how much.
I love customizing and I've made my living at it for the last 40 years. I own a small service business where I do similar things. I build custom motorcycles, custom wheels, hot rod motors and the like. I've never had an issue like what is going on here. I have chipped a paint job by accident a couple of times and immediately called the owner offering to do what was necessary to make it right. They appreciated my offer but refused.
I can't believe a business is disassembling a light unit costing over 3 grand and doing a poor amateurish refinishing job and allowing the solvents in the paint craze the inside of the lenses. Then not sealing them properly. I guess some businesses will do anything for people that they think have too much money.
I feel sorry for the victims here that have had their expensive lights ruined in an attempt to have a little different look. Hope this all works out.
Registered User
Joined: Oct 2012
Posts: 437
From: Laguna Beach, CA
Rep Power: 37
+1 Nick49
There is always Small Claims Court. Here in CA it is up to $7500.
Even if they are not in your City or State, because they did business with you, you can take them to small claims court in your city and they will have to come and defend themselves, or they forfeit. I think even if they show up, you have a great case.
Thread Starter
|
Registered User

Joined: Feb 2011
Posts: 1,075
From: Lewisville, NC
Rep Power: 110
Good news guys.
This is not that hard.
I'm by no means finished, but this is easily fixable.
Below are some initial pictures. You can see the foggy look on the lenses when installed. The foggy lens after removal (removal is very easy BTW). And then the clear lense after simply wiping it off with some PLASTX plastic cleaner.


Later, Steve
This is not that hard.
I'm by no means finished, but this is easily fixable.
Below are some initial pictures. You can see the foggy look on the lenses when installed. The foggy lens after removal (removal is very easy BTW). And then the clear lense after simply wiping it off with some PLASTX plastic cleaner.
Later, Steve


Thread Starter
|
Registered User
Joined: Feb 2011
Posts: 1,075
From: Lewisville, NC
Rep Power: 110
I should have the lights finished and some video posted in the next couple of days.
The lights are done, except resealing them. I'm wanting to make sure everything is right before I seal them back up.
Later, Steve
The lights are done, except resealing them. I'm wanting to make sure everything is right before I seal them back up.
Later, Steve
Registered User
Joined: Dec 2012
Posts: 349
From: Portsmouth, NH
Rep Power: 36
Thats right brother... allow ample time for out-gassing. On another note, I was wondering if, after you let the paint cure, if using a spray wax on the interior painted surface of the lens will help seal any more out-gassing. I know the spray wax wont hurt... just wondering if it will help.
Thread Starter
|
Registered User
Joined: Feb 2011
Posts: 1,075
From: Lewisville, NC
Rep Power: 110
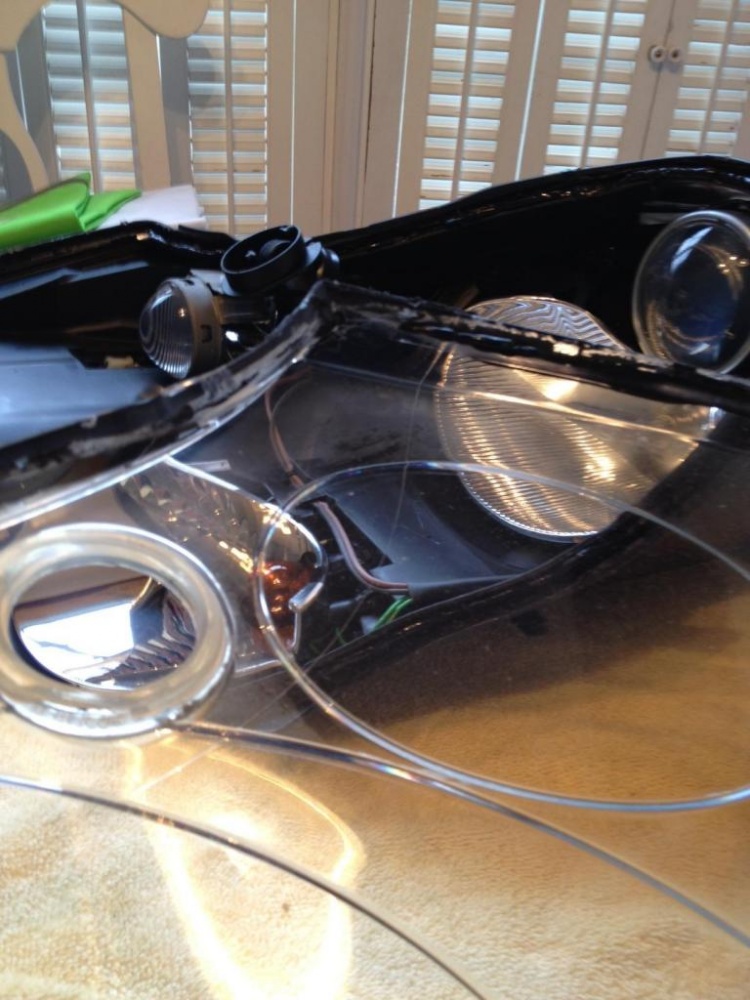
Okay, here the quick DIY for headlight disassembly.
First removed the housing at the back to the light that holds the HID ballast (not just the metal ballast, but the plastic housing that holds the ballast). It's only a couple of screws and it allows you to remove the ballast and wiring that connects to the HID bulb. It would probably be fine, but I didn't want to take the chance.
Then removed the rubber trim piece from around the lens.
Finally, preheat the oven to 200 degrees and placed the whole headlight assembly in the oven for 7 minutes. You can easily remove the light with your hands for disassembly. I then started prying around the lens with a flat head screwdriver. Nothing too forceful, just work your way around the lens. Be patient, the seal will break somewhere and you can start working from that point.
The hard part is cleaning all the sealant from the lens and housing, so you will get a good seal with the new sealant. I used a razor blade on the lens and flat head screwdriver for the housing.
For reassemble, I used basic black silicone. Since I'm not disassembling the original light, I can't speak to what the factory seals them with, but the sealant that was on my lights was definitely black silicone. This stuff seals oil pans, so it can be air tight and handles a lot of heat. It also stays rubbery and doesn't get brittle over time. Basically fill the channel in the housing and re-install the lens. I used painters tape to keep the lens tight while the silicone dried.
Here's a short video of me removing the lens. Like I said above, take your time and work around the lens. You will find a spot where the seal will break and it gets easy from that point.
Later, Steve
Last edited by Steve Jarvis; Nov 12, 2014 at 06:05 AM.

Registered User
Joined: Oct 2009
Posts: 347
From: New York
Rep Power: 38
Thanks Steve for really delivering, and documenting this so well. It gives me more confidence to take on what others have seen as a high risk DIY in the past.
It's brave DIYers, such as Steve, who make this site so valuable. IB should be paying you money
It's brave DIYers, such as Steve, who make this site so valuable. IB should be paying you money