
Build Log: NineEreven Turbo NB

Thread Starter
|
Registered User
Joined: May 2013
Posts: 271
From: Cincinnati, OH
Rep Power: 26

Build Log: NineEreven Turbo NB
I figure it is time I create my build log thread here more to share than to seek insight. I have a thread on rennlist going as well but I just wanted to share the build with exclusive 6speeders.
TPC turbo build on a NB 996.1 Millenium Edition C4
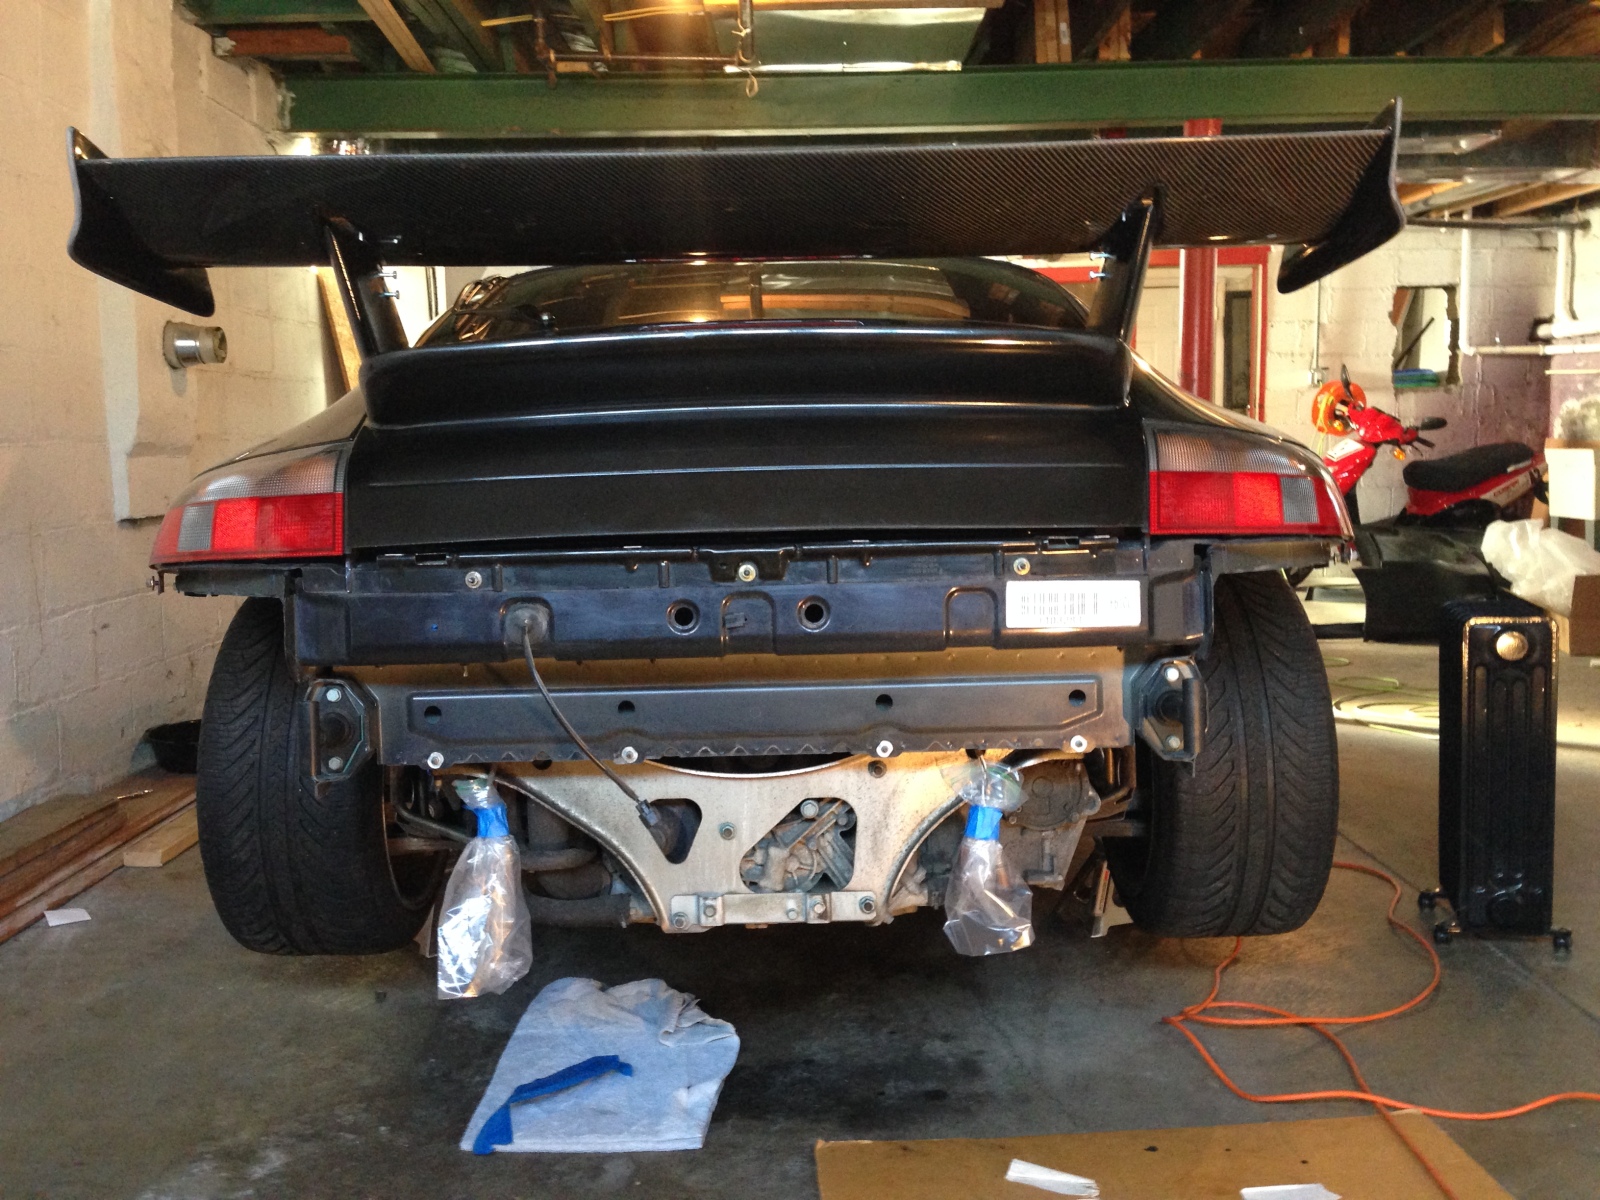
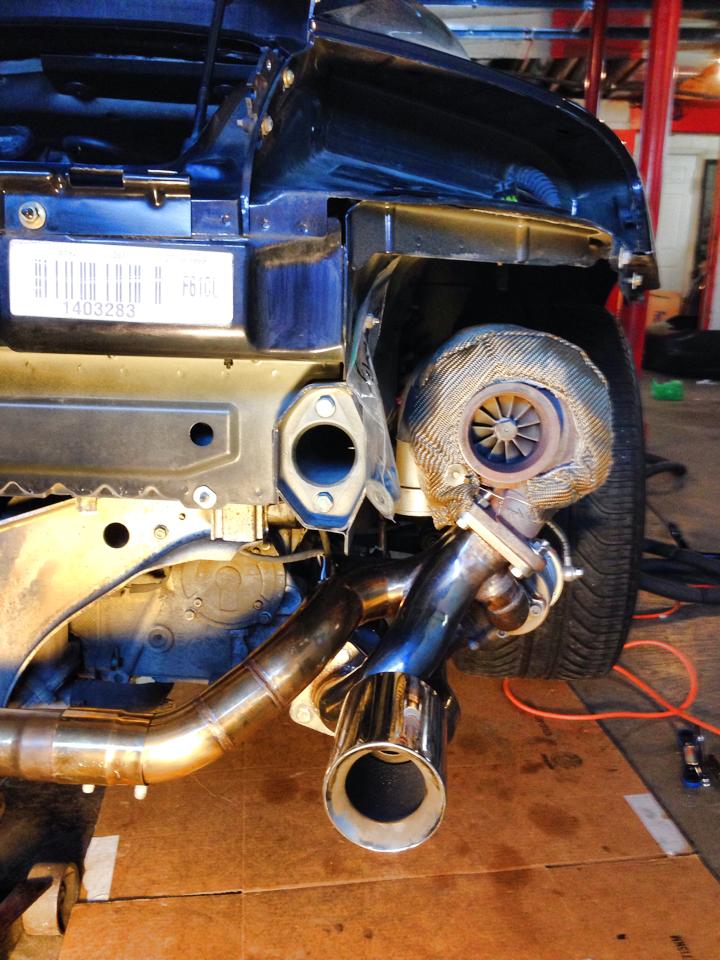
So as you can see I have made quite a bit of progress already. The motor needs to be raised back up, and I need to tap the oil return line still. I am about 75% of the way done with the water to air intercooler set up. Once those are all buttoned up, I can start intsalling the intake/cold side hoses and give her a test fire to see how she does.
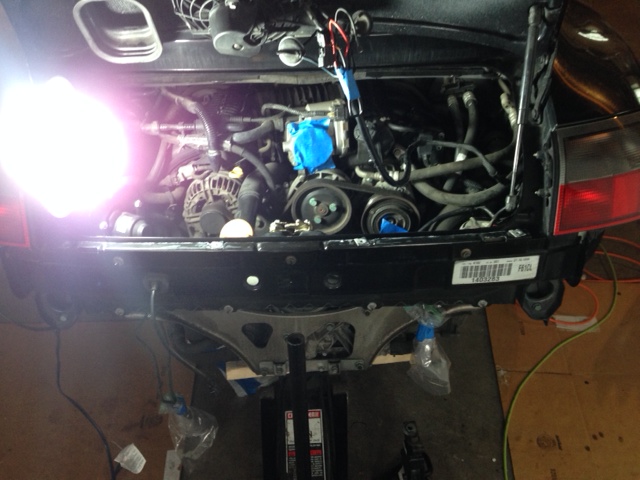
I have a ton of pictures I will post up tonight of the third radiator install and the injectors install.
TPC turbo build on a NB 996.1 Millenium Edition C4
So as you can see I have made quite a bit of progress already. The motor needs to be raised back up, and I need to tap the oil return line still. I am about 75% of the way done with the water to air intercooler set up. Once those are all buttoned up, I can start intsalling the intake/cold side hoses and give her a test fire to see how she does.
I have a ton of pictures I will post up tonight of the third radiator install and the injectors install.
Thread Starter
|
Registered User
Joined: May 2013
Posts: 271
From: Cincinnati, OH
Rep Power: 26
As in, how many man hours is it taking to install everything?
It is taking me, doing all the work alone about 30 hours so far. I am very precise and don't have any help really. The injectors took me several hours (3.5) to do alone because they are hard to get to, and the exhaust system was a pain because it was rusted out when I took it off. I bet a proficient person can do it in a weekend if they had several hands and all the tools and parts ready to go. I am doing maintenance stuff as well as I go, belts, pumps, etc.
It is taking me, doing all the work alone about 30 hours so far. I am very precise and don't have any help really. The injectors took me several hours (3.5) to do alone because they are hard to get to, and the exhaust system was a pain because it was rusted out when I took it off. I bet a proficient person can do it in a weekend if they had several hands and all the tools and parts ready to go. I am doing maintenance stuff as well as I go, belts, pumps, etc.
Registered User
Joined: Sep 2008
Posts: 942
From: Vancouver
Rep Power: 65

Similar experiences with my SC... those injectors are brutal on the hands. Takes a bit of skill but a lot of patience...
I did a lot of maintenance as well. Also did the water pump given that the are prone to go. May want to consider that if you need to disconnect the cooling system anyways. I did as many cooling pipes as I could get my hands on on the entire car since I had it all apart anyways.
Cheers
Aaron
I did a lot of maintenance as well. Also did the water pump given that the are prone to go. May want to consider that if you need to disconnect the cooling system anyways. I did as many cooling pipes as I could get my hands on on the entire car since I had it all apart anyways.
Cheers
Aaron
Thread Starter
|
Registered User
Joined: May 2013
Posts: 271
From: Cincinnati, OH
Rep Power: 26
Similar experiences with my SC... those injectors are brutal on the hands. Takes a bit of skill but a lot of patience...
I did a lot of maintenance as well. Also did the water pump given that the are prone to go. May want to consider that if you need to disconnect the cooling system anyways. I did as many cooling pipes as I could get my hands on on the entire car since I had it all apart anyways.
Cheers
Aaron
I did a lot of maintenance as well. Also did the water pump given that the are prone to go. May want to consider that if you need to disconnect the cooling system anyways. I did as many cooling pipes as I could get my hands on on the entire car since I had it all apart anyways.
Cheers
Aaron

Registered User
Joined: Aug 2013
Posts: 300
From: Europe
Rep Power: 36
Realy impressive! Do you reuse the oemexhaust? Ok, 30 hours still seams ok, considering what you actually need to do! ")
I ordered all the "bolts on upgrade" i could find for my car, but if I know my self they would only last this summer and then I will be looking at your pics once to many times and go there my self
Realy to bad there are no Europedealers with theese systems. When you order them oversea you have to add almost 75% up on the cost just to get them to Europ�, cause of all the tax, duty and freight
Thread Starter
|
Registered User
Joined: May 2013
Posts: 271
From: Cincinnati, OH
Rep Power: 26
Realy impressive! Do you reuse the oemexhaust? Ok, 30 hours still seams ok, considering what you actually need to do!
I ordered all the "bolts on upgrade" i could find for my car, but if I know my self they would only last this summer and then I will be looking at your pics once to many times and go there my self
Realy to bad there are no Europedealers with theese systems. When you order them oversea you have to add almost 75% up on the cost just to get them to Europ�, cause of all the tax, duty and freight
Feel free if you get into it PM me for anything. The directions are kinda slim in terms of descriptions on stuff, and I could take some guess work out of it for you.
Trending Topics
Registered User
Joined: Sep 2008
Posts: 942
From: Vancouver
Rep Power: 65
Sounds cool. What I did with my boost gauge is I bought an extra a-pillar for the driver's side off someone local. Then I got a dual gauge pod online. I cut holes in the a-pillar and modified the gauge pod so they were molded together -- with some fibreglass and bondo work.
After that I had a local upholstery shop wrap the whole thing in leather and had it stitched down the gauge pods. I used gauges with a white face and red needles -- same as my dash.
When done, it looks as stock as it can be -- versus looking like a cheesy set of pods bolted on to an a-pillar or anywhere else.
I like this way more than the Porsche ones I've seen that mounted above the steering column.
Here are some pictures I took of it: https://www.6speedonline.com/forums/...ml#post3114922
Cheers
Aaron
Thread Starter
|
Registered User
Joined: May 2013
Posts: 271
From: Cincinnati, OH
Rep Power: 26
Sounds cool. What I did with my boost gauge is I bought an extra a-pillar for the driver's side off someone local. Then I got a dual gauge pod online. I cut holes in the a-pillar and modified the gauge pod so they were molded together -- with some fibreglass and bondo work.
After that I had a local upholstery shop wrap the whole thing in leather and had it stitched down the gauge pods. I used gauges with a white face and red needles -- same as my dash.
When done, it looks as stock as it can be -- versus looking like a cheesy set of pods bolted on to an a-pillar or anywhere else.
I like this way more than the Porsche ones I've seen that mounted above the steering column.
Here are some pictures I took of it: https://www.6speedonline.com/forums/...ml#post3114922
Cheers
Aaron
After that I had a local upholstery shop wrap the whole thing in leather and had it stitched down the gauge pods. I used gauges with a white face and red needles -- same as my dash.
When done, it looks as stock as it can be -- versus looking like a cheesy set of pods bolted on to an a-pillar or anywhere else.
I like this way more than the Porsche ones I've seen that mounted above the steering column.
Here are some pictures I took of it: https://www.6speedonline.com/forums/...ml#post3114922
Cheers
Aaron
Registered User
Joined: Sep 2008
Posts: 942
From: Vancouver
Rep Power: 65
I considered that area as well, but I was thinking about view angles... as in looking down that low to read information versus a quick glance to the left to see it.
But what you're saying does make sense.
My original thought was to get a Chrono gauge pod and mount it into the dash like the 997. However, the 996 dash has that long angle over the gauge clusters and I just couldn't find a place to mount it that would look right. So I went with the a-pillar.
Cheers
Aaron
Thread Starter
|
Registered User
Joined: May 2013
Posts: 271
From: Cincinnati, OH
Rep Power: 26
I considered that area as well, but I was thinking about view angles... as in looking down that low to read information versus a quick glance to the left to see it.
But what you're saying does make sense.
My original thought was to get a Chrono gauge pod and mount it into the dash like the 997. However, the 996 dash has that long angle over the gauge clusters and I just couldn't find a place to mount it that would look right. So I went with the a-pillar.
Cheers
Aaron
But what you're saying does make sense.
My original thought was to get a Chrono gauge pod and mount it into the dash like the 997. However, the 996 dash has that long angle over the gauge clusters and I just couldn't find a place to mount it that would look right. So I went with the a-pillar.
Cheers
Aaron
So far the thread looks good, the supercharger kits are so pretty!
If you have them, do you have pics of your routing for the third radiator hoses from the front to the rear? I ran mine last night, and it gets pretty dang close to some drivetrain parts. Anywhere else though and it is the lowest point in the car which I dont like. I just think there has to be a route I am not seeing...
Registered User
Joined: Sep 2008
Posts: 942
From: Vancouver
Rep Power: 65
So photos of that are basically impossible. I ran them over the drive axles and transmission and up and over the engine from behind. Not so bad on the driver's side, a ***** on the passenger side due to the AC being there.
Imagine a straight line from the front to the back of the engine block, near 90 degree bend upwards, then a 90 degree bend along the fuel rails (but obviously they run further away from the engine than that -- more along the inside fenders).
That's the easiest way to explain it, but it took multiple attempts to get it to go that way. Once I had it routed, I used zap straps to make sure it all stayed in place and didn't end up dropping down in the way of any axles or suspension.
Hope that makes sense...
Cheers
Aaron
Thread Starter
|
Registered User
Joined: May 2013
Posts: 271
From: Cincinnati, OH
Rep Power: 26
So photos of that are basically impossible. I ran them over the drive axles and transmission and up and over the engine from behind. Not so bad on the driver's side, a ***** on the passenger side due to the AC being there.
Imagine a straight line from the front to the back of the engine block, near 90 degree bend upwards, then a 90 degree bend along the fuel rails (but obviously they run further away from the engine than that -- more along the inside fenders).
That's the easiest way to explain it, but it took multiple attempts to get it to go that way. Once I had it routed, I used zap straps to make sure it all stayed in place and didn't end up dropping down in the way of any axles or suspension.
Hope that makes sense...
Cheers
Aaron
Imagine a straight line from the front to the back of the engine block, near 90 degree bend upwards, then a 90 degree bend along the fuel rails (but obviously they run further away from the engine than that -- more along the inside fenders).
That's the easiest way to explain it, but it took multiple attempts to get it to go that way. Once I had it routed, I used zap straps to make sure it all stayed in place and didn't end up dropping down in the way of any axles or suspension.
Hope that makes sense...
Cheers
Aaron
Registered User
Joined: Sep 2008
Posts: 942
From: Vancouver
Rep Power: 65
Nope. If you were close to exhaust I'd have some concern, but if you have engine bay temperatures high enough to melt those, then you'd better hope you also installed a fire extinguisher! 
Cheers
Aaron
Cheers
Aaron
Registered User
Joined: Aug 2013
Posts: 300
From: Europe
Rep Power: 36
There is a guy in slovenia selling a kit for $3500 and its already in europe. Might think about doing that! I can set you up with his name on here if you are interested.
Feel free if you get into it PM me for anything. The directions are kinda slim in terms of descriptions on stuff, and I could take some guess work out of it for you.
Feel free if you get into it PM me for anything. The directions are kinda slim in terms of descriptions on stuff, and I could take some guess work out of it for you.
Wow, thats a good deal! I am not sure thogh if I oud to byu it or not. Still waiting for the upgrades I just bought hmmmmmm

In the kit you got, its "all included" or do you need to buy more things? Like ecu-tune?
But it would sure be a good thing to have a fellowmember "been there done that" to ask
