

The benefits of the GIAC Flashloader system and ...


I suppose I should have used better terminology than "limp." The safety timing maps as they might more appropriately be called are simply lower timing request maps that the programming can switch. This can happen for a myriad of reasons such as electronic hardware failures (boost control, EGT, primary O2 sensors), Intake air temperatures and/or EGTs climbing out of spec, octane level too low.
When I change modes in my cars, I always make it a point to hit the read button and ensure that the switch took place. It doesn't really take any longer and makes for good peace of mind.
When I change modes in my cars, I always make it a point to hit the read button and ensure that the switch took place. It doesn't really take any longer and makes for good peace of mind.
Take a look at the video link here:
http://awe-tuning.com/media/multimed...lashloader.wmv
When you push the "read" button on the hand held unit, it tells you what programs are loaded into the ECU, and then it tells you what program is currently selected.
When you push a different program button, the hand held flashes back at you to confirm. Very simple system.

Registered User
Joined: Oct 2008
Posts: 2,321
From: Fastlane USA
Rep Power: 246


Dyno help
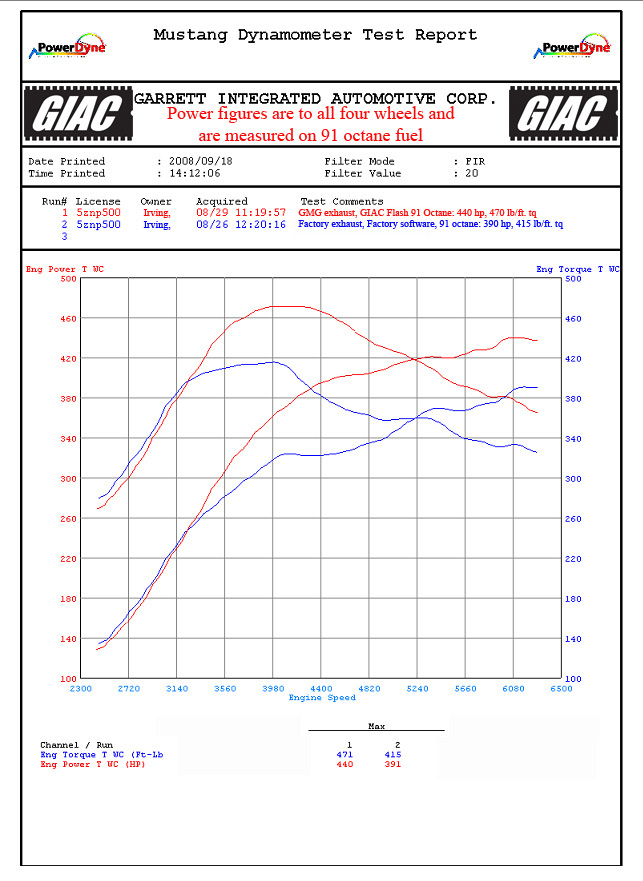
<HR style="COLOR: #d1d1e1" SIZE=1><!-- / icon and title -->Sorry for the sophomoric question, but could someone explain how to interpret the dyno chart supplied by GIAC? My confusion lies with correlating the colored lines and as to which curve(s) correspond to runs 1/2, stock vs. GIAC, torque vs HP, basically the whole chart. Thanks.
Registered User
Joined: Oct 2008
Posts: 2,321
From: Fastlane USA
Rep Power: 246
Hi Andrew,
This is very helpful thread. Are the settings for the GIAC Flashloader established with the stock or modified exhaust system, or does it even matter, meaning, if you replace the stock exhaust on a 997tt with a modified exhaust (less backpressure) how would that affect the ECU (stock or GIAC) and which ignition map it chooses? Thanks.
And vise-versa, if you upgrade with GIAC software and not replace the stock exhaust,
Registered User
Joined: Jan 2007
Posts: 10,774
From: OR Room 5
Rep Power: 1007
<hr style="color: rgb(209, 209, 225);" size="1"><!-- / icon and title -->Sorry for the sophomoric question, but could someone explain how to interpret the dyno chart supplied by GIAC? My confusion lies with correlating the colored lines and as to which curve(s) correspond to runs 1/2, stock vs. GIAC, torque vs HP, basically the whole chart. Thanks.
Two blue curves - one for HP, one for torque.
Two red curves - one for HP, one for torque after modifications.
Registered User
Joined: Oct 2008
Posts: 2,321
From: Fastlane USA
Rep Power: 246
Comprendo. Many Thanks.
 Hilarious.
Registered User
Joined: Oct 2008
Posts: 2,321
From: Fastlane USA
Rep Power: 246
Hi Austin,
Just to follow up on this thread and some clarification, GIAC flash still utilizes the knock sensor to determine which map to connect within the "stock, pump, race" settings but will not automatically "jump" between these settings? Whereas the Porsche stock ECU will jump back and forth automatically? Wouldn't it be better to automatically jump between octane settings than to have have to preset manually in case of mistakes that could potentially damage the engine?
Thanks,
Dave
Hi Kafka,
If you are running a pump/100 mix I would definitely stay in the pump gas program to receive full benefit of the increased octane. With the pump file active, adding higher octane in with your pump fuel will still allow for more power as it will switch to the highest of the 4 primary timing maps in the file. Whereas, switching to the 100 octane map might create a reverse effect switching the DME into one of the lower "limp" type timing maps.
Regarding mixing, I should note that if your fuel gauge is basically on "Empty" and you fill up with an overwhelming majority of 100, 104 or 109 octane fuel, switching into race mode will be fine. 20/80, 30/70, etc... pump/100 mixtures are more generally what I am referring to above.
In terms of safety if the car is switched into a race mode mistakenly. Well, it's funny you should ask. We actually had one of our local test cars come to our dyno for testing on PURE 91 octane set in race mode (as it had been for the previous 10 days since he had filled up with 91 after a track day). The owner noted no pinging or knock issues with the car whatsoever over the course of those days which is why he did not think to switch it. We logged the car on the dyno with it still in race mode and on pump gas and, our calibration was doing its job pulling 10-12 degrees of timing in one of the lower timing maps. Obviously, I do NOT recommend this, but I mention it because it is a testament to the safeties that we leave intact in the 997TT mapping. As noted previously, the DME does have multiple timing maps and still has the ability to switch to a limp map if need be. Additionally, the DME can also retard boost and add fuel in an effort to protect the engine.
Nevertheless, checking the program is very cut and dry with our system as it only requires plugging in the flashloader and pressing the read button with the ignition switched to the accessory or on position. I know everyone makes mistakes from time to time regardless of age, though.

Registered User
Joined: Aug 2008
Posts: 377
From: Canada
Rep Power: 63
TTDude,
You make a good point, and open an interesting can of worms. I believe EVOM's it software automatically detects and switches between octane levels. It is NOT my intention to start a GIAC vs. EVOMS debate but to ask what the pros and cons are for these two very reputable companies' (they both offers very top quality products!) different philosophies and technologies. I'm planning for one of their kits soon and I only hear excellent comments re both of their products. But I'd like to know more about the pros and cons of the two systems.
Can anybody make some comments here (without product bashing)?
K.
P.S. Some of us seniors still want to have fun (before our 9pm bedtime of course).
Last edited by Kafka997; Nov 3, 2008 at 11:57 AM.
Registered User
Joined: Dec 2007
Posts: 1,617
From: Orange County Socal
Rep Power: 159
EVOMS does have the ability to switch on it's own. I have the EVOMSit flash on my tt and it rocks. I have driven a 997tt with the GIAC and it too makes good power. I debated internally for quite some time before making my decison . It was a tough one to make.

Thread Starter
|
Former Vendor
Joined: Sep 2003
Posts: 4,479
Rep Power: 0
Hi Austin,
Just to follow up on this thread and some clarification, GIAC flash still utilizes the knock sensor to determine which map to connect within the "stock, pump, race" settings but will not automatically "jump" between these settings? Whereas the Porsche stock ECU will jump back and forth automatically? Wouldn't it be better to automatically jump between octane settings than to have have to preset manually in case of mistakes that could potentially damage the engine?
Thanks,
Dave
Just to follow up on this thread and some clarification, GIAC flash still utilizes the knock sensor to determine which map to connect within the "stock, pump, race" settings but will not automatically "jump" between these settings? Whereas the Porsche stock ECU will jump back and forth automatically? Wouldn't it be better to automatically jump between octane settings than to have have to preset manually in case of mistakes that could potentially damage the engine?
Thanks,
Dave
 oNotPromoteQF/> <w:LidThemeOther>EN-US</w:LidThemeOther> <w:LidThemeAsian>X-NONE</w:LidThemeAsian> <w:LidThemeComplexScript>X-NONE</w:LidThemeComplexScript> <w:Compatibility> <w:BreakWrappedTables/> <w:SnapToGridInCell/> <w:WrapTextWithPunct/> <w:UseAsianBreakRules/> <wontGrowAutofit/> <w:SplitPgBreakAndParaMark/> <wontVertAlignCellWithSp/> <wontBreakConstrainedForcedTables/> <wontVertAlignInTxbx/> <w:Word11KerningPairs/> <w:CachedColBalance/> </w:Compatibility> <w:BrowserLevel>MicrosoftInternetExplorer4</w:BrowserLevel> <m:mathPr> <m:mathFont m:val="Cambria Math"/> <m:brkBin m:val="before"/> <m:brkBinSub m:val="--"/> <m:smallFrac m:val="off"/> <m:dispDef/> <m:lMargin m:val="0"/> <m:rMargin m:val="0"/> <m:defJc m:val="centerGroup"/> <m:wrapIndent m:val="1440"/> <m:intLim m:val="subSup"/> <m:naryLim m:val="undOvr"/> </m:mathPr></w:WordDocument> </xml><![endif]--><!--[if gte mso 9]><xml> <w:LatentStyles DefLockedState="false" DefUnhideWhenUsed="true" DefSemiHidden="true" DefQFormat="false" DefPriority="99" LatentStyleCount="267"> <w:LsdException Locked="false" Priority="0" SemiHidden="false" UnhideWhenUsed="false" QFormat="true" Name="Normal"/> <w:LsdException Locked="false" Priority="9" SemiHidden="false" UnhideWhenUsed="false" QFormat="true" Name="heading 1"/> <w:LsdException Locked="false" Priority="9" QFormat="true" Name="heading 2"/> <w:LsdException Locked="false" Priority="9" QFormat="true" Name="heading 3"/> <w:LsdException Locked="false" Priority="9" QFormat="true" Name="heading 4"/> <w:LsdException Locked="false" Priority="9" QFormat="true" Name="heading 5"/> <w:LsdException Locked="false" Priority="9" QFormat="true" Name="heading 6"/> <w:LsdException Locked="false" Priority="9" QFormat="true" Name="heading 7"/> <w:LsdException Locked="false" Priority="9" QFormat="true" Name="heading 8"/> <w:LsdException Locked="false" Priority="9" QFormat="true" Name="heading 9"/> <w:LsdException Locked="false" Priority="39" Name="toc 1"/> <w:LsdException Locked="false" Priority="39" Name="toc 2"/> <w:LsdException Locked="false" Priority="39" Name="toc 3"/> <w:LsdException Locked="false" Priority="39" Name="toc 4"/> <w:LsdException Locked="false" Priority="39" Name="toc 5"/> <w:LsdException Locked="false" Priority="39" Name="toc 6"/> <w:LsdException Locked="false" Priority="39" Name="toc 7"/> <w:LsdException Locked="false" Priority="39" Name="toc 8"/> <w:LsdException Locked="false" Priority="39" Name="toc 9"/> <w:LsdException Locked="false" Priority="35" QFormat="true" Name="caption"/> <w:LsdException Locked="false" Priority="10" SemiHidden="false" UnhideWhenUsed="false" QFormat="true" Name="Title"/> <w:LsdException Locked="false" Priority="1" Name="Default Paragraph Font"/> <w:LsdException Locked="false" Priority="11" SemiHidden="false" UnhideWhenUsed="false" QFormat="true" Name="Subtitle"/> <w:LsdException Locked="false" Priority="22" SemiHidden="false" UnhideWhenUsed="false" QFormat="true" Name="Strong"/> <w:LsdException Locked="false" Priority="20" SemiHidden="false" UnhideWhenUsed="false" QFormat="true" Name="Emphasis"/> <w:LsdException Locked="false" Priority="59" SemiHidden="false" UnhideWhenUsed="false" Name="Table Grid"/> <w:LsdException Locked="false" UnhideWhenUsed="false" Name="Placeholder Text"/> <w:LsdException Locked="false" Priority="1" SemiHidden="false" UnhideWhenUsed="false" QFormat="true" Name="No Spacing"/> <w:LsdException Locked="false" Priority="60" SemiHidden="false" UnhideWhenUsed="false" Name="Light Shading"/> <w:LsdException Locked="false" Priority="61" SemiHidden="false" UnhideWhenUsed="false" Name="Light List"/> <w:LsdException Locked="false" Priority="62" SemiHidden="false" UnhideWhenUsed="false" Name="Light Grid"/> <w:LsdException Locked="false" Priority="63" SemiHidden="false" UnhideWhenUsed="false" Name="Medium Shading 1"/> <w:LsdException Locked="false" Priority="64" SemiHidden="false" UnhideWhenUsed="false" Name="Medium Shading 2"/> <w:LsdException Locked="false" Priority="65" SemiHidden="false" UnhideWhenUsed="false" Name="Medium List 1"/> <w:LsdException Locked="false" Priority="66" SemiHidden="false" UnhideWhenUsed="false" Name="Medium List 2"/> <w:LsdException Locked="false" Priority="67" SemiHidden="false" UnhideWhenUsed="false" Name="Medium Grid 1"/> <w:LsdException Locked="false" Priority="68" SemiHidden="false" UnhideWhenUsed="false" Name="Medium Grid 2"/> <w:LsdException Locked="false" Priority="69" SemiHidden="false" UnhideWhenUsed="false" Name="Medium Grid 3"/> <w:LsdException Locked="false" Priority="70" SemiHidden="false" UnhideWhenUsed="false" Name="Dark List"/> <w:LsdException Locked="false" Priority="71" SemiHidden="false" UnhideWhenUsed="false" Name="Colorful Shading"/> <w:LsdException Locked="false" Priority="72" SemiHidden="false" UnhideWhenUsed="false" Name="Colorful List"/> <w:LsdException Locked="false" Priority="73" SemiHidden="false" UnhideWhenUsed="false" Name="Colorful Grid"/> <w:LsdException Locked="false" Priority="60" SemiHidden="false" UnhideWhenUsed="false" Name="Light Shading Accent 1"/> <w:LsdException Locked="false" Priority="61" SemiHidden="false" UnhideWhenUsed="false" Name="Light List Accent 1"/> <w:LsdException Locked="false" Priority="62" SemiHidden="false" UnhideWhenUsed="false" Name="Light Grid Accent 1"/> <w:LsdException Locked="false" Priority="63" SemiHidden="false" UnhideWhenUsed="false" Name="Medium Shading 1 Accent 1"/> <w:LsdException Locked="false" Priority="64" SemiHidden="false" UnhideWhenUsed="false" Name="Medium Shading 2 Accent 1"/> <w:LsdException Locked="false" Priority="65" SemiHidden="false" UnhideWhenUsed="false" Name="Medium List 1 Accent 1"/> <w:LsdException Locked="false" UnhideWhenUsed="false" Name="Revision"/> <w:LsdException Locked="false" Priority="34" SemiHidden="false" UnhideWhenUsed="false" QFormat="true" Name="List Paragraph"/> <w:LsdException Locked="false" Priority="29" SemiHidden="false" UnhideWhenUsed="false" QFormat="true" Name="Quote"/> <w:LsdException Locked="false" Priority="30" SemiHidden="false" UnhideWhenUsed="false" QFormat="true" Name="Intense Quote"/> <w:LsdException Locked="false" Priority="66" SemiHidden="false" UnhideWhenUsed="false" Name="Medium List 2 Accent 1"/> <w:LsdException Locked="false" Priority="67" SemiHidden="false" UnhideWhenUsed="false" Name="Medium Grid 1 Accent 1"/> <w:LsdException Locked="false" Priority="68" SemiHidden="false" UnhideWhenUsed="false" Name="Medium Grid 2 Accent 1"/> <w:LsdException Locked="false" Priority="69" SemiHidden="false" UnhideWhenUsed="false" Name="Medium Grid 3 Accent 1"/> <w:LsdException Locked="false" Priority="70" SemiHidden="false" UnhideWhenUsed="false" Name="Dark List Accent 1"/> <w:LsdException Locked="false" Priority="71" SemiHidden="false" UnhideWhenUsed="false" Name="Colorful Shading Accent 1"/> <w:LsdException Locked="false" Priority="72" SemiHidden="false" UnhideWhenUsed="false" Name="Colorful List Accent 1"/> <w:LsdException Locked="false" Priority="73" SemiHidden="false" UnhideWhenUsed="false" Name="Colorful Grid Accent 1"/> <w:LsdException Locked="false" Priority="60" SemiHidden="false" UnhideWhenUsed="false" Name="Light Shading Accent 2"/> <w:LsdException Locked="false" Priority="61" SemiHidden="false" UnhideWhenUsed="false" Name="Light List Accent 2"/> <w:LsdException Locked="false" Priority="62" SemiHidden="false" UnhideWhenUsed="false" Name="Light Grid Accent 2"/> <w:LsdException Locked="false" Priority="63" SemiHidden="false" UnhideWhenUsed="false" Name="Medium Shading 1 Accent 2"/> <w:LsdException Locked="false" Priority="64" SemiHidden="false" UnhideWhenUsed="false" Name="Medium Shading 2 Accent 2"/> <w:LsdException Locked="false" Priority="65" SemiHidden="false" UnhideWhenUsed="false" Name="Medium List 1 Accent 2"/> <w:LsdException Locked="false" Priority="66" SemiHidden="false" UnhideWhenUsed="false" Name="Medium List 2 Accent 2"/> <w:LsdException Locked="false" Priority="67" SemiHidden="false" UnhideWhenUsed="false" Name="Medium Grid 1 Accent 2"/> <w:LsdException Locked="false" Priority="68" SemiHidden="false" UnhideWhenUsed="false" Name="Medium Grid 2 Accent 2"/> <w:LsdException Locked="false" Priority="69" SemiHidden="false" UnhideWhenUsed="false" Name="Medium Grid 3 Accent 2"/> <w:LsdException Locked="false" Priority="70" SemiHidden="false" UnhideWhenUsed="false" Name="Dark List Accent 2"/> <w:LsdException Locked="false" Priority="71" SemiHidden="false" UnhideWhenUsed="false" Name="Colorful Shading Accent 2"/> <w:LsdException Locked="false" Priority="72" SemiHidden="false" UnhideWhenUsed="false" Name="Colorful List Accent 2"/> <w:LsdException Locked="false" Priority="73" SemiHidden="false" UnhideWhenUsed="false" Name="Colorful Grid Accent 2"/> <w:LsdException Locked="false" Priority="60" SemiHidden="false" UnhideWhenUsed="false" Name="Light Shading Accent 3"/> <w:LsdException Locked="false" Priority="61" SemiHidden="false" UnhideWhenUsed="false" Name="Light List Accent 3"/> <w:LsdException Locked="false" Priority="62" SemiHidden="false" UnhideWhenUsed="false" Name="Light Grid Accent 3"/> <w:LsdException Locked="false" Priority="63" SemiHidden="false" UnhideWhenUsed="false" Name="Medium Shading 1 Accent 3"/> <w:LsdException Locked="false" Priority="64" SemiHidden="false" UnhideWhenUsed="false" Name="Medium Shading 2 Accent 3"/> <w:LsdException Locked="false" Priority="65" SemiHidden="false" UnhideWhenUsed="false" Name="Medium List 1 Accent 3"/> <w:LsdException Locked="false" Priority="66" SemiHidden="false" UnhideWhenUsed="false" Name="Medium List 2 Accent 3"/> <w:LsdException Locked="false" Priority="67" SemiHidden="false" UnhideWhenUsed="false" Name="Medium Grid 1 Accent 3"/> <w:LsdException Locked="false" Priority="68" SemiHidden="false" UnhideWhenUsed="false" Name="Medium Grid 2 Accent 3"/> <w:LsdException Locked="false" Priority="69" SemiHidden="false" UnhideWhenUsed="false" Name="Medium Grid 3 Accent 3"/> <w:LsdException Locked="false" Priority="70" SemiHidden="false" UnhideWhenUsed="false" Name="Dark List Accent 3"/> <w:LsdException Locked="false" Priority="71" SemiHidden="false" UnhideWhenUsed="false" Name="Colorful Shading Accent 3"/> <w:LsdException Locked="false" Priority="72" SemiHidden="false" UnhideWhenUsed="false" Name="Colorful List Accent 3"/> <w:LsdException Locked="false" Priority="73" SemiHidden="false" UnhideWhenUsed="false" Name="Colorful Grid Accent 3"/> <w:LsdException Locked="false" Priority="60" SemiHidden="false" UnhideWhenUsed="false" Name="Light Shading Accent 4"/> <w:LsdException Locked="false" Priority="61" SemiHidden="false" UnhideWhenUsed="false" Name="Light List Accent 4"/> <w:LsdException Locked="false" Priority="62" SemiHidden="false" UnhideWhenUsed="false" Name="Light Grid Accent 4"/> <w:LsdException Locked="false" Priority="63" SemiHidden="false" UnhideWhenUsed="false" Name="Medium Shading 1 Accent 4"/> <w:LsdException Locked="false" Priority="64" SemiHidden="false" UnhideWhenUsed="false" Name="Medium Shading 2 Accent 4"/> <w:LsdException Locked="false" Priority="65" SemiHidden="false" UnhideWhenUsed="false" Name="Medium List 1 Accent 4"/> <w:LsdException Locked="false" Priority="66" SemiHidden="false" UnhideWhenUsed="false" Name="Medium List 2 Accent 4"/> <w:LsdException Locked="false" Priority="67" SemiHidden="false" UnhideWhenUsed="false" Name="Medium Grid 1 Accent 4"/> <w:LsdException Locked="false" Priority="68" SemiHidden="false" UnhideWhenUsed="false" Name="Medium Grid 2 Accent 4"/> <w:LsdException Locked="false" Priority="69" SemiHidden="false" UnhideWhenUsed="false" Name="Medium Grid 3 Accent 4"/> <w:LsdException Locked="false" Priority="70" SemiHidden="false" UnhideWhenUsed="false" Name="Dark List Accent 4"/> <w:LsdException Locked="false" Priority="71" SemiHidden="false" UnhideWhenUsed="false" Name="Colorful Shading Accent 4"/> <w:LsdException Locked="false" Priority="72" SemiHidden="false" UnhideWhenUsed="false" Name="Colorful List Accent 4"/> <w:LsdException Locked="false" Priority="73" SemiHidden="false" UnhideWhenUsed="false" Name="Colorful Grid Accent 4"/> <w:LsdException Locked="false" Priority="60" SemiHidden="false" UnhideWhenUsed="false" Name="Light Shading Accent 5"/> <w:LsdException Locked="false" Priority="61" SemiHidden="false" UnhideWhenUsed="false" Name="Light List Accent 5"/> <w:LsdException Locked="false" Priority="62" SemiHidden="false" UnhideWhenUsed="false" Name="Light Grid Accent 5"/> <w:LsdException Locked="false" Priority="63" SemiHidden="false" UnhideWhenUsed="false" Name="Medium Shading 1 Accent 5"/> <w:LsdException Locked="false" Priority="64" SemiHidden="false" UnhideWhenUsed="false" Name="Medium Shading 2 Accent 5"/> <w:LsdException Locked="false" Priority="65" SemiHidden="false" UnhideWhenUsed="false" Name="Medium List 1 Accent 5"/> <w:LsdException Locked="false" Priority="66" SemiHidden="false" UnhideWhenUsed="false" Name="Medium List 2 Accent 5"/> <w:LsdException Locked="false" Priority="67" SemiHidden="false" UnhideWhenUsed="false" Name="Medium Grid 1 Accent 5"/> <w:LsdException Locked="false" Priority="68" SemiHidden="false" UnhideWhenUsed="false" Name="Medium Grid 2 Accent 5"/> <w:LsdException Locked="false" Priority="69" SemiHidden="false" UnhideWhenUsed="false" Name="Medium Grid 3 Accent 5"/> <w:LsdException Locked="false" Priority="70" SemiHidden="false" UnhideWhenUsed="false" Name="Dark List Accent 5"/> <w:LsdException Locked="false" Priority="71" SemiHidden="false" UnhideWhenUsed="false" Name="Colorful Shading Accent 5"/> <w:LsdException Locked="false" Priority="72" SemiHidden="false" UnhideWhenUsed="false" Name="Colorful List Accent 5"/> <w:LsdException Locked="false" Priority="73" SemiHidden="false" UnhideWhenUsed="false" Name="Colorful Grid Accent 5"/> <w:LsdException Locked="false" Priority="60" SemiHidden="false" UnhideWhenUsed="false" Name="Light Shading Accent 6"/> <w:LsdException Locked="false" Priority="61" SemiHidden="false" UnhideWhenUsed="false" Name="Light List Accent 6"/> <w:LsdException Locked="false" Priority="62" SemiHidden="false" UnhideWhenUsed="false" Name="Light Grid Accent 6"/> <w:LsdException Locked="false" Priority="63" SemiHidden="false" UnhideWhenUsed="false" Name="Medium Shading 1 Accent 6"/> <w:LsdException Locked="false" Priority="64" SemiHidden="false" UnhideWhenUsed="false" Name="Medium Shading 2 Accent 6"/> <w:LsdException Locked="false" Priority="65" SemiHidden="false" UnhideWhenUsed="false" Name="Medium List 1 Accent 6"/> <w:LsdException Locked="false" Priority="66" SemiHidden="false" UnhideWhenUsed="false" Name="Medium List 2 Accent 6"/> <w:LsdException Locked="false" Priority="67" SemiHidden="false" UnhideWhenUsed="false" Name="Medium Grid 1 Accent 6"/> <w:LsdException Locked="false" Priority="68" SemiHidden="false" UnhideWhenUsed="false" Name="Medium Grid 2 Accent 6"/> <w:LsdException Locked="false" Priority="69" SemiHidden="false" UnhideWhenUsed="false" Name="Medium Grid 3 Accent 6"/> <w:LsdException Locked="false" Priority="70" SemiHidden="false" UnhideWhenUsed="false" Name="Dark List Accent 6"/> <w:LsdException Locked="false" Priority="71" SemiHidden="false" UnhideWhenUsed="false" Name="Colorful Shading Accent 6"/> <w:LsdException Locked="false" Priority="72" SemiHidden="false" UnhideWhenUsed="false" Name="Colorful List Accent 6"/> <w:LsdException Locked="false" Priority="73" SemiHidden="false" UnhideWhenUsed="false" Name="Colorful Grid Accent 6"/> <w:LsdException Locked="false" Priority="19" SemiHidden="false" UnhideWhenUsed="false" QFormat="true" Name="Subtle Emphasis"/> <w:LsdException Locked="false" Priority="21" SemiHidden="false" UnhideWhenUsed="false" QFormat="true" Name="Intense Emphasis"/> <w:LsdException Locked="false" Priority="31" SemiHidden="false" UnhideWhenUsed="false" QFormat="true" Name="Subtle Reference"/> <w:LsdException Locked="false" Priority="32" SemiHidden="false" UnhideWhenUsed="false" QFormat="true" Name="Intense Reference"/> <w:LsdException Locked="false" Priority="33" SemiHidden="false" UnhideWhenUsed="false" QFormat="true" Name="Book Title"/> <w:LsdException Locked="false" Priority="37" Name="Bibliography"/> <w:LsdException Locked="false" Priority="39" QFormat="true" Name="TOC Heading"/> </w:LatentStyles> </xml><![endif]--><style> <!-- /* Font Definitions */ @font-face {font-family:"Cambria Math"; panose-1:2 4 5 3 5 4 6 3 2 4; mso-font-charset:0; mso-generic-font-family:roman; mso-font-pitch:variable; mso-font-signature:-1610611985 1107304683 0 0 159 0;} @font-face {font-family:Calibri; panose-1:2 15 5 2 2 2 4 3 2 4; mso-font-charset:0; mso-generic-font-family:swiss; mso-font-pitch:variable; mso-font-signature:-1610611985 1073750139 0 0 159 0;} /* Style Definitions */ p.MsoNormal, li.MsoNormal, div.MsoNormal {mso-style-unhide:no; mso-style-qformat:yes; mso-style-parent:""; margin-top:0in; margin-right:0in; margin-bottom:10.0pt; margin-left:0in; line-height:115%; mso-pagination:widow-orphan; font-size:11.0pt; font-family:"Calibri","sans-serif"; mso-ascii-font-family:Calibri; mso-ascii-theme-font:minor-latin; mso-fareast-font-family:Calibri; mso-fareast-theme-font:minor-latin; mso-hansi-font-family:Calibri; mso-hansi-theme-font:minor-latin; mso-bidi-font-family:"Times New Roman"; mso-bidi-theme-font:minor-bidi;} .MsoChpDefault {mso-style-type:export-only; mso-default-props:yes; mso-ascii-font-family:Calibri; mso-ascii-theme-font:minor-latin; mso-fareast-font-family:Calibri; mso-fareast-theme-font:minor-latin; mso-hansi-font-family:Calibri; mso-hansi-theme-font:minor-latin; mso-bidi-font-family:"Times New Roman"; mso-bidi-theme-font:minor-bidi;} .MsoPapDefault {mso-style-type:export-only; margin-bottom:10.0pt; line-height:115%;} @page Section1 {size:8.5in 11.0in; margin:1.0in 1.0in 1.0in 1.0in; mso-header-margin:.5in; mso-footer-margin:.5in; mso-paper-source:0;} div.Section1 {page:Section1;} --> </style><!--[if gte mso 10]> <style> /* Style Definitions */ table.MsoNormalTable {mso-style-name:"Table Normal"; mso-tstyle-rowband-size:0; mso-tstyle-colband-size:0; mso-style-noshow:yes; mso-style-priority:99; mso-style-qformat:yes; mso-style-parent:""; mso-padding-alt:0in 5.4pt 0in 5.4pt; mso-para-margin-top:0in; mso-para-margin-right:0in; mso-para-margin-bottom:10.0pt; mso-para-margin-left:0in; line-height:115%; mso-pagination:widow-orphan; font-size:11.0pt; font-family:"Calibri","sans-serif"; mso-ascii-font-family:Calibri; mso-ascii-theme-font:minor-latin; mso-fareast-font-family:"Times New Roman"; mso-fareast-theme-font:minor-fareast; mso-hansi-font-family:Calibri; mso-hansi-theme-font:minor-latin;} </style> <![endif]--> Within the stock, pump and race maps, our software adjusts timing maps the same way that a factory 997TT would. Our software automatically moves between timing maps depending on noise from the knock sensors. The thing that sets our software apart is that it does much more than adjust timing maps when switching modes. Our software has different fuel maps, boost maps, torque limits, etc� that are all changed over as well when the program is switched from stock to pump, pump to race, and so on. It is also true that our switching abilities give the ECU more timing maps to switch between.
 For what it�s worth, there is no automatic octane detection beyond the knock sensor, the DME does not have a sniffer that senses octane and adjusts accordingly. Knock control is native to these DME�s which will begin at the highest timing map when the car is freshly flashed and move down. Each program has its own unique map set that is calibrated to be safe at the optimized octane levels we set for each. The race map has timing maps available that are extremely low in the event that mechanical hardware or sensor input failure on the car or insufficient octane is used. For stock pump and race settings, we have complete sets of maps for overboost and non-overboost modes. To make it clear, each of our modes utilize knock control to find the optimal mapping for a given octane level just like the factory and some other aftermarket software companies.
This post made previously in this thread might also help to break down what I am saying above.
A fully loaded flashloader system has..
1) Pump gas calibration includes but is not limited to:
- GIAC pump gas boost tables.
- Four RON (research octane) based ignition maps ranging from 98 RON to 93 RON and the DME can jump between these to adapt to octane and condition differences.
2) Fully stock calibration which includes:
- Stock boost tables.
- Four Stock RON dependant ignition maps.
3) Race gas calibration includes but is not limited to.
- Race gas boost tables.
- Four RON (research octane) based ignition maps ranging from C16 leaded racing fuel to 100 RON and the DME can jump between these to adapt to octane and condition differences.
4) The valet mode:
- Limited to part throttle.
5) The Kill mode:
- immobilizes the car, even if the key is used.
The stock chip's automatic switching, that many tuners over the years have used for higher octane switching, works structurally the same as our stock chip option by itself or the pump program by itself, etc.
Registered User
Joined: Oct 2008
Posts: 2,321
From: Fastlane USA
Rep Power: 246
Thanks for the reply. Is it not possible to design software to incorporate all the input maps-boost, fuel, timing, etc under one umbrella or is that too much processing for the ECU to handle? I appreciate your help.
<LINK href="file:///C:%5CUsers%5CAUSTIN%7E1%5CAppData%5CLocal%5CTemp%5 Cmsohtmlclip1%5C01%5Cclip_filelist.xml" rel=File-List><LINK href="file:///C:%5CUsers%5CAUSTIN%7E1%5CAppData%5CLocal%5CTemp%5 Cmsohtmlclip1%5C01%5Cclip_themedata.thmx" rel=themeData><LINK href="file:///C:%5CUsers%5CAUSTIN%7E1%5CAppData%5CLocal%5CTemp%5 Cmsohtmlclip1%5C01%5Cclip_colorschememapping.xml" rel=colorSchemeMapping><STYLE> <!-- /* Font Definitions */ @font-face {font-family:"Cambria Math"; panose-1:2 4 5 3 5 4 6 3 2 4; mso-font-charset:0; mso-generic-font-family:roman; mso-font-pitch:variable; mso-font-signature:-1610611985 1107304683 0 0 159 0;} @font-face {font-family:Calibri; panose-1:2 15 5 2 2 2 4 3 2 4; mso-font-charset:0; mso-generic-font-family:swiss; mso-font-pitch:variable; mso-font-signature:-1610611985 1073750139 0 0 159 0;} /* Style Definitions */ p.MsoNormal, li.MsoNormal, div.MsoNormal {mso-style-unhide:no; mso-style-qformat:yes; mso-style-parent:""; margin-top:0in; margin-right:0in; margin-bottom:10.0pt; margin-left:0in; line-height:115%; mso-pagination:widow-orphan; font-size:11.0pt; font-family:"Calibri","sans-serif"; mso-ascii-font-family:Calibri; mso-ascii-theme-font:minor-latin; mso-fareast-font-family:Calibri; mso-fareast-theme-font:minor-latin; mso-hansi-font-family:Calibri; mso-hansi-theme-font:minor-latin; mso-bidi-font-family:"Times New Roman"; mso-bidi-theme-font:minor-bidi;} .MsoChpDefault {mso-style-type:export-only; mso-default-props:yes; mso-ascii-font-family:Calibri; mso-ascii-theme-font:minor-latin; mso-fareast-font-family:Calibri; mso-fareast-theme-font:minor-latin; mso-hansi-font-family:Calibri; mso-hansi-theme-font:minor-latin; mso-bidi-font-family:"Times New Roman"; mso-bidi-theme-font:minor-bidi;} .MsoPapDefault {mso-style-type:export-only; margin-bottom:10.0pt; line-height:115%;} @page Section1 {size:8.5in 11.0in; margin:1.0in 1.0in 1.0in 1.0in; mso-header-margin:.5in; mso-footer-margin:.5in; mso-paper-source:0;} div.Section1 {page:Section1;} --> </STYLE> Within the stock, pump and race maps, our software adjusts timing maps the same way that a factory 997TT would. Our software automatically moves between timing maps depending on noise from the knock sensors. The thing that sets our software apart is that it does much more than adjust timing maps when switching modes. Our software has different fuel maps, boost maps, torque limits, etc� that are all changed over as well when the program is switched from stock to pump, pump to race, and so on. It is also true that our switching abilities give the ECU more timing maps to switch between.
For what it�s worth, there is no automatic octane detection beyond the knock sensor, the DME does not have a sniffer that senses octane and adjusts accordingly. Knock control is native to these DME�s which will begin at the highest timing map when the car is freshly flashed and move down. Each program has its own unique map set that is calibrated to be safe at the optimized octane levels we set for each. The race map has timing maps available that are extremely low in the event that mechanical hardware or sensor input failure on the car or insufficient octane is used. For stock pump and race settings, we have complete sets of maps for overboost and non-overboost modes. To make it clear, each of our modes utilize knock control to find the optimal mapping for a given octane level just like the factory and some other aftermarket software companies.
This post made previously in this thread might also help to break down what I am saying above.

Registered User
Joined: Dec 2006
Posts: 3,116
From: Palos Verdes
Rep Power: 256
Is it related to the fact that there is no "sniffer that senses octane and adjusts accordingly," as Austin stated below? In other words, the ability to switch according to octane depends on an *ability* to tell what octane it is? And since the ECU doesn't have this capability, it cannot do auto switching?
>>>>>>>>>>>>
For what it�s worth, there is no automatic octane detection beyond the knock sensor, the DME does not have a sniffer that senses octane and adjusts accordingly.
>>>>>>>>>>>>>