

Water Pump Replacement DIY Help Please

Thread Starter
|
Registered User
Joined: Mar 2014
Posts: 36
From: Redwood City, CA
Rep Power: 14

Water Pump Replacement DIY Help Please
I had the drips this past weekend from under the water pump. Pulled the belt and sure enough the bearings are gone. Just FYI, although it is a 2007, my car only has 23,000 miles on it...seems a little early for a water pump replacement....
Disassembly went pretty well. Followed the advice from members, which gave me the courage to take this on, and which helped tremendously! I will be replacing the water pump and the thermostat since I'm in the neighborhood.
Couple questions:
1) I have a metal gasket on the water pump, which also gaskets an adjacent part. I would have to pull off whatever that adjacent part is to remove the gasket, which I don't think is intended. With an aftermarket, non-OEM pump (Laso) does anyone know if I can install it utilizing the existing metal gasket, or do I need to pull it off and install new gaskets?
2) Will I be successful in refilling the system without a UView type refiller kit, as suggested in a Rennlist DIY video, by opening the burping valve?
3) Okay to use normal screw-type clamps to replace the OEM spring clamps?
Thanks as always!
Registered User
Joined: Jan 2013
Posts: 63
Rep Power: 16
1. You definitely need a new gasket. The OEM one is connected to the neighboring gasket with three or four small metal connections, which you will need to cut. Install a brand-new gasket in it's place with the new pump.
2. I used a regular old funnel to replace the coolant and followed the Pelican Parts tech article on how to bleed the system.
3. Spring-type hose clamps are recommended because they maintain constant pressure since they allow for the natural expansion and contraction that comes with operating cycles.
A couple of other notes -- when you support the motor to loosen the mount brace, be sure not to cover up the forward part of the base of the motor (with wood that you should sandwich between your engine and jack). This is because there is a small torx bolt there that you will need to remove (along with two or three on the driver's side of the block) to free up a hard line with enough wiggle room to get the old pump out and the new one back on.
Other than that, just take your time and enjoy the quality time with your car
Registered User
Joined: Oct 2012
Posts: 631
From: Hangtown, Ca.(gold country)
Rep Power: 42
Im interested, 06 with 30K...might try it myself whenever it happens..any pics will help...I changed my lifetime coolant at 28K, hoping to get some more miles out of it...coolant should be pink but it was a red wine color..


Here is a great DIY for water pump replacement. Hope this helps. If you need parts we have them here. If you need any other help please don't hesitate to ask!
-Luccia
If you need parts we have them here. If you need any other help please don't hesitate to ask!-Luccia
__________________


Registered User
Joined: Mar 2013
Posts: 389
From: Midwest
Rep Power: 29
Thor... You will/can be successful burping the system via gravity bleed with your purge valve left open and the car standing at idle for a while. You will lose approx. 2 gallons on the ground when removing the water pump.
Hell yes youll install new gasket.
Im not a fan of any spring clamp. If you feel the need to use them....buy new ones. I will not use them, and instead use German "Gemi" brand hose clamps. Some will say you need expansion/contraction of a clamp... I disagree with this, as remember, your expansion tank top valve when up to operating temp, opens and allows this expansion.
I just bought a new used motor scooter with only 20 miles on it and a 2010 model year.... it had spring clamps on it...guess what... both were leaking.
Good luck with the project. Please try to follow torque specs and sequence your tightening to snug in a star pattern before final torque, and youre GTG!
Registered User
Joined: Feb 2010
Posts: 1,889
From: SoCal
Rep Power: 161

i just had the water pump replaced as a part of preventive maintenance (and added a third radiator
). here is a good DIY for WP:
http://rennlist.com/forums/997-forum...with-pics.html
Thread Starter
|
Registered User
Joined: Mar 2014
Posts: 36
From: Redwood City, CA
Rep Power: 14
1. You definitely need a new gasket. The OEM one is connected to the neighboring gasket with three or four small metal connections, which you will need to cut. Install a brand-new gasket in it's place with the new pump.
2. I used a regular old funnel to replace the coolant and followed the Pelican Parts tech article on how to bleed the system.
3. Spring-type hose clamps are recommended because they maintain constant pressure since they allow for the natural expansion and contraction that comes with operating cycles.
A couple of other notes -- when you support the motor to loosen the mount brace, be sure not to cover up the forward part of the base of the motor (with wood that you should sandwich between your engine and jack). This is because there is a small torx bolt there that you will need to remove (along with two or three on the driver's side of the block) to free up a hard line with enough wiggle room to get the old pump out and the new one back on.
Other than that, just take your time and enjoy the quality time with your car
2. I used a regular old funnel to replace the coolant and followed the Pelican Parts tech article on how to bleed the system.
3. Spring-type hose clamps are recommended because they maintain constant pressure since they allow for the natural expansion and contraction that comes with operating cycles.
A couple of other notes -- when you support the motor to loosen the mount brace, be sure not to cover up the forward part of the base of the motor (with wood that you should sandwich between your engine and jack). This is because there is a small torx bolt there that you will need to remove (along with two or three on the driver's side of the block) to free up a hard line with enough wiggle room to get the old pump out and the new one back on.
Other than that, just take your time and enjoy the quality time with your car
I have to say I am enjoying our quality time together!
Should have her back together tomorrow...
Trending Topics
Thread Starter
|
Registered User
Joined: Mar 2014
Posts: 36
From: Redwood City, CA
Rep Power: 14
Thanks Patrick/CC/Lucia...really helpful. This is my first major (to me) DIY on my car, NTM last year, so everyone's advice is greatly appreciated.
I got everything dismantled okay, engine lifted, pump removed. However, that last tricky bolt removal on the wp was tricky. Bought some longer extensions for my 1/4" drive to hopefully be able to reassemble more easily and tighten to spec.
The Rennlist video was really helpful for disassembly. I'll post pics on reassembly if I find a particularly useful trick.
My pleasure and don't let it being your first major DIY job discourage you. Let us know how it goes.
-Luccia
-Luccia
__________________
Registered User
Joined: Mar 2013
Posts: 389
From: Midwest
Rep Power: 29
Yea Thor...the WP bolt at the 5 oclock position isn't the easiest to undo/re tighten. if youre having issues getting that last bolt to thread in... throw a bit of tooth paste on the bolt head as to hold it onto your socket to be able to get it started.
Don't give in to the spring clamp crowd...they aren't that great, and not that great of a design either. good luck!!
Don't give in to the spring clamp crowd...they aren't that great, and not that great of a design either. good luck!!
Thread Starter
|
Registered User
Joined: Mar 2014
Posts: 36
From: Redwood City, CA
Rep Power: 14
Well, I gott'er all put back together, torqued, refilled and tested! Thanks everyone for your advice...really helpful...
Little more to the story...she's not my DD, and my wife wanted to use the car while her parents were in town so they could drive her car. She had never driven it before, so we decided to go out to dinner and she would drive to make sure she was comfortable with it (she'd never driven it before). I've had it for about a year-and-a-half, and she's purred like a kitten since day one. As we got out of the car, this red fluid was flowing out from underneath...the seven stages of trauma overcame me...shock, disbelief, denial, BLAME is as far as I got...So, random event (with only 23k miles on her..), or something deeper? I choose to believe the latter.
My learnings on this for anyone else new to DIY'ing their 997.1...
1) totally something to go after, with very good "introductory" experience in working on your car.
2) have 1/4" drive and long extensions handy.
3) have universals which make 75 degree angles handy.
4) used the European screw clamps, interesting that I bought them from Porsche, and they didn't even have spring clamps available....telling?
5) have small hands handy.
6) get a 1/4" torque wrench (probably obvious to everyone else).
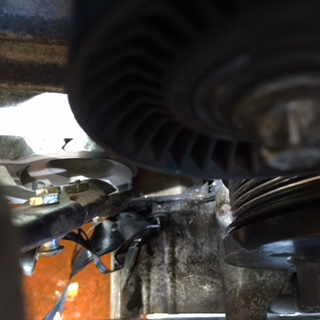
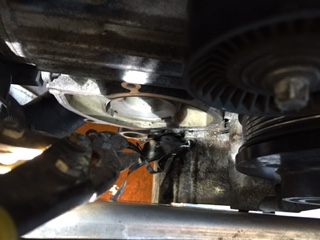
Couple pics that might help the next newbie:
Cutting out old gasket with tin snips
Using extensions for difficult to reach bolts
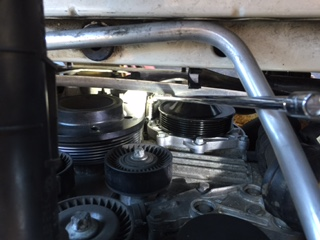
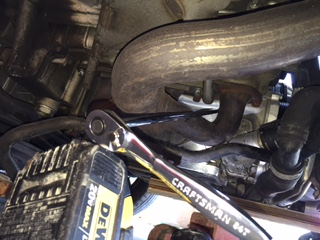
Little more to the story...she's not my DD, and my wife wanted to use the car while her parents were in town so they could drive her car. She had never driven it before, so we decided to go out to dinner and she would drive to make sure she was comfortable with it (she'd never driven it before). I've had it for about a year-and-a-half, and she's purred like a kitten since day one. As we got out of the car, this red fluid was flowing out from underneath...the seven stages of trauma overcame me...shock, disbelief, denial, BLAME is as far as I got...So, random event (with only 23k miles on her..), or something deeper? I choose to believe the latter.
My learnings on this for anyone else new to DIY'ing their 997.1...
1) totally something to go after, with very good "introductory" experience in working on your car.
2) have 1/4" drive and long extensions handy.
3) have universals which make 75 degree angles handy.
4) used the European screw clamps, interesting that I bought them from Porsche, and they didn't even have spring clamps available....telling?
5) have small hands handy.
6) get a 1/4" torque wrench (probably obvious to everyone else).
Couple pics that might help the next newbie:
Cutting out old gasket with tin snips
Using extensions for difficult to reach bolts

Thread
Thread Starter
Forum
Replies
Last Post
turbotuner20v
Automobiles For Sale
20
Sep 11, 2015 12:02 PM