

997.1 - How to replace your starter during your lunch break

Thread Starter
|
Registered User
Joined: Jan 2011
Posts: 375
From: RALEIGH, NC
Rep Power: 36


997.1 - How to replace your starter during your lunch break
For those following our saga of endless maintenance, here is the last (unplanned) installment on our 2006 C4S.
Last weekend, my car refused to start on the parking lot of my working place, leaving me stranded for 1.5 hours, while AAA was busy assisting other "customers".... it was Valentine day. A new battery was installed, allowing the car a few more days of life.
Four days later, the car refused to start completely, despite the change of battery. Every time it was cranked in the meantime, a loud noise was being heard in the back of the engine, right after the engine started. Not a pleasant feeling for sure. I am describing these symptoms for people who may experience the same. You will then, know what to do.
Again, AAA is being called. This time the operator knows me: "Oh you are the guy with the Black Porsche....?" Yes, the same one!! I am taking advantage of my Gold membership, apparently.
This time I am having the car towed to my friend's garage. The AAA operator tries to bang on the starter with a long rod, while I try to turn the key. The net result is that a white smoke starts coming out of the engine compartment, causing me to freak out. I disconnect the battery and we put the car on the truck bed.
About three years ago, I replaced the starter to alleviate the atrocious warm-start symptoms at the gas station, while all the enthusiasts and jealous people are smirking at my pathetic attempts to re-start the car. The original starter was replaced by a rebuilt one, "Hecho in Mejico!". It lasted three years and ended up in a white cloud of smoke. In comparison, my 1997 BMW 540i is still on its original starter, with 200,000 miles on the odometer. They knew how to build cars, in the 90's.
Having already replaced the starter, I was not afraid of doing it again, and ended up performing the task in less time than it takes most of us to take a lunch break: 1.5 hours.

The original part (made by Bosch) cost about $1200 at any Porsche Dealer. Worldpac offers the Genuine/Bosch part for $207. It is a no brainer, and this time I am not going with :Hecho in Mejico" but with "Made in Hungary". Let's see who will last the longest: Mexicans against Hungarians, under the watch of Mr. Bosch. Note in passing, the slight markup at the Porsche dealership. Also, note the "Do not strike with Hammer" label for the AAA operators (the guy was trying to help and told me that he had rescued 7 cars with that trick, the night before).
Okay, back to the shop for another round. Replacing the starter is not too difficult and as long as you have some readily available tools, it does not present any difficulties. Honestly, the major hindrance is the oil feed hose, which is always in the middle.
0) Disconnect the negative of your battery. Leave the trunk lid open.
1) Remove your air filter. A lot has been written on that subject and I will not detail it. I recommend gluing the two large rubber grommets to the chassis. This way, you will never lose them again.
2) Remove the four E-10 bolts holding the throttle actuator, after delicately unplugging the connector. Remove and store aside that unit.
3) Using a 7mm socket, undo all four hose clamps from the throttle holder. Make sure they are very lose. Push the rubber sleeves to the outside. Pry the plastic holder out. This is the most delicate part: removing and replacing these assemblies without damaging the rubber sleeves. It is very tight.
4) Squeeze hard the Air/Oil return lines (two of them) and disconnect them from the Air/Oil Separator box.
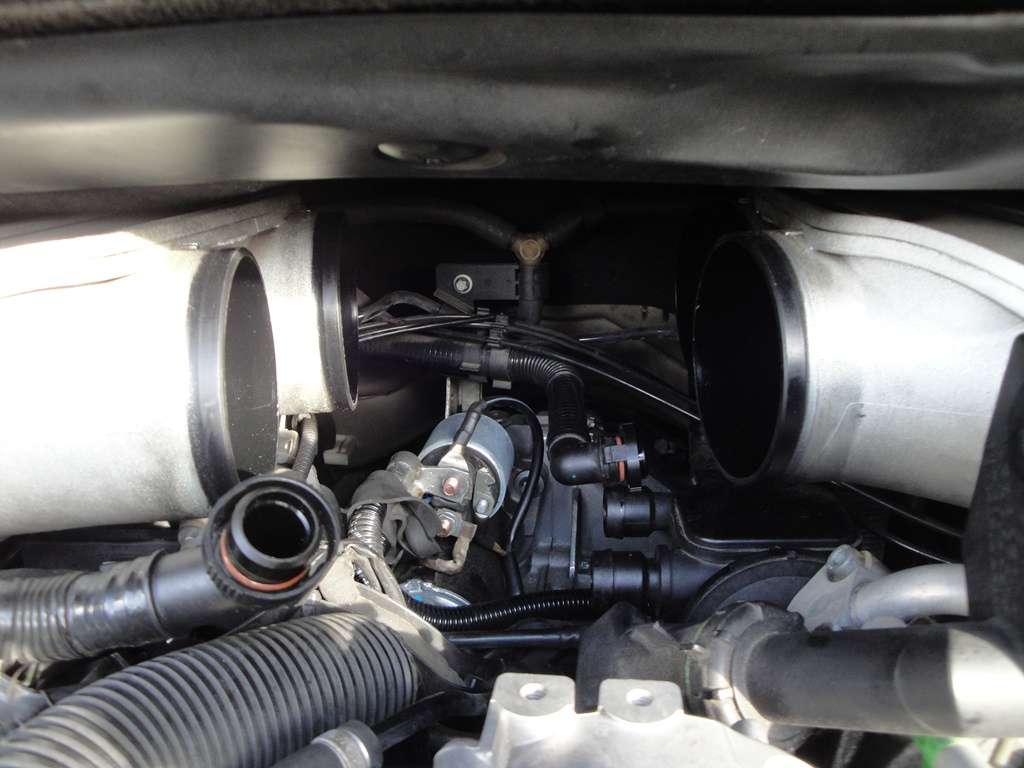
5) Using an extension for your 7 mm socket, unscrew again all four hose clamps from the resonator cavity. Again, push the rubber sleeve to the outside (left and right), and gently pry out the resonator. Be careful, as on the back of it is a vacuum line that you will have to disconnect before pulling it out of the engine compartment.
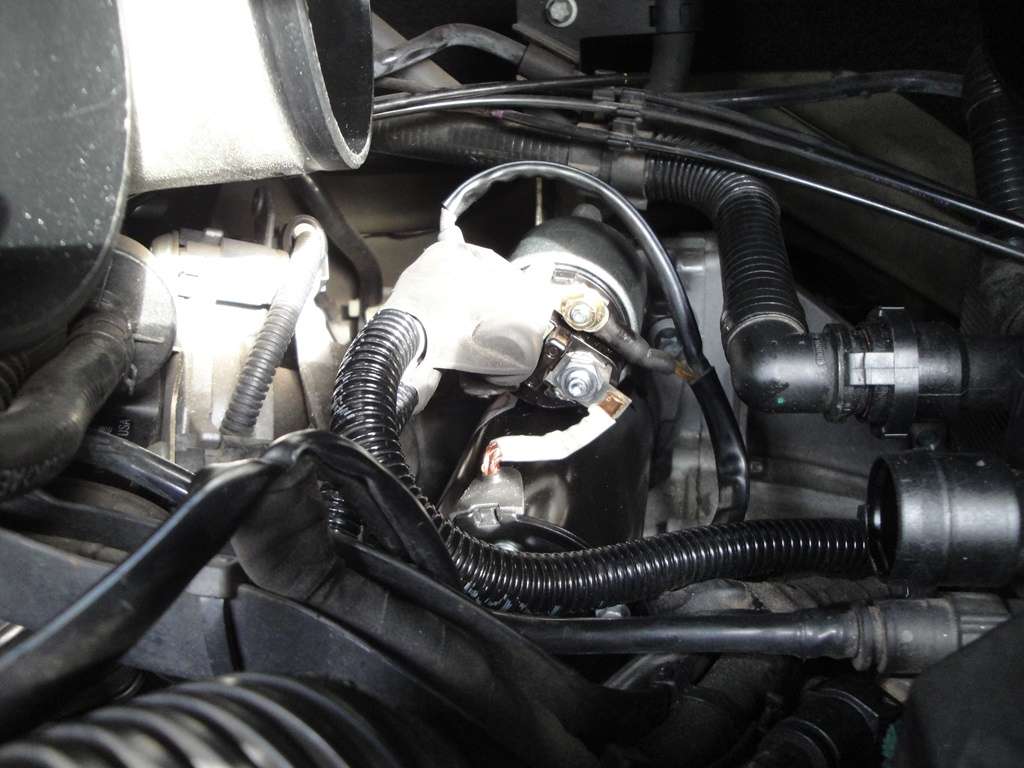
This is what we end up with, giving us a nice view on the defective part. You can see the two AOS lines on the bottom right, and the starter in the center of the picture.
6) Using a 13 mm wrench/socket, undo the main connection to the starter. Using a 10 mm wrench/socket, undo the command line to crank up the starter. You will notice that there is another electrical connection that goes between the main cable from the battery and the starter bolt. Let's not forget it when we re-assemble the lines.
7) Using your E-14 socket, a Universal joint and a 3/8" extension bar (I found the 18 inches long is perfect for that job), reach the top bolt holding the starter:

8) Take a deep breath....and the bolt should unlock easily. Whew.... Carefully, remove the E-14 bolt assisting it with your fingers. We do not want to lose anything, at this stage, don't we?
9) The bottom bolt is a lot more difficult to reach. Some people have been able to reach it without touching the alternator. I do not know how they did it. We want to play it safe at this stage. Damaging the second bolt means, removing the engine from the car, for a close intervention. We only have 90 minutes, so we do not have time for this kind of bad joke. So I prefer to take the safe path.
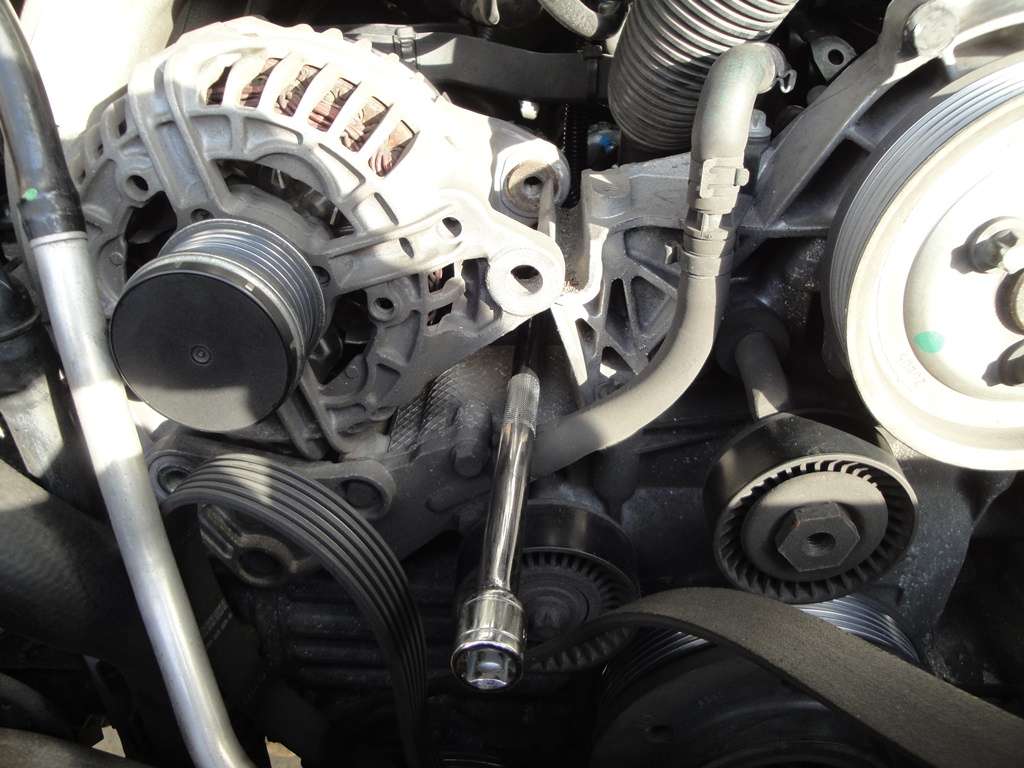
10) Using a 24 mm socket and break out bar, remove the tension on the serpentine belt. There is no need to remove the belt, we just want to free the alternator pulley. It takes 10 seconds and it is the right way to do it.
11) Using your E-14 and E-16 sockets, undo the long bolts (E-16) and the less long bolt (E-14) that are holding the alternator. Using your 3/8 inch 18 inches long bar, gently pry up the alternator by about 1 inch. That gap is going to give us enough room to pass the E-14 socket, the U-Joint and our 18 inches long extension bar. Put some tape tape around the U-Joint to keep is stiff and straight.

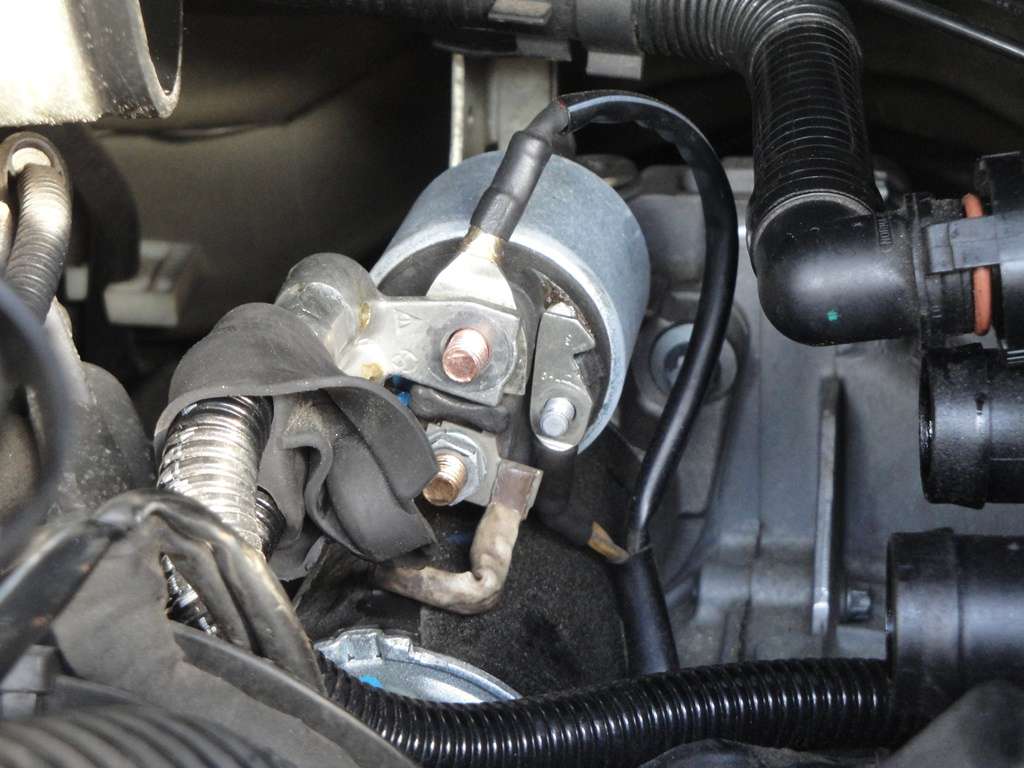
12) With your right hand, dive into the engine, around the starter (to the left) until you can feel with the tip of your fingers, the second E-14 bolt. With your left hand, find a way for your E-14 socket/U-Joint/Extension bar, under the alternator, under a bunch of hoses, until your right fingers can feel the tool approaching. Insert the E-14 socket in the bolt. From the outside, tap slightly the extension bar to make sure the E-14 socket is in position and connect the ratchet. This way of doing guarantee an almost straight alignment for the tool and the best chances of success to unlock that difficult bolt. The picture below shows where we stand before unlocking the second bolt.
13) Take a deep breath, make sure your bar is pushed all the way in, connect the ratchet, pray.....and that's it. Gently and very carefully using your right hand, assist with the extraction of the second bolt. Again we do not want to lose any part in the bottomless guts of the beast.
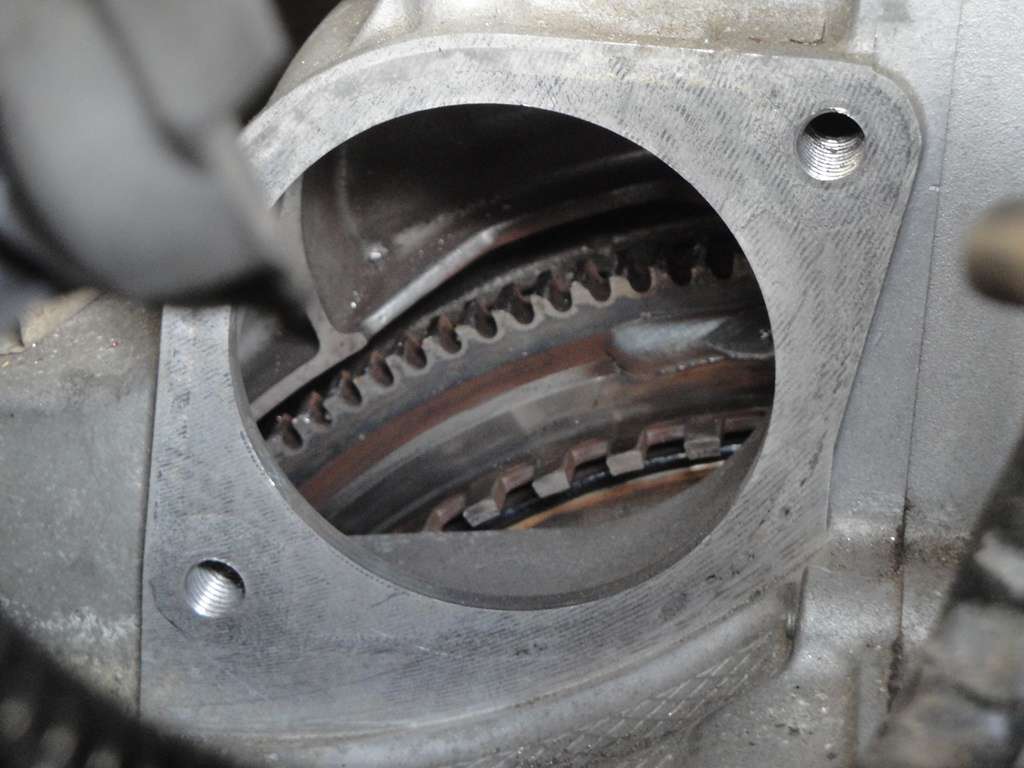
14) Wiggle the starter and pull it out carefully. You now have a great view on the flywheel teeth, flywheel that we replaced a couple of months ago, when we changed the clutch. My son keeps telling me that this car is too much trouble and that I should get a Toyota. He may have a point.
Re-assembly is easy. Just do the above steps in reverse:
15) Insert the new starter and install the top bolt without tightening it. This will position the starter and help during the insertion of the lower bolt.
16) Using some tape, attach the second bolt to the E-14 socket/U-Joint/Extension bar and insert it through the same path, monitoring the penetration with your right hand. Torque the lower bolt. Torque the upper bolt. I used moderate torque as I know that this job may have to be redone in a few years. I think Porsche recommends 33 lb-feet torque.
17) Re-connect both electrical lines, using your 13 mm and 10 mm sockets. Do not forget the extra line between the battery cable and the starter.
18) Re-connect the front AOS line.
19) Now start the fun: re-install the resonator and do not forget to connect the vacuum line on the back of it. I managed to insert the rubber sleeve on each side and then wiggle the resonator in between. Make sure all is air tight and tighten the clamps with your 7 mm socket. Be careful that the pivot of the resonator flap points to the upper quadrant, otherwise it will prevent you from installing the front throttle holder.
20) Reconnect the second AOS line.
21) Install the throttle holder, using the trick from before: sleeves on the outside, holder wiggled in place. It may work some other way, too.
22) Re-install your alternator and tighten both E-16 and E-14 bolts. I find it easier to start with the left E-14 bolt, and then finish with the E-16 pulley holder.
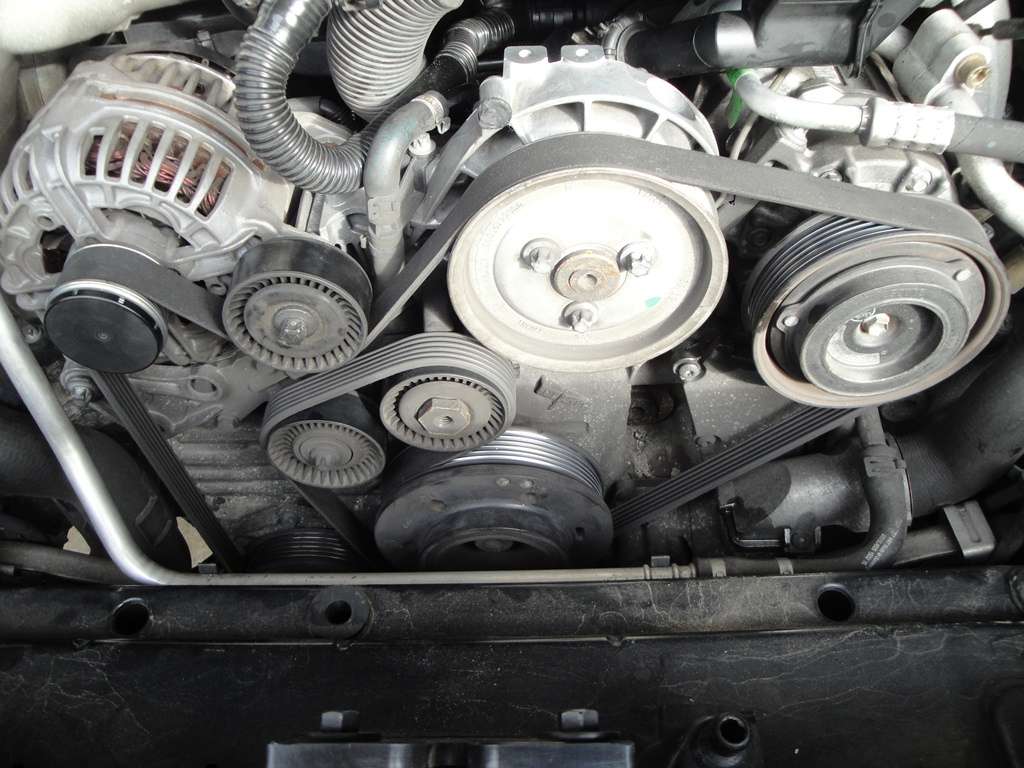
23) Re-position the serpentine belt. For those who do not remember how it goes, here is a picture:
24) Install the throttle body. Connect the wires.
25) verify everything..... We can try cranking the engine at this stage.
26) Re-connect your battery.
27) Crank up the engine. It should start immediately with a very manly attitude. The starter is still full of stamina.
28) Re-install the air filter.
29) Tap yourself on the shoulder: you are great, did a good job and you just saved $1000 (parts) plus $500 on labor. You can pop open a beer and enjoy the day.
Life is great.
Yves
Last weekend, my car refused to start on the parking lot of my working place, leaving me stranded for 1.5 hours, while AAA was busy assisting other "customers".... it was Valentine day. A new battery was installed, allowing the car a few more days of life.
Four days later, the car refused to start completely, despite the change of battery. Every time it was cranked in the meantime, a loud noise was being heard in the back of the engine, right after the engine started. Not a pleasant feeling for sure. I am describing these symptoms for people who may experience the same. You will then, know what to do.
Again, AAA is being called. This time the operator knows me: "Oh you are the guy with the Black Porsche....?" Yes, the same one!! I am taking advantage of my Gold membership, apparently.
This time I am having the car towed to my friend's garage. The AAA operator tries to bang on the starter with a long rod, while I try to turn the key. The net result is that a white smoke starts coming out of the engine compartment, causing me to freak out. I disconnect the battery and we put the car on the truck bed.
About three years ago, I replaced the starter to alleviate the atrocious warm-start symptoms at the gas station, while all the enthusiasts and jealous people are smirking at my pathetic attempts to re-start the car. The original starter was replaced by a rebuilt one, "Hecho in Mejico!". It lasted three years and ended up in a white cloud of smoke. In comparison, my 1997 BMW 540i is still on its original starter, with 200,000 miles on the odometer. They knew how to build cars, in the 90's.
Having already replaced the starter, I was not afraid of doing it again, and ended up performing the task in less time than it takes most of us to take a lunch break: 1.5 hours.
The original part (made by Bosch) cost about $1200 at any Porsche Dealer. Worldpac offers the Genuine/Bosch part for $207. It is a no brainer, and this time I am not going with :Hecho in Mejico" but with "Made in Hungary". Let's see who will last the longest: Mexicans against Hungarians, under the watch of Mr. Bosch. Note in passing, the slight markup at the Porsche dealership. Also, note the "Do not strike with Hammer" label for the AAA operators (the guy was trying to help and told me that he had rescued 7 cars with that trick, the night before).
Okay, back to the shop for another round. Replacing the starter is not too difficult and as long as you have some readily available tools, it does not present any difficulties. Honestly, the major hindrance is the oil feed hose, which is always in the middle.
0) Disconnect the negative of your battery. Leave the trunk lid open.
1) Remove your air filter. A lot has been written on that subject and I will not detail it. I recommend gluing the two large rubber grommets to the chassis. This way, you will never lose them again.
2) Remove the four E-10 bolts holding the throttle actuator, after delicately unplugging the connector. Remove and store aside that unit.
3) Using a 7mm socket, undo all four hose clamps from the throttle holder. Make sure they are very lose. Push the rubber sleeves to the outside. Pry the plastic holder out. This is the most delicate part: removing and replacing these assemblies without damaging the rubber sleeves. It is very tight.
4) Squeeze hard the Air/Oil return lines (two of them) and disconnect them from the Air/Oil Separator box.
5) Using an extension for your 7 mm socket, unscrew again all four hose clamps from the resonator cavity. Again, push the rubber sleeve to the outside (left and right), and gently pry out the resonator. Be careful, as on the back of it is a vacuum line that you will have to disconnect before pulling it out of the engine compartment.
This is what we end up with, giving us a nice view on the defective part. You can see the two AOS lines on the bottom right, and the starter in the center of the picture.
6) Using a 13 mm wrench/socket, undo the main connection to the starter. Using a 10 mm wrench/socket, undo the command line to crank up the starter. You will notice that there is another electrical connection that goes between the main cable from the battery and the starter bolt. Let's not forget it when we re-assemble the lines.
7) Using your E-14 socket, a Universal joint and a 3/8" extension bar (I found the 18 inches long is perfect for that job), reach the top bolt holding the starter:
8) Take a deep breath....and the bolt should unlock easily. Whew.... Carefully, remove the E-14 bolt assisting it with your fingers. We do not want to lose anything, at this stage, don't we?
9) The bottom bolt is a lot more difficult to reach. Some people have been able to reach it without touching the alternator. I do not know how they did it. We want to play it safe at this stage. Damaging the second bolt means, removing the engine from the car, for a close intervention. We only have 90 minutes, so we do not have time for this kind of bad joke. So I prefer to take the safe path.
10) Using a 24 mm socket and break out bar, remove the tension on the serpentine belt. There is no need to remove the belt, we just want to free the alternator pulley. It takes 10 seconds and it is the right way to do it.
11) Using your E-14 and E-16 sockets, undo the long bolts (E-16) and the less long bolt (E-14) that are holding the alternator. Using your 3/8 inch 18 inches long bar, gently pry up the alternator by about 1 inch. That gap is going to give us enough room to pass the E-14 socket, the U-Joint and our 18 inches long extension bar. Put some tape tape around the U-Joint to keep is stiff and straight.
12) With your right hand, dive into the engine, around the starter (to the left) until you can feel with the tip of your fingers, the second E-14 bolt. With your left hand, find a way for your E-14 socket/U-Joint/Extension bar, under the alternator, under a bunch of hoses, until your right fingers can feel the tool approaching. Insert the E-14 socket in the bolt. From the outside, tap slightly the extension bar to make sure the E-14 socket is in position and connect the ratchet. This way of doing guarantee an almost straight alignment for the tool and the best chances of success to unlock that difficult bolt. The picture below shows where we stand before unlocking the second bolt.
13) Take a deep breath, make sure your bar is pushed all the way in, connect the ratchet, pray.....and that's it. Gently and very carefully using your right hand, assist with the extraction of the second bolt. Again we do not want to lose any part in the bottomless guts of the beast.
14) Wiggle the starter and pull it out carefully. You now have a great view on the flywheel teeth, flywheel that we replaced a couple of months ago, when we changed the clutch. My son keeps telling me that this car is too much trouble and that I should get a Toyota. He may have a point.
Re-assembly is easy. Just do the above steps in reverse:
15) Insert the new starter and install the top bolt without tightening it. This will position the starter and help during the insertion of the lower bolt.
16) Using some tape, attach the second bolt to the E-14 socket/U-Joint/Extension bar and insert it through the same path, monitoring the penetration with your right hand. Torque the lower bolt. Torque the upper bolt. I used moderate torque as I know that this job may have to be redone in a few years. I think Porsche recommends 33 lb-feet torque.
17) Re-connect both electrical lines, using your 13 mm and 10 mm sockets. Do not forget the extra line between the battery cable and the starter.
18) Re-connect the front AOS line.
19) Now start the fun: re-install the resonator and do not forget to connect the vacuum line on the back of it. I managed to insert the rubber sleeve on each side and then wiggle the resonator in between. Make sure all is air tight and tighten the clamps with your 7 mm socket. Be careful that the pivot of the resonator flap points to the upper quadrant, otherwise it will prevent you from installing the front throttle holder.
20) Reconnect the second AOS line.
21) Install the throttle holder, using the trick from before: sleeves on the outside, holder wiggled in place. It may work some other way, too.
22) Re-install your alternator and tighten both E-16 and E-14 bolts. I find it easier to start with the left E-14 bolt, and then finish with the E-16 pulley holder.
23) Re-position the serpentine belt. For those who do not remember how it goes, here is a picture:
24) Install the throttle body. Connect the wires.
25) verify everything..... We can try cranking the engine at this stage.
26) Re-connect your battery.
27) Crank up the engine. It should start immediately with a very manly attitude. The starter is still full of stamina.
28) Re-install the air filter.
29) Tap yourself on the shoulder: you are great, did a good job and you just saved $1000 (parts) plus $500 on labor. You can pop open a beer and enjoy the day.
Life is great.
Yves
Last edited by yvesvidal; Feb 21, 2016 at 10:38 AM.


Registered User
Joined: Jul 2011
Posts: 845
From: Viera, Florida
Rep Power: 53
Trending Topics

Registered User
Joined: Oct 2016
Posts: 1
From: Atlanta
Rep Power: 0
Hot Start Problem Redux
Oh, my head is spinning... I too have a hot starting problem with my beautiful �06 C2S Cabrio beast with 53k miles. Frankly, I�m reluctant to run errands or even stop for gas because I�m afraid it won�t crank fast enough to start. Heaven forbid I might stall the engine at a stoplight and suffer the humiliation of being stranded. I�m a seasoned manual shift guy, so stalling is almost unheard of... but it can happen to the best of us, right?
Anyway, I�ve been reading numerous discussion boards and the consensus is that one or more of the following is to blame (not in any order):
- Defective starter (due to overheating and/or weak battery?)
- Defective +power panel-to-starter cable (inadequate design?)
- Defective or undercharged battery (or parasitic power drain, or alternator?)
- Defective +battery cable quick-connector/pin @ firewall (poor design?)
- Defective alternator (causing low battery charge or vice versa?)
- Defective or loose ground strap (this is way too inexpensive to be taken seriously)
Did I forget anything? I should mention that my AGM battery is 9 months old.
I�m an automotive engineer, a dedicated car guy, and longtime DIY aficionado, but it seems that a premium automobile ought to start every time � hot or cold. I�m reminded of my old MGB that was perpetually breaking down, especially components supplied by Lucas Electric Ltd. (aptly nicknamed, �The Prince of Darkness�). If this hot start issue was a Jaguar, everyone would be mocking me for investing in a British POS. Full disclosure, my gorgeous 2001 XK8 V8 never failed to start or crank briskly during any hot or cold scenario. In fact, I�ve never owned a car, foreign or domestic that failed to crank when hot. Go figure.
I apologize for my rant. I do love my 997 and really do want it to be as reliable as it is exhilarating. Can someone please guide me down a sensible troubleshooting path?
PS ~ I don�t have any history to suggest that any electrical components or cables were replaced, other than the battery. This is a 100% southern car with one previous owner between 2006-2016.
Registered User
Joined: Oct 2017
Posts: 8
From: San Francisco
Rep Power: 0
Oh, my head is spinning... I too have a hot starting problem with my beautiful �06 C2S Cabrio beast with 53k miles. Frankly, I�m reluctant to run errands or even stop for gas because I�m afraid it won�t crank fast enough to start. Heaven forbid I might stall the engine at a stoplight and suffer the humiliation of being stranded. I�m a seasoned manual shift guy, so stalling is almost unheard of... but it can happen to the best of us, right?
Anyway, I�ve been reading numerous discussion boards and the consensus is that one or more of the following is to blame (not in any order):
- Defective starter (due to overheating and/or weak battery?)
- Defective +power panel-to-starter cable (inadequate design?)
- Defective or undercharged battery (or parasitic power drain, or alternator?)
- Defective +battery cable quick-connector/pin @ firewall (poor design?)
- Defective alternator (causing low battery charge or vice versa?)
- Defective or loose ground strap (this is way too inexpensive to be taken seriously)
Did I forget anything? I should mention that my AGM battery is 9 months old.
I�m an automotive engineer, a dedicated car guy, and longtime DIY aficionado, but it seems that a premium automobile ought to start every time � hot or cold. I�m reminded of my old MGB that was perpetually breaking down, especially components supplied by Lucas Electric Ltd. (aptly nicknamed, �The Prince of Darkness�). If this hot start issue was a Jaguar, everyone would be mocking me for investing in a British POS. Full disclosure, my gorgeous 2001 XK8 V8 never failed to start or crank briskly during any hot or cold scenario. In fact, I�ve never owned a car, foreign or domestic that failed to crank when hot. Go figure.
I apologize for my rant. I do love my 997 and really do want it to be as reliable as it is exhilarating. Can someone please guide me down a sensible troubleshooting path?
PS ~ I don�t have any history to suggest that any electrical components or cables were replaced, other than the battery. This is a 100% southern car with one previous owner between 2006-2016.
Anyway, I�ve been reading numerous discussion boards and the consensus is that one or more of the following is to blame (not in any order):
- Defective starter (due to overheating and/or weak battery?)
- Defective +power panel-to-starter cable (inadequate design?)
- Defective or undercharged battery (or parasitic power drain, or alternator?)
- Defective +battery cable quick-connector/pin @ firewall (poor design?)
- Defective alternator (causing low battery charge or vice versa?)
- Defective or loose ground strap (this is way too inexpensive to be taken seriously)
Did I forget anything? I should mention that my AGM battery is 9 months old.
I�m an automotive engineer, a dedicated car guy, and longtime DIY aficionado, but it seems that a premium automobile ought to start every time � hot or cold. I�m reminded of my old MGB that was perpetually breaking down, especially components supplied by Lucas Electric Ltd. (aptly nicknamed, �The Prince of Darkness�). If this hot start issue was a Jaguar, everyone would be mocking me for investing in a British POS. Full disclosure, my gorgeous 2001 XK8 V8 never failed to start or crank briskly during any hot or cold scenario. In fact, I�ve never owned a car, foreign or domestic that failed to crank when hot. Go figure.
I apologize for my rant. I do love my 997 and really do want it to be as reliable as it is exhilarating. Can someone please guide me down a sensible troubleshooting path?
PS ~ I don�t have any history to suggest that any electrical components or cables were replaced, other than the battery. This is a 100% southern car with one previous owner between 2006-2016.
1. Bad battery. You said you already replaced this so can rule that out, but the best way to check is have your indy test the cold crank amps.
2. Bad crimp on the alternator/starter cable. This is a common issue on early 997s. The cable itself costs $85 and you can DIY it, but its involved. My indy was only charging ~$600 to replace it so its not a big expense. The way you test for this is have your indy measure the voltage drop between your alternator and battery. If the drop is more than .5, your cable is to blame. My indy said you can sometimes see heat damage where the cable connects to the starter, but you need to pull the plenum and throttle body out to get a good look at it.
You will also rule out the alternator at the same time. Its likely not the issue. My indy said very few go bad. You can, however, upgrade the 997.1 alternator with a newer regulator from the 997.2 (black box on the back of the alternator) to give it more pep. Also cheap. I think the regulator is like $45.
3. Bad starter. If its not the prior 2 issues, then its your starter.
The bolt in the firewall for the power distribution panel is likely not the issue. It can add some resistance if severely corroded but likely not enough to cause the issue on its own. I cleaned mine and it had marginal effect.
Mine is going bad too and plan to replace the cable and probably started whenever I get some extra time. Doing them both at the same time makes a lot of sense since you have it all apart. A simple fix I have found in the mean time is just to charge the battery every other week. That greatly minimizes the issue.