Aston Martin DB7, DB9, DBS, Vantage V8, Vanquish, and Classic models

Accidentally removed my interior..

Thread Tools
 
Search this Thread
 
Rate Thread
 
  #1  
Old 12-31-2014, 01:21 PM
speedracer800's Avatar
Registered User
Thread Starter
Join Date: Jun 2010
Location: Lake Geneva, WI
Posts: 757
Rep Power: 46
speedracer800 is a jewel in the roughspeedracer800 is a jewel in the roughspeedracer800 is a jewel in the rough
Accidentally removed my interior..

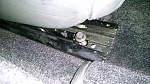
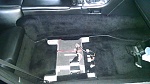
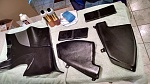
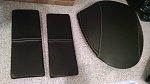
So since I had to remove a few of the interior panels on my DB9 to get the headliner out for the custom work I wanted to do to it I thought it was a really good time to address a few of the other little interior details I've been meaning to take care of.

I wanted to install the LED interior bulbs that many of you have spoken pretty highly about. Also the back window in my car has had a few smudges on it way down on the bottom portion where the glass meets the parcel shelf and behind the brake light. Totally impossible to get your hands in there to clean. To really do this right the parcel shelf needs to be removed, which was fine because I have this annoying rattle going on back there I needed to look in to. While the headliner was out, it was a good time to hard wire in my radar detector as well...

Well, one thing led to another and before I knew it I had most of my cars leather interior pieces on my kitchen counter top being cleaned and conditioned. I was really able to do a good thorough job this way. Obviously way more so than trying to do it all in the car. I'm an unmarried guy so I can do this kinda thing in my kitchen without backlash. More work that has happened in there in a very long time I should add..

I removed the passenger front seat. This was super easy and I think I'm going to do it every time I need to clean the interior. Really made getting access to the back of the car WAY easier. I'm 6'2 and 220 pounds and climbing in the back seat to do anything is nearly impossible.

Just 4 bolts and 4 wiring harness plugs. First unbolt the seat then you can easily tilt it back to more easily get access to the plugs.

It was a good project that wasn't too difficult. I just took my time and things came apart pretty easy and went back together without any surprises. I did go ahead and order all new plastic panel fasteners though for reassembly. It seemed like once you pulled these loose they would never hold tight again.

Here are a couple pictures. I was hoping to post more but the forum is limiting me to just 6. Is that correct??

Click image for larger version

Name:	seat bolt 1.jpg
Views:	187
Size:	3.25 MB
ID:	410933

Click image for larger version

Name:	IMG_20141207_150021271.jpg
Views:	201
Size:	2.69 MB
ID:	410934

Click image for larger version

Name:	IMG_20141212_171023731.jpg
Views:	189
Size:	2.84 MB
ID:	410935

Click image for larger version

Name:	IMG_20141211_072806799_HDR.jpg
Views:	247
Size:	3.25 MB
ID:	410936

Click image for larger version

Name:	IMG_20141212_112507701.jpg
Views:	216
Size:	2.28 MB
ID:	410937
 

Last edited by speedracer800; 01-01-2015 at 07:47 PM.
  #2  
Old 12-31-2014, 01:27 PM
speedracer800's Avatar
Registered User
Thread Starter
Join Date: Jun 2010
Location: Lake Geneva, WI
Posts: 757
Rep Power: 46
speedracer800 is a jewel in the roughspeedracer800 is a jewel in the roughspeedracer800 is a jewel in the rough
A few more pictures..
 
Attached Thumbnails Click image for larger version

Name:	IMG_20141212_1128283011.jpg
Views:	179
Size:	2.26 MB
ID:	410938   Click image for larger version

Name:	IMG_20141212_1129418711.jpg
Views:	187
Size:	1.86 MB
ID:	410939   Click image for larger version

Name:	IMG_20141212_112350440_HDR1.jpg
Views:	196
Size:	3.10 MB
ID:	410940   Click image for larger version

Name:	IMG_20141212_112855315.jpg
Views:	185
Size:	2.23 MB
ID:	410941   Click image for larger version

Name:	IMG_20141212_112405942_HDR.jpg
Views:	185
Size:	3.09 MB
ID:	410942  

  #3  
Old 12-31-2014, 01:37 PM
yvr's Avatar
yvr
yvr is offline
Registered User
Join Date: Jan 2012
Location: Vancouver
Posts: 926
Rep Power: 63
yvr has much to be proud ofyvr has much to be proud ofyvr has much to be proud ofyvr has much to be proud ofyvr has much to be proud ofyvr has much to be proud ofyvr has much to be proud ofyvr has much to be proud ofyvr has much to be proud ofyvr has much to be proud of
I've got a set of pictures just like that I got mine apart with the passenger seat in place, but it was really cramped in the back. Next time the seat comes out!

Made me smile to see the hand-written markings behind the panels in mine, and it looks like you have some too.
 
  #4  
Old 12-31-2014, 01:42 PM
speedracer800's Avatar
Registered User
Thread Starter
Join Date: Jun 2010
Location: Lake Geneva, WI
Posts: 757
Rep Power: 46
speedracer800 is a jewel in the roughspeedracer800 is a jewel in the roughspeedracer800 is a jewel in the rough
Back together, looking and smelling like brand new.

Click image for larger version

Name:	IMG_20141231_143541630.jpg
Views:	112
Size:	4.12 MB
ID:	410943

Click image for larger version

Name:	IMG_20141231_143333049.jpg
Views:	158
Size:	3.99 MB
ID:	410944

Click image for larger version

Name:	IMG_20141231_143354084.jpg
Views:	164
Size:	3.94 MB
ID:	410945

Click image for larger version

Name:	IMG_20141231_143551980.jpg
Views:	178
Size:	4.04 MB
ID:	410946

Click image for larger version

Name:	IMG_20141231_143428603.jpg
Views:	145
Size:	3.97 MB
ID:	410947
 
  #5  
Old 12-31-2014, 01:49 PM
speedracer800's Avatar
Registered User
Thread Starter
Join Date: Jun 2010
Location: Lake Geneva, WI
Posts: 757
Rep Power: 46
speedracer800 is a jewel in the roughspeedracer800 is a jewel in the roughspeedracer800 is a jewel in the rough
Originally Posted by yvr
I've got a set of pictures just like that I got mine apart with the passenger seat in place, but it was really cramped in the back. Next time the seat comes out!

Made me smile to see the hand-written markings behind the panels in mine, and it looks like you have some too.
Definitely! That was really fun to see. Removing the seat was a game changer. Really allowed easy access. So easy, I'll do it every time. Plus it revealed some things that could never have been uncovered otherwise. Here is one of the treasures found under the passenger seat. Made me wonder what kind of monster the PO was!! I'd like to note that the ketchup package was unopened..

Click image for larger version

Name:	IMG_20141207_150409428.jpg
Views:	253
Size:	2.79 MB
ID:	410948
 
  #6  
Old 12-31-2014, 02:11 PM
yvr's Avatar
yvr
yvr is offline
Registered User
Join Date: Jan 2012
Location: Vancouver
Posts: 926
Rep Power: 63
yvr has much to be proud ofyvr has much to be proud ofyvr has much to be proud ofyvr has much to be proud ofyvr has much to be proud ofyvr has much to be proud ofyvr has much to be proud ofyvr has much to be proud ofyvr has much to be proud ofyvr has much to be proud of
BTW -- where did you get the new plastic fasteners? Is there a part number? I've got a couple of weak ones.
 
  #7  
Old 12-31-2014, 02:20 PM
speedracer800's Avatar
Registered User
Thread Starter
Join Date: Jun 2010
Location: Lake Geneva, WI
Posts: 757
Rep Power: 46
speedracer800 is a jewel in the roughspeedracer800 is a jewel in the roughspeedracer800 is a jewel in the rough
Originally Posted by yvr
BTW -- where did you get the new plastic fasteners? Is there a part number? I've got a couple of weak ones.
I ordered originally from my dealer then needed a few more so I actually went down to NAPA and found some that were nearly identical. Here is one of the part numbers from Aston Martin. I ran into 3 different ones. Depending on what part I was working on. The dealer can easily look it up for you if you describe the part you're trying to secure

Click image for larger version

Name:	IMG_20141207_155713796.jpg
Views:	166
Size:	3.02 MB
ID:	410957
 
  #8  
Old 12-31-2014, 02:46 PM
yvr's Avatar
yvr
yvr is offline
Registered User
Join Date: Jan 2012
Location: Vancouver
Posts: 926
Rep Power: 63
yvr has much to be proud ofyvr has much to be proud ofyvr has much to be proud ofyvr has much to be proud ofyvr has much to be proud ofyvr has much to be proud ofyvr has much to be proud ofyvr has much to be proud ofyvr has much to be proud ofyvr has much to be proud of
Awesome. Thanks!
 
  #9  
Old 12-31-2014, 02:48 PM
07sportspack's Avatar
Registered User
Join Date: Aug 2013
Location: Central Florida
Posts: 477
Rep Power: 30
07sportspack will become famous soon enough
Lightbulb

Thanks for posting speedracer800. That seat is coming out of mine next time the leatherique goes on! I debated doing so when replacing the battery. I really shouda !!
 
  #10  
Old 12-31-2014, 03:23 PM
speedracer800's Avatar
Registered User
Thread Starter
Join Date: Jun 2010
Location: Lake Geneva, WI
Posts: 757
Rep Power: 46
speedracer800 is a jewel in the roughspeedracer800 is a jewel in the roughspeedracer800 is a jewel in the rough
Originally Posted by 07sportspack
Thanks for posting speedracer800. That seat is coming out of mine next time the leatherique goes on! I debated doing so when replacing the battery. I really shouda !!
The key is to tilt the seat all the way forward before unhooking the electronics. Makes it a smaller package coming out the opening. Also helps to have a second person help guide it out. It's not too heavy, easily a one man job but I worried about nicking the inner door panel, etc when removing it. I also covered the sill plates for the same reason.. Good luck.
 
  #11  
Old 12-31-2014, 07:05 PM
sdekoning's Avatar
Registered User
Join Date: Jun 2014
Location: Paphos, Cyprus
Posts: 463
Rep Power: 35
sdekoning is a splendid one to beholdsdekoning is a splendid one to beholdsdekoning is a splendid one to beholdsdekoning is a splendid one to beholdsdekoning is a splendid one to beholdsdekoning is a splendid one to beholdsdekoning is a splendid one to behold
Brilliant and familiar pictures I see. Thanks for posting the part-number for the black pushers; will need a bag of these as well when I put the interior back eventually.
 
Attached Thumbnails Click image for larger version

Name:	IMG_20141025_173752.jpg
Views:	120
Size:	1,002.9 KB
ID:	410965   Click image for larger version

Name:	IMG_20141025_173925.jpg
Views:	115
Size:	1.00 MB
ID:	410966  
  #12  
Old 12-31-2014, 07:28 PM
telum01's Avatar
Registered User
Join Date: Apr 2009
Location: NoVa
Posts: 4,366
Rep Power: 293
telum01 Is a GOD !telum01 Is a GOD !telum01 Is a GOD !telum01 Is a GOD !telum01 Is a GOD !telum01 Is a GOD !telum01 Is a GOD !telum01 Is a GOD !telum01 Is a GOD !telum01 Is a GOD !telum01 Is a GOD !
Originally Posted by sdekoning
Brilliant and familiar pictures I see. Thanks for posting the part-number for the black pushers; will need a bag of these as well when I put the interior back eventually.
I'm gonna need more pics of your seat setup, and how it's mounted
 
  #13  
Old 01-01-2015, 12:53 PM
captain Greg's Avatar
Registered User
Join Date: Jan 2013
Posts: 805
Rep Power: 52
captain Greg is a splendid one to beholdcaptain Greg is a splendid one to beholdcaptain Greg is a splendid one to beholdcaptain Greg is a splendid one to beholdcaptain Greg is a splendid one to beholdcaptain Greg is a splendid one to beholdcaptain Greg is a splendid one to behold
why does a guy who is mostly single want a car with a back seat Aston martin a single guy...im jealous

thanks for sharing the pics
 
  #14  
Old 05-15-2015, 02:04 AM
wysoseereeus's Avatar
Registered User
Join Date: Mar 2015
Posts: 82
Rep Power: 16
wysoseereeus is just really nicewysoseereeus is just really nicewysoseereeus is just really nicewysoseereeus is just really nice
Originally Posted by speedracer800
Definitely! That was really fun to see. Removing the seat was a game changer. Really allowed easy access. So easy, I'll do it every time. Plus it revealed some things that could never have been uncovered otherwise. Here is one of the treasures found under the passenger seat. Made me wonder what kind of monster the PO was!! I'd like to note that the ketchup package was unopened..

Attachment 410948
Impressive work. How long did it take you pull everything apart and put things back together again? And did you use the Workshop Manual to help you figure things out?
 
  #15  
Old 05-16-2015, 12:28 AM
speedracer800's Avatar
Registered User
Thread Starter
Join Date: Jun 2010
Location: Lake Geneva, WI
Posts: 757
Rep Power: 46
speedracer800 is a jewel in the roughspeedracer800 is a jewel in the roughspeedracer800 is a jewel in the rough
Originally Posted by wysoseereeus
Impressive work. How long did it take you pull everything apart and put things back together again? And did you use the Workshop Manual to help you figure things out?
Actually not very long. 4-5 hours tops. I didn't have a shop manual, I just figured it out as I went with the help of posts on this forum. It's really very straightforward.


You have already rated this thread Rating: Thread Rating: 0 votes,  average.

Quick Reply: Accidentally removed my interior..


All times are GMT -6. The time now is 08:54 PM.