
Greetings from Niagara, Ontario, Canada


Thread Starter
|
Registered User
Joined: Apr 2017
Posts: 399
From: Niagara Region
Rep Power: 29

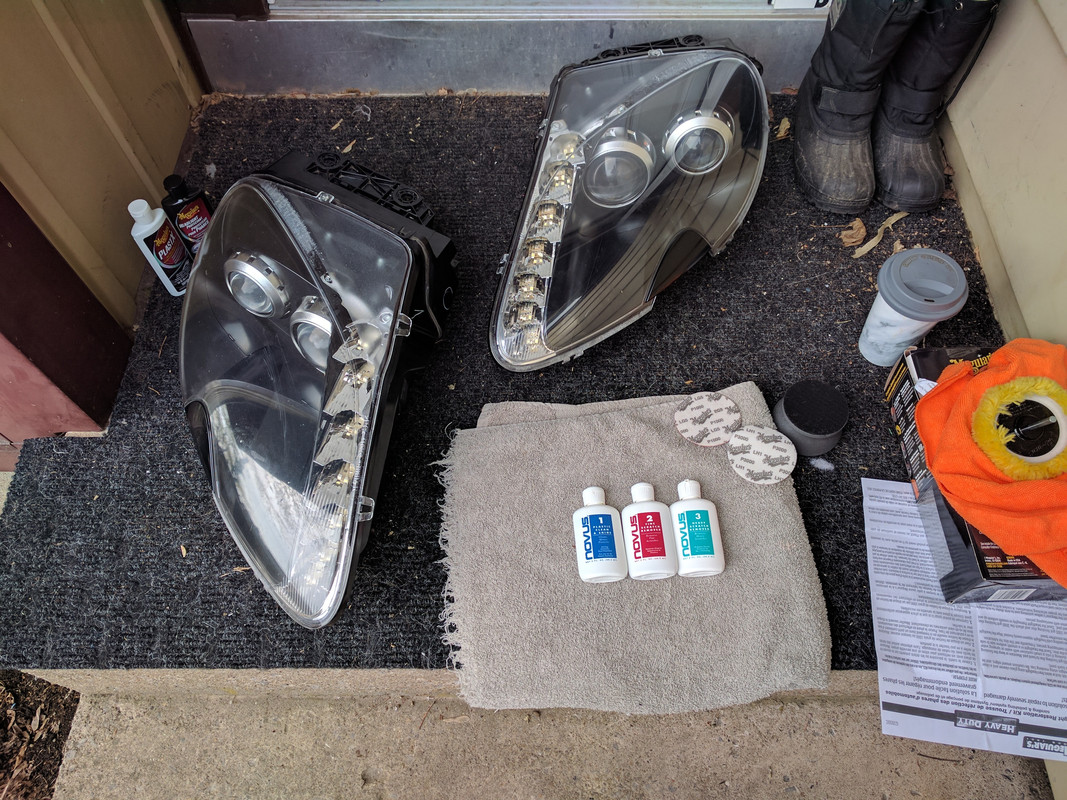
So once inside of lens were cleaned with glass polish I notice the outsides had significant scratches. I still reinstalled the lens on each assembly as it would be easier to work on them that way. One lens looked like someone had taken a key to it scrapping back and forth like ten times, while the other just had one deep scratch.
The good news was that the entire front end of the car had new clear film installed on it within the last couple of years (including the headlights). Therefore the damage was on the film not the lens itself. So I ordered new ones from WeatherTech only to be told they are NLA. Trying not to get too side tracked from my main mission of getting the car on the road, I thought I'll try to repair the film and if I screw them up, I can just peel them off.
This was my chance to use a 3 stage plastic repair kit Santa put in my stocking at Christmas. Since the scratches were deep, I also used step supplies from a headlight restoration kit I had from a previous project.
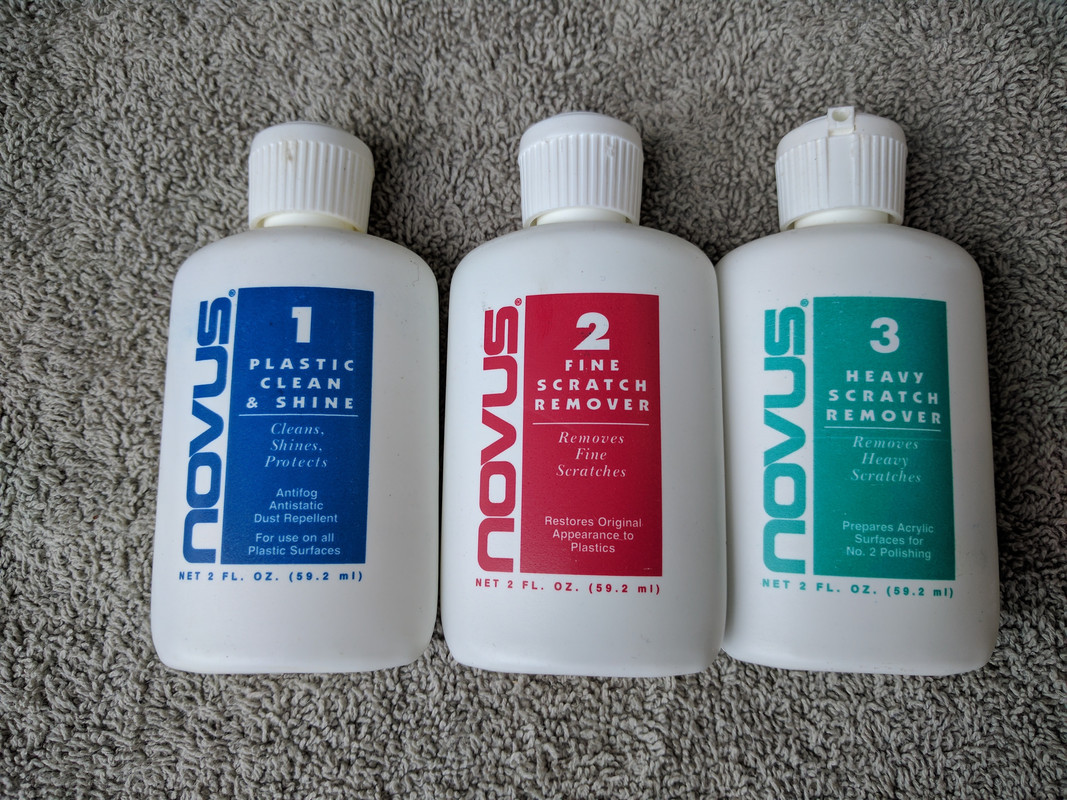
The 5 steps that worked (in order) were :
1. wet sanding, 1000 grit
2. wet sanding 3000 grit
3. deep scratch remover cream
4. light scratch remover cream
5. liquid protectant
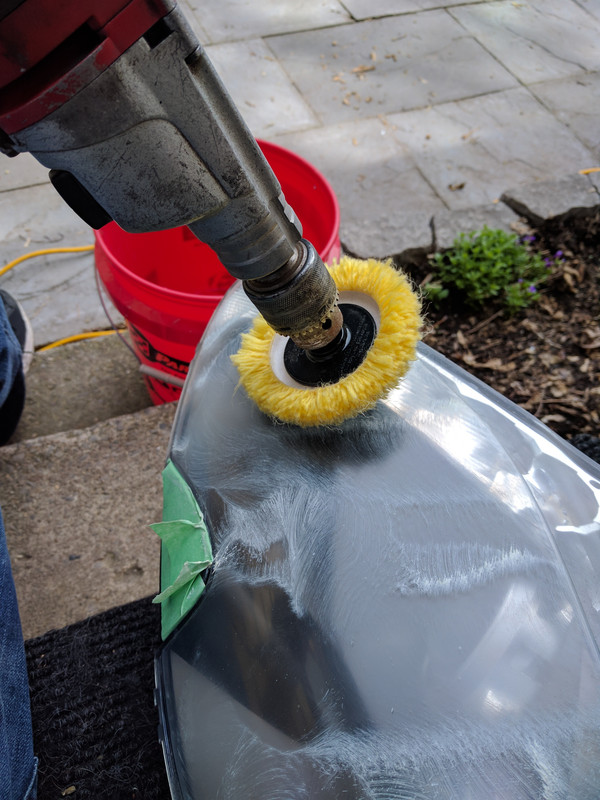
#3, and #4 required drill buffing while #5 was buffed by hand using a microfiber towel.
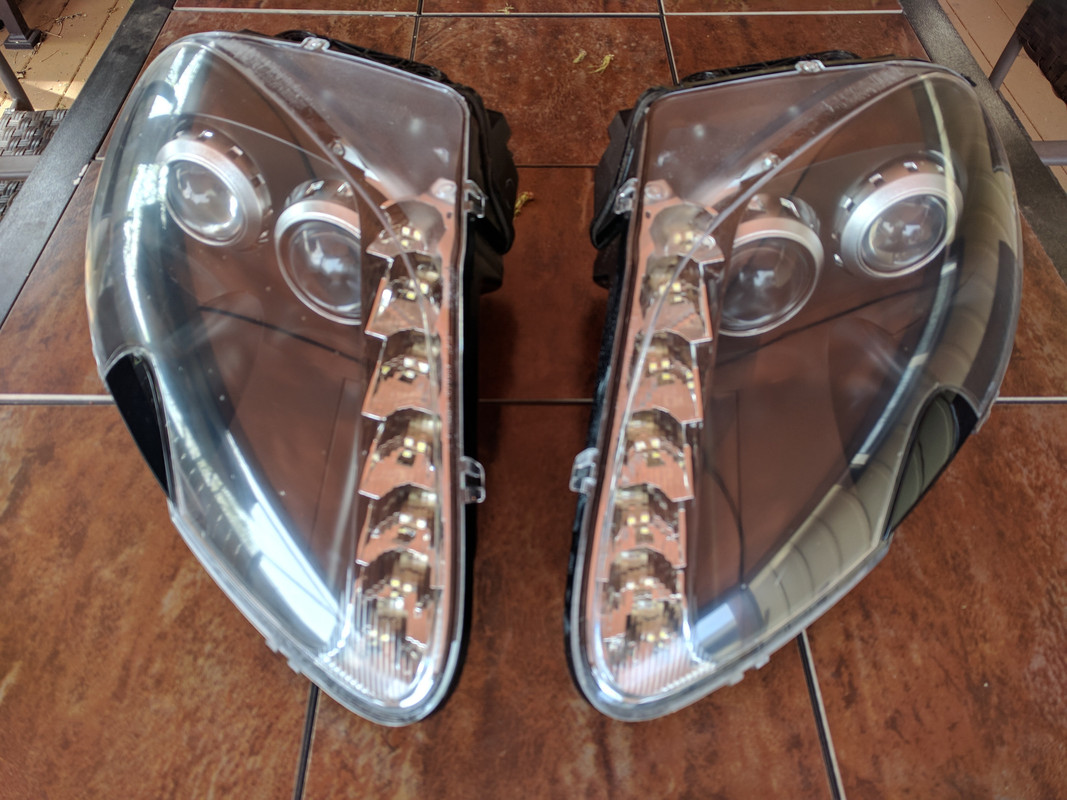
To my amazement, it actually worked and since I already had the supplies, it was really just an hour of my time versus $100 for new film.
The only thing I couldn't fix was air bubbles on the passenger lens that likely have been there since film was applied.
The drivers side lens now looks brand new!
Will I get new film? Yes eventually given the cost of new lens but they have been repaired to my satisfaction in the interim. Plus I don't want to drive around without film on them as I spend a lot of time on the highway where stone chips are more common.
Below are the pictures - might be hard to see the before damage, but they were very noticeable (white hazy scratches) in the sun to the naked eye. Now they have completely disappeared!
As always let me know if you have any questions...otherwise I just using this build thread to document everything I do to the car, It becomes a great reference for me and any future owner or enthusiast asking questions about a product or part number etc. "MY MEMORY IS GOOD, BUT SHORT!"
Thanks for lookin, Cheers
The good news was that the entire front end of the car had new clear film installed on it within the last couple of years (including the headlights). Therefore the damage was on the film not the lens itself. So I ordered new ones from WeatherTech only to be told they are NLA. Trying not to get too side tracked from my main mission of getting the car on the road, I thought I'll try to repair the film and if I screw them up, I can just peel them off.
This was my chance to use a 3 stage plastic repair kit Santa put in my stocking at Christmas. Since the scratches were deep, I also used step supplies from a headlight restoration kit I had from a previous project.
The 5 steps that worked (in order) were :
1. wet sanding, 1000 grit
2. wet sanding 3000 grit
3. deep scratch remover cream
4. light scratch remover cream
5. liquid protectant
#3, and #4 required drill buffing while #5 was buffed by hand using a microfiber towel.
To my amazement, it actually worked and since I already had the supplies, it was really just an hour of my time versus $100 for new film.
The only thing I couldn't fix was air bubbles on the passenger lens that likely have been there since film was applied.
The drivers side lens now looks brand new!
Will I get new film? Yes eventually given the cost of new lens but they have been repaired to my satisfaction in the interim. Plus I don't want to drive around without film on them as I spend a lot of time on the highway where stone chips are more common.
Below are the pictures - might be hard to see the before damage, but they were very noticeable (white hazy scratches) in the sun to the naked eye. Now they have completely disappeared!
As always let me know if you have any questions...otherwise I just using this build thread to document everything I do to the car, It becomes a great reference for me and any future owner or enthusiast asking questions about a product or part number etc. "MY MEMORY IS GOOD, BUT SHORT!"
Thanks for lookin, Cheers
Last edited by 007V8Vantage; Mar 29, 2021 at 09:50 PM. Reason: spelling
Registered User


Joined: Oct 2015
Posts: 1,560
From: Ottawa, Ontario, Canada
Rep Power: 98

It's good that you found a fix for the headlight washer although I have yet to have mine come out in my first 10,000km of driving. If you read the manual it says that at an interval in ones trip they do come out (I don't know how many time you have to hit the Windshield washer button for them to come out once) There are no actual button or switch to make them spay... I guess I will never see mine come out as I try no to drive her in the rain
Thread Starter
|
Registered User
Joined: Apr 2017
Posts: 399
From: Niagara Region
Rep Power: 29
It's good that you found a fix for the headlight washer although I have yet to have mine come out in my first 10,000km of driving. If you read the manual it says that at an interval in ones trip they do come out (I don't know how many time you have to hit the Windshield washer button for them to come out once) There are no actual button or switch to make them spay... I guess I will never see mine come out as I try no to drive her in the rain

I read that too about the headlight washers. They are an option so check that you don't just have dummy covers. If your washer bottle has dual pumps, you have headlight washers. For testing purposes, I pressed and held the washer button with the key in run position and engine not running. My experience was the headlight washers fired about 2-3 seconds in. After holding washer button for 10 seconds, I let go. During the final wipes on the windshield wipers (after windshield washer stopped) the headlight washers fired a second time. In order to test again, the key needed to be cycled off and on. Hope that helps you find out if yours work.
BTW - They make enough noise to hear without car running if you don't have an assistant watching them....and if you have wet headlights = success.
Last edited by 007V8Vantage; Mar 29, 2021 at 09:55 PM.

Thread Starter
|
Registered User
Joined: Apr 2017
Posts: 399
From: Niagara Region
Rep Power: 29
Thanks very much and happy to be here!
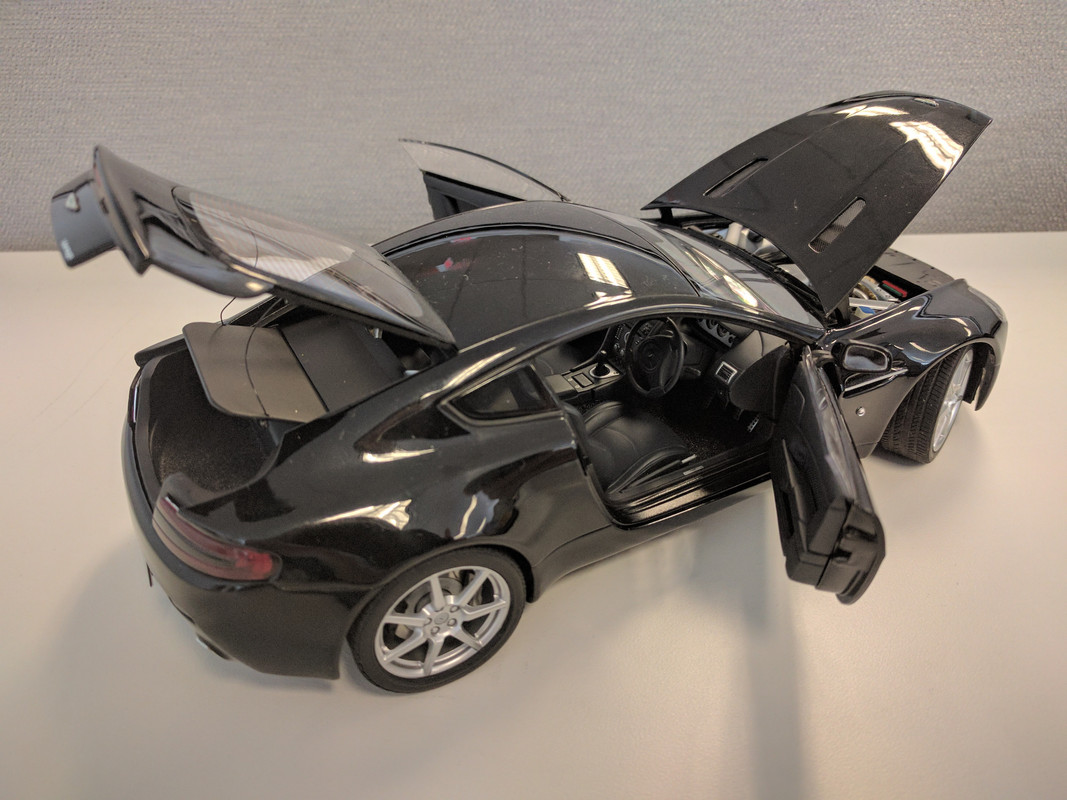
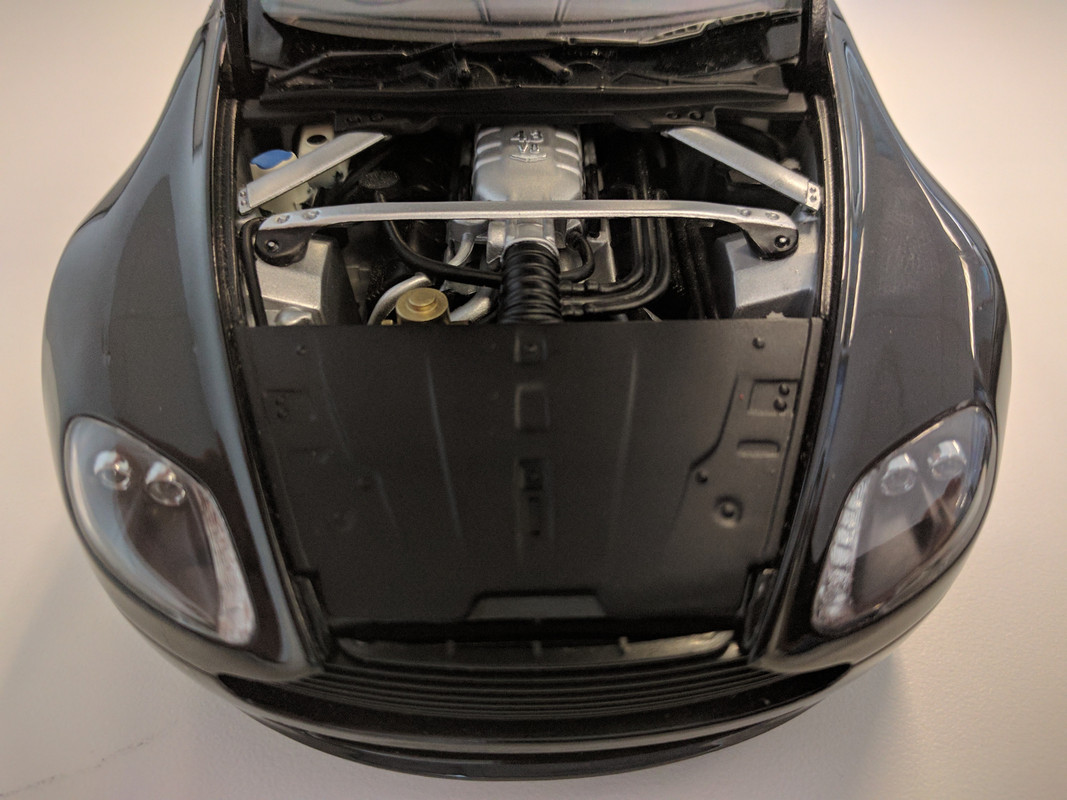
I was able to find an Vantage for my desk at work with identical exterior, colour and engine bay.

I was able to find an Vantage for my desk at work with identical exterior, colour and engine bay.
Last edited by 007V8Vantage; Mar 29, 2021 at 10:08 PM.
Thread Starter
|
Registered User
Joined: Apr 2017
Posts: 399
From: Niagara Region
Rep Power: 29
Weekend Update
Thanks guys, yes this used Black Auto Art 1/18th scale metal model is a pretty good representation of my car and I picked it up relatively cheap.
Friday morning at 7 am this arrived in good condition from forum member handyman2009 - thanks again.

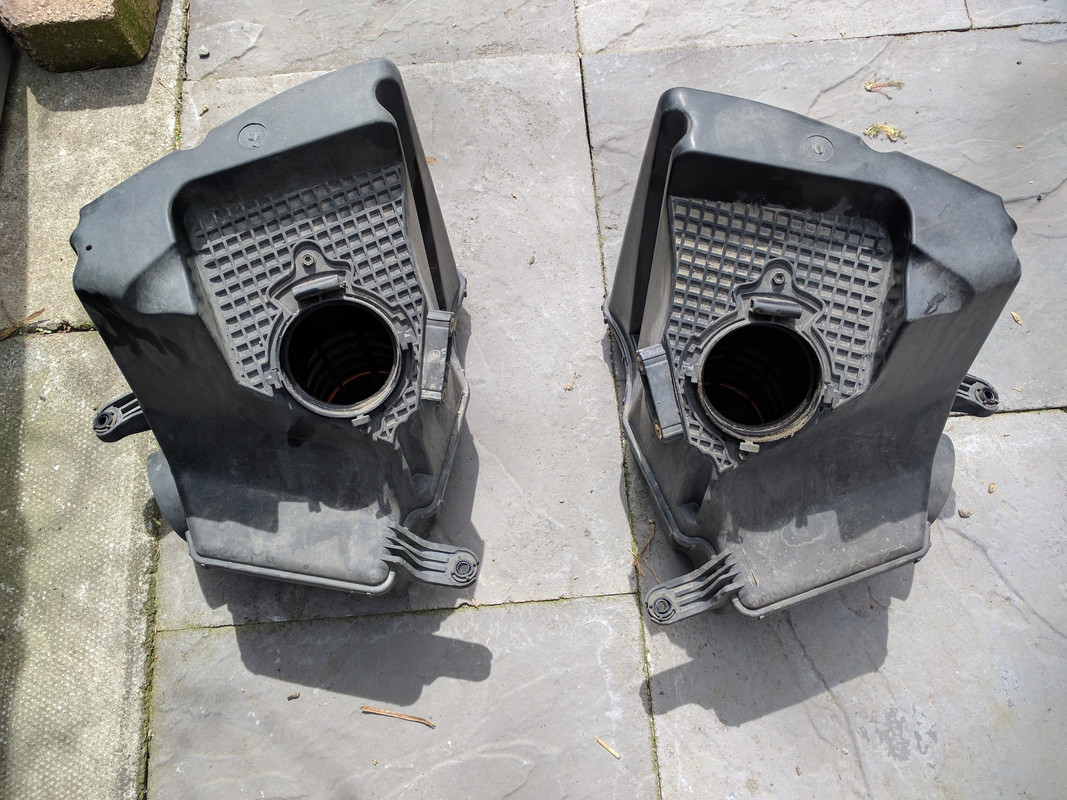
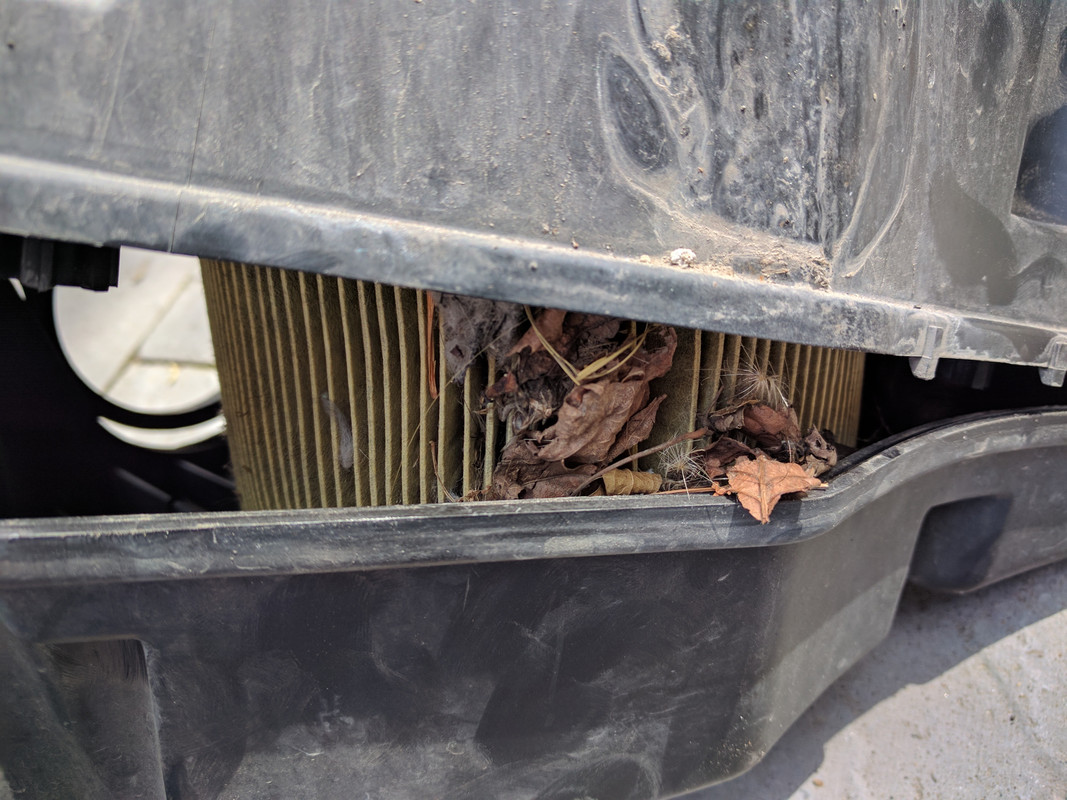
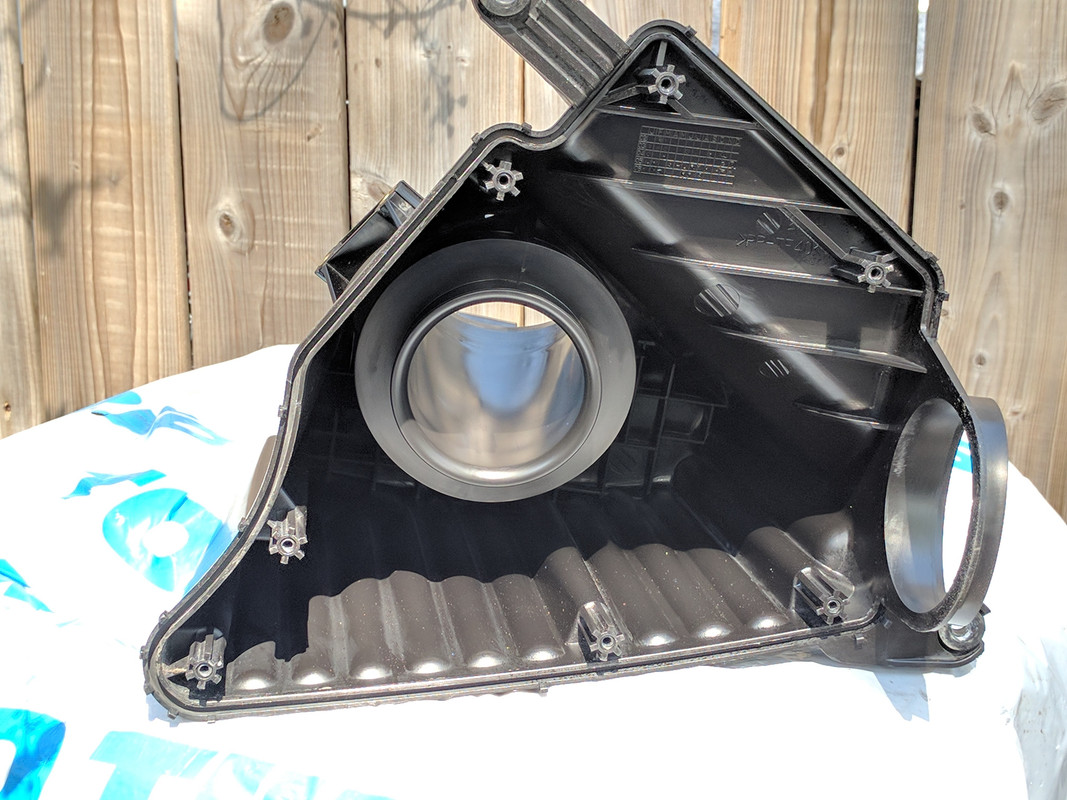
Next thing I worked on was the airboxes (clean and reinstall).
As you can see the airboxes looked like a sandbox so I likely won't put the bottom covers back on. That way the same sand, leaves and debris won't have to be constantly filtered and can escape via gravity when the engine isn't running.
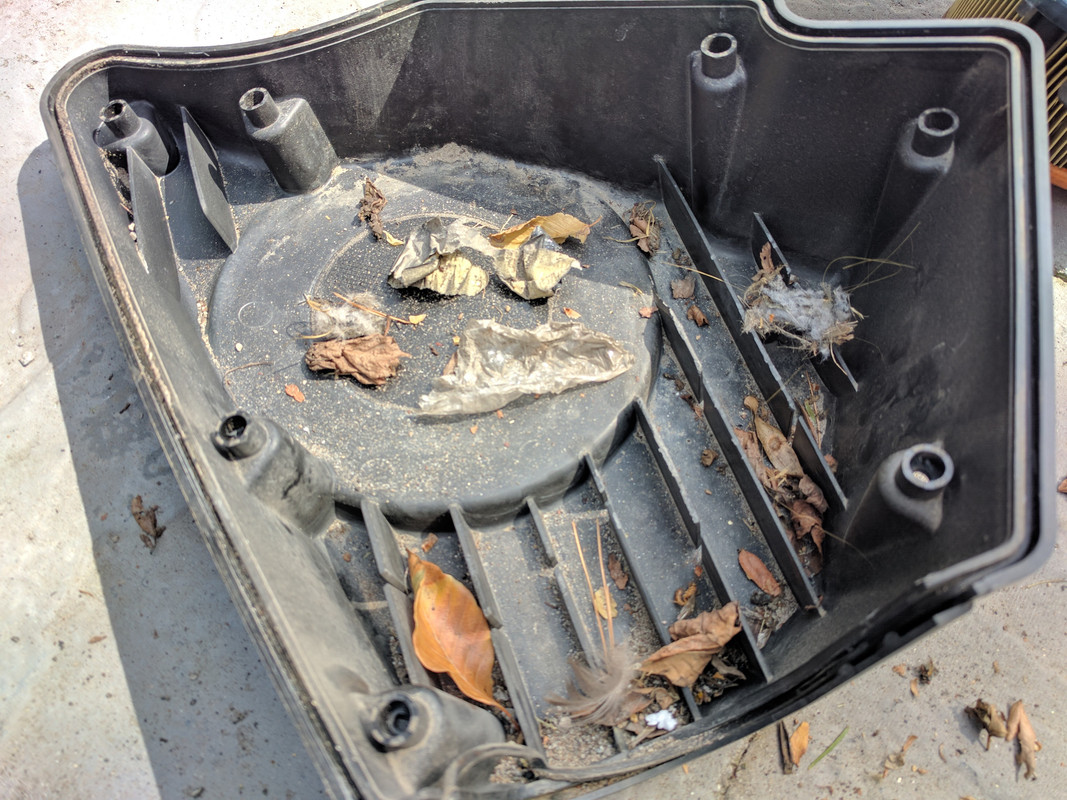
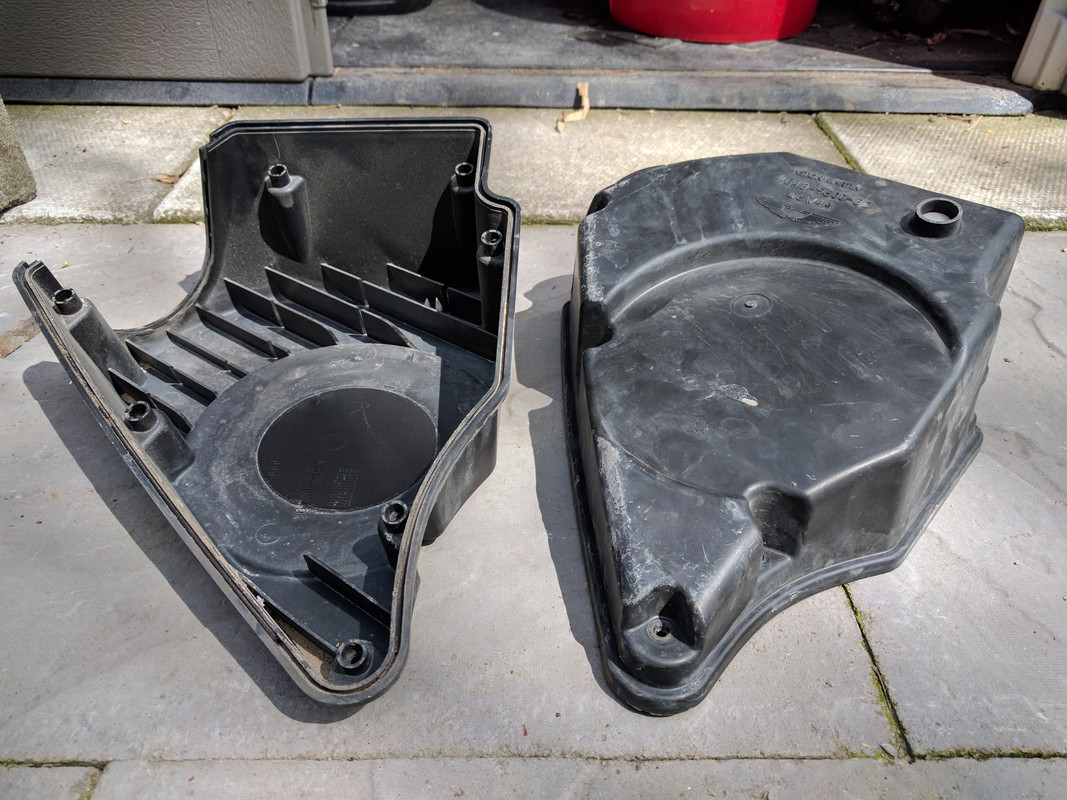
Here are the bottom covers to the airboxes I am referring to held on by 7 screws:
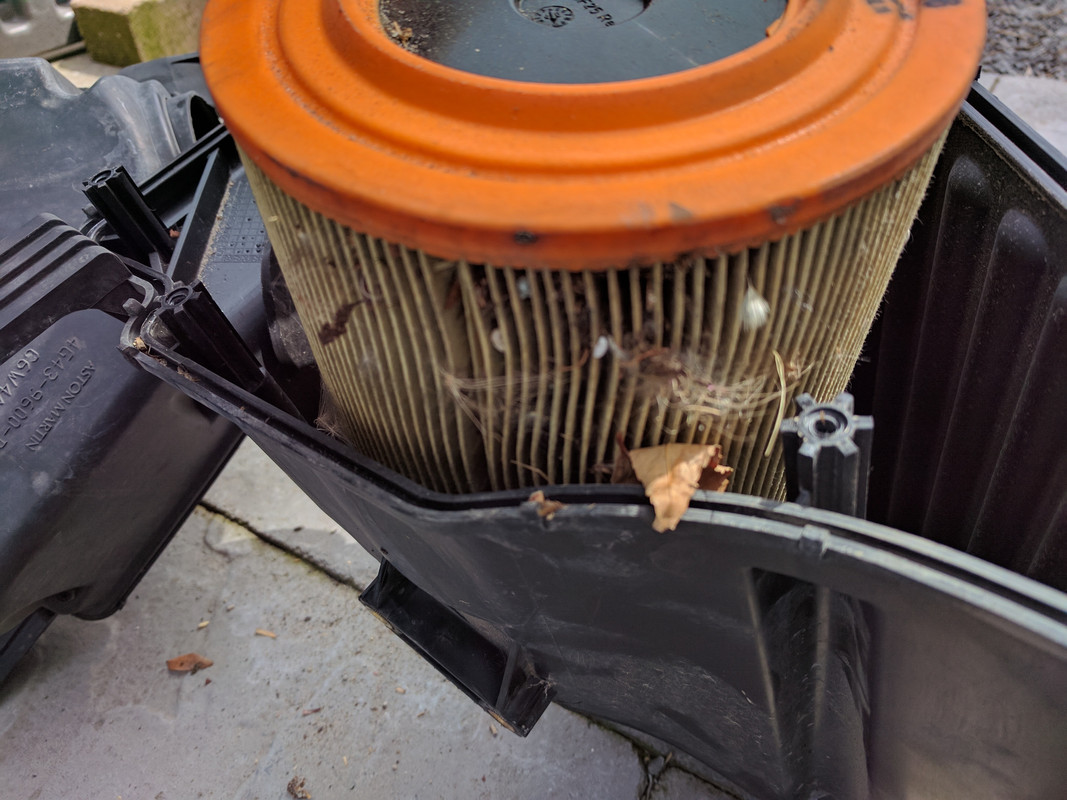
Wow looks like these filters haven't been changed in a long time:

Upon inspection, it is obvious the OEM filters work very well when comparing the outside to the inside which still looks brand new
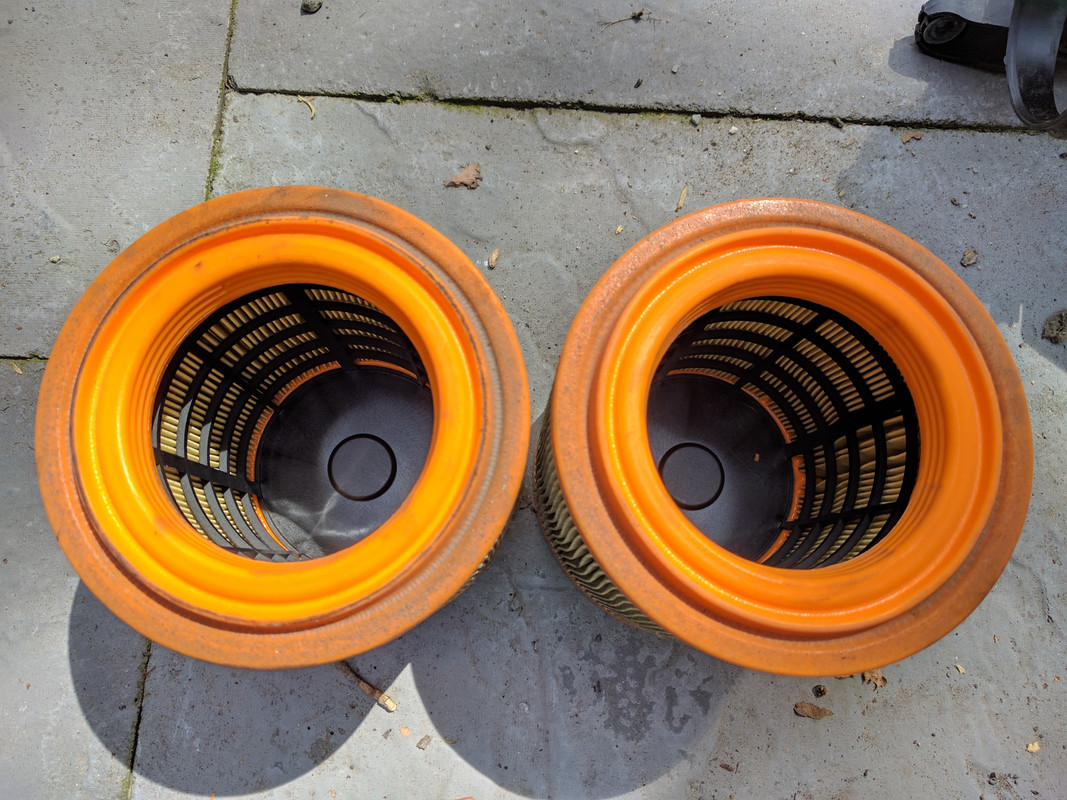
Since I don't know for sure when the last time the air filters were replaced I've ordered new ones to start fresh on a regular service schedule.
Friday morning at 7 am this arrived in good condition from forum member handyman2009 - thanks again.
Next thing I worked on was the airboxes (clean and reinstall).
As you can see the airboxes looked like a sandbox so I likely won't put the bottom covers back on. That way the same sand, leaves and debris won't have to be constantly filtered and can escape via gravity when the engine isn't running.
Here are the bottom covers to the airboxes I am referring to held on by 7 screws:
Wow looks like these filters haven't been changed in a long time:
Upon inspection, it is obvious the OEM filters work very well when comparing the outside to the inside which still looks brand new
Since I don't know for sure when the last time the air filters were replaced I've ordered new ones to start fresh on a regular service schedule.
Last edited by 007V8Vantage; Apr 7, 2021 at 08:34 PM. Reason: spelling
Thread Starter
|
Registered User
Joined: Apr 2017
Posts: 399
From: Niagara Region
Rep Power: 29
Airbox reinstall
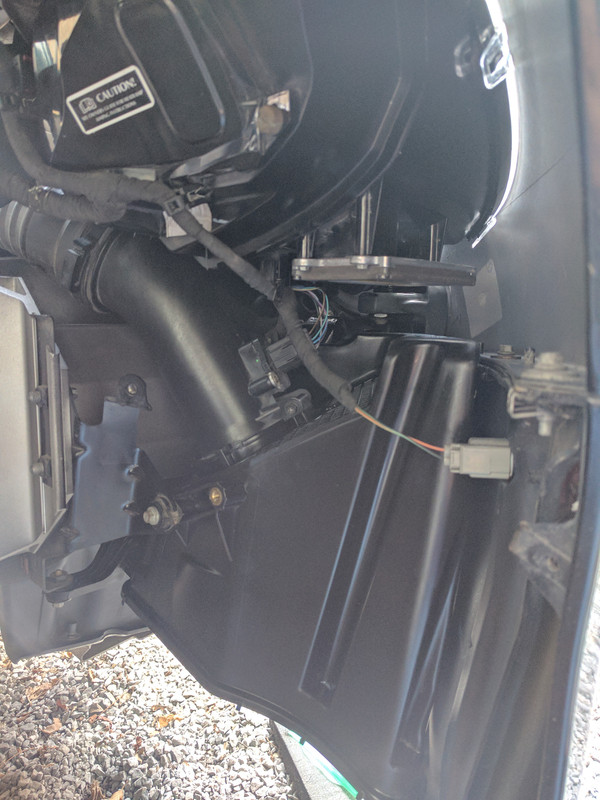
After a good cleaning the airboxes were reinstalled with the 3 screws holding each. You know you're in love when you thoroughly clean areas no one will see - well except forum members online LOL:

Next up, time to remove the door struts while I have the fender liners out...
Next up, time to remove the door struts while I have the fender liners out...
Last edited by 007V8Vantage; Apr 7, 2021 at 08:44 PM. Reason: pic error
Thread Starter
|
Registered User
Joined: Apr 2017
Posts: 399
From: Niagara Region
Rep Power: 29
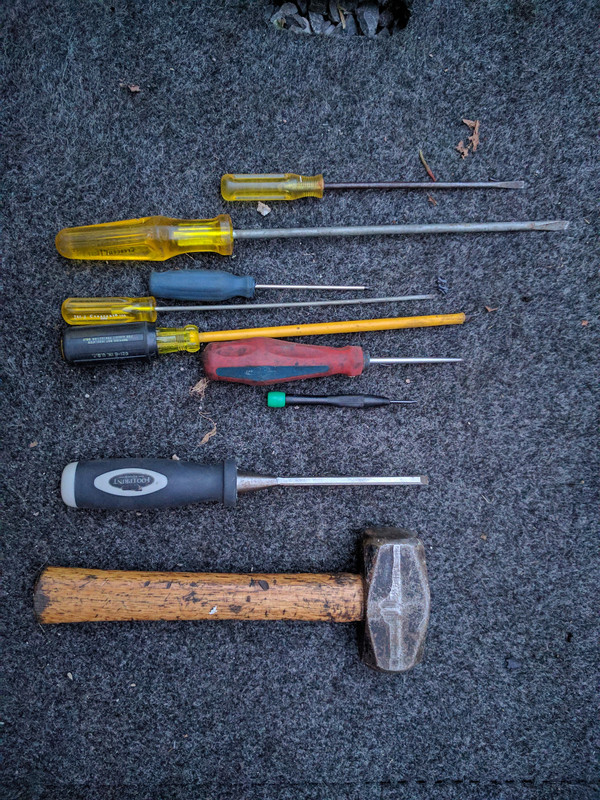
I Googled how to do this and there seemed to be a lack a good photos showing the dark area where the door struts or gas lift supports live.
Since my main helper Aston lacks the necessary oppose-able thumbs, I wanted a way to do this on my own. Plus, I have limited space so wanted to remove them with the doors closed. This is what I did to successfully remove them.
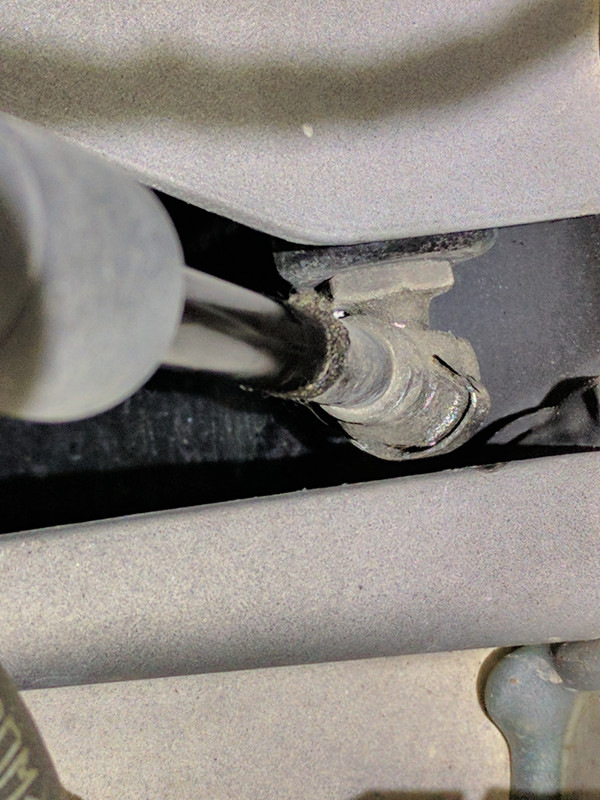
1. First grab all the flat screw drivers you have to find the best one for the job of releasing the retaining clips - for me the best choice was a narrow chisel with a 2-1/2 pound sledge
2. First unplug the side marker plug to reduce risk of damaging it. Once the near end clip is released, here is where I moved that end to
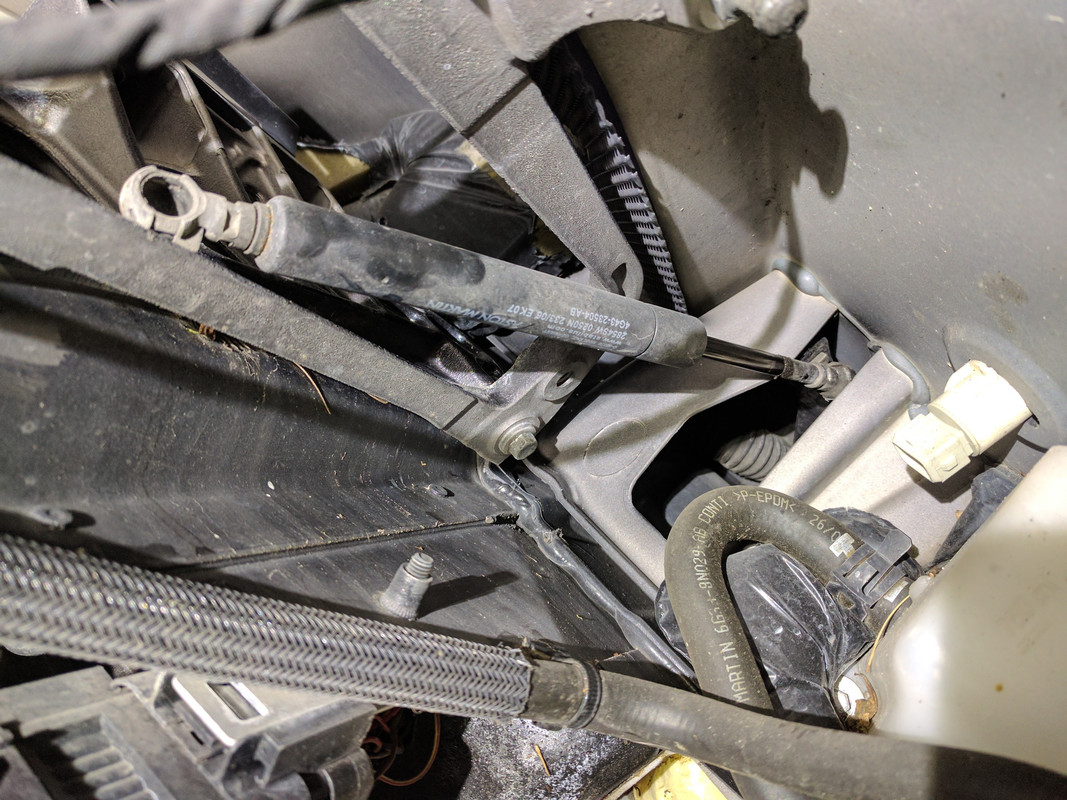
3. You don't need to remove the clip in the rear as it will fall into the door cavity, so I just gave the chisel a couple LIGHT taps with the hammer until it popped up halfway. Don't worry about scratching the strut as the old ones are going in the bin. This is what that looks like - remember the car doors are closed the whole time
4. Again, see where I move the front end so it's out of the way and to make the rear end more accessible
5. Repeat with the chisel tap to release back clip. Note the direction the new struts will need to be oriented prior to removal or take a picture like this
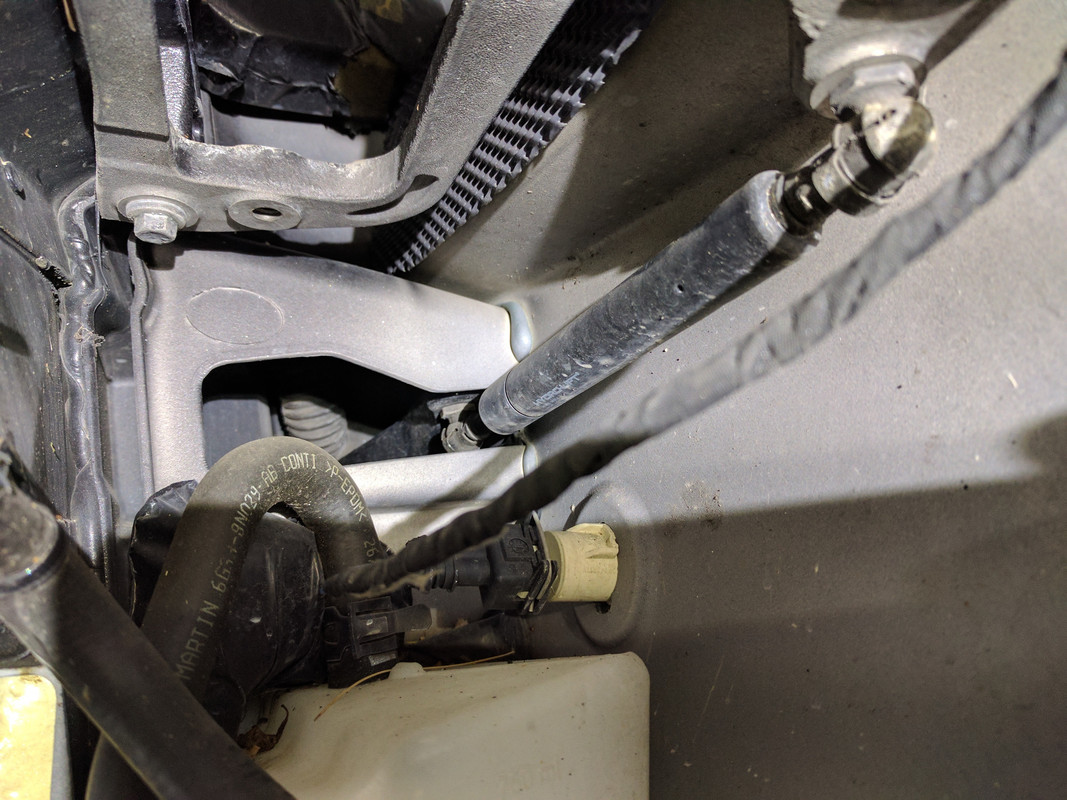
Installation of new ones is just a matter of popping the rear ends on first and then the near or forward ends second.
Since my main helper Aston lacks the necessary oppose-able thumbs, I wanted a way to do this on my own. Plus, I have limited space so wanted to remove them with the doors closed. This is what I did to successfully remove them.
1. First grab all the flat screw drivers you have to find the best one for the job of releasing the retaining clips - for me the best choice was a narrow chisel with a 2-1/2 pound sledge
2. First unplug the side marker plug to reduce risk of damaging it. Once the near end clip is released, here is where I moved that end to
3. You don't need to remove the clip in the rear as it will fall into the door cavity, so I just gave the chisel a couple LIGHT taps with the hammer until it popped up halfway. Don't worry about scratching the strut as the old ones are going in the bin. This is what that looks like - remember the car doors are closed the whole time
4. Again, see where I move the front end so it's out of the way and to make the rear end more accessible
5. Repeat with the chisel tap to release back clip. Note the direction the new struts will need to be oriented prior to removal or take a picture like this
Installation of new ones is just a matter of popping the rear ends on first and then the near or forward ends second.
Last edited by 007V8Vantage; Apr 7, 2021 at 09:05 PM.
Thread Starter
|
Registered User
Joined: Apr 2017
Posts: 399
From: Niagara Region
Rep Power: 29
Hmm, after seeing those air-boxes, my thought process was:
1. I know the car hasn't been to an Aston Dealer in a few years
2. The previous owner wasn't a car DIYer.
3. It's not like the cabin filters are much "easier" to change than the airbox filters, LOL
Therefore, after seeing those air filters, I thought better check the cabin air filters too!
Leather glove box surround pulled off by hand and push button switch unplugged:
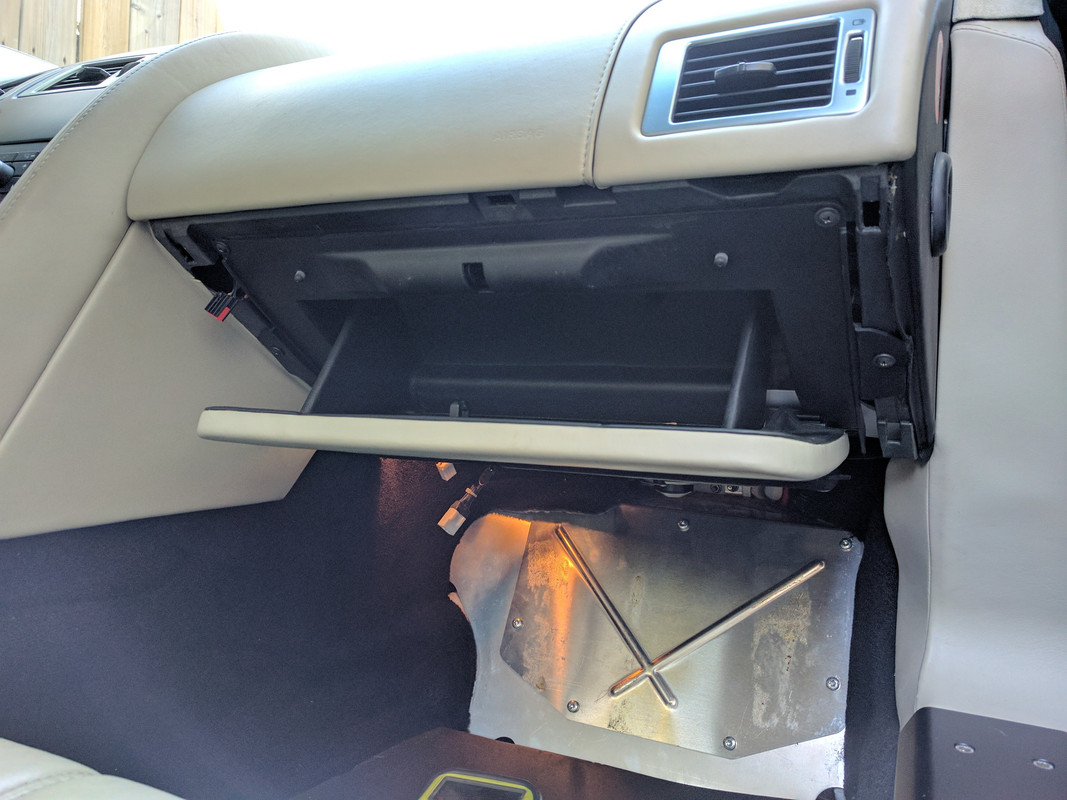
3 screws at glovebox hinge removed along with screws holding glovebox to dash:
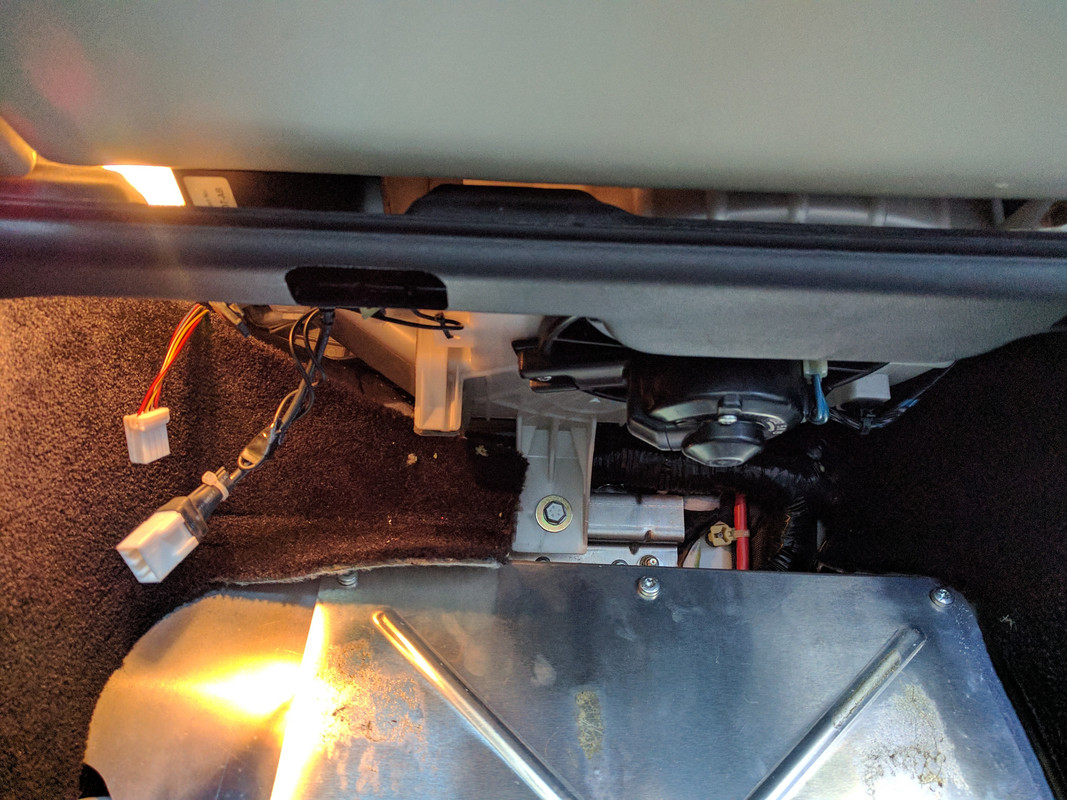
Swing the glovebox down and to the right as it's still attached to the "soft open" cable. Then you can unclip the white plastic door on the cabin filter housing and slide out the two filters:

Really, are you freakin' kidding me?

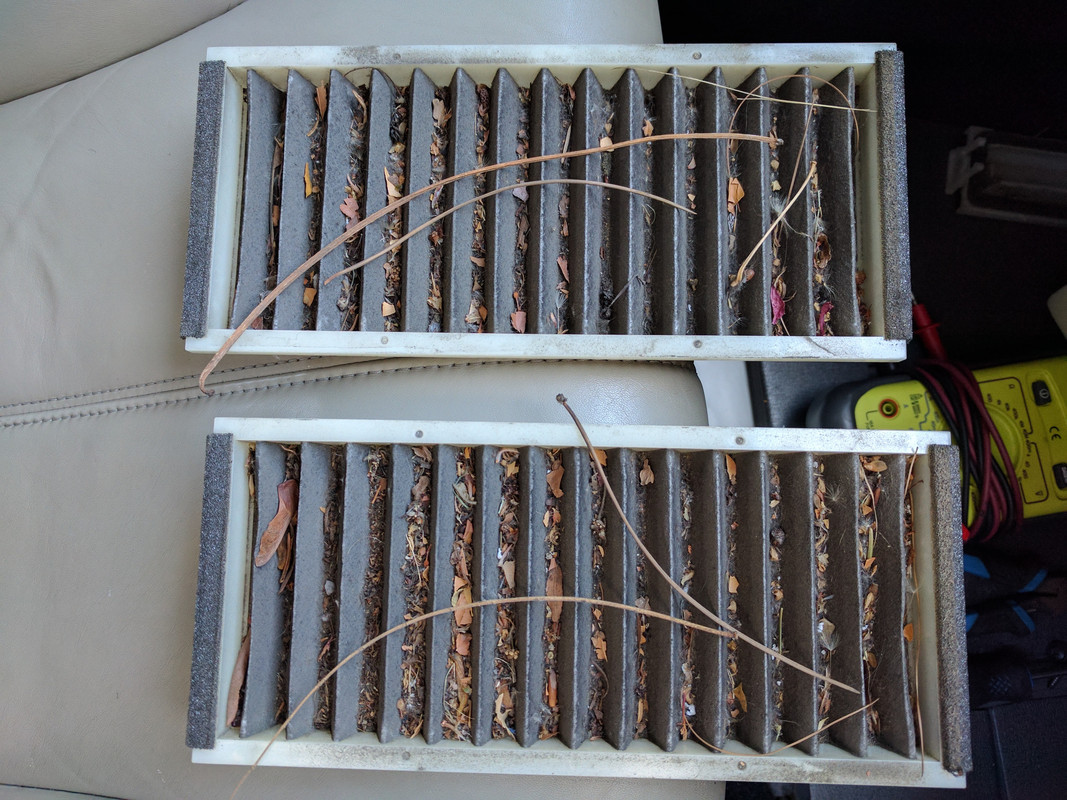
My Vantage must be relieved to be in "rehab"
")
Last edited by 007V8Vantage; Apr 7, 2021 at 09:16 PM.
