
Anybody DIY spark plugs for their Panamera?


Registered User
Joined: Mar 2017
Posts: 36
From: Wilmington, DE
Rep Power: 13

I just changed the plugs on my non-turbo v8. Honestly it was really easy but you will need some special tools that you can pick up anywhere. Also, the screws for the coils are aluminum and they need to be replaced.
It should take 1-2 hours the first time. If I were to do it again it would honestly probably take ~30-45 minutes to change all 8 plugs.
Parts:
-Spark Plugs - FGR5NQE04 (turbo has different plugs)
-Aluminum Screws (Porsche recommends to always use new aluminum screws)
-- Coils - 948-105-146-00 (Generally regularly available at the dealer)
-- Engine Torque Damper (I reused these parts)
--- WHT-004-595
--- WHT-005-204
--- WHT-004-635 (x2)
Tools:
You do not need all these tools but they will make your life easier. If you have all of this readily available the swap is extremely quick and easy. There is NOTHING difficult to reach / remove by having the swivel, wobble, and mini ratchet wrench. No cursing at all.
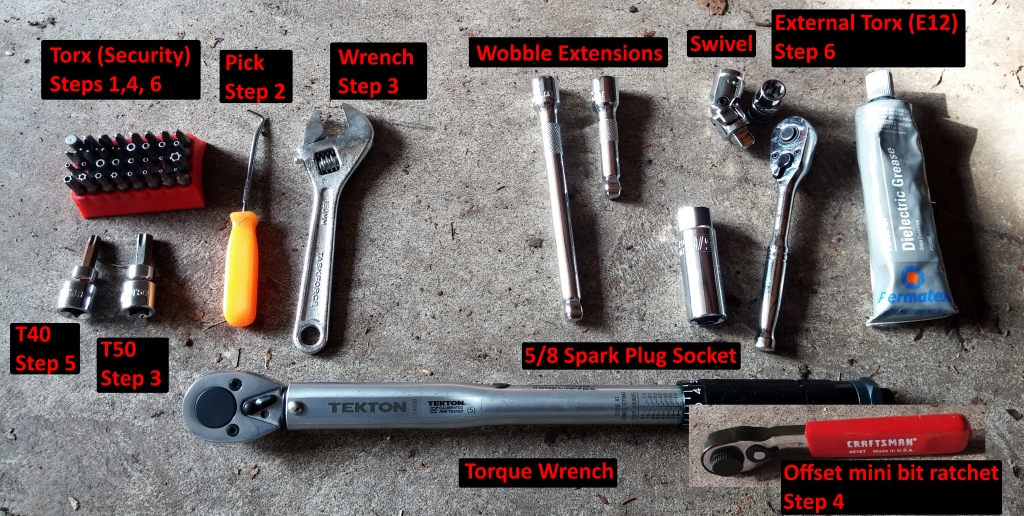
Torx bits - (avusm3 stated he needed a T30 Security) I don't remember the exact sizes.
Large torx - T40 & T50
External / Inverted / Hexalobular E12 socket
Pick or very small flat head
Wrench (adjustable or combo wrenches)
Wobble extension set (the wobble makes life easier)
Swivel socket
Socket wrenches
5/8 Spark plug socket
Offset mini ratchet wrench
Dielectric grease
Procedure:
Hope I didn't miss anything - I'm doing this mostly from memory. Again, this is how I did it - doesn't mean it's THE ONLY way.
It should take 1-2 hours the first time. If I were to do it again it would honestly probably take ~30-45 minutes to change all 8 plugs.
Parts:
-Spark Plugs - FGR5NQE04 (turbo has different plugs)
-Aluminum Screws (Porsche recommends to always use new aluminum screws)
-- Coils - 948-105-146-00 (Generally regularly available at the dealer)
-- Engine Torque Damper (I reused these parts)
--- WHT-004-595
--- WHT-005-204
--- WHT-004-635 (x2)
Tools:
You do not need all these tools but they will make your life easier. If you have all of this readily available the swap is extremely quick and easy. There is NOTHING difficult to reach / remove by having the swivel, wobble, and mini ratchet wrench. No cursing at all.
Torx bits - (avusm3 stated he needed a T30 Security) I don't remember the exact sizes.
Large torx - T40 & T50
External / Inverted / Hexalobular E12 socket
Pick or very small flat head
Wrench (adjustable or combo wrenches)
Wobble extension set (the wobble makes life easier)
Swivel socket
Socket wrenches
5/8 Spark plug socket
Offset mini ratchet wrench
Dielectric grease
Procedure:
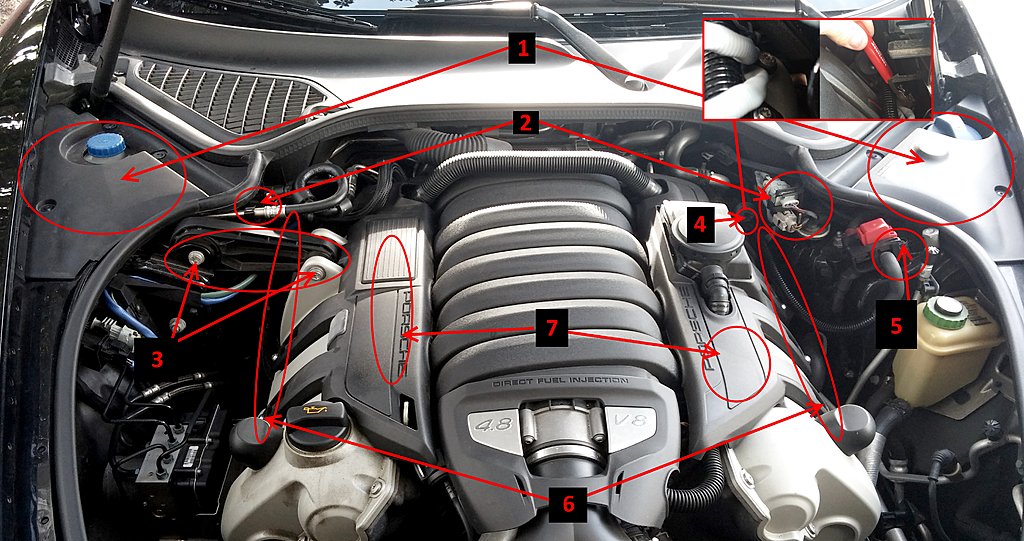
- Remove the torx screws holding in each corner cover and pop them off.
- Pop the vacuum lines (passenger side) off of the black clip and use your pick to remove the black mounting clip completely. Remove the wiring harnesses (driver side) from the black clip and use your pick to remove the black clip completely
- Use the T50 bit and adjustable wrench to remove the two aluminum bolts. Slide the damper up and remove it.
- Use your mini ratchet wrench with the proper security torx bit (avusm3 says it's a T30) to loosen the bolt that holds on the black plastic pathway blocking access to the farthest plug. Remove the screw by hand so that you don't drop it.
- Use the T40 and remove the screw holding the positive jumper post. This, in conjunction with step 4, makes it easier to remove the farthest coil and plug as you can now move the large gauge wire out of the way
- Remove the 8 screws holding the two decorative covers
- Lift up on each cover and slide them out to remove
- There should be plenty of clearance at all 8 coils. Remove the eight coil screws using the E12 socket. Be aware of how much force is needed to remove these screws - you will use LESS force to tighten the new ones. Note: I needed the swivel socket to take out the screw for the driver's side closest to the firewall (marked around the step 4 outline)
- Unplug the harnesses from the coils
- Remove the coils by griping with your thumb and index finger and rotating back and forth, then out. Inspect the boots for any cracks - if you find some, you'll want to replace that coil.
- Grab the 5/8 spark plug socket with the appropriate extensions. Slide onto the plugs, remove with a socket wrench. I did not need a swivel for ANY of the plugs.
- Place a new plug in the spark plug socket with the wobble extension. Thread it in by hand until hand tight. Attach the torque wrench and finish by torquing them to 22 lb ft
- Place a SMALL amount of dielectric grease on the tiny inner lip of the coil boot. Do not glob it on and avoid getting it into the boot. Reattach the coils to the spark plugs by pushing firmly into place.
- Install the ignition coil screws through the coils and into the valve cover BY HAND. Snug them up with the E12 socket ...barely! Do not "tighten" them - just snug them up. They will snap easily!
- Perform the reverse scenario to put the car back together ...might want to put the damper back on (with the old bolts - you'll need to remove it again to put the cover back on) and try starting the car first.
Hope I didn't miss anything - I'm doing this mostly from memory. Again, this is how I did it - doesn't mean it's THE ONLY way.
Last edited by rmjjensen; Jul 30, 2017 at 11:22 AM. Reason: DIY Procedure

Registered User
Joined: Jun 2016
Posts: 210
From: Sydney
Rep Power: 0
I did plugs & coils on my car.
Its def a DIY project. Its just the same as any other car.
The ones closest to the firewall are the hardest.
The only "special" tools you will need is Torx set from memory.
Its def a DIY project. Its just the same as any other car.
The ones closest to the firewall are the hardest.
The only "special" tools you will need is Torx set from memory.
Registered User
Joined: Feb 2017
Posts: 120
From: Michigan
Rep Power: 16
Aluminum screws are used to help prevent dissimilar metal corrosion issues. The valve covers are made of magnesium (from the Porsche press releases). The aluminum screws are much closer in galvanic potential to magnesium than steel screws- if you used steel you could set up a galvanic cell between the two metals and unfortunately the magnesium would be the metal to start disappearing.
The service manual also states that the screws should be replaced and not reused.
Regards,
Chuck
2014 Panamera 4S
The service manual also states that the screws should be replaced and not reused.
Regards,
Chuck
2014 Panamera 4S
Last edited by HP41; Mar 12, 2017 at 05:18 PM. Reason: added attachment

Registered User
Joined: Mar 2016
Posts: 69
From: Maryland
Rep Power: 13
Hey Everyone.. i'm very Glad this topic came up. Well I've decided to do a tune up on my 970TT and go with the 1 step colder "Denso 5345 IKH22 Iridium Power Plug" and a set of new coil packs. I will also do a fully oil service to include the engine flush using Liqui Moly engine flush. My parts should all be arriving this week to include an under-tray which has been previously damaged some how, but its the perfect time to have that replaced as well. I will make a DYI video with the help of another person while completing this tune up and post my results on here once its complete. Im shooting for this Sat for the work to be done. Stay tuned!!.
Registered User
Joined: Mar 2017
Posts: 36
From: Wilmington, DE
Rep Power: 13
I edited my post to include the DIY procedure.
https://www.6speedonline.com/forums/...ml#post4616409
https://www.6speedonline.com/forums/...ml#post4616409


Registered User
Joined: Mar 2017
Posts: 18
Rep Power: 0
Rmjjensen- awesome. Thanks you're the first on the Internet to document this for Panameras! Small but import first step to the DIY folks growing on the PTT's
LBoogie- Denso Iridiums Ik22's I was looking at as well. Are you going to be playing with the gaps, or running at .032 clean? Curious. Now that we got the install basics, now comes the tweaks!
Aluminum screws- wtf. Are they that weight crazy? Thanks for the one that pointed out galvanic, but my background in aerospace - when in doubt steel bolts bc al has no plastic deformation "green zone"- i.e. Heads will pop off. galvanic can be taken care of by threadlock coating is my 2 cents. Or AL washers if fear of surface and not thread. Otherwise someone is going to pop the heads off of those bolts by accident torquing to steel standards.....

Registered User
Joined: Apr 2015
Posts: 95
From: Houston
Rep Power: 17
i edited my post to include the diy procedure.
https://www.6speedonline.com/forums/...ml#post4616409
https://www.6speedonline.com/forums/...ml#post4616409
awesome - thanks!!!!!
Registered User
Joined: Mar 2016
Posts: 69
From: Maryland
Rep Power: 13
Rmjjensen- awesome. Thanks you're the first on the Internet to document this for Panameras! Small but import first step to the DIY folks growing on the PTT's
LBoogie- Denso Iridiums Ik22's I was looking at as well. Are you going to be playing with the gaps, or running at .032 clean? Curious. Now that we got the install basics, now comes the tweaks!
Aluminum screws- wtf. Are they that weight crazy? Thanks for the one that pointed out galvanic, but my background in aerospace - when in doubt steel bolts bc al has no plastic deformation "green zone"- i.e. Heads will pop off. galvanic can be taken care of by threadlock coating is my 2 cents. Or AL washers if fear of surface and not thread. Otherwise someone is going to pop the heads off of those bolts by accident torquing to steel standards.....
LBoogie- Denso Iridiums Ik22's I was looking at as well. Are you going to be playing with the gaps, or running at .032 clean? Curious. Now that we got the install basics, now comes the tweaks!
Aluminum screws- wtf. Are they that weight crazy? Thanks for the one that pointed out galvanic, but my background in aerospace - when in doubt steel bolts bc al has no plastic deformation "green zone"- i.e. Heads will pop off. galvanic can be taken care of by threadlock coating is my 2 cents. Or AL washers if fear of surface and not thread. Otherwise someone is going to pop the heads off of those bolts by accident torquing to steel standards.....
https://www.6speedonline.com/forums/...-1-2bar-2.html
https://www.6speedonline.com/forums/...-plug-gap.html
https://www.6speedonline.com/forums/...ugs-pic-3.html
http://www.ngksparkplugs.ca/tech-info-spark-plugs.cfm
http://www.denso.com.au/sparkplug/make/10/porsche
https://www.densoproducts.com/product.aspx?zpid=11179
Registered User
Joined: Feb 2017
Posts: 120
From: Michigan
Rep Power: 16
Cost at Dealership for Spark-Plug Change ('14 4S)
Data point on dealership cost:
I was comp'd a spark plug change due to it not being done by prior owner/other dealership as part of pre-paid maintenance plan at 30K. I did receive a copy of the bill which will be handled internally between dealerships.
Parts: 6 plugs @ $182.16
Labor: .95 hour @ $128.25
Total billable cost $310.41 (I paid zero)
Great reason to make this a DIY job.
I was all prepared to do job myself (already had the plugs on-hand) but did not want to pass up the offer to get it done under dealership umbrella while still under warranty & CPO. I plan to do the 60K plug change when that time arrives.
I have been very happy with the work done at my dealership (they replaced several parts as part of the CPO / new owner inspection process).
Regards,
Chuck
Registered User
Joined: Mar 2017
Posts: 18
Rep Power: 0
Followed instruction by Jensen. Took 1.5hrs first time. Removing some of the surrounding items definetly did help. Definetly need a wobble extension of two as well.
used Denso iridium sparks- no issues. Smooth as butter.
aluminum standoffs I reused and used locktite to hold in place.
Torque dampener big aluminum bolts I replaced with steel. Aluminum was cross threaded and dorked up- #1 issue with AL - too soft, yet so brittle.
thanks all!
used Denso iridium sparks- no issues. Smooth as butter.
aluminum standoffs I reused and used locktite to hold in place.
Torque dampener big aluminum bolts I replaced with steel. Aluminum was cross threaded and dorked up- #1 issue with AL - too soft, yet so brittle.
thanks all!
Last edited by KamanCali; Mar 28, 2017 at 05:30 PM.
Registered User
Joined: Mar 2017
Posts: 36
From: Wilmington, DE
Rep Power: 13
FWIW I would not recommend using locktite - I hope you used the blue one at least (or maybe the purple?). Glad to hear the swap went well!!
Last edited by rmjjensen; Mar 30, 2017 at 10:14 AM.

