
997 PCM Face removal

Thread Starter
|
Registered User
Joined: Oct 2005
Posts: 437
From: San Francisco
Rep Power: 38

997 PCM Face removal
For those that would like to have their PCM and center stack painted, this serves as a DIY for you. You have to get down to the bare faceplate to be able to have it painted, which requires completely disassembling it.
First, to remove the units from the car:
Step 1 - Remove small carpeted trim piece from side of center console by PCM (Beside PCM) Using Torx wrench size T-30
Step 2 - Remove two leather side trim pieces using Torx wrench size T-20, then pull towards rear of car to release the clips
Step 3 - Using 5mm Allen wrench turn four (two each side) black hex locks 1/4 - 1/2 turn to unlatch side locks. Do not force these. They turn very easily in the correct direction. Open glove box on passenger side to access these latches.
Step 4 - Removing retaining screw using 7mm wrench on right hand side of PCM
Step 5 - Carefully slide out PCM
I would recommend you take pics of the faces of the PCM and all units you are disassembling so you can use as a reference for the buttons when re-assembling.
To remove HVAC and trim all the way down, you will see a couple torx bolts, just loosen and slide each unit out.
To remove the faces off the HVAC and panel that holds the sport button, traction control button etc, it is very straight forward. The HVAC has four T6 torx screws on the back of the face. Remove those 4 and separate the face from the unit. This will expose the back of the circuit board and you will see 4 more 6 screws to undo. Once you have removed those, you can take the face off, remove the display, and popping out the buttons is easy.
For the other panel, there are no screws, you just carefully pry the face off. Very straight forward.


Heater Controls


Now to the PCM Nav Unit.
Remove both ***** from front of unit by pulling straight out.
Remove the upper case cover by separating it at the tabs along the center.

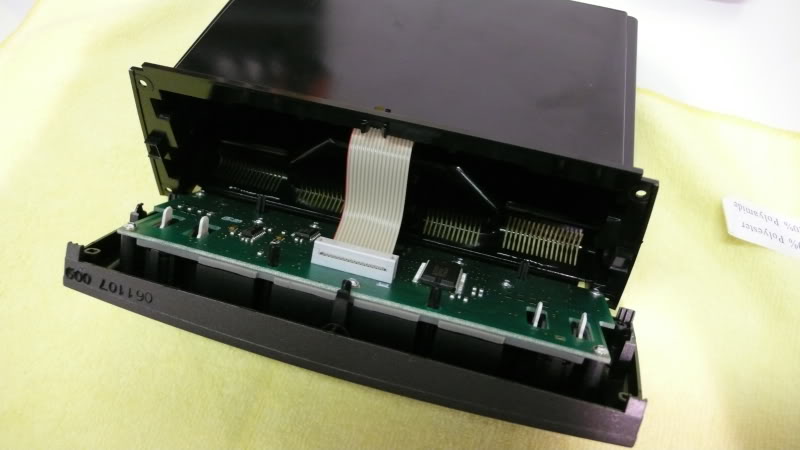
Disconnect the CD drive wiring from the circuit board and set the top aside. To remove the faceplate, there is a T8 torx on each side on the circuit board. Once removed pull the face straight out. Carefully do this as there are a few connectors still plugged into the circuit board which you will unplug.
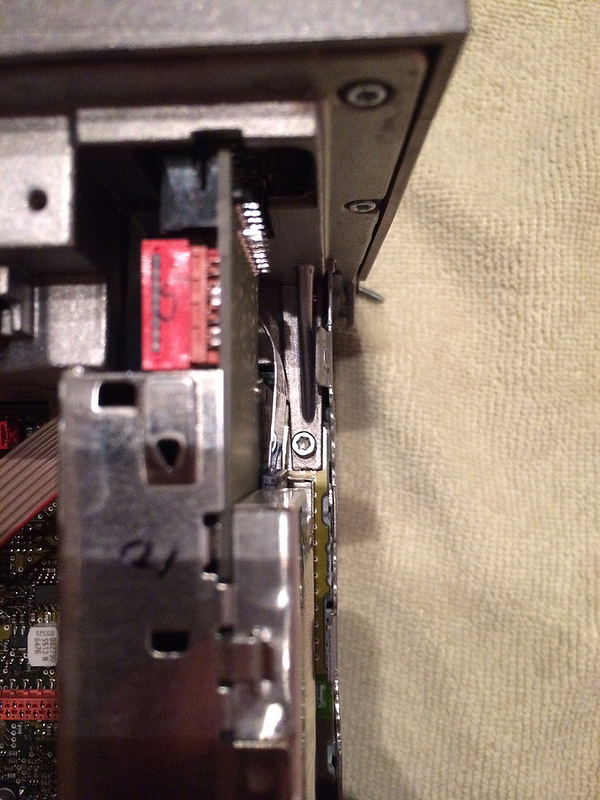
photo 1 (4) by bmwtye1, on Flickr
Now that you have the faceplate off, remove all the T8 torx to separate the back casing.

photo 2 (4) by bmwtye1, on Flickr
One you remove the back you will see this

photo 3 (3) by bmwtye1, on Flickr
Release the tabs for the whole screen unit (white piece in the picuture) and remove the screen assembly.

photo 4 (1) by bmwtye1, on Flickr
Remove the circuit board

photo 1 (5) by bmwtye1, on Flickr
Now you have access to all the buttons that you need to carefully pry out. In this pic im showing you what to push to pop the black plastic cover off the back of the button which will allow the button to fall right out. To remove the Sim card slot, you will need a T6 to remove 4 screws on it.

photo 3 (4) by bmwtye1, on Flickr
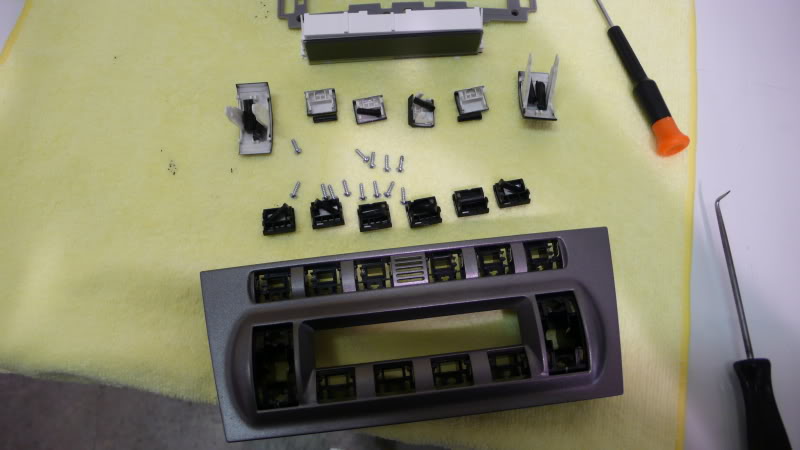
All said and done

photo 4 (2) by bmwtye1, on Flickr
Now you have the bare panels ready for paint.
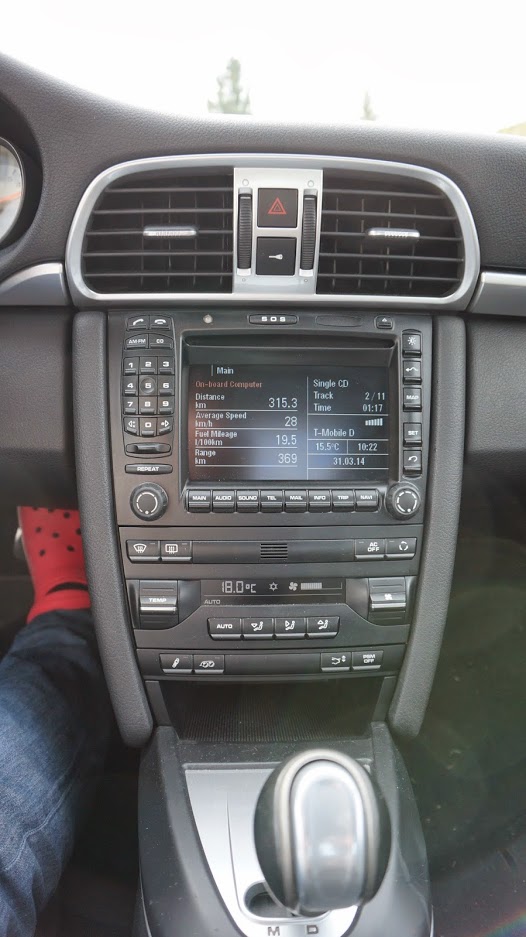
I had mine painted Satin Black. Final pic after re-assembly.

photo 1 (3) by bmwtye1, on Flickr
First, to remove the units from the car:
Step 1 - Remove small carpeted trim piece from side of center console by PCM (Beside PCM) Using Torx wrench size T-30
Step 2 - Remove two leather side trim pieces using Torx wrench size T-20, then pull towards rear of car to release the clips
Step 3 - Using 5mm Allen wrench turn four (two each side) black hex locks 1/4 - 1/2 turn to unlatch side locks. Do not force these. They turn very easily in the correct direction. Open glove box on passenger side to access these latches.
Step 4 - Removing retaining screw using 7mm wrench on right hand side of PCM
Step 5 - Carefully slide out PCM
I would recommend you take pics of the faces of the PCM and all units you are disassembling so you can use as a reference for the buttons when re-assembling.
To remove HVAC and trim all the way down, you will see a couple torx bolts, just loosen and slide each unit out.
To remove the faces off the HVAC and panel that holds the sport button, traction control button etc, it is very straight forward. The HVAC has four T6 torx screws on the back of the face. Remove those 4 and separate the face from the unit. This will expose the back of the circuit board and you will see 4 more 6 screws to undo. Once you have removed those, you can take the face off, remove the display, and popping out the buttons is easy.
For the other panel, there are no screws, you just carefully pry the face off. Very straight forward.
Heater Controls
Now to the PCM Nav Unit.
Remove both ***** from front of unit by pulling straight out.
Remove the upper case cover by separating it at the tabs along the center.
Disconnect the CD drive wiring from the circuit board and set the top aside. To remove the faceplate, there is a T8 torx on each side on the circuit board. Once removed pull the face straight out. Carefully do this as there are a few connectors still plugged into the circuit board which you will unplug.
photo 1 (4) by bmwtye1, on Flickr
Now that you have the faceplate off, remove all the T8 torx to separate the back casing.
photo 2 (4) by bmwtye1, on Flickr
One you remove the back you will see this
photo 3 (3) by bmwtye1, on Flickr
Release the tabs for the whole screen unit (white piece in the picuture) and remove the screen assembly.
photo 4 (1) by bmwtye1, on Flickr
Remove the circuit board
photo 1 (5) by bmwtye1, on Flickr
Now you have access to all the buttons that you need to carefully pry out. In this pic im showing you what to push to pop the black plastic cover off the back of the button which will allow the button to fall right out. To remove the Sim card slot, you will need a T6 to remove 4 screws on it.
photo 3 (4) by bmwtye1, on Flickr
All said and done
photo 4 (2) by bmwtye1, on Flickr
Now you have the bare panels ready for paint.
I had mine painted Satin Black. Final pic after re-assembly.
photo 1 (3) by bmwtye1, on Flickr
Registered User
Joined: Jan 2014
Posts: 103
Rep Power: 17
Hey TYE - just a very quick thank you - the removal was daunting and your step by step really helped out.
One last point for others who want to do this - learn from my fail. If you have the Porsche fitted telephone module, the cable is identical to the screen socket.....
make sure you reconnect them right - the telephone module goes in horizontal circuit board, the monitor next to the ribbon cable connector!
I plugged my Navi back in, the radio came on and I had no screen - Que. a panic moment.
see photos below of my finished module :-)
I also sprayed the steering wheel Horn surround at the same time. Colour used was a generic satin black.

Thread Starter
|
Registered User
Joined: Oct 2005
Posts: 437
From: San Francisco
Rep Power: 38
Originally Posted by Zubehor
sorry to dig up such an old post but what did you guys use to paint the center stack? it does look so much better painted black.


Registered User
Joined: Jan 2018
Posts: 5
From: Los Angeles
Rep Power: 0
Ok, I'm really going back in time now.
TYE, on your photo with the PCM faceplate completely disassembled you have two clear super small clips sitting right next to the volume button ribbon. Do you remember where they go? I followed your tutorial and now I'm stuck on where those two little guys go.
Thanks for the awesome step by step.
CC
TYE, on your photo with the PCM faceplate completely disassembled you have two clear super small clips sitting right next to the volume button ribbon. Do you remember where they go? I followed your tutorial and now I'm stuck on where those two little guys go.
Thanks for the awesome step by step.
CC
Trending Topics
Registered User
Joined: Jun 2013
Posts: 746
From: toronto
Rep Power: 50

this is awesome (and insane!)
thank you.
thank you.
For those that would like to have their PCM and center stack painted, this serves as a DIY for you. You have to get down to the bare faceplate to be able to have it painted, which requires completely disassembling it.
First, to remove the units from the car:
Step 1 - Remove small carpeted trim piece from side of center console by PCM (Beside PCM) Using Torx wrench size T-30
Step 2 - Remove two leather side trim pieces using Torx wrench size T-20, then pull towards rear of car to release the clips
Step 3 - Using 5mm Allen wrench turn four (two each side) black hex locks 1/4 - 1/2 turn to unlatch side locks. Do not force these. They turn very easily in the correct direction. Open glove box on passenger side to access these latches.
Step 4 - Removing retaining screw using 7mm wrench on right hand side of PCM
Step 5 - Carefully slide out PCM
I would recommend you take pics of the faces of the PCM and all units you are disassembling so you can use as a reference for the buttons when re-assembling.
To remove HVAC and trim all the way down, you will see a couple torx bolts, just loosen and slide each unit out.
To remove the faces off the HVAC and panel that holds the sport button, traction control button etc, it is very straight forward. The HVAC has four T6 torx screws on the back of the face. Remove those 4 and separate the face from the unit. This will expose the back of the circuit board and you will see 4 more 6 screws to undo. Once you have removed those, you can take the face off, remove the display, and popping out the buttons is easy.
For the other panel, there are no screws, you just carefully pry the face off. Very straight forward.
Heater Controls
Now to the PCM Nav Unit.
Remove both ***** from front of unit by pulling straight out.
Remove the upper case cover by separating it at the tabs along the center.
Disconnect the CD drive wiring from the circuit board and set the top aside. To remove the faceplate, there is a T8 torx on each side on the circuit board. Once removed pull the face straight out. Carefully do this as there are a few connectors still plugged into the circuit board which you will unplug.
photo 1 (4) by bmwtye1, on Flickr
Now that you have the faceplate off, remove all the T8 torx to separate the back casing.
photo 2 (4) by bmwtye1, on Flickr
One you remove the back you will see this
photo 3 (3) by bmwtye1, on Flickr
Release the tabs for the whole screen unit (white piece in the picuture) and remove the screen assembly.
photo 4 (1) by bmwtye1, on Flickr
Remove the circuit board
photo 1 (5) by bmwtye1, on Flickr
Now you have access to all the buttons that you need to carefully pry out. In this pic im showing you what to push to pop the black plastic cover off the back of the button which will allow the button to fall right out. To remove the Sim card slot, you will need a T6 to remove 4 screws on it.
photo 3 (4) by bmwtye1, on Flickr
All said and done
photo 4 (2) by bmwtye1, on Flickr
Now you have the bare panels ready for paint.
I had mine painted Satin Black. Final pic after re-assembly.
photo 1 (3) by bmwtye1, on Flickr


Thread
Thread Starter
Forum
Replies
Last Post