
FINISHED Kenwood DVD/NAV install and AC control mod- Pics and some DIY stuff


Thread Starter
|
Registered User
Joined: Apr 2007
Posts: 3,123
From: Chained to my Laptop....
Rep Power: 172


Ok so I found myself posting pics and info across three other threads about putting in my Kenwood 7100 NAV unit and modding the AC controls to fit the upper slot in the lower console. So thought I would consolidate into one set of info in hopes that it will provide another good set of info for others who want to do this.
And, a huge thanks to Icemann633, Newport996, Ritchie996 and others who have paved the way with these mods already and given me the inspiration / information to get me started.
Saturday:
Just installed the kenwood 7100 and did the AC mod today- about 4 hours.
A lot of careful grinding to get the AC control, pocket and trim to fit neatly.
Still not finished, there is a slight lip on the lower pocket and need to make a more fitted trim ring for the kenwood (ugly gaps top / bottom).
That is on tomorrow's to-do list .
.
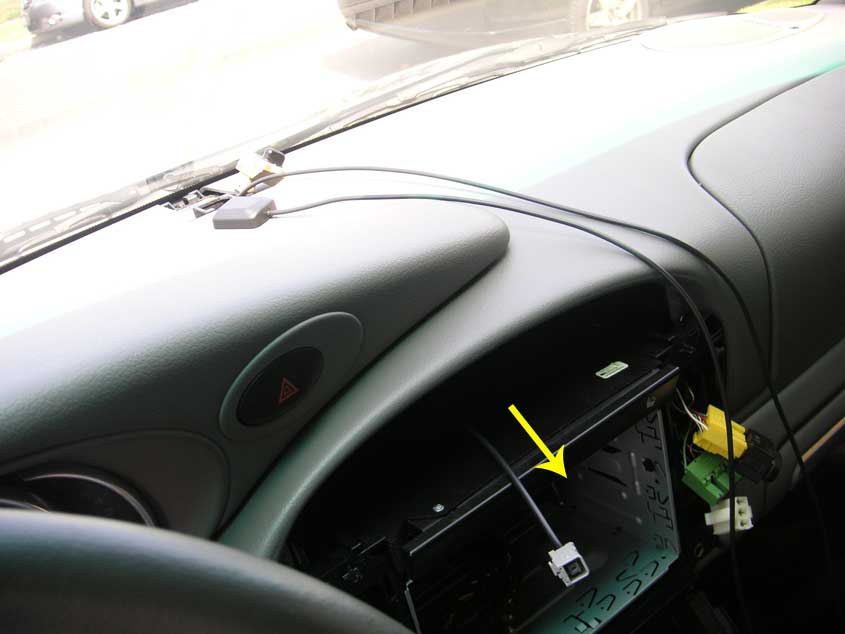
Here's a pic of the mounted unit and new AC control location, plus shots of the NAV antenna install. Found a great spot for the NAV antenna!.
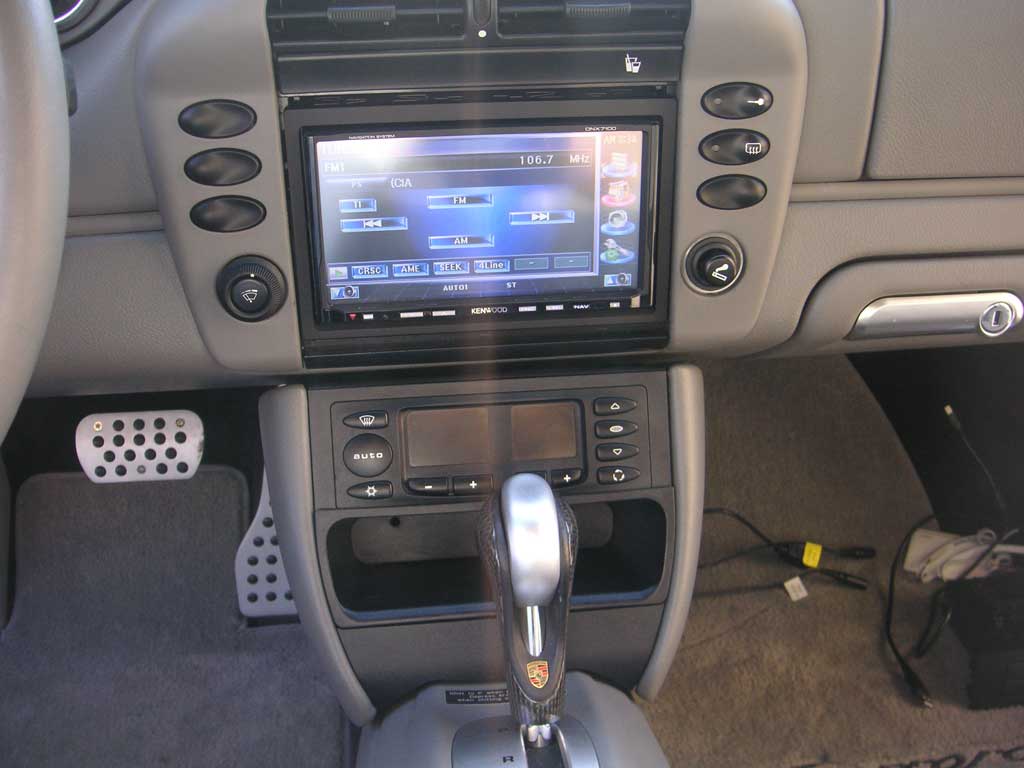
I chose to secure the cage for the kenwood with screws through either side of the cage into the console frame. This allowed me to set the height of the unit in the opening much easier, and it is very secure.
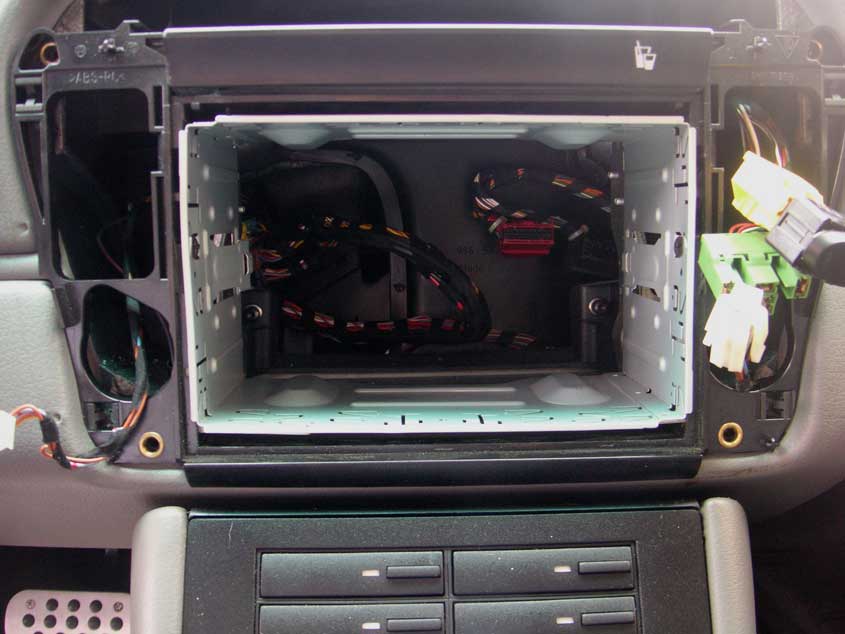
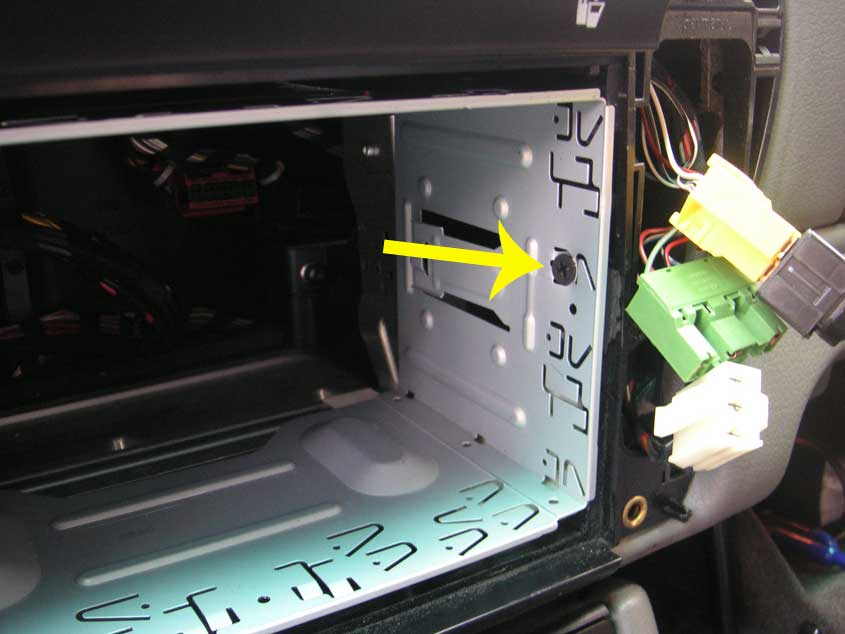
Closeup of right side screw point.
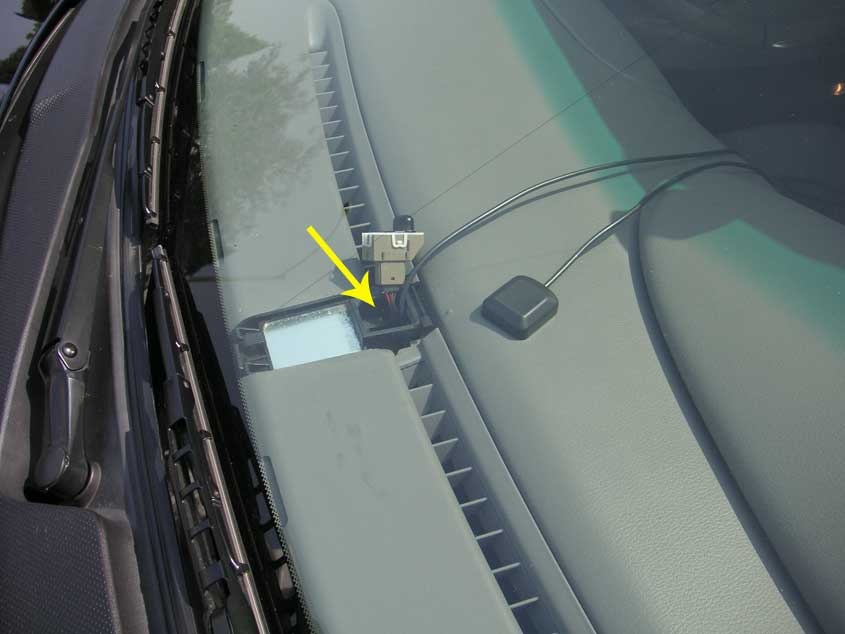
Some shots of the NAV antenna placement and running the cable. It is actually quite simple to do.
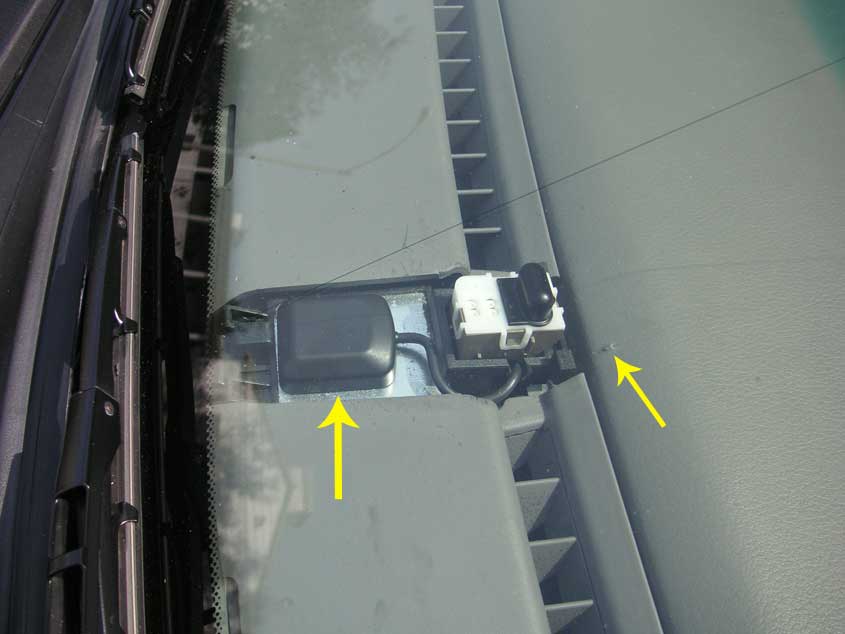
Toughest part was popping up the alarm indicator cover without damaging anything. It was very tough to take off, as you can see from the lower picture showing a slight bit of damage to my dash. fortunately this bo-bo is under the cover and out of sight. The cover pops up from the back (closest to you).
run cable down through opening for the alarm indicator
reach through the console opening and fish it through with your hand.
Carefully make a notch for the cable on the side plastic with a dremel, otherwise the alarm indicator wil not sit back down in the socket.
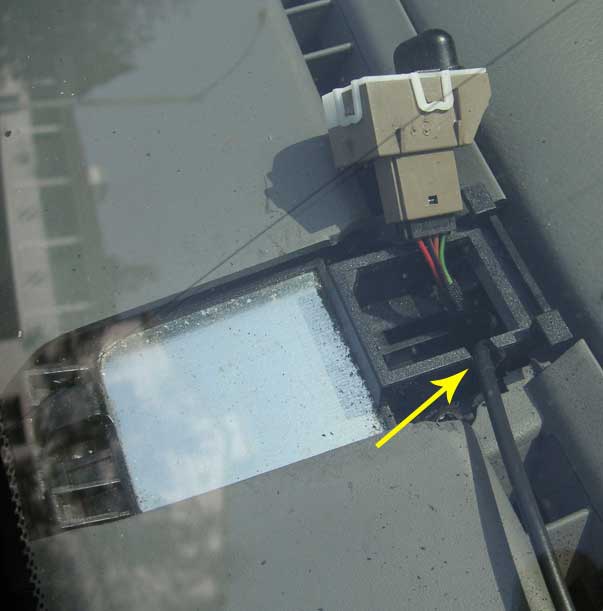
My antenna was magnetic so i just stuck it right on the metal (per the instructions with my unit). All done! Again, be careful with the hand tools around the dash (don't be like me...lol).
Overall, the kenwood made a very nice improvement in sound (running through the bose factory amp...for now). I would say the bose sounds 2x as good as before. Next I will replace the amp and all of the speakers, probably next month.
OK on to day two and wrap up of the AC console mod and dash trim piece for the kenwood.
And, a huge thanks to Icemann633, Newport996, Ritchie996 and others who have paved the way with these mods already and given me the inspiration / information to get me started.
Saturday:
Just installed the kenwood 7100 and did the AC mod today- about 4 hours.
A lot of careful grinding to get the AC control, pocket and trim to fit neatly.
Still not finished, there is a slight lip on the lower pocket and need to make a more fitted trim ring for the kenwood (ugly gaps top / bottom).
That is on tomorrow's to-do list
.Here's a pic of the mounted unit and new AC control location, plus shots of the NAV antenna install. Found a great spot for the NAV antenna!.
I chose to secure the cage for the kenwood with screws through either side of the cage into the console frame. This allowed me to set the height of the unit in the opening much easier, and it is very secure.
Closeup of right side screw point.
Some shots of the NAV antenna placement and running the cable. It is actually quite simple to do.
Toughest part was popping up the alarm indicator cover without damaging anything. It was very tough to take off, as you can see from the lower picture showing a slight bit of damage to my dash. fortunately this bo-bo is under the cover and out of sight. The cover pops up from the back (closest to you).
run cable down through opening for the alarm indicator
reach through the console opening and fish it through with your hand.
Carefully make a notch for the cable on the side plastic with a dremel, otherwise the alarm indicator wil not sit back down in the socket.
My antenna was magnetic so i just stuck it right on the metal (per the instructions with my unit). All done! Again, be careful with the hand tools around the dash (don't be like me...lol).
Overall, the kenwood made a very nice improvement in sound (running through the bose factory amp...for now). I would say the bose sounds 2x as good as before. Next I will replace the amp and all of the speakers, probably next month.
OK on to day two and wrap up of the AC console mod and dash trim piece for the kenwood.
Last edited by p0rsch3; May 29, 2007 at 12:18 AM.
Thread Starter
|
Registered User
Joined: Apr 2007
Posts: 3,123
From: Chained to my Laptop....
Rep Power: 172
Sunday:
Today was all about getting the final fit and finish together for the kenwood and AC controls. I would say that this complete DIY requires considerable patience making the modifications to the plastic pieces. The primary tools used for this phase were a razor knife, ruler and dremel.
NOTE: Icemann633 posted great pics of the actual bracket mods neccessary to fit the AC controls into the top slot. Please go to this thread to see Icemann's pics and DIY info: https://www.6speedonline.com/forums/...ad.php?t=84524
I removed the lower console again to fix up the AC control and lower pocket alignment, and get rid of that small overhang lip on the bottom pocket.
Further grinding to the top of the pocket edge was required as it was pressing to snuggly against the edge of the AC control, causing it to pop out and over the AC control.
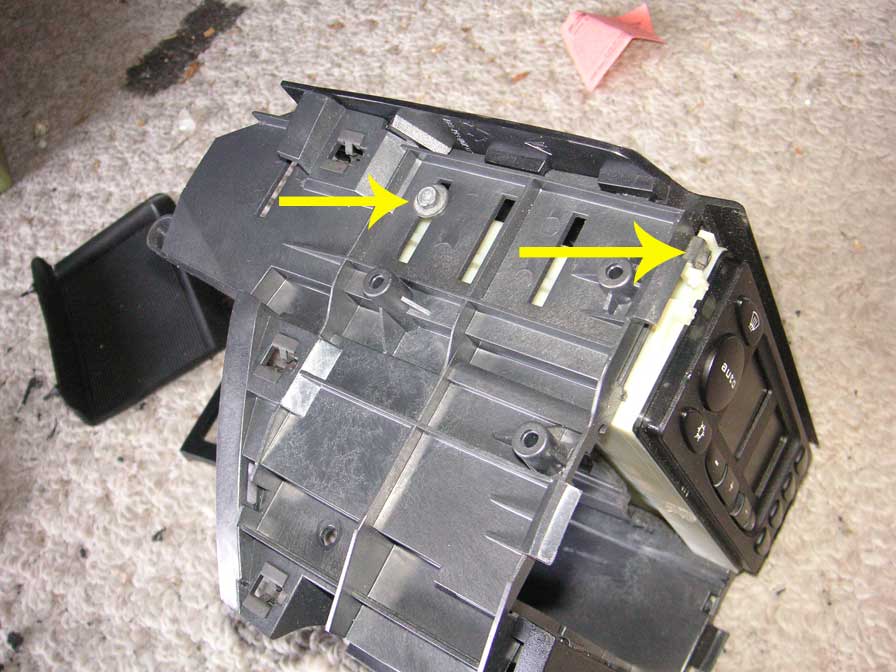
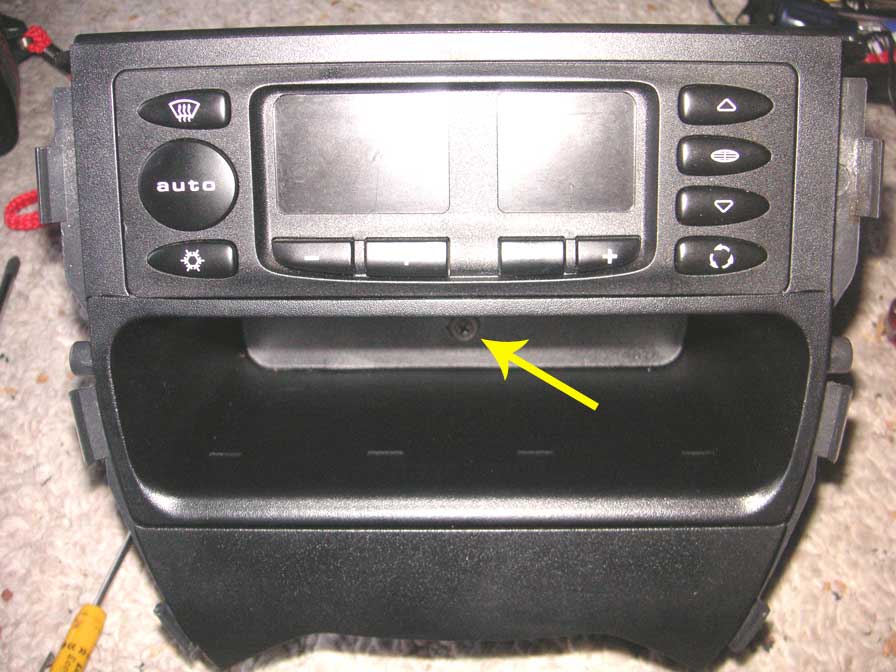
I ground down 1/16" or so in the area of the top pocket lip that touched the AC control (between yellow arrows). kind of 'concaved' it a bit so the AC control would sit down into the pocket lip.
On the underside of the pocket (forgot to get a pic) I also shaved off a bit more than 1/16" from the six support legs (three on each underside) and center "V" shaped tang (flip it over and you will see what I mean)- This allowed the pocket to sit slightly lower in the slot and a bit closer to the top edge of the batwing piece.
Then I needed a way to make sure the pocket was pressed back into the console bracket firmly.
I made an L bracket from an old car stereo back strap that I had in my junk box, and fastened the rear of the pocket to an area of the console body (pressing in the pocket in firmly to seat it beofre screwing it in).
Now, keep in mind I did take the pocket back out after this so I could finish grinding the trim piece for the AC console.
After the trim piece is done and on, then secure the lower pocket in place.
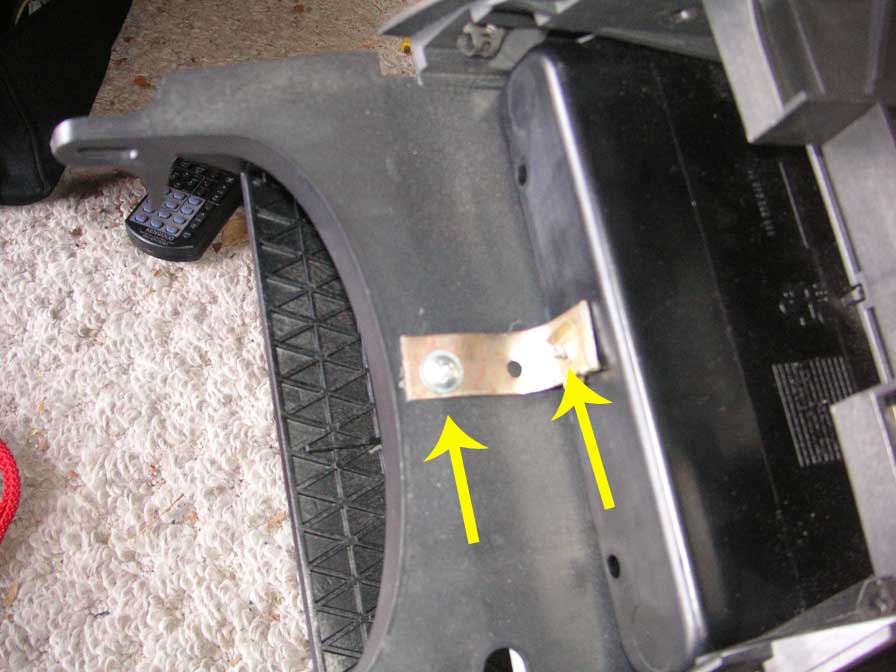
This is how I fastened the AC control to the console bracket. No front screws needed, there is a lot of empty plastic on that AC control body so it is fine to shoot a couple of screws into it from either side (rear arrow), towards the upper half of the AC control (by hand, use self-taps, don't use a screw gun).
once you put both screws in, do not tighten yet- just make it snug but still moveable.
The front arrow, I used two 'speed clips' from an old speaker installation kit (again from the ever-handy drawer-o-junk) and slid them on over the plastic ears of the AC control to space it forward about 1/16".
This will help with the alignment.
Ok- moving on to the actual trim for the AC control.
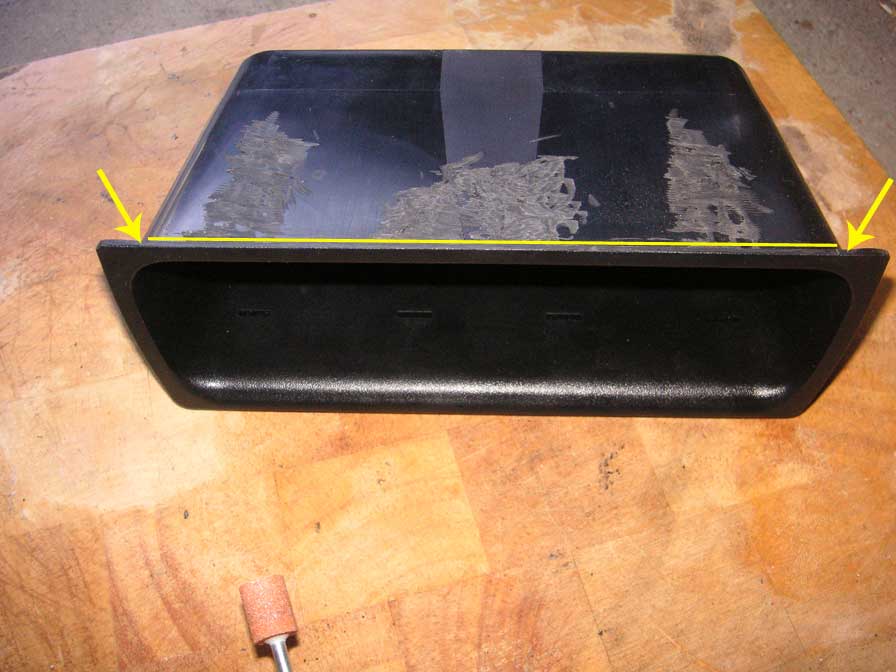
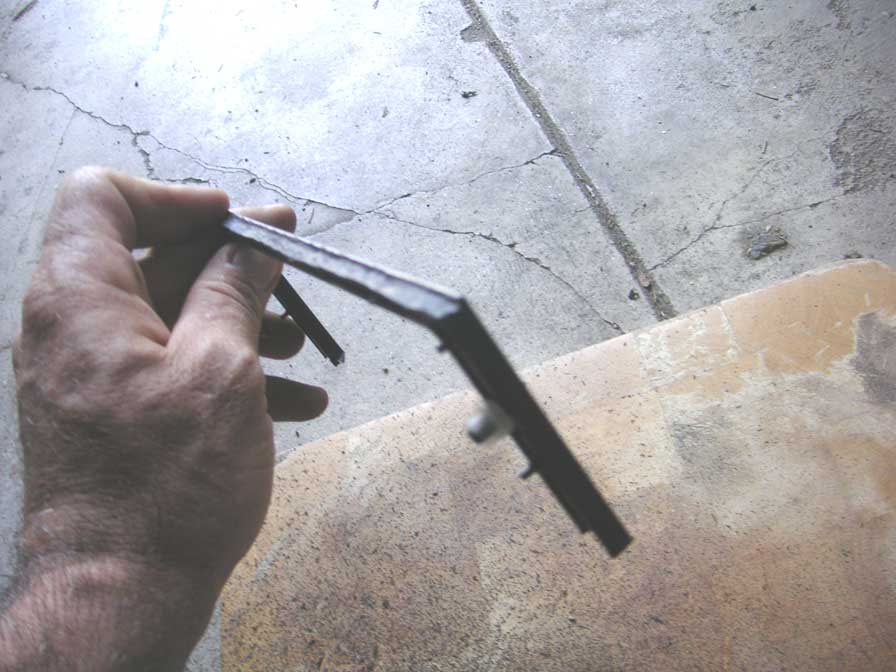
I dissected the oem trim piece and you will start with cutting off the bottom right at the lower part of the curved inside opening.
easiest way is to use a dremel with a thin cutoff wheel. note that the outer edge of the cut should slope down so it hugs the curve of the lower pocket top edge.
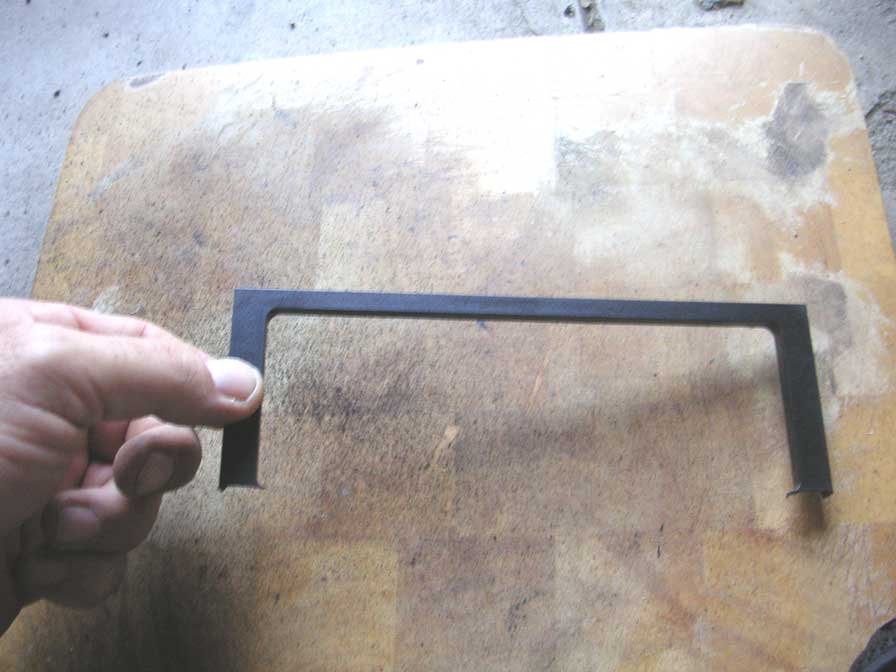
As this pic shows, you will want to cut off about half of the thickness on the top of the trim piece. It gets in the way and keeps things from lining up. Use a steady hand and a dremel cutoff wheel.
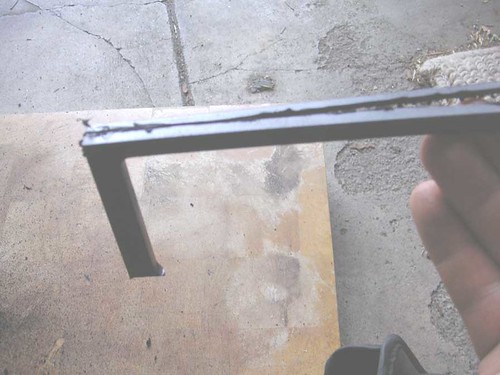
Now things get fun.. There is a dropped lip on the very top plastic piece of the console. when you put the AC control in place it pushes down on things and screws up the alignment. I decided to make a channel on the trim piece for this upper lip to fit into and relieve the downward pressure.
Use a dremel cutoff wheel to score the channel, then use a grinding barrell to reduce the height of the plastic on the back side of the channel. You want to end up with a little less than 1/8" sticking up along the front part of the trim and about a bit less than 1/8 thick.

When you are done with this part, and you have the AC control in place in the top slot, place the trim around the AC control and put the lower pocket in to check for fit.
You are going to have to do this several times until you have ground off enough of the plastic on the top lip of the lower pocket and the AC trim piece to get everything to fit snugly. After you get everything to fit and lined up, tighten up the two side screws that will secure the AC control and screw the lower pocket to the L bracket.
Here is the console assembled and properly aligned:
Now that that is done and back in the car, I needed to make a decent looking trim piece for the kenwood unit that would cover the top/bottom gaps and make it look as integrated as possible. I bought a nice big piece of Metra ABS (order from an online car stereo store) for this- but lo and behold.. Kenwood gives you a super-sweet huge 'universal' trim piece for use in several different cars.
So the center cut was already finished, making my job easier. I just needed to measure and trim the outside (they give you about 2" all around).
Now, since I had that nice piece of Metra:
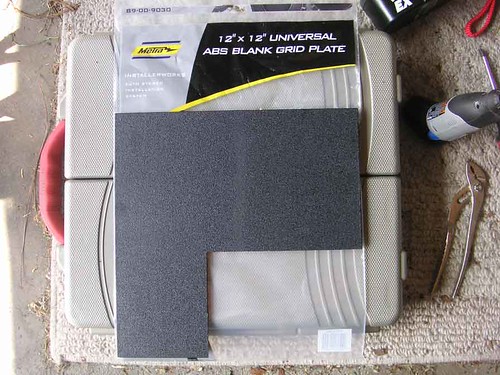
I decided that I should use the Metra to cut out a 'cover piece' for times when I don't want that beautiful 7" screen visible to the public. PLUS, my gf's X3 just got broken into last night right here outside my house and they stole her TomTom GPS.. They completely smashed in the driver's window. @$$holes!
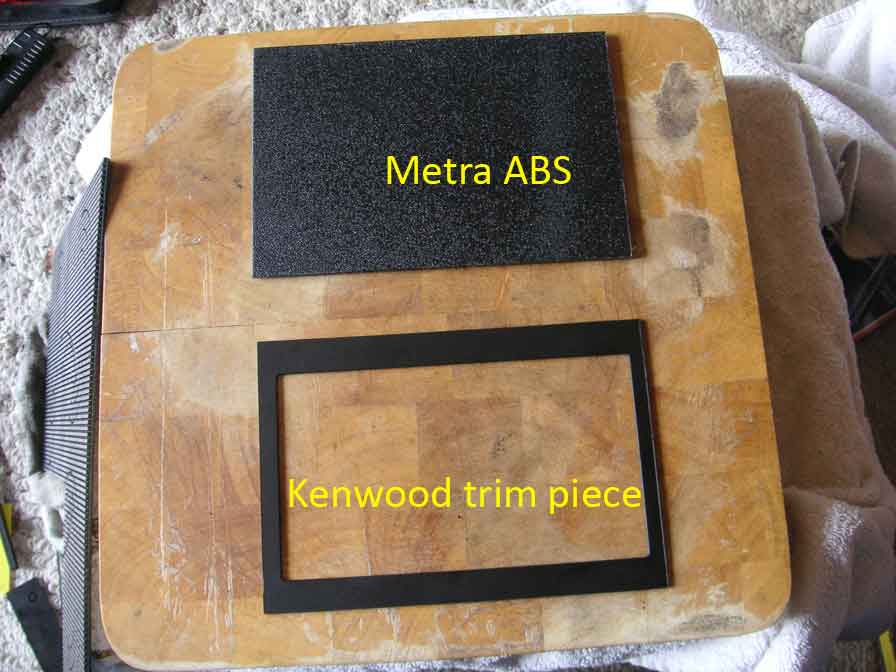
Here's the finished cut-out for the kenwood trim and the 'stealth' blank plate:
(continued - 10 picture link limit per post?????)
Today was all about getting the final fit and finish together for the kenwood and AC controls. I would say that this complete DIY requires considerable patience making the modifications to the plastic pieces. The primary tools used for this phase were a razor knife, ruler and dremel.
NOTE: Icemann633 posted great pics of the actual bracket mods neccessary to fit the AC controls into the top slot. Please go to this thread to see Icemann's pics and DIY info: https://www.6speedonline.com/forums/...ad.php?t=84524
I removed the lower console again to fix up the AC control and lower pocket alignment, and get rid of that small overhang lip on the bottom pocket.
Further grinding to the top of the pocket edge was required as it was pressing to snuggly against the edge of the AC control, causing it to pop out and over the AC control.
I ground down 1/16" or so in the area of the top pocket lip that touched the AC control (between yellow arrows). kind of 'concaved' it a bit so the AC control would sit down into the pocket lip.
On the underside of the pocket (forgot to get a pic) I also shaved off a bit more than 1/16" from the six support legs (three on each underside) and center "V" shaped tang (flip it over and you will see what I mean)- This allowed the pocket to sit slightly lower in the slot and a bit closer to the top edge of the batwing piece.
Then I needed a way to make sure the pocket was pressed back into the console bracket firmly.
I made an L bracket from an old car stereo back strap that I had in my junk box, and fastened the rear of the pocket to an area of the console body (pressing in the pocket in firmly to seat it beofre screwing it in).
Now, keep in mind I did take the pocket back out after this so I could finish grinding the trim piece for the AC console.
After the trim piece is done and on, then secure the lower pocket in place.
This is how I fastened the AC control to the console bracket. No front screws needed, there is a lot of empty plastic on that AC control body so it is fine to shoot a couple of screws into it from either side (rear arrow), towards the upper half of the AC control (by hand, use self-taps, don't use a screw gun).
once you put both screws in, do not tighten yet- just make it snug but still moveable.
The front arrow, I used two 'speed clips' from an old speaker installation kit (again from the ever-handy drawer-o-junk) and slid them on over the plastic ears of the AC control to space it forward about 1/16".
This will help with the alignment.
Ok- moving on to the actual trim for the AC control.
I dissected the oem trim piece and you will start with cutting off the bottom right at the lower part of the curved inside opening.
easiest way is to use a dremel with a thin cutoff wheel. note that the outer edge of the cut should slope down so it hugs the curve of the lower pocket top edge.
As this pic shows, you will want to cut off about half of the thickness on the top of the trim piece. It gets in the way and keeps things from lining up. Use a steady hand and a dremel cutoff wheel.
Now things get fun.. There is a dropped lip on the very top plastic piece of the console. when you put the AC control in place it pushes down on things and screws up the alignment. I decided to make a channel on the trim piece for this upper lip to fit into and relieve the downward pressure.
Use a dremel cutoff wheel to score the channel, then use a grinding barrell to reduce the height of the plastic on the back side of the channel. You want to end up with a little less than 1/8" sticking up along the front part of the trim and about a bit less than 1/8 thick.
When you are done with this part, and you have the AC control in place in the top slot, place the trim around the AC control and put the lower pocket in to check for fit.
You are going to have to do this several times until you have ground off enough of the plastic on the top lip of the lower pocket and the AC trim piece to get everything to fit snugly. After you get everything to fit and lined up, tighten up the two side screws that will secure the AC control and screw the lower pocket to the L bracket.
Here is the console assembled and properly aligned:
Now that that is done and back in the car, I needed to make a decent looking trim piece for the kenwood unit that would cover the top/bottom gaps and make it look as integrated as possible. I bought a nice big piece of Metra ABS (order from an online car stereo store) for this- but lo and behold.. Kenwood gives you a super-sweet huge 'universal' trim piece for use in several different cars.
So the center cut was already finished, making my job easier. I just needed to measure and trim the outside (they give you about 2" all around).
Now, since I had that nice piece of Metra:
I decided that I should use the Metra to cut out a 'cover piece' for times when I don't want that beautiful 7" screen visible to the public. PLUS, my gf's X3 just got broken into last night right here outside my house and they stole her TomTom GPS.. They completely smashed in the driver's window. @$$holes!
Here's the finished cut-out for the kenwood trim and the 'stealth' blank plate:
(continued - 10 picture link limit per post?????)
Last edited by p0rsch3; May 29, 2007 at 09:51 AM.
Thread Starter
|
Registered User
Joined: Apr 2007
Posts: 3,123
From: Chained to my Laptop....
Rep Power: 172
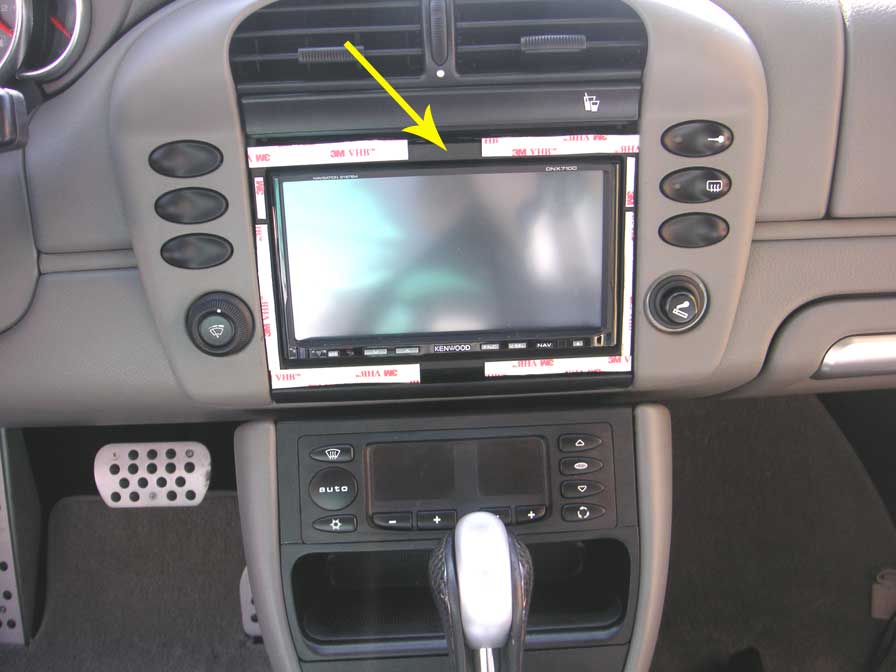
Hit the trim pieces with a bit of satin black plastic texture paint:
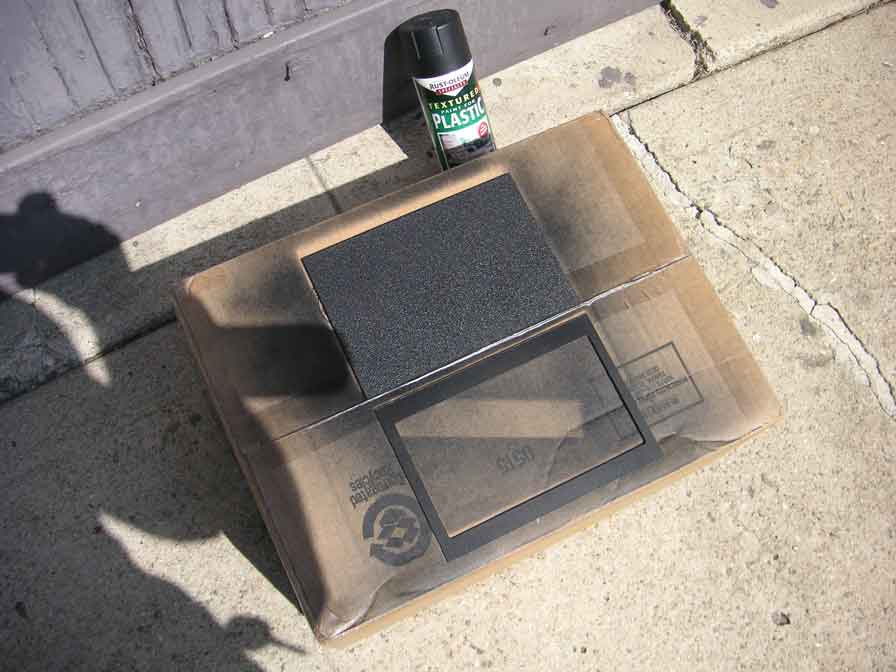
Here's the mounting surface prepared for the final trim piece. I wanted to flush-mount everything as much as possible w/ the horseshoe, so I left the thick snap-bezel trim in place (arrow) around the kenwood as a 'mounting surface, because it provided the spacing I needed to space the final trim forward and up flush with the dash horseshoe.
Slap on some white medium-thick 3m double-sticky stuff and were' just about ready to wrap things up.
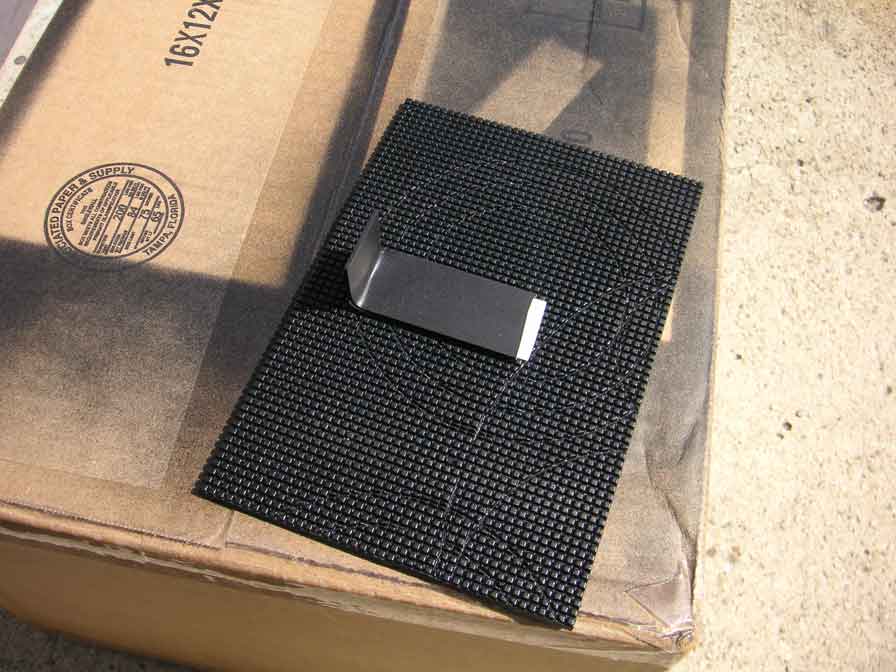
Ok, back to finishing up the mount for the 'stealth' cover.
I used a thin piece of abs and heat-bent it to 90 degrees, then double-stick taped it to the back of the Metra.
The thin plastic "L" slides in to the thin gap beween the top of the DVD screen and my bezel trim, and since it is plastic it will not scratch anything. once I am satisfied that I have the "L" stuck in the right spot on the blank I will final-glue it with some 2-part black epoxy.
Kenwood NAV/DVD, custom bezel and AC control mod- finished!
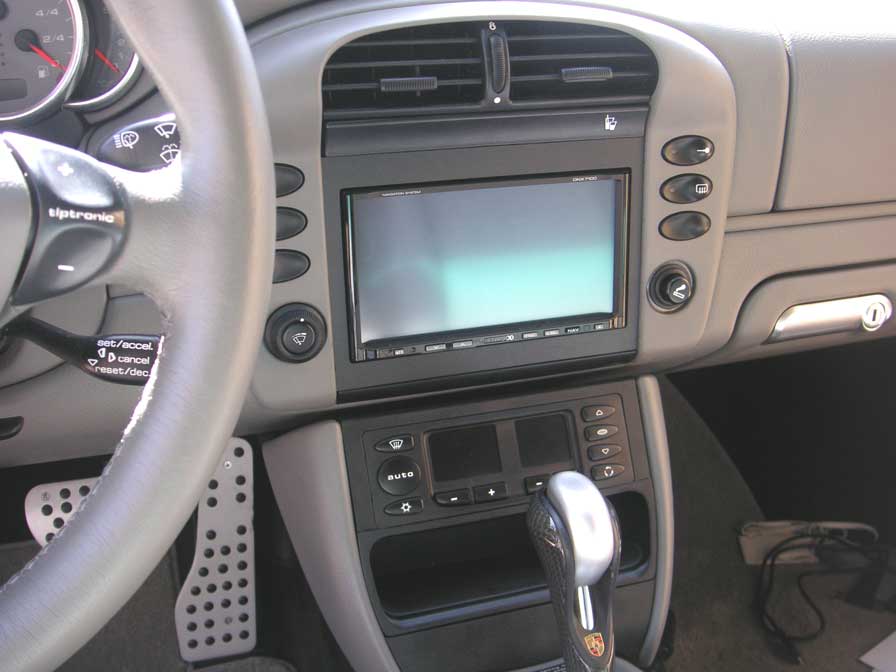
And with the 'stealth' cover applied:

I'm pleased with how it turned out, this was definitely a fun project. Spent this evening cruising up to Malibu and then to Santa Monica bumpin the music vids
NOTE: the easiest and cleanest way to cut ABS plastic is as follows:
1. mark measurement points on the front side of your work with the tip of a heavy duty utility razor knife. if you cut from the back side, you will have frayed edges on the front of your work.
2. use a metal ruler and lightly draw the line between your measurement marks on the front side of your work. re-trace the line several times against the ruler to make the initial cut channel.
3. firmly go over the cut line several times with the razor knife with increasing pressure until you are cut about 3/4 through the ABS.
4. outer-edge cuts, you can bend and snap off the pieces leaving a clean front cut line, and probably will not need to sand anything. -Or, if you have the patience continue scoring until you cut all the way through.
5. inside-opening cuts you will need to score until you cut all the way through, and make your scores from corner of each line toward center so as not the end up with 'crows feet' marks on the face at each corner junction. If you have a very steady hand you can use a good jigsaw and very fine-cut blade.
This method takes patience but yields the cleanest cut results. Of course, this assumes you do not have access to a stand-up scrolling band saw.
Here's the mounting surface prepared for the final trim piece. I wanted to flush-mount everything as much as possible w/ the horseshoe, so I left the thick snap-bezel trim in place (arrow) around the kenwood as a 'mounting surface, because it provided the spacing I needed to space the final trim forward and up flush with the dash horseshoe.
Slap on some white medium-thick 3m double-sticky stuff and were' just about ready to wrap things up.
Ok, back to finishing up the mount for the 'stealth' cover.
I used a thin piece of abs and heat-bent it to 90 degrees, then double-stick taped it to the back of the Metra.
The thin plastic "L" slides in to the thin gap beween the top of the DVD screen and my bezel trim, and since it is plastic it will not scratch anything. once I am satisfied that I have the "L" stuck in the right spot on the blank I will final-glue it with some 2-part black epoxy.
Kenwood NAV/DVD, custom bezel and AC control mod- finished!
And with the 'stealth' cover applied:
I'm pleased with how it turned out, this was definitely a fun project. Spent this evening cruising up to Malibu and then to Santa Monica bumpin the music vids
NOTE: the easiest and cleanest way to cut ABS plastic is as follows:
1. mark measurement points on the front side of your work with the tip of a heavy duty utility razor knife. if you cut from the back side, you will have frayed edges on the front of your work.
2. use a metal ruler and lightly draw the line between your measurement marks on the front side of your work. re-trace the line several times against the ruler to make the initial cut channel.
3. firmly go over the cut line several times with the razor knife with increasing pressure until you are cut about 3/4 through the ABS.
4. outer-edge cuts, you can bend and snap off the pieces leaving a clean front cut line, and probably will not need to sand anything. -Or, if you have the patience continue scoring until you cut all the way through.
5. inside-opening cuts you will need to score until you cut all the way through, and make your scores from corner of each line toward center so as not the end up with 'crows feet' marks on the face at each corner junction. If you have a very steady hand you can use a good jigsaw and very fine-cut blade.
This method takes patience but yields the cleanest cut results. Of course, this assumes you do not have access to a stand-up scrolling band saw.
Last edited by p0rsch3; May 29, 2007 at 10:06 AM.
Thread Starter
|
Registered User
Joined: Apr 2007
Posts: 3,123
From: Chained to my Laptop....
Rep Power: 172
FYI-
I made a 1:1 template drawing of the finished kenwood bezel.
I will scan it to PDF at work on tuesday and post, just download - print - use as template.
This should fit all kenwood 7xxx units and save some time making things pretty in your 996 (not sure what years, i'm guessing that having the cupholder assembly like my '02 is key).

Registered User
Joined: Dec 2005
Posts: 87
From: So Cal
Rep Power: 24
Great Job
Excellent write up on the NAV install and I love the attention to detail on the trim pieces. I guess I'll see it in a couple weeks. Question, why didn't you use the Boxster upper pocket and move the A/C control to the bottom?


Registered User
Joined: Mar 2006
Posts: 657
From: Palm Beach, Fl
Rep Power: 47
Trending Topics
Thread Starter
|
Registered User
Joined: Apr 2007
Posts: 3,123
From: Chained to my Laptop....
Rep Power: 172
Originally Posted by xdream
Excellent write up on the NAV install and I love the attention to detail on the trim pieces. I guess I'll see it in a couple weeks. Question, why didn't you use the Boxster upper pocket and move the A/C control to the bottom?
Blame it on icemann... LOL - no, seriously, the goal here was to do something different and move the AC control to the upper slot. I found the factory location of the lower slot to be less convenient because it is semi-blocked by the tip shifter.
Yeah looking forward to hooking up soon, hope the initial production pieces with your invention are working out!
Last edited by p0rsch3; May 29, 2007 at 09:36 AM.
Thread Starter
|
Registered User
Joined: Apr 2007
Posts: 3,123
From: Chained to my Laptop....
Rep Power: 172
Originally Posted by icemann633
Looks great and glad I could help! After I get over this flu I will finish my AC trim...

Registered User
Joined: Dec 2005
Posts: 87
From: So Cal
Rep Power: 24
That's true, I forgot about that shifter. I have a 6 speed so it's not as bad. How do you like the Kenwood nav so far?
Originally Posted by p0rsch3
Thanks!
Blame it on icemann... LOL - no, seriously, the goal here was to do something different and move the AC control to the upper slot. I found the factory location of the lower slot to be less convenient because it is semi-blocked by the tip shifter.
Yeah looking forward to hooking up soon, hope the initial production pieces with your invention are working out!