

Money2536's White 991 C2S Journal


Thread Starter
|
Registered User

Joined: Nov 2009
Posts: 671
From: The Villages, FL
Rep Power: 67


Flat Black Emblem Install
Well...I gave it a whirl. Let's just say I wasted $75 and a few hours of my time. It doesn't look terrible, but I'm not happy with the result. I didn't listen to the advice of finding a shop with a template.
I decided to test out a badge again after seeing kmatt's post with his satin black Sport Technos.
http://forums.rennlist.com/rennforum...rt-techno.html
I wanted it to look like this but in black lettering.

I ordered up the badge from Suncoast.

I got my tools ready.

After much consternation, I settled on using some envelopes as a straight edge. I also found what I thought to be the center-line. I used a wax pencil to make a mark. I lined up the center line of the envelopes with the center of the car. Then I measured from the left and right corners of the envelopes and to the top of the bumper to make sure they were equidistant.
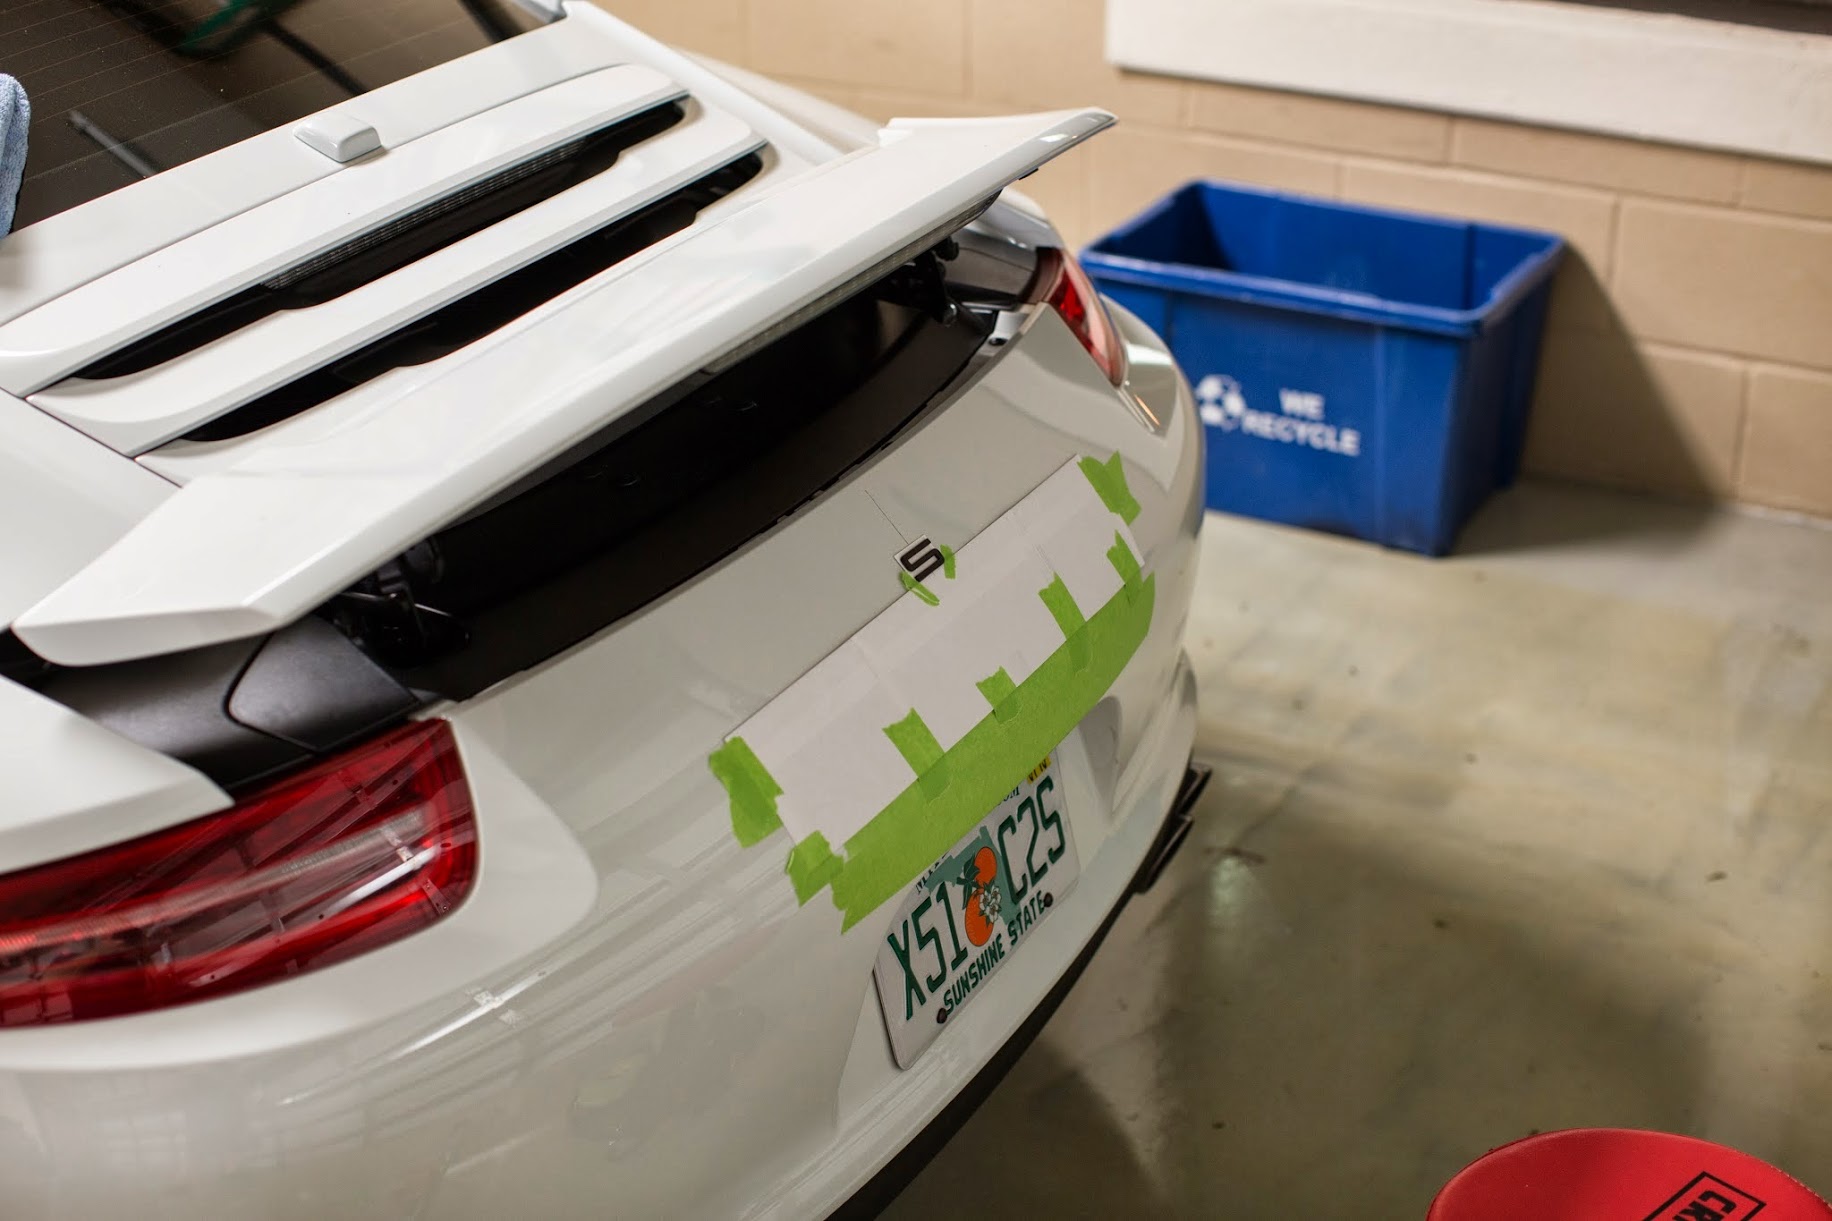


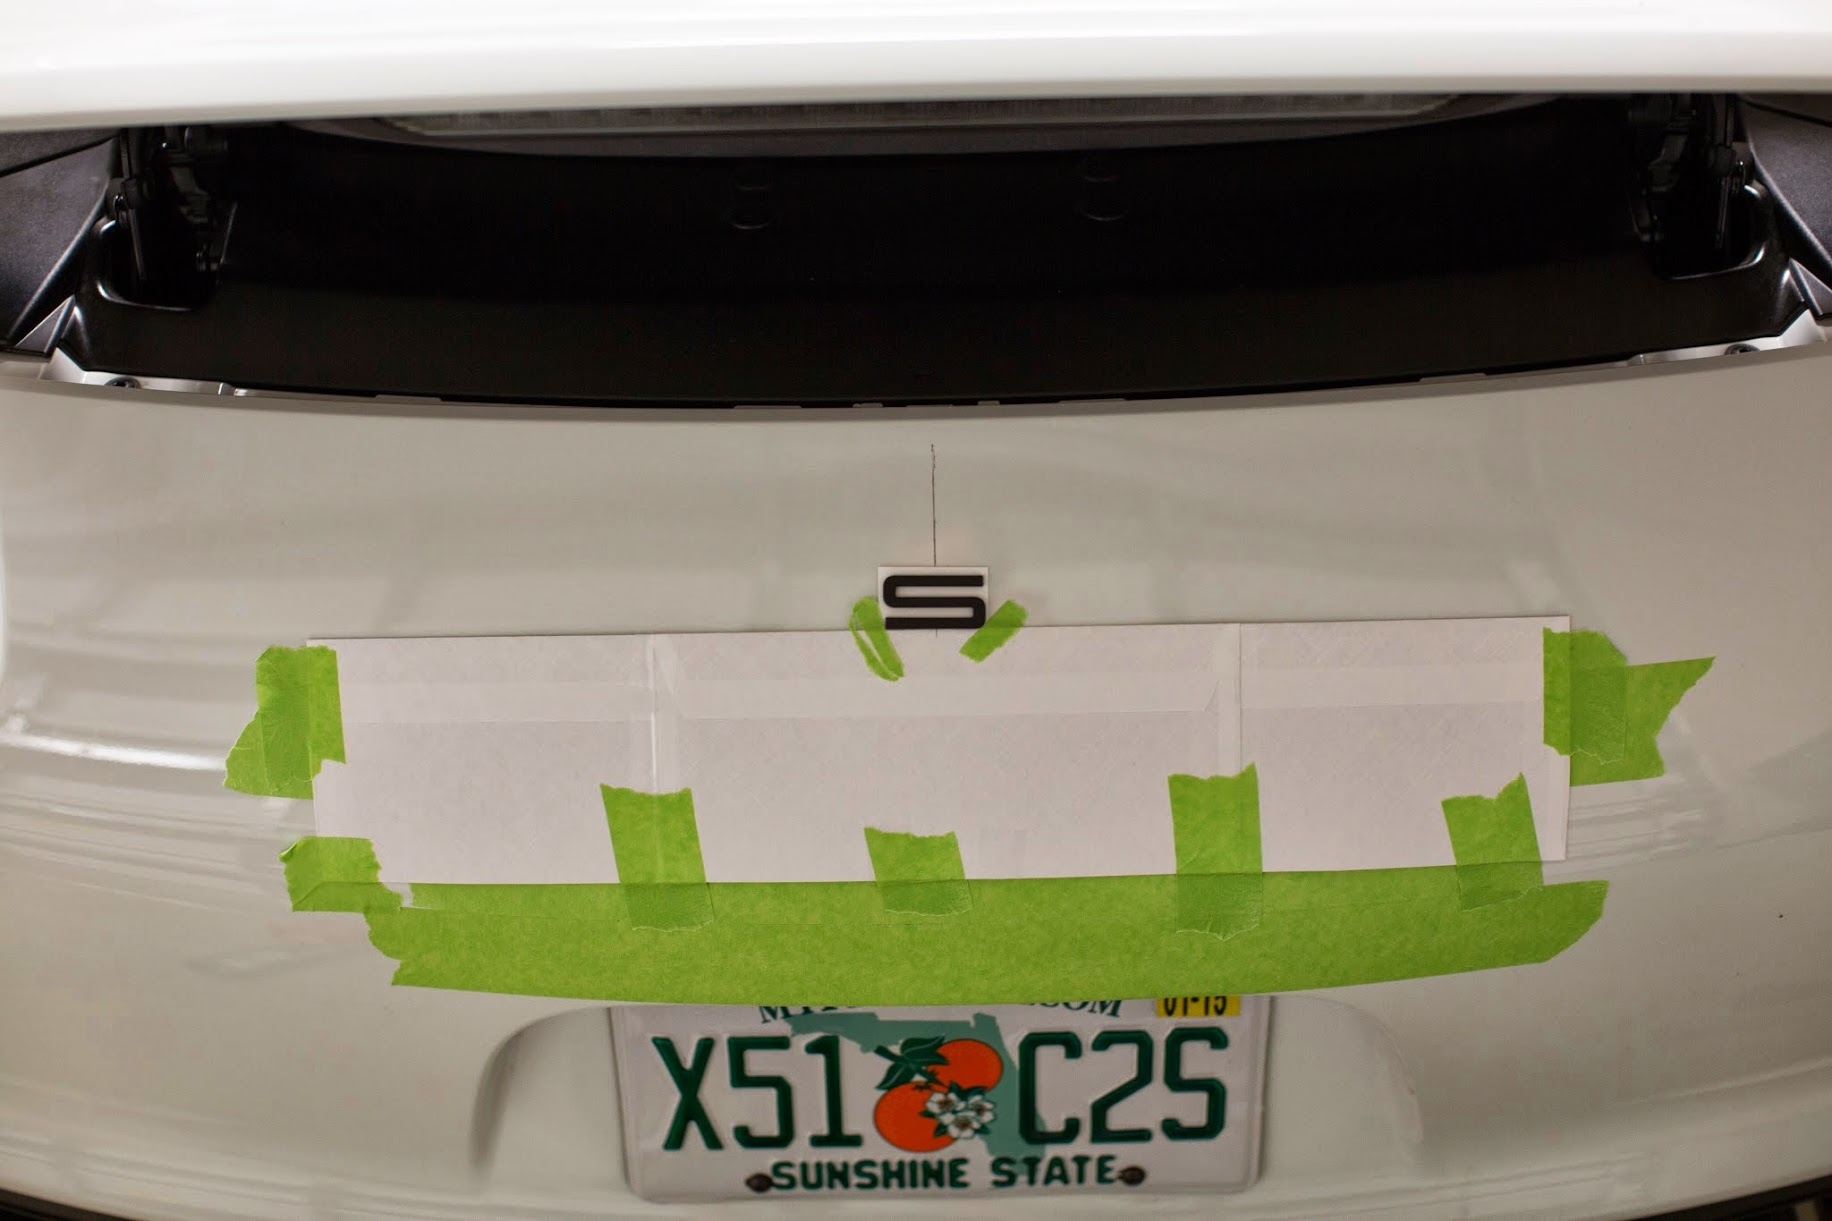
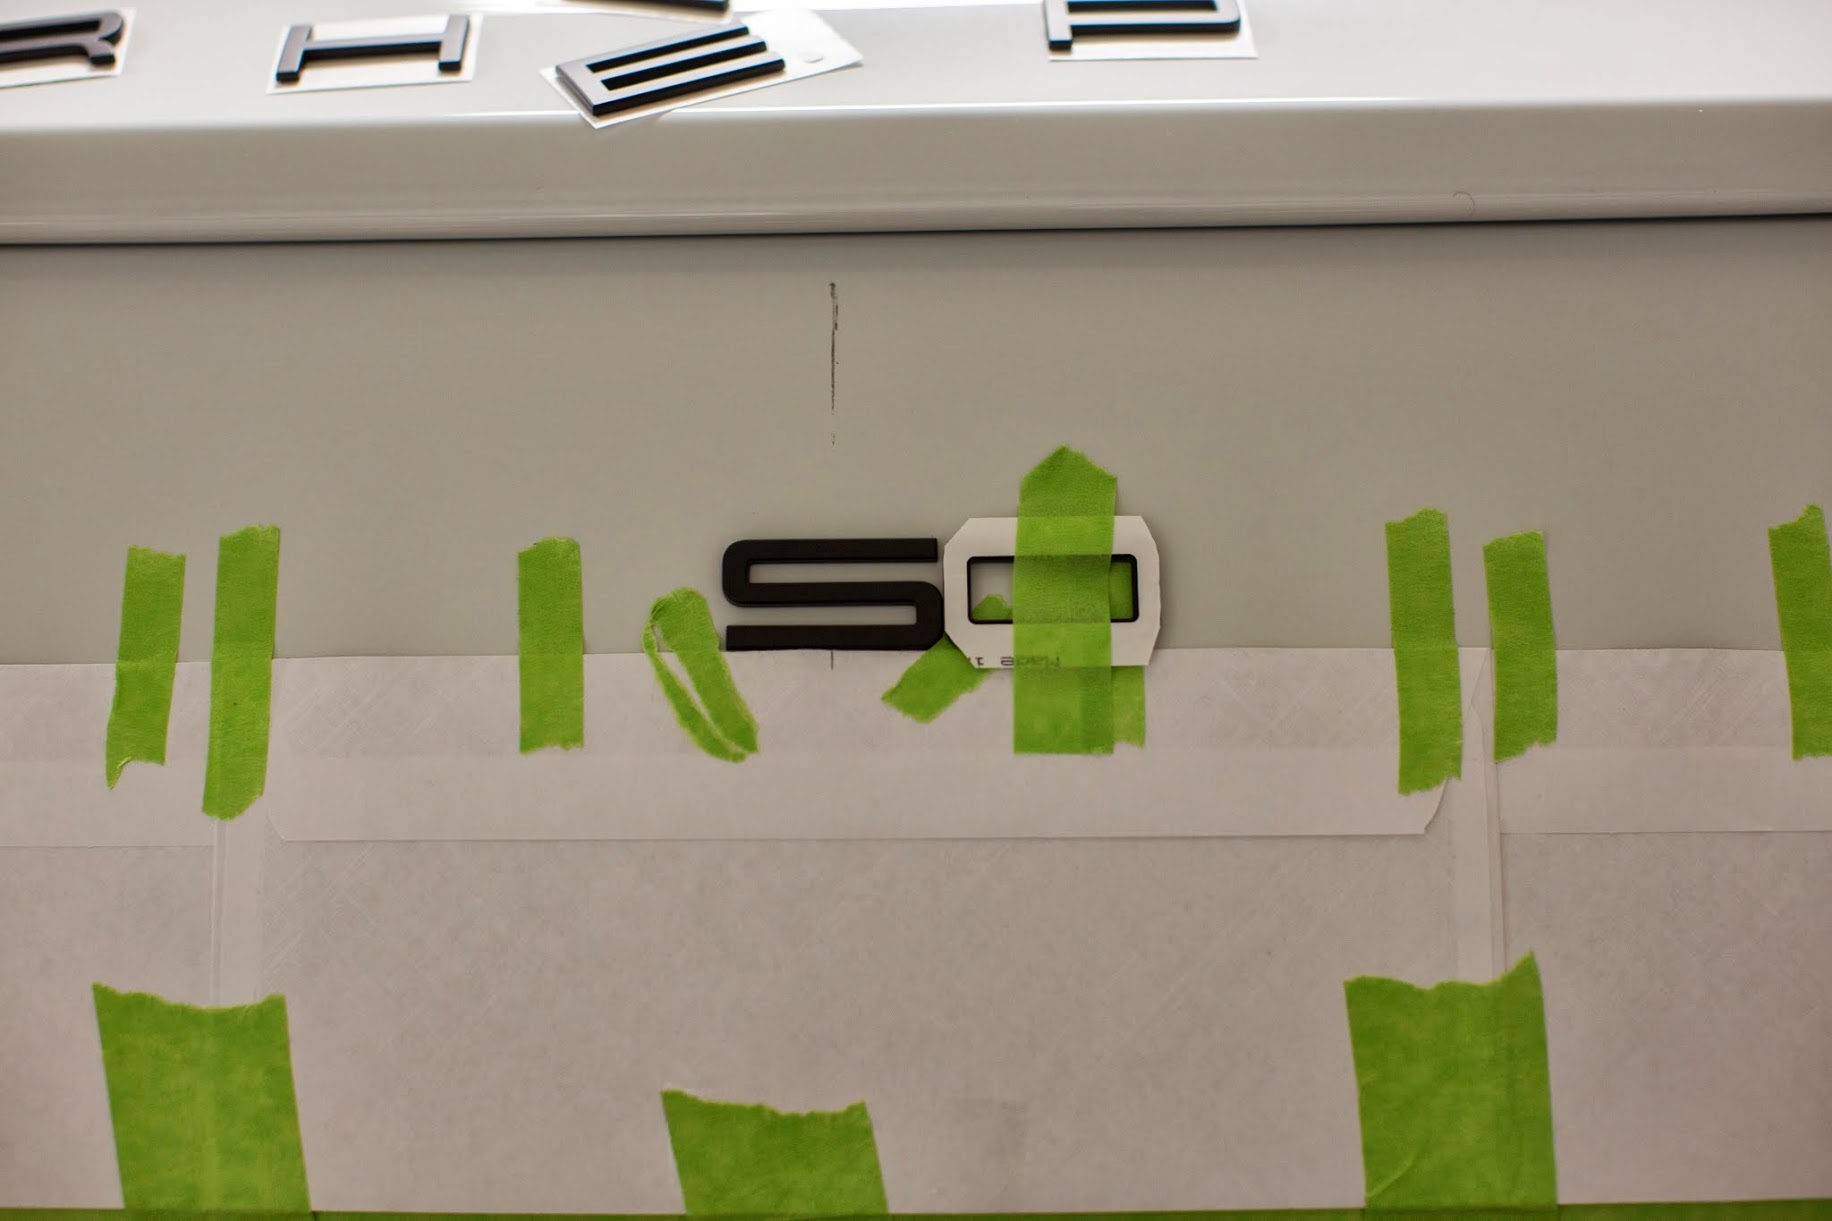
I test fit all of the letters. The vertical lines are taped just to keep the letters from falling under the envelopes.

I prepped the surface with some IPA.


I used someone's suggestion that the "O" could be used to set the spacing.


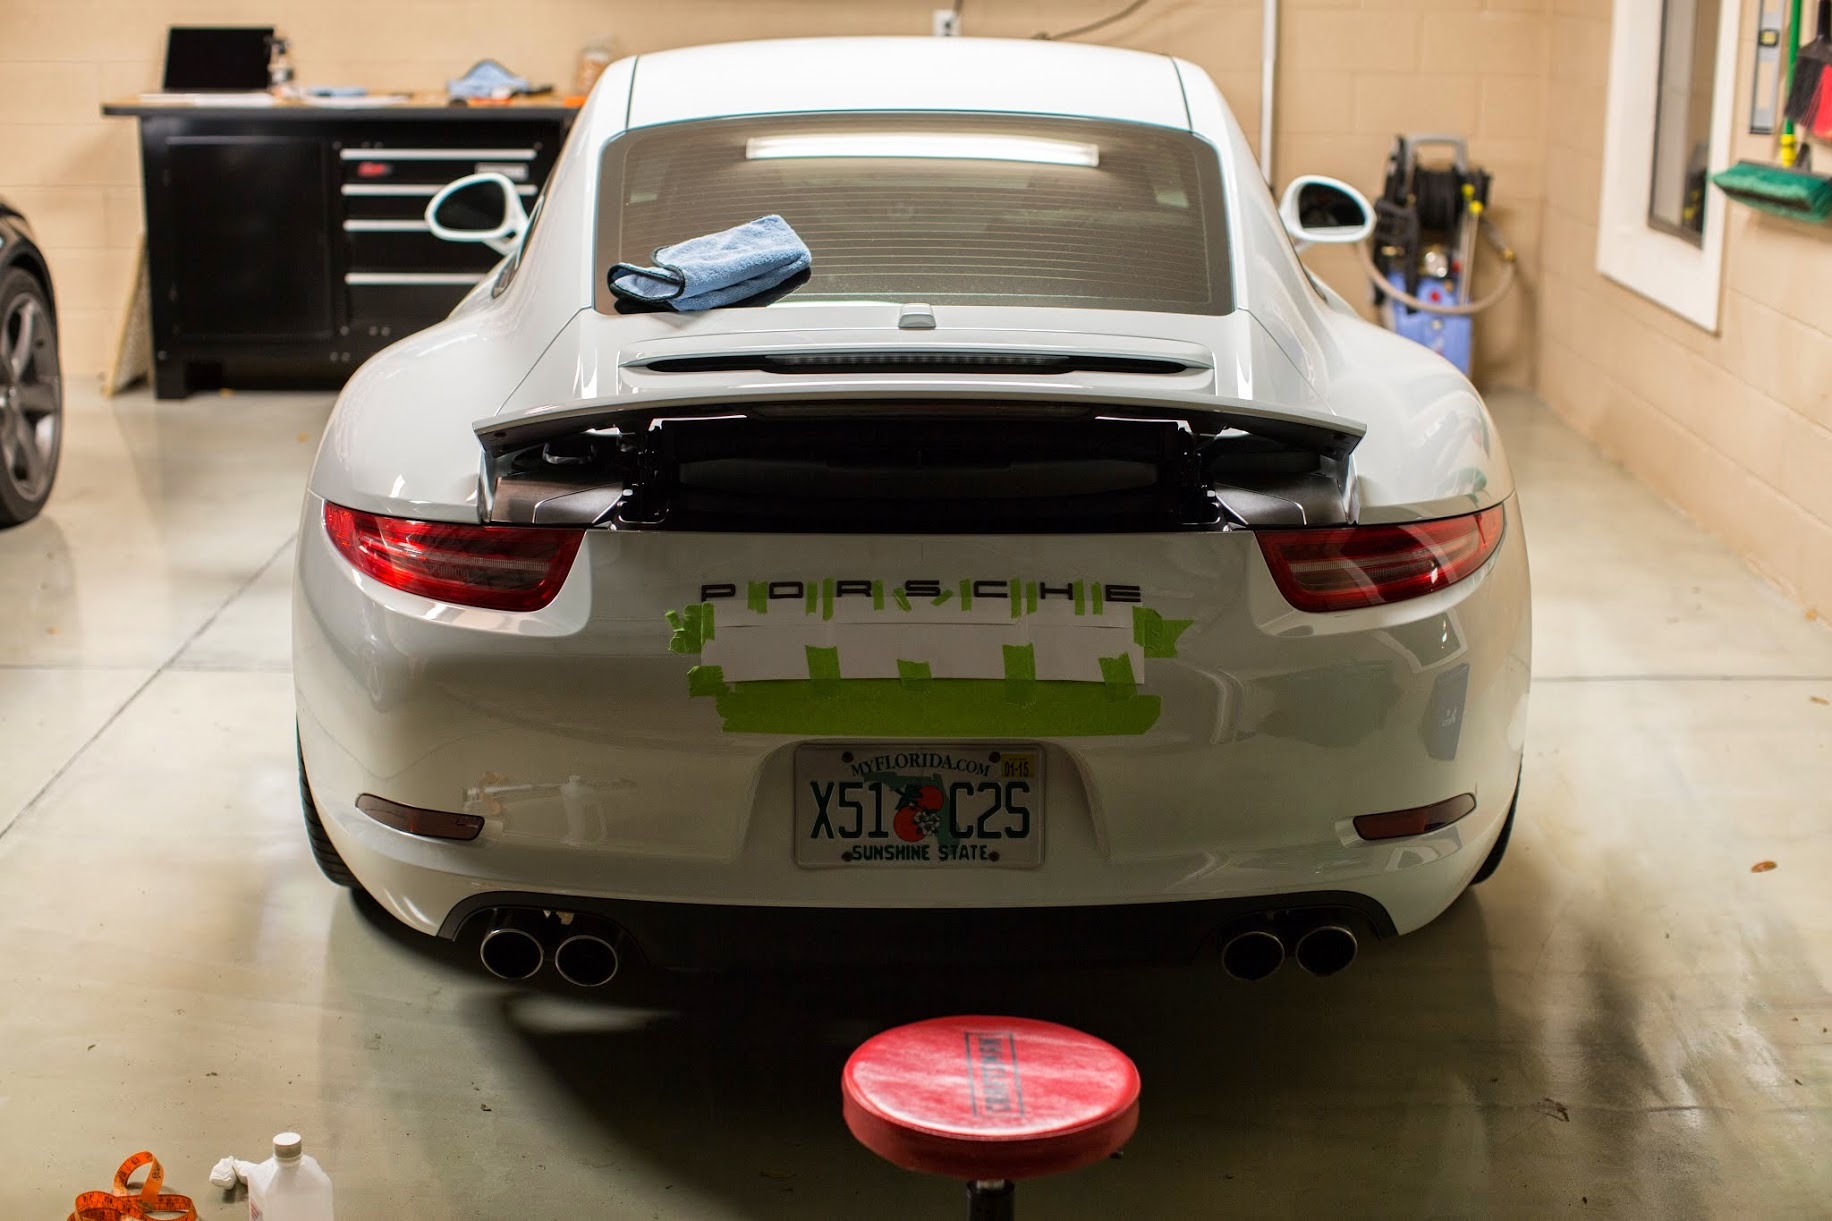

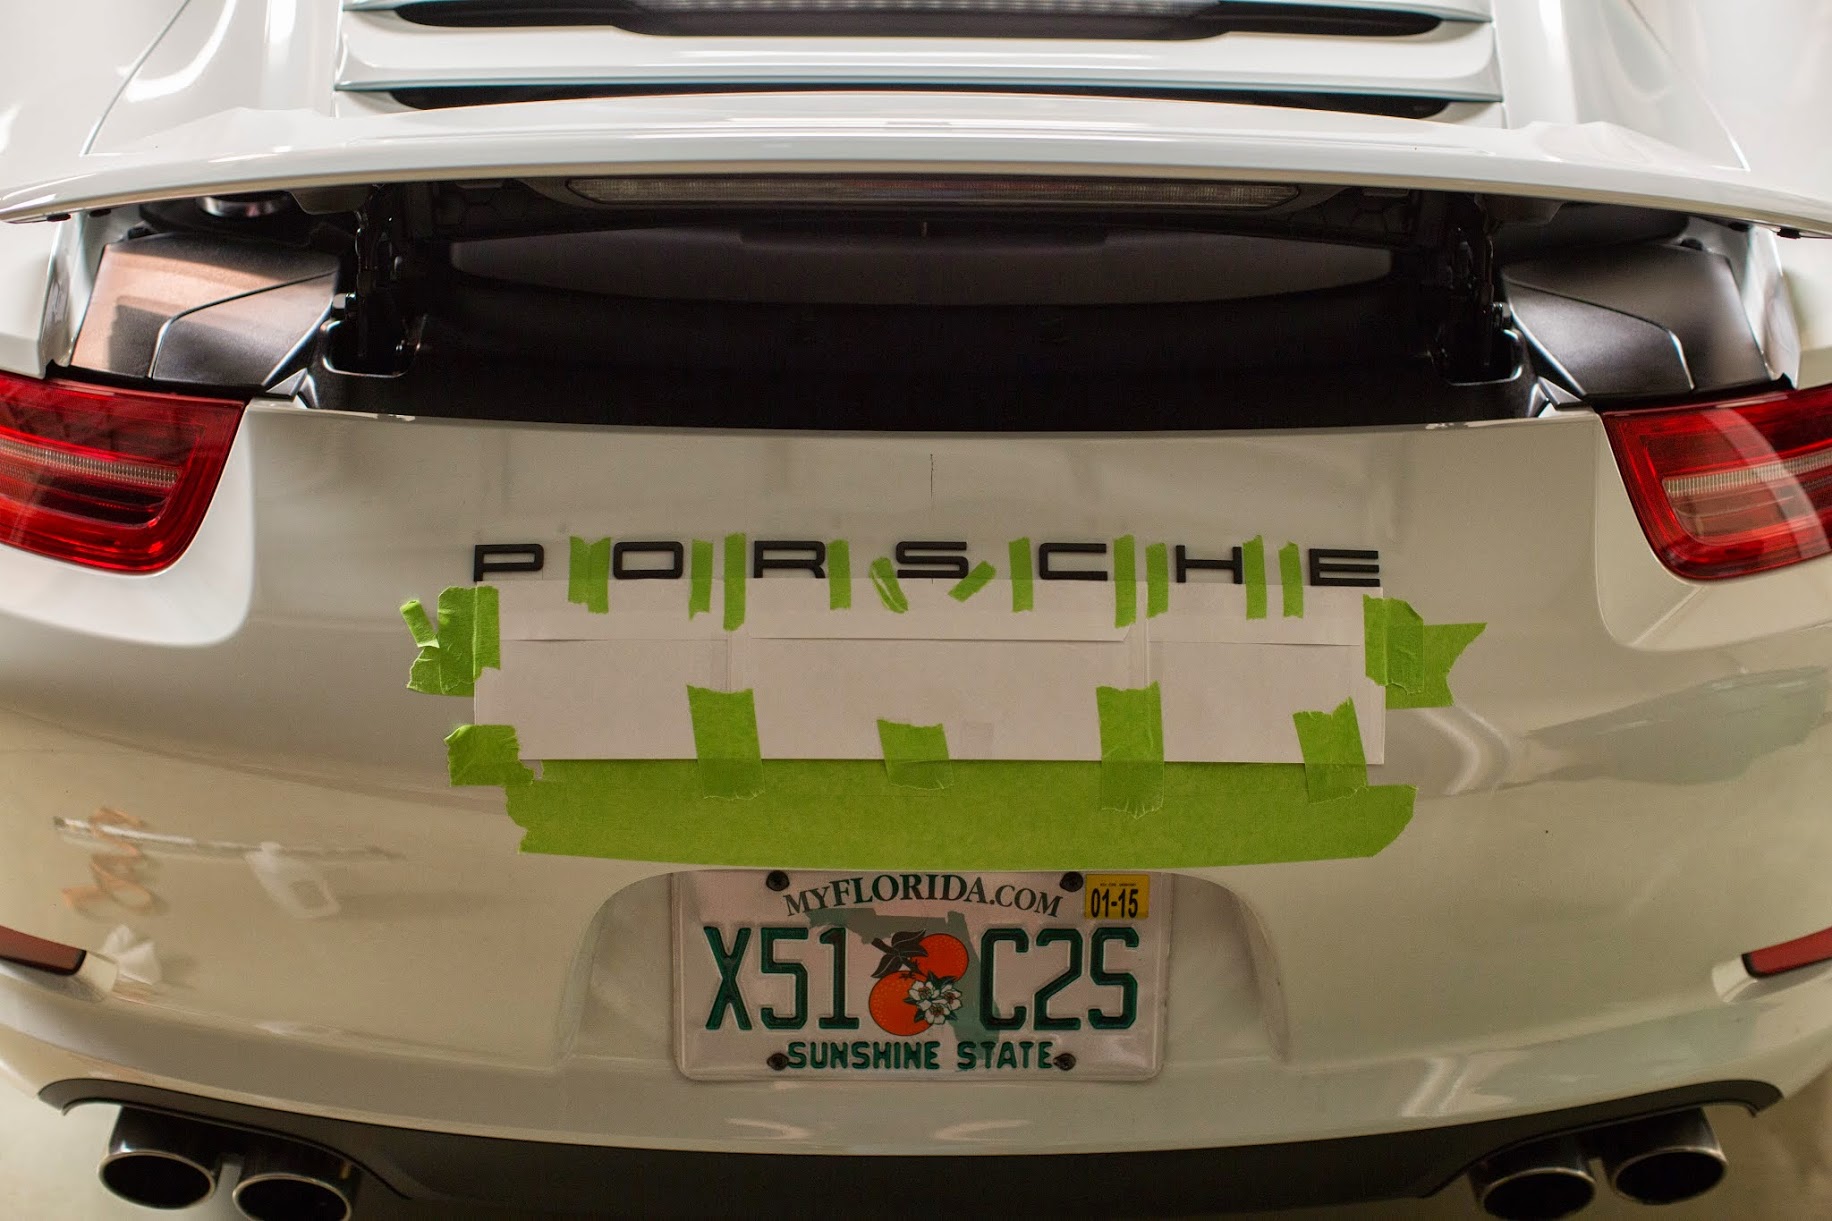

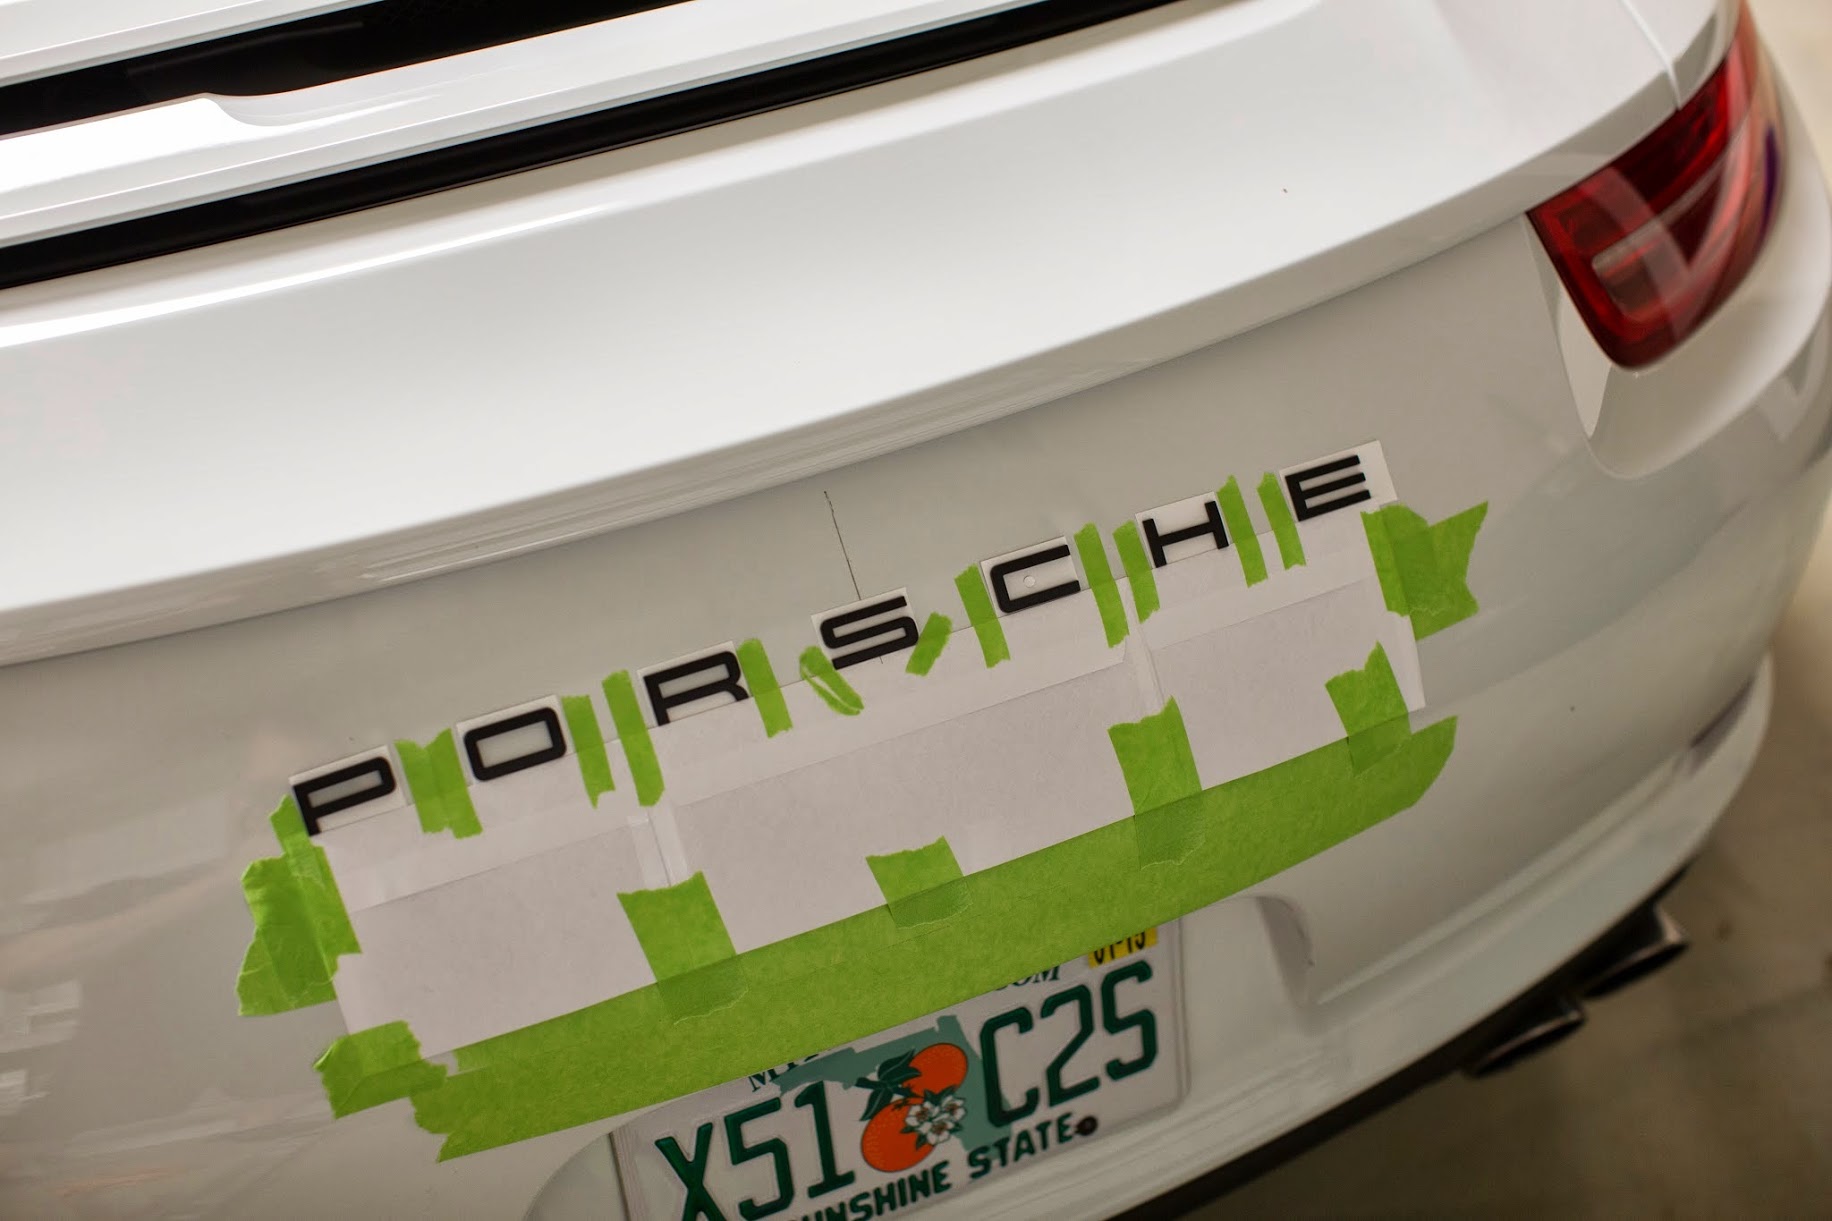
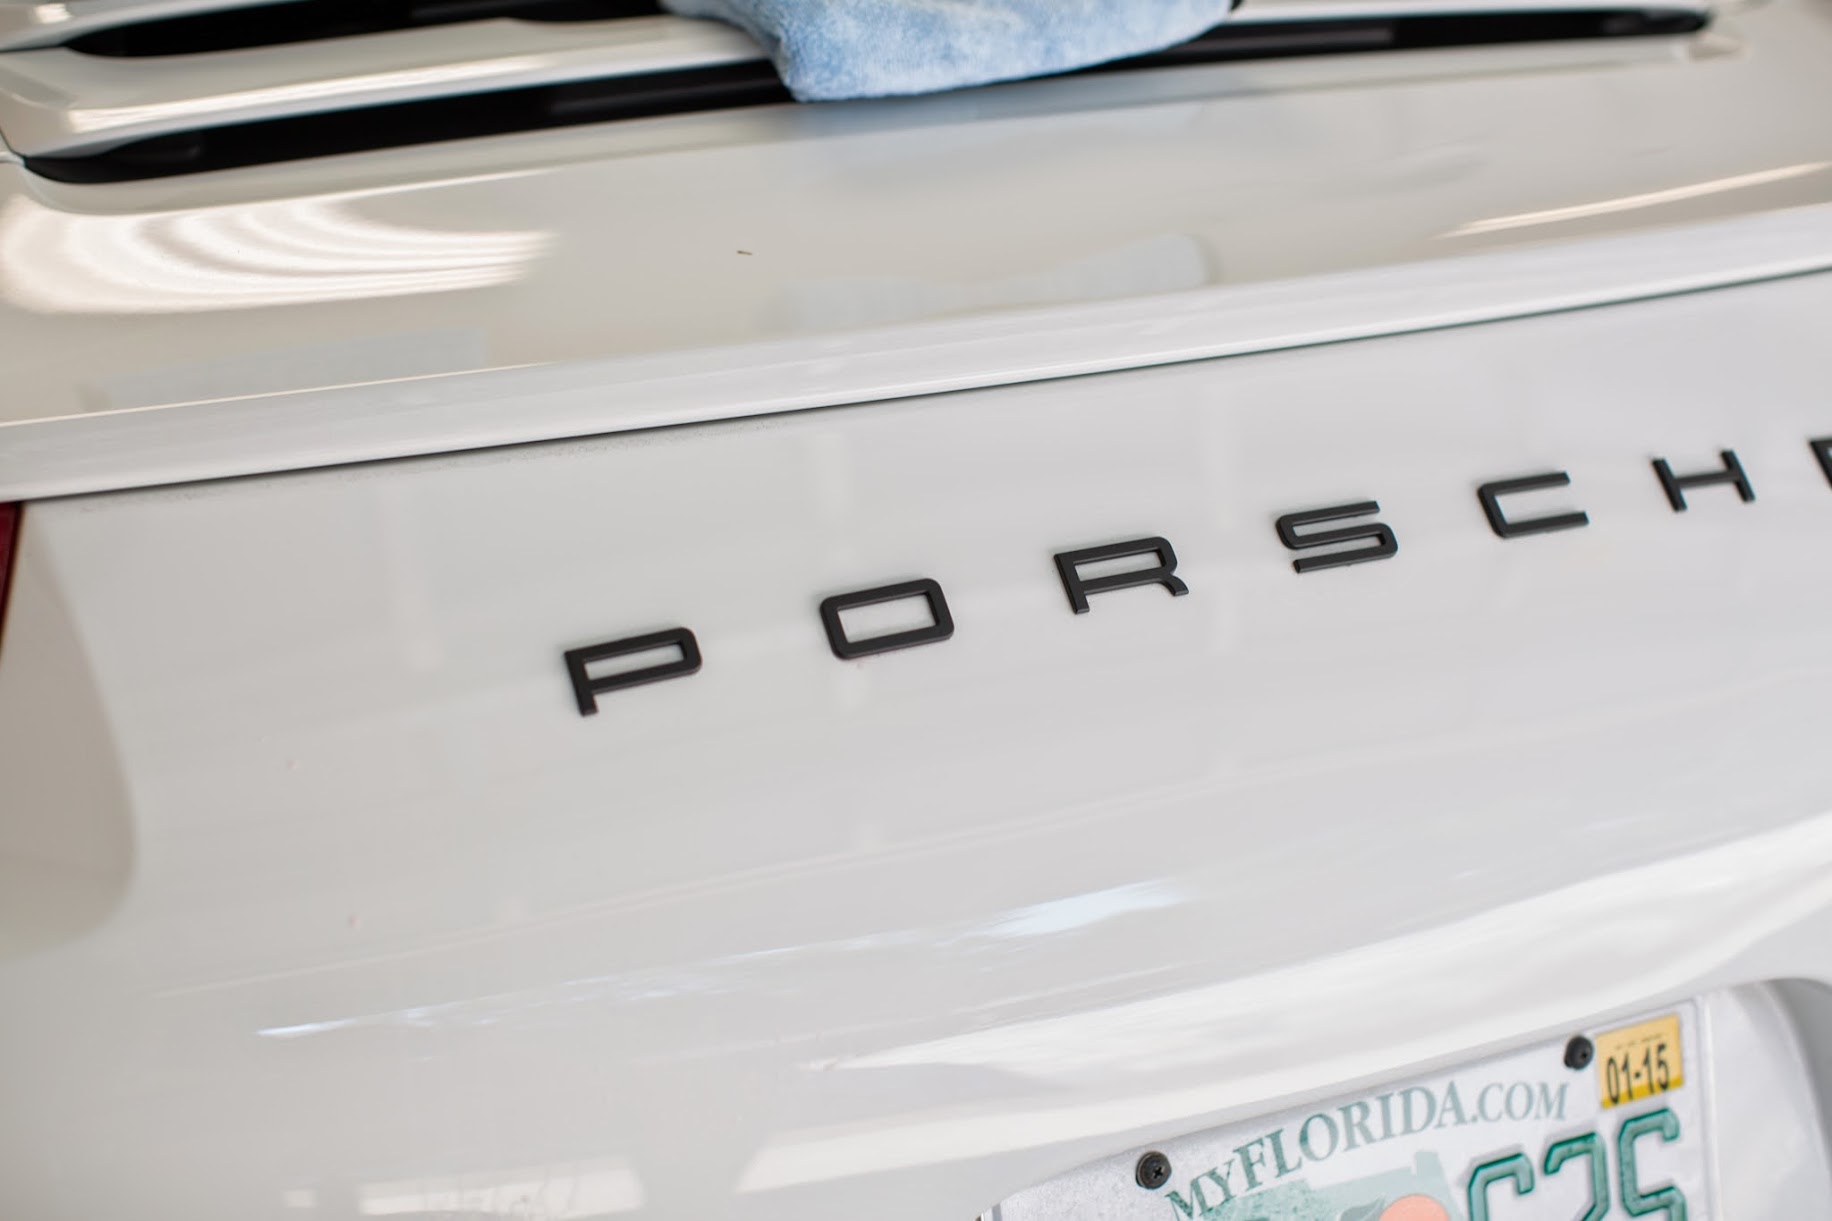
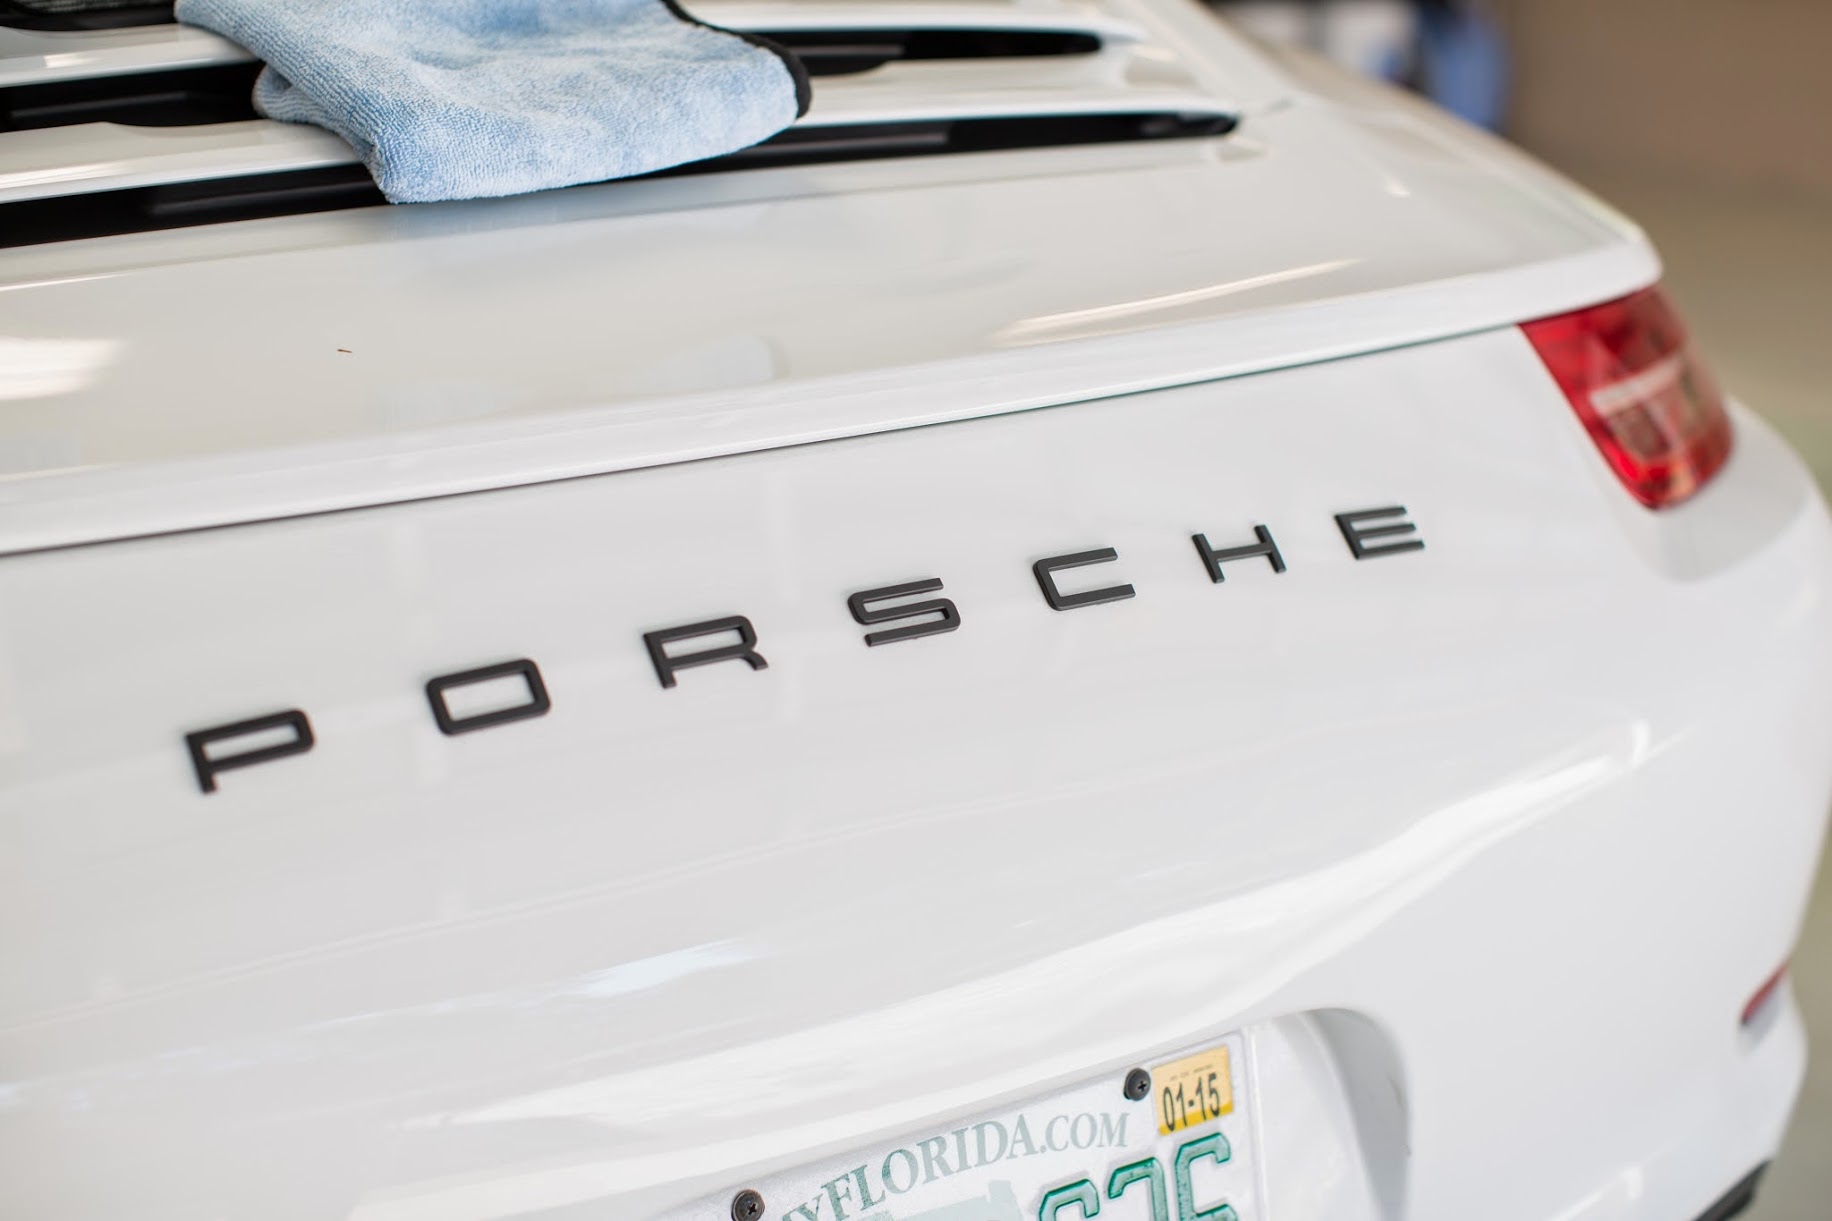
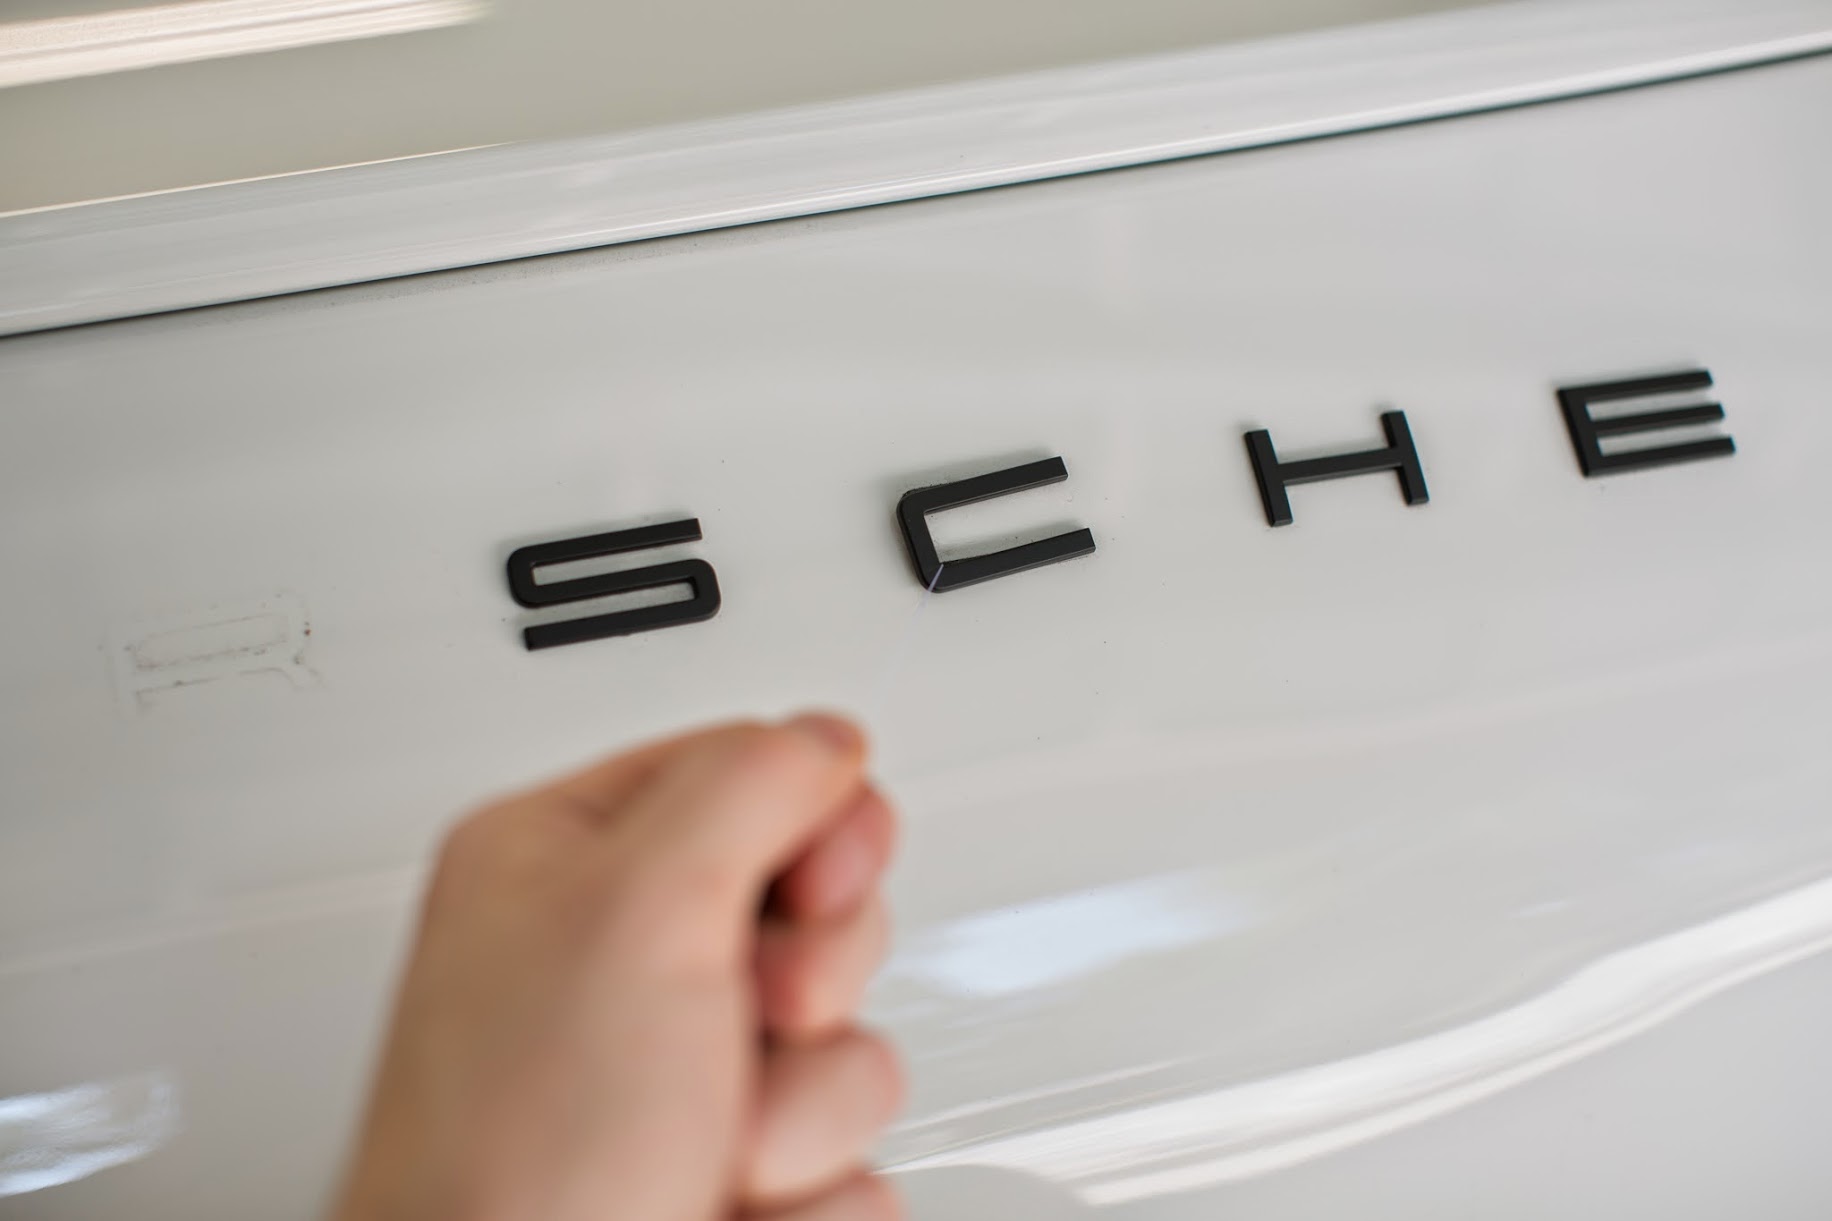
And the result is a curved looking badge. Obviously I did it wrong, and laying the envelopes on the curved bumper makes a curved line. Despite being schooled in engineering, the concept eludes me.

As you can see in the photos, it appears that the "S" is off to the right when referring to the Sat. Radio antenna. I'm not sure what's up with that. The "P" and "E" are equidistant from the lights.


Conclusions:
It it super hard to measure and align on a curved surface with no square reference points. I'm going to leave it on for a while to make sure I want a badge back there.
After all this, I still don't know how to do it correctly. I think the better way to do it would have been to lay out the letters properly spaced and aligned to a straight line on a flat table. Then run a piece of tape across the completed emblem. I thought it would be easy to run a few pieces of tape across the bumper to find the proper spot to layout the letters. I was wrong. I also installed to low on the bumper.
The guys at Cars and Coffee today didn't think it looked bad. I'll take some more shots in the sun in the next few days.
If I decide to keep a badge, I'm going to find a shop with a template. I washed the car today after a day with it on. I hated using a towel to get in the cracks. I ended up having to go to my bathroom cabinet to break out the q-tips to clean it so I would be able to sleep tonight. This is why I hate badges. I think the simplest fix is to get the Tech Art wing.
I decided to test out a badge again after seeing kmatt's post with his satin black Sport Technos.
http://forums.rennlist.com/rennforum...rt-techno.html
I wanted it to look like this but in black lettering.
I ordered up the badge from Suncoast.
I got my tools ready.
After much consternation, I settled on using some envelopes as a straight edge. I also found what I thought to be the center-line. I used a wax pencil to make a mark. I lined up the center line of the envelopes with the center of the car. Then I measured from the left and right corners of the envelopes and to the top of the bumper to make sure they were equidistant.
I test fit all of the letters. The vertical lines are taped just to keep the letters from falling under the envelopes.
I prepped the surface with some IPA.
I used someone's suggestion that the "O" could be used to set the spacing.
And the result is a curved looking badge. Obviously I did it wrong, and laying the envelopes on the curved bumper makes a curved line. Despite being schooled in engineering, the concept eludes me.
As you can see in the photos, it appears that the "S" is off to the right when referring to the Sat. Radio antenna. I'm not sure what's up with that. The "P" and "E" are equidistant from the lights.
Conclusions:
It it super hard to measure and align on a curved surface with no square reference points. I'm going to leave it on for a while to make sure I want a badge back there.
After all this, I still don't know how to do it correctly. I think the better way to do it would have been to lay out the letters properly spaced and aligned to a straight line on a flat table. Then run a piece of tape across the completed emblem. I thought it would be easy to run a few pieces of tape across the bumper to find the proper spot to layout the letters. I was wrong. I also installed to low on the bumper.
The guys at Cars and Coffee today didn't think it looked bad. I'll take some more shots in the sun in the next few days.
If I decide to keep a badge, I'm going to find a shop with a template. I washed the car today after a day with it on. I hated using a towel to get in the cracks. I ended up having to go to my bathroom cabinet to break out the q-tips to clean it so I would be able to sleep tonight. This is why I hate badges. I think the simplest fix is to get the Tech Art wing.
Thread Starter
|
Registered User
Joined: Nov 2009
Posts: 671
From: The Villages, FL
Rep Power: 67
It was raining most of the day, so I need to take it out and get a better photo.

Registered User
Joined: Dec 2013
Posts: 353
From: Atlanta
Rep Power: 28
Came out ok, I used various uninspiring forms of measurements to make my guide. I am happy with the result but I'm a bit too high on the "R" which put the letters off by a half a degree IMOP. Looks good installed though. I have three degrees and I still did not get it right. Is there a better way to put decals on? BTW I did want your buddy's GT3 but I found this RS5 gathering pollen in the back of a VW dealership and had to save her.
Thread Starter
|
Registered User
Joined: Nov 2009
Posts: 671
From: The Villages, FL
Rep Power: 67
It's time for Video!
I've been waiting to do a PSE video until I decided what exhaust I planned to do. There is an abandoned community nearby where I've done a few exhaust test videos in the past. I went there with my Canon 5d Mark III to do a quick before video. I guess someone bought the property as there was a new sign and a new gate, so I had to head home until I find a new place to shoot.
I've tried to do videos before on my Canon 5D Mark II. Holy mother, I forgot how awesome my M3 was/sounded!
The lesson I learned is that it is basically impossible to get a video in focus without an Optical ViewFinder. Since I'm having another child in August, I figured I might as well get a good hood. The wife doesn't have to know, I really got it for my Journal's future exhaust videos...
I'm sure I'll get the adapter plate to use with the battery grip, but I wanted to test it out before I spent another $100. I'm sure some of you camera gurus can help me through get a hand held rig for the future, but here is what I just bought:
http://www.zacuto.com/z-finder-dslr-viewfinder

I already have a Rode Stereo Video Mic with a dead kitten.
http://www.rodemic.com/microphones/stereovideomic

I get most everything from B&H Photo Video. I'll be using with a Manfotto video head and Gitzo tripod. Stay tuned for some videos.
I've tried to do videos before on my Canon 5D Mark II. Holy mother, I forgot how awesome my M3 was/sounded!
The lesson I learned is that it is basically impossible to get a video in focus without an Optical ViewFinder. Since I'm having another child in August, I figured I might as well get a good hood. The wife doesn't have to know, I really got it for my Journal's future exhaust videos...
I'm sure I'll get the adapter plate to use with the battery grip, but I wanted to test it out before I spent another $100. I'm sure some of you camera gurus can help me through get a hand held rig for the future, but here is what I just bought:
http://www.zacuto.com/z-finder-dslr-viewfinder
I already have a Rode Stereo Video Mic with a dead kitten.
http://www.rodemic.com/microphones/stereovideomic
I get most everything from B&H Photo Video. I'll be using with a Manfotto video head and Gitzo tripod. Stay tuned for some videos.
Last edited by Money2536; Apr 20, 2014 at 08:53 PM.
Thread Starter
|
Registered User
Joined: Nov 2009
Posts: 671
From: The Villages, FL
Rep Power: 67
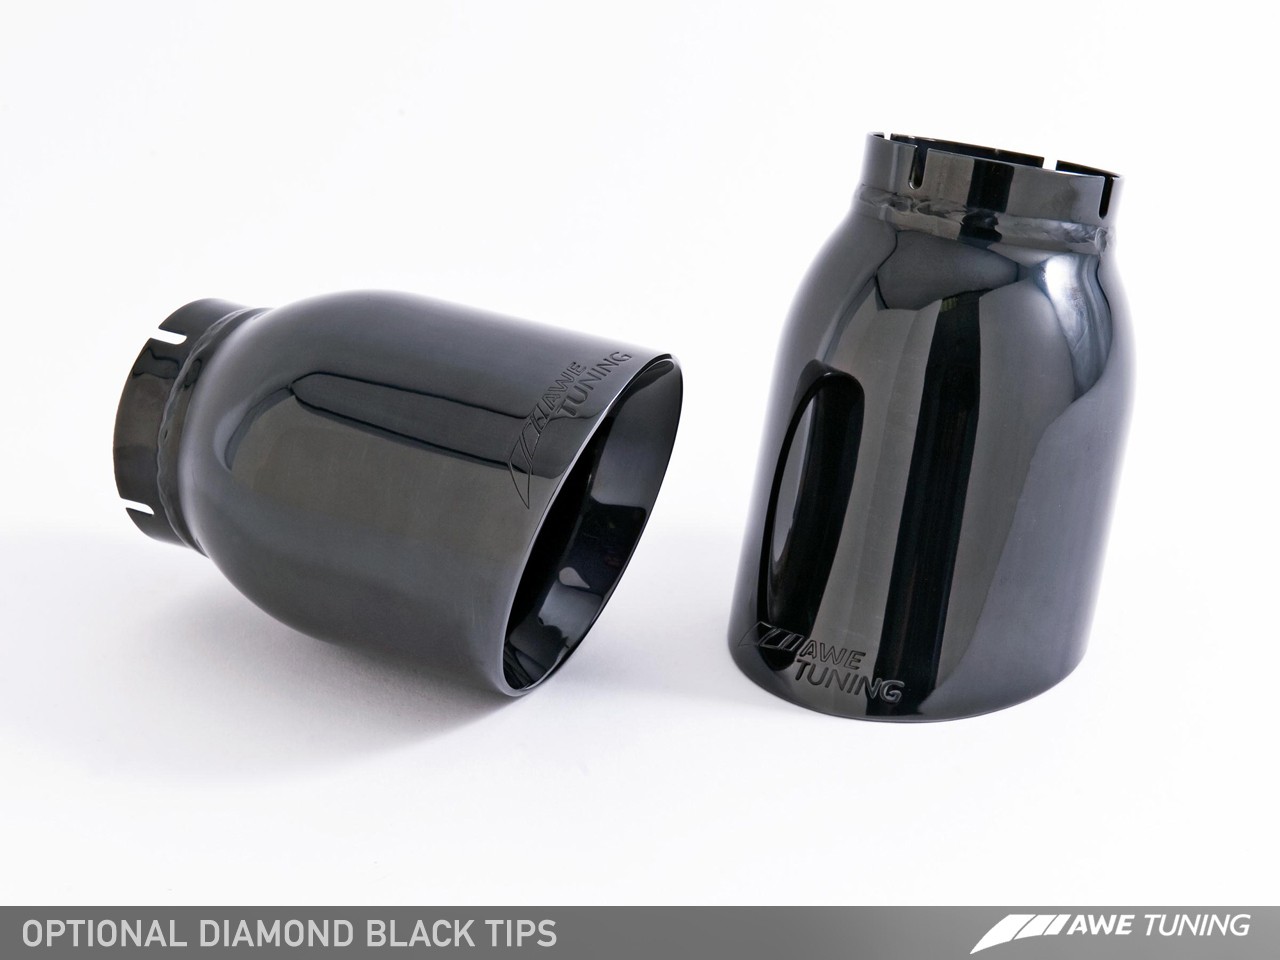
AWE SwitchPath Ordered!
I finally decided to order the AWE SwitchPath with Diamond Black tips.
http://www.awe-tuning.com/awe-tuning-porsche-carrera-s-switchpath-exhaust-system[/URL]
I have an AWE exhaust on my S4. I wouldn't say I dislike the tip design, but I'm not wild about it. I wasn't going to get tips but decided to add the Diamond Black to my order. A little "tip" (no pun intended), buying the tips later would cost $595 plus shipping versus costing me about $185 shipped when ordering with the exhaust. I figured if I don't like them, I could sell them and not lose any money on the deal.
I ended up ordering it through Eric @ Supreme Power rather than going direct from AWE. I would recommend you give those guys a call or shoot an email.
http://www.supremepower.com[/URL]
eric@supremepower.com
The exhaust will be shipped directly from AWE. Despite my typical inability to be frugal, I got a decent deal. Ordering direct from AWE would have cost me $2,795 plus shipping versus $2,572 shipped.
AWE said it takes about 8 days to build as they are custom made after ordering. I'm going to make a PSE video this weekend, so stay tuned for some videos (if you care).
http://www.awe-tuning.com/awe-tuning-porsche-carrera-s-switchpath-exhaust-system[/URL]
I have an AWE exhaust on my S4. I wouldn't say I dislike the tip design, but I'm not wild about it. I wasn't going to get tips but decided to add the Diamond Black to my order. A little "tip" (no pun intended
), buying the tips later would cost $595 plus shipping versus costing me about $185 shipped when ordering with the exhaust. I figured if I don't like them, I could sell them and not lose any money on the deal.I ended up ordering it through Eric @ Supreme Power rather than going direct from AWE. I would recommend you give those guys a call or shoot an email.
http://www.supremepower.com[/URL]
eric@supremepower.com
The exhaust will be shipped directly from AWE. Despite my typical inability to be frugal, I got a decent deal. Ordering direct from AWE would have cost me $2,795 plus shipping versus $2,572 shipped.
AWE said it takes about 8 days to build as they are custom made after ordering. I'm going to make a PSE video this weekend, so stay tuned for some videos (if you care).

Congrats on the exhaust!
Regarding the emblem I had installed/removed mine on a couple of cars (including my current 991). Real pro's have a template but I only used painter's tape that I ran parallel to the edge of the rear wing. Not totally perfect but it does not look curved.
Regarding the emblem I had installed/removed mine on a couple of cars (including my current 991). Real pro's have a template but I only used painter's tape that I ran parallel to the edge of the rear wing. Not totally perfect but it does not look curved.
Thread Starter
|
Registered User
Joined: Nov 2009
Posts: 671
From: The Villages, FL
Rep Power: 67
Congrats on the exhaust!
Regarding the emblem I had installed/removed mine on a couple of cars (including my current 991). Real pro's have a template but I only used painter's tape that I ran parallel to the edge of the rear wing. Not totally perfect but it does not look curved.
Regarding the emblem I had installed/removed mine on a couple of cars (including my current 991). Real pro's have a template but I only used painter's tape that I ran parallel to the edge of the rear wing. Not totally perfect but it does not look curved.
Not need to spend a penny on it unless you damage the emblem while removing it (should be fairly easy with dental floss). I have re-used emblems multiple times, simply rubbed off the adhesive and reapplied bits of 3M double sided molding tape. The emblem sticks just as well as when it came from the factory.
Thread Starter
|
Registered User
Joined: Nov 2009
Posts: 671
From: The Villages, FL
Rep Power: 67
991 PSE Exhaust Video
As I've mentioned, I wanted to do a PSE video prior to replacing the center section with the AWE SwitchPath. I went back out to my soon to be developed, abandoned community and hoped to not get arrested. My mission was accomplished, but my new $300 viewfinder eyecup didn't help me get a proper, in-focus video. Oh well, you can clearly hear the car, and that's what matters.
Thread Starter
|
Registered User
Joined: Nov 2009
Posts: 671
From: The Villages, FL
Rep Power: 67
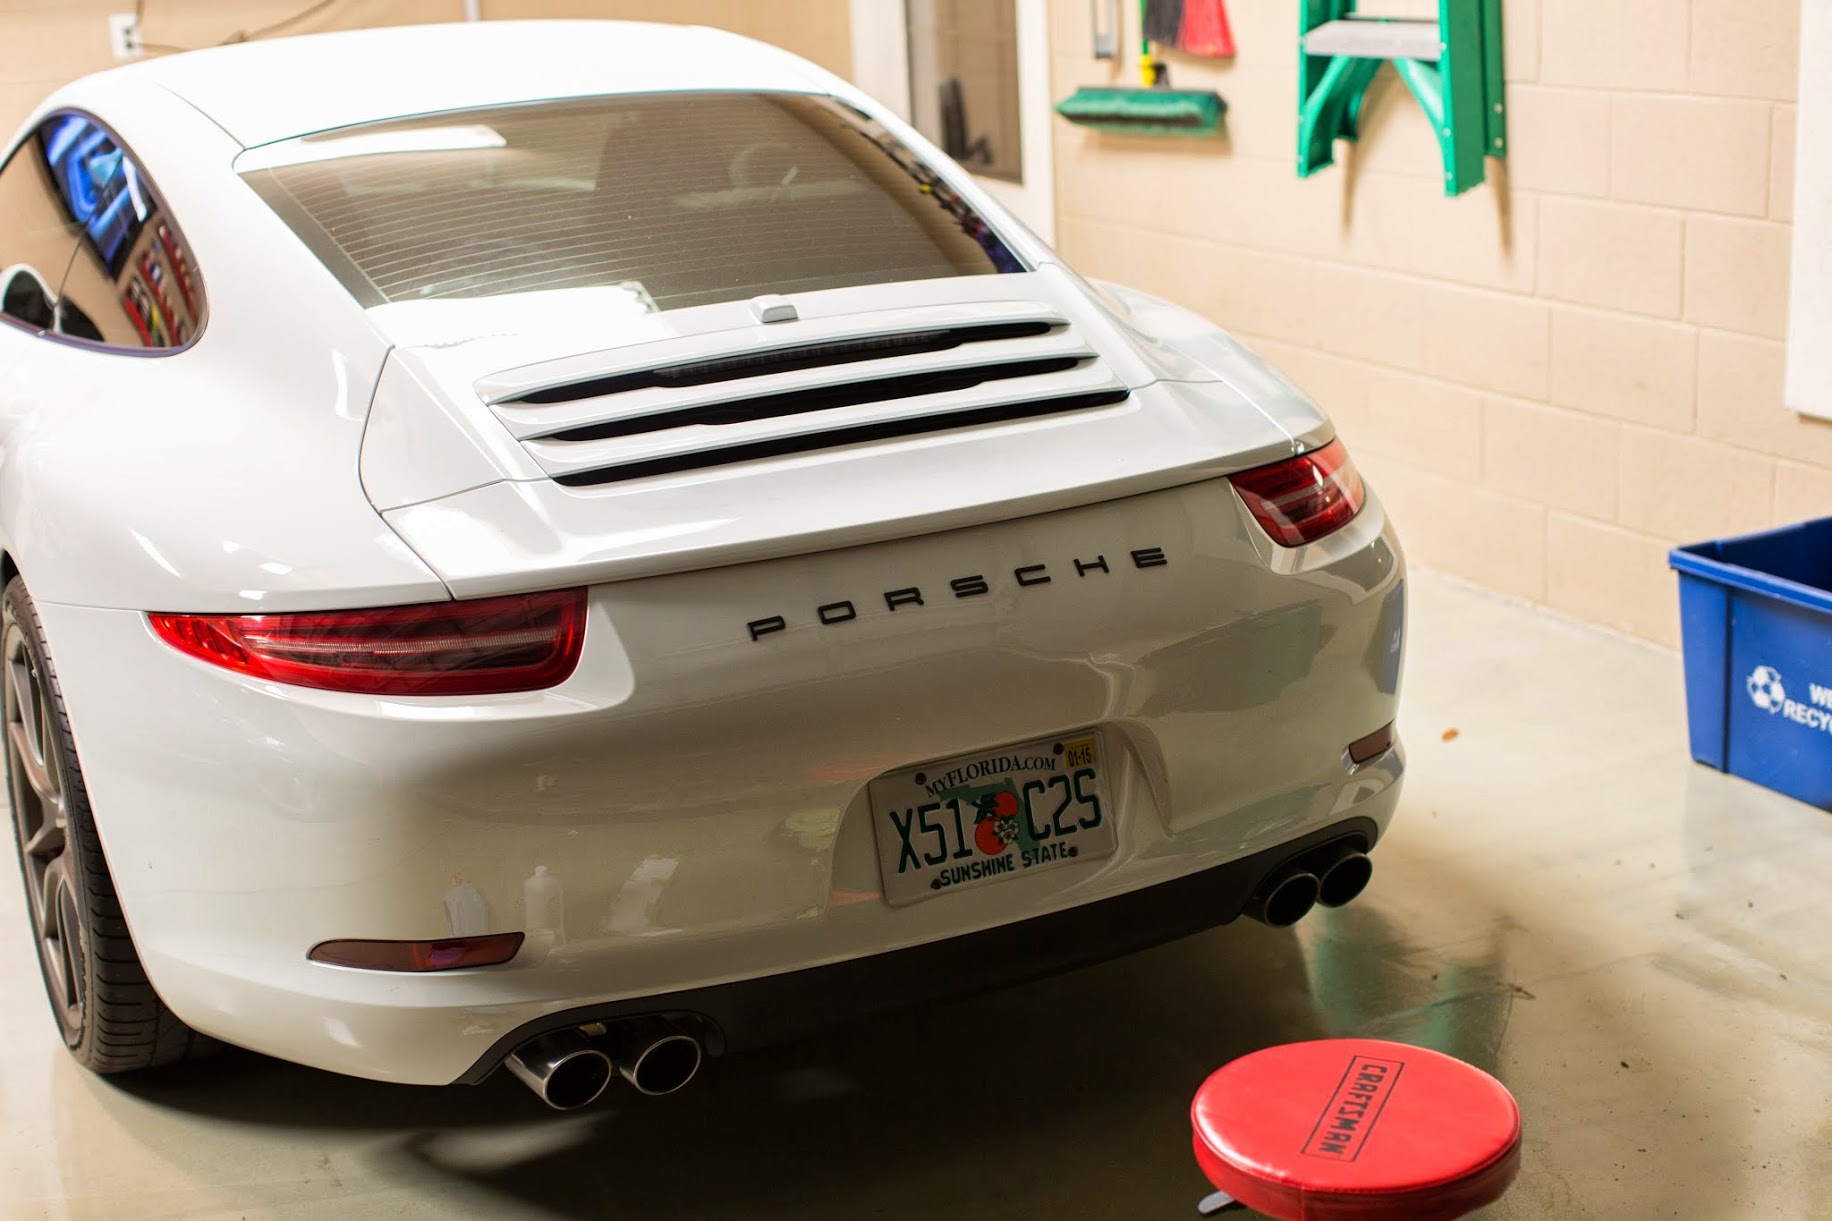
Debadged...Again
I gave it a go for about a week with the badge. The trapped dirt in the cracks is driving me crazy. Combining with the fact that I need to pull it off and redo it made me decided to yank it off again and leave it. Sorry to offend those that think it looks plain without a badge. What can I say? I'm a plain kind of guy.
It's a good thing that my wife likes to fish. We always have tons of this on hand.

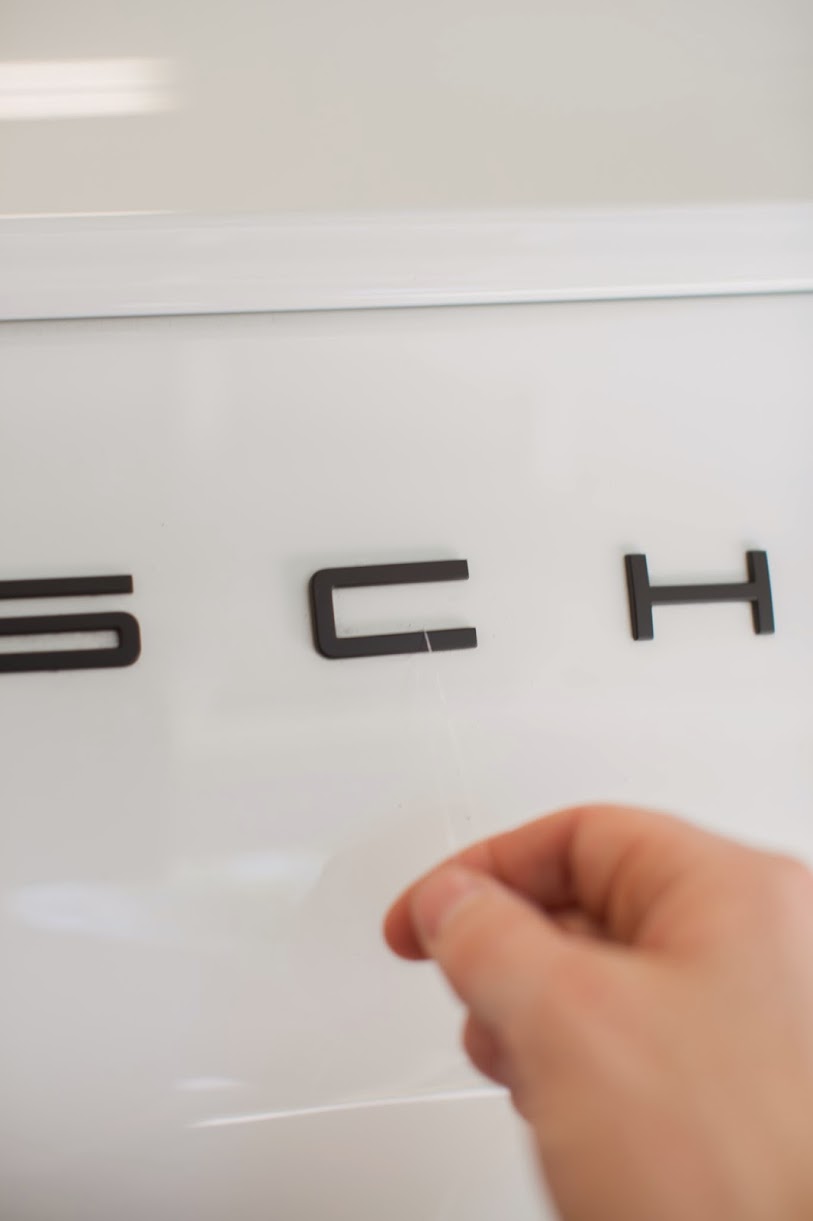

Since the badge wasn't on long, all I needed was a quick spray of this to get the last bit of residue off. I have to wash the car tomorrow, so I'll spread some Sonax Polymer Net Shield on to make sure the area under the badge it coated.


What can I say? I'm a plain kind of guy.It's a good thing that my wife likes to fish. We always have tons of this on hand.
Since the badge wasn't on long, all I needed was a quick spray of this to get the last bit of residue off. I have to wash the car tomorrow, so I'll spread some Sonax Polymer Net Shield on to make sure the area under the badge it coated.