
Problem with Valentine One hardwire - Help

Thread Starter
|
Registered User
Joined: Jun 2004
Posts: 410
From: Texas
Rep Power: 41

Problem with Valentine One hardwire - Help
Just had V1 hardwired by local shop yesterday. Now dome light (in front of rear view mirror) permanently on....wont turn off. Any ideas? look like a tool driving at night with interior all lit up. TIA.

Registered User
Joined: Dec 2007
Posts: 1,230
From: Turkey
Rep Power: 68
hahaha, it should be wired to the fuse of the 12v outlet that is underneath the glovebox, so that it will turn on when the engine starts and turn off when you remove the key from ignition.
Registered User
Joined: Nov 2006
Posts: 1,237
From: Boston, MA
Rep Power: 89


On the same topic I just finished making a concealed display mirror for a Cayenne, makes for a slick install.


Registered User
Joined: Feb 2009
Posts: 24
From: TX
Rep Power: 0
Can't you take it back to the shop? I'd be a little wary though, if they screw up something this straightforward I don't know that I'd want to trust my car to them. Does the light come on only when the V1 is on? Are you sure you don't have the light switched on... just though I'd check
On the same topic I just finished making a concealed display mirror for a Cayenne, makes for a slick install.
On the same topic I just finished making a concealed display mirror for a Cayenne, makes for a slick install.
Registered User
Joined: Nov 2006
Posts: 1,237
From: Boston, MA
Rep Power: 89
")
Or just some $$$ of course.
Registered User
Joined: Apr 2009
Posts: 813
From: NYC/NJ
Rep Power: 71
Thanks
Registered User
Joined: Jun 2009
Posts: 178
From: Atlanta, GA USA
Rep Power: 37
If you have the heat blocking thermal glass, you're very limited in where the receiver unit can be mounted.
Trending Topics
Registered User
Joined: Nov 2006
Posts: 1,237
From: Boston, MA
Rep Power: 89
I've always mounted it in the rear whenever possible, seems to work just as well and far less obtrusive. If you are willing to sacrifice laser then it can also be embedded within a head rest for an extra-stealthy install, I've seen that done in a few BMWs.
Registered User
Joined: Nov 2008
Posts: 250
From: WA
Rep Power: 28
Hardwiring a radar detector is probably the easiest mod you can make. Just push the wire through the headliner and run it down the passenger-side pillar, which comes off with 1 screw. It's obvious the shop wired it improperly and/or rewired the dome light...
I had a V1 concealed mirror in my last vehicle. It's a cool novelty but really not worth the cost/work involved. I prefer my 9500xi over the V1 anyways.
I had a V1 concealed mirror in my last vehicle. It's a cool novelty but really not worth the cost/work involved. I prefer my 9500xi over the V1 anyways.
Thread Starter
|
Registered User
Joined: Jun 2004
Posts: 410
From: Texas
Rep Power: 41
Can't you take it back to the shop? I'd be a little wary though, if they screw up something this straightforward I don't know that I'd want to trust my car to them. Does the light come on only when the V1 is on? Are you sure you don't have the light switched on... just though I'd check
On the same topic I just finished making a concealed display mirror for a Cayenne, makes for a slick install.
On the same topic I just finished making a concealed display mirror for a Cayenne, makes for a slick install.
Registered User
Joined: Sep 2009
Posts: 131
From: Toronto Canada
Rep Power: 22
Also make sure they install an in-line fuse at the fuse box.
Be present to make sure they don't run the wire on top of the airbag in the pillar.


Former Vendor
Joined: Aug 2006
Posts: 233
From: San Luis Obispo, CA
Rep Power: 0
This info is from 997, hope it helps, more info here:
https://www.6speedonline.com/forums/...g-rides-2.html
We've done this on a couple of 997's. What's great about this is you're able to have the Radar Detector be switched on and off with the ignition and you don't have a cord hanging down from the Radar Detector and plugged into a cigarette lighter.
Using one of these Add-A-Fuse deals is a great way to grab an ignition on 12-Volt source with out having to cut/splice on factory wiring.
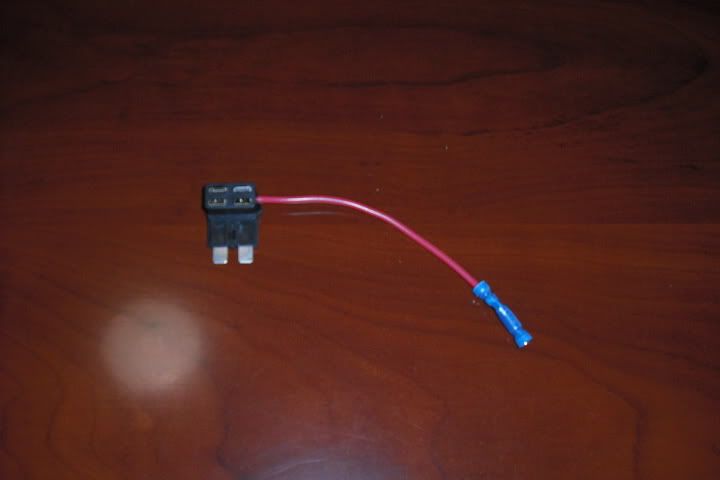
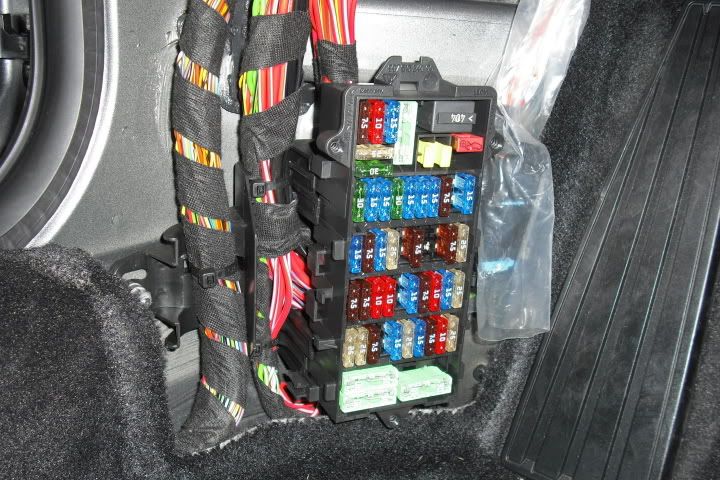
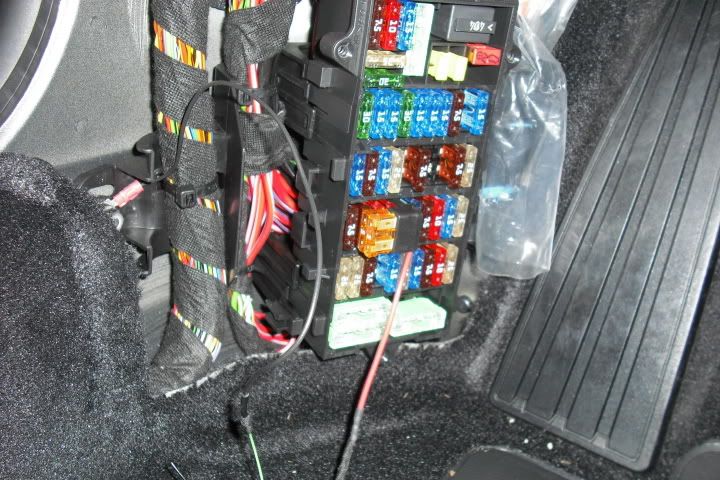
The Add-A-Fuse goes right into a fuse block. For this install there was an unused fuse location that was a switched on 12-Volt source so we used that. With the Add-A-Fuse you may also use it with a pre-existing fuse, replace that fuse with the Add-A-Fuse, put the removed fuse into the Add-A-Fuse then place a second fuse into the Add-A-Fuse so the Radar Detector has a inline fuse (we used a 5 Amp fuse going to the Radar Detector).
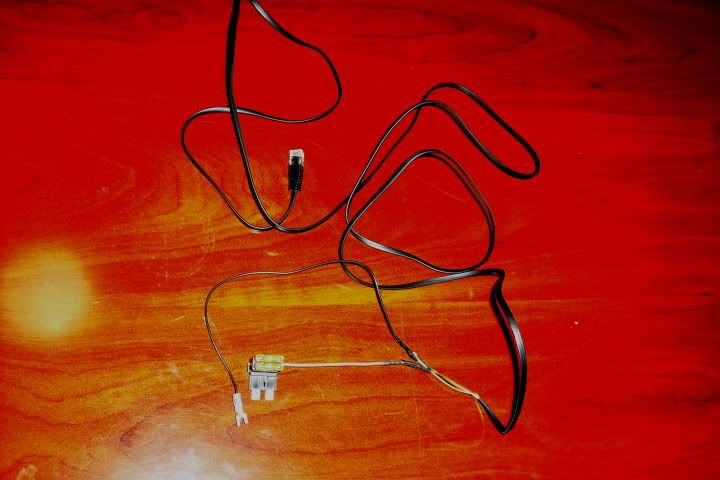
We used basically a phone cable as a wire to the Radar Detector. Find out which wire needs to be Hot (12-Volt Source), then Solder and shrink wrap the Add-A-Fuse to that.
Find out which wire needs to be Ground, then solder and shrink wrap a connector that suits your install to complete a good ground.

Here we used a pre-existing nut on a stud for our ground close to the fuse block, we put a stainless steel washer behind that nut so the ground connector gets sandwiched between to pieces of steel to make a good ground.
Remove the A-Pillar Cover so you can route the wire and secure it with some zip ties. Route the wire to where you want the Radar Detector and your about done already and the wire is hidden.

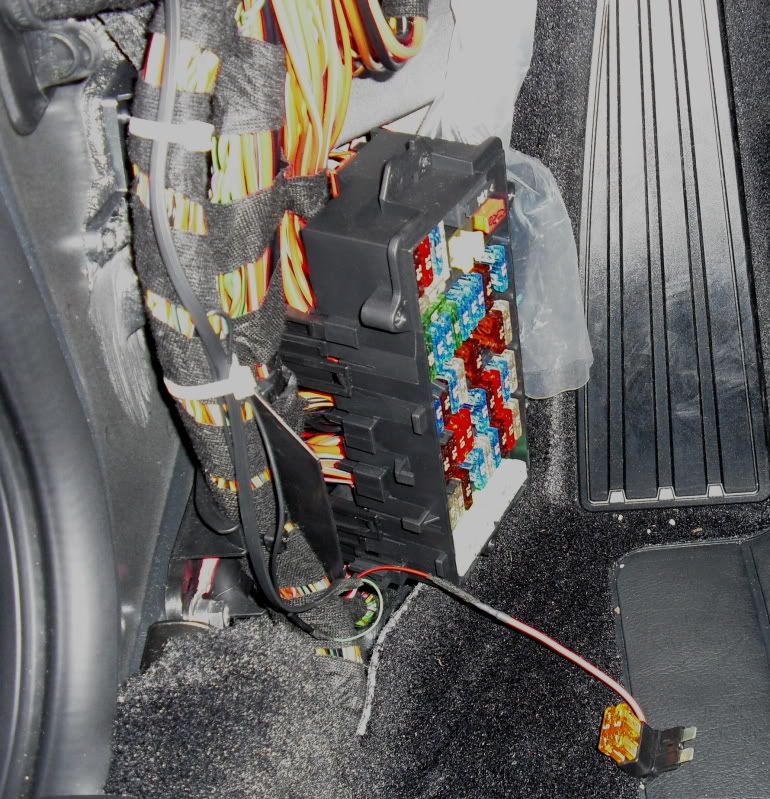
Here's how this Fuse Block looked when done with the cover off. The Add-A-Fuse is easily accessible and removed for any maintenance and nothing from the factory has been cut up. Having fun and keeping it clean. Any question please ask.

Removing and reinstalling the A-Pillar Cover on the Coupes is a little tricky, Cabriolet's are much easier. Here are some pictures and info to help with the Coupes to help when Hardwiring into your Fuse Panel.
Start by removing the Hanger Holder Piece, pry from the base, then lift up to release the tab. I try to pry up with just my fingers, if that doesn't work, try to use some type of plastic wedge rather than a metal screwdirver.


Please have a look at these to get an idea how the Hanger Cover is held in. The 2-bottom tabs pop in and out of place, the top is more hinged.


Here is the A-Pillar removed so you may see what holds it in place. No screws or bolts, just poped in and out of place with metal prongs (5 Prongs total) and a tab at the base that inserts by the dash board.


This portion runs along the windshield, note the 2-Prongs. Also note the tab that inserts into a slot by the dashboard.


This portion runs along the headliner, note the 3-Prongs.


Please note this Plastic Post, which insert in hole towards the top of the windshield. It's tricky to see when installing, but look to make sure this is going into it's home so you don't break it off or have to wonder why your A-Pillar Cover doesn't seem to be fitting right.

Ok so once the Hanger holder is off, work your fingers under the A-Pillar cover and start to pull those prongs free from their homes. I start around the top near where the headliner and windshield meet. Once the Prongs are pulled free, which will make a little noise, carefully slip the back of the A-Pillar Cover free from the B-Pillar Cover, it just sits behind it a little as seen in this picture.
This is with the A-Pillar Cover slipped by the B-Pillar Cover. You may have to bow the A-Pillar Cover a little to work it free here and reinstall, just be carefull and take your time. You don't need to be very forcefull here.

Once the Prongs are released and you have the back of the A-Pillar Cover past the B-Pillar Cover, carefully lower the A-Pillar cover down towards the floor (watch out for your headrest and seat belt). Lowering the A-Pillar Cover down now frees the tab at the front bottom portion of the A-Pillar Cover where it inserts into the slot and groove by the dash board.


Once the bottom portion of the A-Pillar Cover is free from the dash, just carefully take it out of the cabin as it should be totally free now.


Reinstalling is basically reverse order. Insert into dash, sneak by B-Pillar Cover, line your Prongs and that plastic post up. Once things are lined up, start to press back in place, will make a little noise again. The first time you do this it can be a little intimidating but it's not that bad. The biggest thing is being patient and somewhat gentle, the most force needed should be to release the Prongs. Other than that you should not be using a lot of force. If you are not real comfortable with doing this and you're not too far from San Luis Obispo, CA you're welcome to bring your Porsche over to G Rides
 .
.

Thread
Thread Starter
Forum
Replies
Last Post