991 DIYs


Former Vendor
Joined: Jan 2014
Posts: 31
From: Santa Clara, CA
Rep Power: 0

I'll throw this one in here as well:
Front and rear lower control arm replacement.
Upper control arm replacement.
Front and rear shock replacement.
Bushing swap.
Plus more.
Basically entire suspension swap.
https://www.6speedonline.com/forums/...ml#post4202914
Front and rear lower control arm replacement.
Upper control arm replacement.
Front and rear shock replacement.
Bushing swap.
Plus more.
Basically entire suspension swap.
https://www.6speedonline.com/forums/...ml#post4202914

Banned
Joined: Jan 2013
Posts: 769
From: Nor Cal
Rep Power: 71

I'll throw this one in here as well:
Front and rear lower control arm replacement.
Upper control arm replacement.
Front and rear shock replacement.
Bushing swap.
Plus more.
Basically entire suspension swap.
https://www.6speedonline.com/forums/...ml#post4202914
Front and rear lower control arm replacement.
Upper control arm replacement.
Front and rear shock replacement.
Bushing swap.
Plus more.
Basically entire suspension swap.
https://www.6speedonline.com/forums/...ml#post4202914
Registered User
Joined: Aug 2013
Posts: 366
From: New Jersey
Rep Power: 27
Just posted new DIY to the main thread in response to some questions about removing side mirrors from the 991 doors....
Thanks for the feedback!
Thanks for the feedback!
Registered User
Joined: Dec 2013
Posts: 675
From: Chalfont, PA
Rep Power: 55
991 DIY: Black Headlight Upgrade
Continuing along the modifications trail.... 
Posted another easy DIY to the main forum
I've also posted this over on my blog: 991 DIY: Black Headlamp Upgrade
This DIY may also be useful for anyone who may find themselves replacing a headlamp bulb, or replacing a damaged headlamp assembly....
Posted another easy DIY to the main forum
I've also posted this over on my blog: 991 DIY: Black Headlamp Upgrade
This DIY may also be useful for anyone who may find themselves replacing a headlamp bulb, or replacing a damaged headlamp assembly....
Last edited by plenum; Jan 23, 2015 at 04:01 PM. Reason: Added link
Registered User

Joined: Dec 2012
Posts: 1,499
From: New York
Rep Power: 93
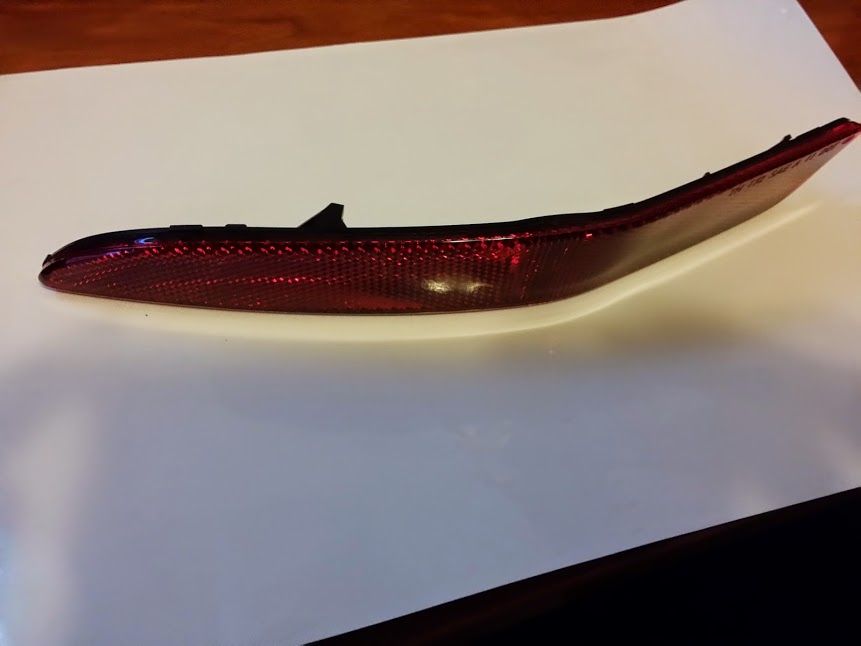
[b] diy - wrapping your reflectors to make body color [/b]
Here is an easy mod that should take about 15 minutes, more if you are not used to wrapping parts. I have been meaning to do this for a while and finally got the time. It is very easy and very cheap - cost me some time and 99 cents. So here we go.
Here is pic of reflector on top of the white vinyl wrap I purchased from ebay. You don't need a lot - I bought a letter sized sheet, gloss white.

Here is the back of the reflector. Removing is easy - just push in A (the rounded side of the reflector) so that you can get a plastic tool behind the squared off portion of the reflector (B). What you need to do is push the tab (C) off the retaining hole. As you push, the reflector will flex, but don't worry it will not break - just push slowly and purposefully and the tab will clear. Once it clears, the reflectors will come right off. Also, make sure you get your plastic tool completely behind the reflector, otherwise you might separate the reflector from the black housing (don't ask me how I know).

Once you have the reflectors off, time to wrap. This is the most consuming part, depending on how painstaking you are. It is relatively easy, but you need to take your time around the curved corners. Use a hair dryer to help you shape the wrap around the edges.

Once you are finished wrapping, pop the reflectors back in. Slip the tab in the retaining hole and snap the curved end in. You are done! Now, take pictures of your work for all to admire.

Registered User
Joined: Dec 2013
Posts: 675
From: Chalfont, PA
Rep Power: 55
DIY - 991 Exhaust Sound Mod
Registered User
Joined: Aug 2013
Posts: 366
From: New Jersey
Rep Power: 27
Here is an easy mod that should take about 15 minutes, more if you are not used to wrapping parts. I have been meaning to do this for a while and finally got the time. It is very easy and very cheap - cost me some time and 99 cents. So here we go.
Here is pic of reflector on top of the white vinyl wrap I purchased from ebay. You don't need a lot - I bought a letter sized sheet, gloss white.
Here is the back of the reflector. Removing is easy - just push in A (the rounded side of the reflector) so that you can get a plastic tool behind the squared off portion of the reflector (B). What you need to do is push the tab (C) off the retaining hole. As you push, the reflector will flex, but don't worry it will not break - just push slowly and purposefully and the tab will clear. Once it clears, the reflectors will come right off. Also, make sure you get your plastic tool completely behind the reflector, otherwise you might separate the reflector from the black housing (don't ask me how I know).

Once you have the reflectors off, time to wrap. This is the most consuming part, depending on how painstaking you are. It is relatively easy, but you need to take your time around the curved corners. Use a hair dryer to help you shape the wrap around the edges.

Once you are finished wrapping, pop the reflectors back in. Slip the tab in the retaining hole and snap the curved end in. You are done! Now, take pictures of your work for all to admire.

Here is pic of reflector on top of the white vinyl wrap I purchased from ebay. You don't need a lot - I bought a letter sized sheet, gloss white.
Here is the back of the reflector. Removing is easy - just push in A (the rounded side of the reflector) so that you can get a plastic tool behind the squared off portion of the reflector (B). What you need to do is push the tab (C) off the retaining hole. As you push, the reflector will flex, but don't worry it will not break - just push slowly and purposefully and the tab will clear. Once it clears, the reflectors will come right off. Also, make sure you get your plastic tool completely behind the reflector, otherwise you might separate the reflector from the black housing (don't ask me how I know).
Once you have the reflectors off, time to wrap. This is the most consuming part, depending on how painstaking you are. It is relatively easy, but you need to take your time around the curved corners. Use a hair dryer to help you shape the wrap around the edges.
Once you are finished wrapping, pop the reflectors back in. Slip the tab in the retaining hole and snap the curved end in. You are done! Now, take pictures of your work for all to admire.
Registered User
Joined: Dec 2013
Posts: 675
From: Chalfont, PA
Rep Power: 55
991 DIY: Jack Your Car Up!

Ok, so the title may be a bit misleading.... Not sure how else to put this, or even if it is technically a DIY.

What I thought I'd put together is a short guide to getting your 991 up on jack stands. I know many members of this board will think this is like "how to change a tire" and ridiculous that anyone would need guidance. But to be honest as a 1st time 911 owner I did some searches to make sure that I didn't damage anything on my own car, and came up with not much at all.
So, with that said, I took my time, put my car up on stands, and documented with some pictures. I am sure there are those out there who have different techniques, "Jack Stand" jack stands, and yes I know some even have full-car lifts in their garage -- this isn't for them! This is for the guys who like me have some trusty old jack stands and a floor jack (or two!), and want to get their 991 up off the ground safely.
Here's a link to the full post and pictures: Getting Your 991 on Jack Stands
Covered are three scenarios:
1. Front only on jack stands;
2. Rear only on jack stands;
3. All four corners up on jack stands!
Hope this helps someone out!
2. Rear only on jack stands;
3. All four corners up on jack stands!
Registered User

Joined: Feb 2010
Posts: 360
From: ATL
Rep Power: 62
Nice job of explaining everything. I'll add that once you have the front up on stands, you can jack from the rear jack pads and place the jack stands under the crossmember near the bolts that hold the suspension arms to the crossmember.
Registered User
Joined: Dec 2013
Posts: 675
From: Chalfont, PA
Rep Power: 55
Thanks again for the feedback!
Registered User
Joined: Dec 2013
Posts: 675
From: Chalfont, PA
Rep Power: 55
991 Center Console Switch Panel Deconstruction

Just getting-around to posting some DIY material. Not long ago, I deconstructed the center console switch box from a 991. I thought the step-by-step and pictures I took would be useful to others, if not just those curious what is in the "magic" box that controls certain features of the car.
So if you are interested in the step-by-step and many more pictures, check out my blog post: Porsche 991 911 Center Console Switch Box Deconstruction
I start the breakdown with the switch panel already removed from the car, so if you haven't read-up on how to do that, read my previous DIY posts on removal elsewhere in this DIY section.
Couple of other things to NOTE:
First: The switch panel in my breakdown is from a 991 with metal/glass roof option. The panel for Cab cars will be nearly identical however the center buttons will be top controls rather than roof. Also, the panel from non-cab cars without the sunroof option will be just blank in the center.
Second: Although I take everything apart, and discuss how one might utilize to create custom buttons or controls that integrate with the factory switch panel, I don't actually go into detail about how to do so. I can't tell you how to hack CAN BUS, wiring, etc. Maybe in a future post....
Anyways, hope this is useful, maybe even interesting to some.
Registered User
Joined: Dec 2013
Posts: 675
From: Chalfont, PA
Rep Power: 55
991 DIY: Rear Side Window Removal

Just posted a new DIY up on my blog: DIY: 991 Rear Side Window Removal
This was a project from some time ago, and just never got around to posting... So, I don't have the complete set of pictures that went along with my notes. I took some more recent reference pics to help, but my notes are complete. I also provide some hints and tricks so the project goes smoothly.
Why would anyone want to do this? Well, the most common reason might be to replace the trim / moulding that runs around the bottom-edge of the rear side window -- as other members will tell you, you can't replace just the trim. It is factory-installed permanently to the glass assembly.
Another reason you might find this helpful is when troubleshooting rattles and other noises. Just knowing how these things go together should help.
Anyways, appreciate any feedback, comments.

Registered User
Joined: Jun 2013
Posts: 17
From: califirnia
Rep Power: 0

This maybe an interest to anyone who wants to paint the spokes surface of their carrera Classic wheel. I found a similar color spray can at Home Depot.

Before

Masking prep

Before

After

Spray can from Home Depot.
After
Last edited by gitongisip; Apr 23, 2015 at 08:01 PM.
Registered User
Joined: Nov 2014
Posts: 204
From: NY
Rep Power: 30