

991 DIYs

Thread Starter
|
Registered User
Joined: Jan 2007
Posts: 10,774
From: OR Room 5
Rep Power: 1007


991 DIYs
https://www.6speedonline.com/forums/...-911-991s.html
https://www.6speedonline.com/forums/...ne-holder.html
https://www.6speedonline.com/forums/...f-install.html
https://www.6speedonline.com/forums/...ne-holder.html
https://www.6speedonline.com/forums/...f-install.html
Last edited by bbywu; Mar 10, 2013 at 11:01 PM.
Registered User
Joined: Jul 2012
Posts: 736
From: Boise, ID
Rep Power: 71
If anyone is interested in protecting their OEM front windshield from rock chips and cracks with a DIY kit, take a look at this thread: https://www.6speedonline.com/forums/...rotection.html
DIY - Radiator grill mesh
My front radiators started to look bad (no functional issue) and a fair amount of rubber and debris would accumulate in the radiator openings after each track day.

There is no grill mesh option available on the market yet for the front sport apron, so I had to go for a quick DIY.
I did not want to remove the front bumper, so I worked 'from the outside'.
Step 1: created a model using painter's tape and semi-rigid wires

Step 2: ordered grill mesh (12 x 48" small diamond - black) from customcargrills.com. I think you can find the same grill at your local Home Depot, but ordering online was more convenient and I trusted the quality a bit more.
Step 3: use the model to cut grills for both radiators air intakes

Step 4: just slide the grill in and attach with 4 zip ties

... and here's the final result:

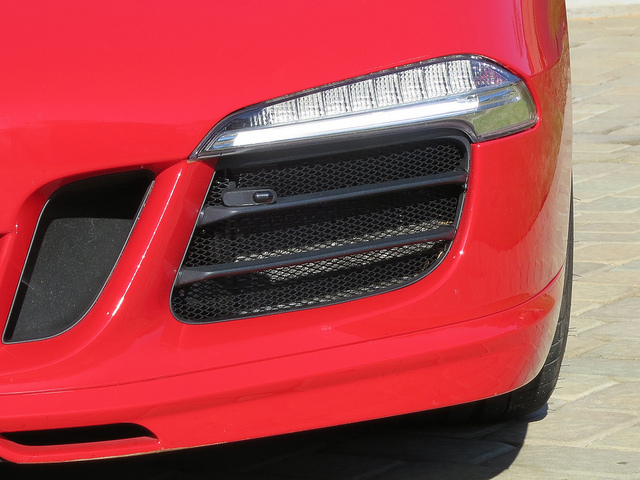
edit: I have attached a PDF file with the template to be used for the grills.
My front radiators started to look bad (no functional issue) and a fair amount of rubber and debris would accumulate in the radiator openings after each track day.
There is no grill mesh option available on the market yet for the front sport apron, so I had to go for a quick DIY.
I did not want to remove the front bumper, so I worked 'from the outside'.
Step 1: created a model using painter's tape and semi-rigid wires
Step 2: ordered grill mesh (12 x 48" small diamond - black) from customcargrills.com. I think you can find the same grill at your local Home Depot, but ordering online was more convenient and I trusted the quality a bit more.
Step 3: use the model to cut grills for both radiators air intakes
Step 4: just slide the grill in and attach with 4 zip ties
... and here's the final result:
edit: I have attached a PDF file with the template to be used for the grills.
Last edited by SM_ATL; Apr 29, 2013 at 10:15 PM. Reason: adding grill templates
BMC air filter
Here we go again with a +0.5 hp/+0.5 dB mod. What is the point of being sarcastic since it is the SECOND time that I do this mod on a 991 ?
?
First, I like mods that I can do myself, second, even if the benefit can hardly be quantified, it can do no harm and you have a (little) bit more sound.
You will need to remove the rear bumper to get access to the airbox. To do this, you'll have to lift/jack the back of the car so that you can remove both wheels.
 r
r
You will get access to the top screws by lifting the wing (if powered or by removing the 2 screws under the engine lid and popping out the ducktail/fixed wing).
Just do not rush things and check that you are not forgetting any screws. You will first remove the taillights, then go around the bumper and remove all the screws you see. Do not forget the 3 screws in each wheel arch. When you are ready to remove the bumper, pull gently and make sure you do not tear off the license plate lighting power cable.

Open the air box, swap the filters and reassemble.
Stock filters:
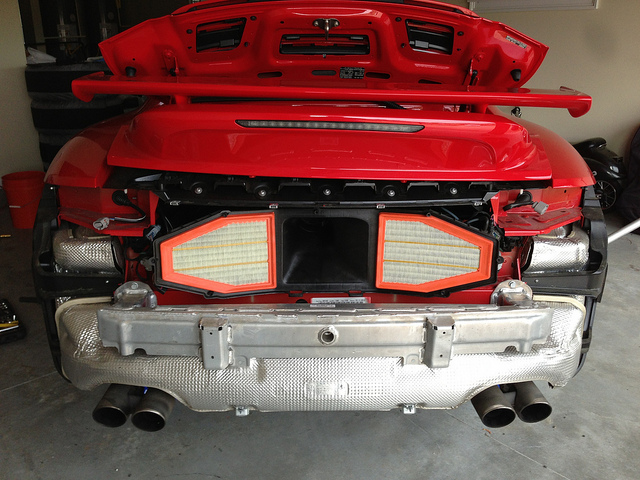
BMC filters:

Be patient again when you put the bumper back in place, you want to make sure that it remains well aligned and flush with the body of the car.
Done in 60 to 75 minutes in total.
Enjoy!
Here we go again with a +0.5 hp/+0.5 dB mod. What is the point of being sarcastic since it is the SECOND time that I do this mod on a 991
? First, I like mods that I can do myself, second, even if the benefit can hardly be quantified, it can do no harm and you have a (little) bit more sound.
You will need to remove the rear bumper to get access to the airbox. To do this, you'll have to lift/jack the back of the car so that you can remove both wheels.
You will get access to the top screws by lifting the wing (if powered or by removing the 2 screws under the engine lid and popping out the ducktail/fixed wing).
Just do not rush things and check that you are not forgetting any screws. You will first remove the taillights, then go around the bumper and remove all the screws you see. Do not forget the 3 screws in each wheel arch. When you are ready to remove the bumper, pull gently and make sure you do not tear off the license plate lighting power cable.
Open the air box, swap the filters and reassemble.
Stock filters:
BMC filters:
Be patient again when you put the bumper back in place, you want to make sure that it remains well aligned and flush with the body of the car.
Done in 60 to 75 minutes in total.
Enjoy!
Registered User
Joined: Sep 2012
Posts: 242
From: SoFL
Rep Power: 25
A little more on deconstructing your 991 to install a BMC air filter or just change the OE one. No way to do it without dropping the rear bumper.
http://www.youtube.com/watch?v=Rnfp6...ature=youtu.be
http://www.youtube.com/watch?v=Rnfp6...ature=youtu.be
Last edited by fantom; Jun 10, 2013 at 08:08 PM.
Registered User
Joined: Oct 2012
Posts: 328
From: VA
Rep Power: 35

Registered User
Joined: Jun 2013
Posts: 6
From: Michigan
Rep Power: 0
I can't believe with the rear bumper off you still can not see the engine! They really did a good job of hiding it on the 991.
Trending Topics


Registered User
Joined: Dec 2012
Posts: 12
From: Connecticut
Rep Power: 0
My driver side window switch wasn't functioning properly. It would lower and raise if I held the switch in position, but it would not go up or down all the way when I hit auto. The dealership gave me instructions on resetting the window switch. It fixed the problem, and I thought I'd pass it along.To reset (car must be on):1) lower the window all the way down and release the switch2) push the switch down, hold it there for 3 seconds, and then release3) raise the window all the way and release the switch4) pull the switch up, hold it for 3 seconds, and then release5) turn car off and then back onHope this helps anyone else who is having switch problems.*Alex
Registered User
Joined: Jan 2014
Posts: 114
From: DFW
Rep Power: 18
DIY Mesh for front grills
I checked the reference above, but that's for the sport bumper cap. Since I have the regular front end I also made my own. I ordered the mesh from customcargrills and made a cardboard template to the rough shape of the opening. I bent the mesh around a 1" pipe and slid it into the opening. Once it was all the way in, there is plenty of room to slide it to one side and get my hand behind the mesh and straighten out the bend. Then slide it the opposite side and finish bending the mesh straight. Then with a couple of black tie wraps to the vertical supports (on the bottom sides) and one on the outboard end and I was done.
PS, excuse all the bugs, I just got back from a fantastic 3 day drive with 5 other Porsche owners to find my intakes full of bugs, leaves and stones. No time like the present to get this mod done.
PS, excuse all the bugs, I just got back from a fantastic 3 day drive with 5 other Porsche owners to find my intakes full of bugs, leaves and stones. No time like the present to get this mod done.
Registered User

Joined: Dec 2012
Posts: 1,499
From: New York
Rep Power: 93
Registered User
Joined: Dec 2013
Posts: 675
From: Chalfont, PA
Rep Power: 55
Registered User
Joined: Nov 2013
Posts: 912
From: California
Rep Power: 56
DIY "Quiet Cabin" Mod. (Locating/blocking the sound symposer valve that pipes in intake/engine noise).
https://www.6speedonline.com/forums/...poser-mod.html
https://www.6speedonline.com/forums/...poser-mod.html
Registered User
Joined: Dec 2012
Posts: 1,499
From: New York
Rep Power: 93
Registered User
Joined: Dec 2012
Posts: 1,499
From: New York
Rep Power: 93
Great detailing tips and recommended product tips
https://www.6speedonline.com/forums/...etailings.html
https://www.6speedonline.com/forums/...etailings.html