


Vf supercharger install questions....post here


Thread Starter
|
Registered User
Joined: Jan 2008
Posts: 2,370
From: Vancouver
Rep Power: 329


Vf supercharger install questions....post here
It seems a few have gone and jumped that GREAT deal Vivid Racing ran on the VF supercharger so with ALL the PM's I have been getting with questions regarding install tips..... I thought lets start a thread for the answers.I just figure it will make it easier for me and you guys...because I have answered the same questions 3-4 times,LOL!
I do not mind giving my advice and rather enjoy it...but this will definitely make it easier,I hope?!
AND this will also open up tips from a few of the the GREAT installers as well(IAPorschedoc,Redridge,1999Porsche911,Cattman) .
I have PM'd all of them of this thread!
So my first bit of advice IS.....
If installing this yourself PLEASE buy Durametric software and do some runs with your car BEFORE you install the charger!
This way we all will have something to compare your numbers to after the install.
Check:
Engine load
Ignition angle
Mass air flow
RPM
Exhaust temp
O2 exhaust sensors upstream bank 1
O2 exhaust sensor downstream bank 1
Fuel trim adaption lower load
Fuel trim mean value
O2 exhaust sensor upstream bank 2
O2 exhaust sensor downstream bank 2
Actual throttle value
Also,buy a mechanical vacuum/boost gauge with enough hose THAT you can run from underneath the deck-lid outside the car and into your hands while driving.
VERY important to do this to see IF you have intake leaks.
So Good-luck and HAPPY installing all you DIYers!
Stacy
PS I will take donations to go towards my next charger....
J/King
I do not mind giving my advice and rather enjoy it...but this will definitely make it easier,I hope?!
AND this will also open up tips from a few of the the GREAT installers as well(IAPorschedoc,Redridge,1999Porsche911,Cattman) .
I have PM'd all of them of this thread!
So my first bit of advice IS.....
If installing this yourself PLEASE buy Durametric software and do some runs with your car BEFORE you install the charger!
This way we all will have something to compare your numbers to after the install.
Check:
Engine load
Ignition angle
Mass air flow
RPM
Exhaust temp
O2 exhaust sensors upstream bank 1
O2 exhaust sensor downstream bank 1
Fuel trim adaption lower load
Fuel trim mean value
O2 exhaust sensor upstream bank 2
O2 exhaust sensor downstream bank 2
Actual throttle value
Also,buy a mechanical vacuum/boost gauge with enough hose THAT you can run from underneath the deck-lid outside the car and into your hands while driving.
VERY important to do this to see IF you have intake leaks.
So Good-luck and HAPPY installing all you DIYers!
Stacy
PS I will take donations to go towards my next charger....
J/King
Last edited by justatoy; Dec 16, 2010 at 09:52 AM.

Registered User
Joined: Jun 2010
Posts: 267
From: Dudley, MA
Rep Power: 41
Thanks Stacy! Vivid was nice enough to do a little layaway program for me because i put a decent deposit on the kit. So it will be a little bit before i install mine. But i am sure i will have some questions for you. I think a good start would be a list of any special tools but i believe that is all on your DIY and Cattman's DIY. So i will of course look there before asking!
Anyone else doing this look here before bugging poor stacy and cattman
https://www.6speedonline.com/forums/...elf-style.html
https://www.6speedonline.com/forums/...on-begins.html
https://www.6speedonline.com/forums/...y-cattman.html
Anyone else doing this look here before bugging poor stacy and cattman
https://www.6speedonline.com/forums/...elf-style.html
https://www.6speedonline.com/forums/...on-begins.html
https://www.6speedonline.com/forums/...y-cattman.html
It seems a few have gone and jumped that GREAT deal Vivid ran on the VF supercharger so with ALL the PM's I have been getting with questions regarding install tips..... I thought lets start a thread for the answers.I just figure it will make it easier for me and you guys...because I have answered the same questions 3-4 times,LOL!
I do not mind giving my advice and rather enjoy it...but this will definitely make it easier,I hope?!
AND this will also open up tips from a few of the the GREAT installers as well(IAPorschedoc,Redridge,1999Porsche911,Cattman) .
I have PM'd all of them of this thread!
So my first bit of advice IS.....
If installing this yourself PLEASE buy Durametric software and do some runs with your car BEFORE you install the charger!
This way we all will have something to compare your numbers to after the install.
Check:
Engine load
Ignition angle
Mass air flow
RPM
Exhaust temp
O2 exhaust sensors upstream bank 1
O2 exhaust sensor downstream bank 1
Fuel trim adaption lower load
Fuel trim mean value
O2 exhaust sensor upstream bank 2
O2 exhaust sensor downstream bank 2
Actual throttle value
Also,buy a mechanical vacuum/boost gauge with enough hose THAT you can run from underneath the deck-lid outside the car and into your hands while driving.
VERY important to do this to see IF you have intake leaks.
So Good-luck and HAPPY installing all you DIYers!
Stacy
PS I will take donations to go towards my next charger....
J/King
I do not mind giving my advice and rather enjoy it...but this will definitely make it easier,I hope?!
AND this will also open up tips from a few of the the GREAT installers as well(IAPorschedoc,Redridge,1999Porsche911,Cattman) .
I have PM'd all of them of this thread!
So my first bit of advice IS.....
If installing this yourself PLEASE buy Durametric software and do some runs with your car BEFORE you install the charger!
This way we all will have something to compare your numbers to after the install.
Check:
Engine load
Ignition angle
Mass air flow
RPM
Exhaust temp
O2 exhaust sensors upstream bank 1
O2 exhaust sensor downstream bank 1
Fuel trim adaption lower load
Fuel trim mean value
O2 exhaust sensor upstream bank 2
O2 exhaust sensor downstream bank 2
Actual throttle value
Also,buy a mechanical vacuum/boost gauge with enough hose THAT you can run from underneath the deck-lid outside the car and into your hands while driving.
VERY important to do this to see IF you have intake leaks.
So Good-luck and HAPPY installing all you DIYers!
Stacy
PS I will take donations to go towards my next charger....
J/King



Registered User
Joined: Jan 2007
Posts: 1,953
From: ATL
Rep Power: 201
Glad to help answer any questions right here, too. I think I'll take a look at my original installation guide, since I marked a lot of notes in it, with regard to extra steps needed, which bolt sizes things were, and what tools I used.
Pic 1: a few of the custom-made tools
Pic 2: another custom-made tool
Pic 3: the mechanical (non-digital) boost/ vac gauge I used to test for air leaks
Pic 4: my hands about halfway through the install. Some of the scratches are now scars that won't go away. And some of the dirt wouldn't come off in time for work the next day no matter what I tried. Looked aweful with a suit!
Pic 5: It's almost painful to relive this! It was soooo cold and lonely and dark in that bus shop last January. The result was worth it, but, man, that sucked!
CATTMAN
Pic 1: a few of the custom-made tools
Pic 2: another custom-made tool
Pic 3: the mechanical (non-digital) boost/ vac gauge I used to test for air leaks
Pic 4: my hands about halfway through the install. Some of the scratches are now scars that won't go away. And some of the dirt wouldn't come off in time for work the next day no matter what I tried. Looked aweful with a suit!
Pic 5: It's almost painful to relive this! It was soooo cold and lonely and dark in that bus shop last January. The result was worth it, but, man, that sucked!
CATTMAN


Registered User
Joined: Jan 2007
Posts: 1,953
From: ATL
Rep Power: 201
Great idea! Ask and ye shall receive!
Here is the first thread, of the actual DIY:
https://www.6speedonline.com/forums/...lti-gauge.html
And here is the update with pics of the working installed gauge with the custom screens, etc.:
https://www.6speedonline.com/forums/...hrono-pod.html
CATTMAN
Trending Topics

Registered User
Joined: Jul 2006
Posts: 3,001
From: NJ
Rep Power: 150
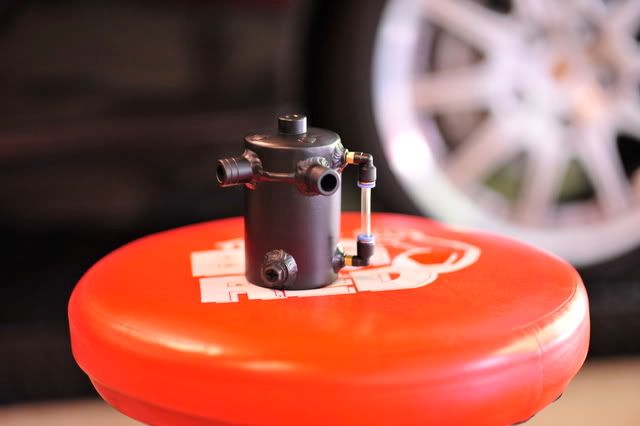
Cool thread Stacy.... Some very good tips in here. My .02.... If you track your car, install one of these. After a day at the track, the can was almost full of oil. For street use, it isnt necessary.

Registered User
Joined: Jan 2007
Posts: 1,953
From: ATL
Rep Power: 201
Catch can is a great idea, although I got sick of emptying and cleaning mine, so now I just, gasp, port the blowby and gasses out the back of the car. I get a couple drops per day on my driveway.
BTW, one HUGE advantage to not allowing the blow-by to recirculate through the intake: reduced intake temps. The blow-by is hot, and messy- I'm glad I am not sending that all through the intake, the blower, etc.
Might not be EPA compliant, or "green", but I passed emissions.
CATTMAN
BTW, one HUGE advantage to not allowing the blow-by to recirculate through the intake: reduced intake temps. The blow-by is hot, and messy- I'm glad I am not sending that all through the intake, the blower, etc.
Might not be EPA compliant, or "green", but I passed emissions.
CATTMAN
Registered User
Joined: Jul 2006
Posts: 3,001
From: NJ
Rep Power: 150
One thing I read about not recirculating the crank case vent or releasing it to atmosphere is the decrease in vacuum. Supposedly, loss of vacuum is not good for the m96 engine.... not sure about the logic though. But it has something to do with the oil foaming up.

Thread
Thread Starter
Forum
Replies
Last Post
sdg1871
991 Turbo
77
Sep 12, 2015 06:54 AM
