
Function GT2 Conversion DIY

Functional GT2 Conversion DIY
GT2 Front Bumper and Aero conversion DIY
By Mike Kelly
March 25, 2011
By Mike Kelly
March 25, 2011
First, I want to thank Ryan at Suncoast for working so hard to get me the parts and then taking some of them back, and the guys at Titon Motorports for their write-up, which was a good starting point.
Pay very close attention to the Red Text here and at the bottom of this �story�.
The below is a list of the parts I ended up BUYING:
996-505-311-30-G2X Bumper Cover
996-505-563-30-01C Air Inlet
996-505-564-30-01C Air Inlet
996-505-561-30-01C Air Inlet
996-575-326-30 Bumper frame (front diffuser)
996-575-325-30 Bumper Air Duct
996-505-741-30-01C Bumper HID
996-505-742-30-01C Bumper HID
The other hardware to simply turn the radiator upside down and mount everything so it lines up is as follows:
996-505-773-32 Spacer Panel (x2)
996-505-531-30 Retaining
996-575-321-30 Air Routing
996-575-322-30 Air Routing
996-504-195-30 Radiator Bracket (Upper)
996-504-679-31 Spacer Sleeve (x2)
996-504-413-30 Radiator Bracket (Lower)
996-575-141-30 Cooling Air Duct
996-504-123-90 Inner fender liner
996-504-124-90 inner Fender Liner
996-575-231-30 Air Guide (R)
996-575-232-30 Air Guide (L)
There are about 20 part numbers related to water lines required in order to do this swap to OEM standards:
996-106-422-75 Hose return
996-106-740-91 Hose
996-106-641-75 Hose
996-106-136-91 Breather Hose
996-106-127-53 Vent Line
996-106-615-54 Water Tube
996-106-623-53 Hose
996-106-627-52 Hose
996-106-611-53 Hose
996-106-615-54 Water Tube
996-106-627-52 Hose
996-106-624-53 Hose Return
996-106-652-54 Water Tube
996-106-651-54 Water Tube
996-106-127-53 Vent Line
996-106-546-54 Y Pipe
996-106-126-54 Vent Line (R)
996-106-225-54 Vent Line (L)
996-106-621-75 Center Radiator Hose (R)
996-106-625-75 Center Radiator Hose (L)
Here is what the pile of �waterline� parts looked like in the floor of my reading room:
So as has been reported elsewhere, I bought a bumper and associated parts from another member in late summer 2010. I sat on the project until I could get enough technical information on the project from aerodynamic, cooling, fit and finish, as well as functionality standpoints. What I wanted to achieve was the best overall OEM �like� install I could. I didn�t want to use worm clamps and spliced water lines if I could help it, didn�t want to relocate the horns, as others have done, and I didn�t want to have mis-matched parts that would look �wrong�. I think I got it right� Read on.
The biggest problem from the outset was finding a water line schematic for routing the $600 worth of water lines I bought from Suncoast Porsche. Upon further inspection, it became really clear that to do it �right�, you�ll have to remove the differential and open up that whole �valley� that exists under it. This routing runs up to the bonnet and then snakes around each side, fishing between the fuel tank, storage compartment and fender wells. I�d been warned that this was no easy task and that I should reconsider what I was thinking of doing.
So I wanted to start with a clean shop, all bits laid out on the floor so I could look at them, and the car opened up without plastic panels in the way. So Friday afternoon I spent an hour doing just that� Once done, I was ready to start the removal of the front bumper.
To do this, you actually start in the bonnet. This plastic trim panel is held on with four small plastic screws. Turn them counter clockwise � turn to release the panel. Careful when removing it as the trim runs up the side of the fender between the bonnet framework and the headlights. Be gentle removing it or you�re likely to break it. I also remove the light inside the luggage compartment, so you don�t drain the battery.
Tools needed:
TORX bits and driver
Phiilips #2 screw driver
Small head flat screw driver (mainly used to pry lightly)
16MM socket and/or wrench (Bumper structure)
13mm socket/ratchet and wrenches (radiator bracketry)
10MM socket/ratchet and wrenches (replacement bolts for bumper structure mounts)
8mm socket (removing the rear panel bolt under the car)
Long needle nose pliers
Vice grip pliers
Something to cut rubber water hoses with (Razor blade or hose cutter)
Drill and bit to drill out rivets in radiator air duct
Pop rivet gun and rivets to re-attach new duct to old radiator
Flashlight
The following steps can be found in detail in the factory service manual.
Next I removed to the fender liners� Removing them is easy, and doesn�t require removing the wheels, but certainly is easier if you do so. I just turned the steering wheel side to side as needed to get to the 4 TORX screws and plastic �push pin� fastener at the marker light within the wheel well. Once you have the inner fender liner portion unbolted, you can remove the side marker light and unplug it so it doesn�t get in the way or scratch the finish. Now move to the underside of the car and finish removing the rest of the torx screws and �push pin� fastener in the brake air guide. There are a total of 21 screws (15 torx and 6 Phillips) and four nylon push pin type fasteners that hold the inner fender liners, spoiler lip and bumper cover in place.
Now we can focus on the bumper cover itself. You�ve removed most of the fasteners on the underside by unbolting the fender liners. However, there are still several in each corner of the bumper cover, at both the bottom, and one on the underside of the marker light bracket. That particular bolt is a Phillips head screw. It is very important to remember securing this point, as it holds the bumper cover in place properly oriented the cover and keeping proper alignment of the cover to headlight/side marker. It�s very easy to miss this screw until you�re completely done installing the fender liners and you have these two screws (one on each side) left over�Trust me, been there, done that� Don�t make this mistake.
Once you have the cover completely unbolted from the upper brackets leading the hood opening and all other areas around the bumper brackets, you can remove the bumper and expose the radiator air ducts and bumper structure. To give you an idea of the time spent to this point, it took less than an hour to remove everything mentioned above along with the two corner radiator air ducts. Removing the air ducts is simple, but you will need that flashlight listed above to see the TORX screws in the front upper and lower corners of the air duct. Once you find them, it�s simple to remove them and extract the ducts from the radiators. Then remove the upper bracket and lower bracket from around the center radiator.
The radiator should remain supported by the hoses. You should have a clean bucket or catch pan handy to drain the coolant into. Pull the safety clip on the radiator drain and drain the radiator into the pan. Then remove both radiator hose clips at the neck of the radiator hoses, and prepare to drain each side, one at a time. Once you have one side disconnected and drained, move to the other. I drained a total of about a half a gallon of coolant, so don�t buy more than a gallon.
*I did not take any pictures of the removal process, because it is covered both in the factory service manual link and online elsewhere.
This is how it will look when you have removed all the components above:
Now, mounting all the new �stuff� isn�t really that hard� You need to swap in the new side radiator air ducts, which isn�t hard. They bolt in exactly as the turbo units did� No surprises there. You�ll need to drill out the rivets in the center radiator air duct to replace the turbo version with the GT2 Version. Make sure to orient it properly.
Properly Oriented Center Air duct:
You will need to cut the new GT2 Water line part numbers 996-106-625-75 and 996-106-621-75 to 9 inches in length, measured from the end of the �collar� where the rubber starts (at the radiator) to the end of the hose that connects to the hard water pipe mounted on the car.
The stock 996TT water lines are much shorter than the required GT2 water lines:
GT2 Waterline Part numbers:
Picture of the GT2 Waterlines installed on the radiator:
Slide the OEM stock Squeeze clamps on the lines about 3 inches up the length of the line to allow for the hose to slide onto the pipe and then the clamp to slide up over the �flare� on the pipe (First pic is of driver side and second is passenger side):
One of the things I�ve read when researching some shop installs is that most shops had to relocate the horns to a different location. I didn�t want that. I wanted the horns to be where Porsche put them from the factory, and I didn�t want this conversion to look cobbled. Below is the horn bracket. You will have to remove it to get access to the passenger hose, but then can easily re-install it in its rightful location:
Before that I spent some time with the grill vent making sure the duct and grill vent lined up:
Parts that are required to orient the radiator properly. Notice the larger bolt and fastener. They are the GT2 units:
In mounting the air guide notice that the clip on the aluminum spacer sits with most of the spacer going through the air duct. This clip keeps the proper distance between the duct and the storage compartment:
Part 2 of Functional GT2 Bumper & Aero Conversion DIY
When installing the bumper cover, bolt the center grill in place on the bumper cover first, and install the whole unit. Along with all headlight trim, and grill trim in place. I used the upper bolts on the vent to the retaining strip and then fit the bumper around the air ducts and fit it to the mount holes at the side marker lights.
Also, the GT2 Bumper structure is the same part number as the Turbo. However, you need the following parts in order to make the bumper structure clear the top of the radiator:
More Pics of the instal:
Here is where I made mistakes others shouldn�t make. Don�t buy all those water lines, like I did (God I hope Ryan can help me out with taking them back) but DO spend the money on the lower radiator mounts that bolt to the corner radiators. These mounts will make it so much easier for you to just bolt the stuff in. I spent about 6 hours test fitting �stuff� because I didn�t buy the brackets. This could easily have been an 8-10 hour job. Instead it turned into 16 hours because I was busy messing with test fitting so much stuff. Part Numbers that you will need that I didn't buy: 996-504-523-30 & 996-504-524-30.
Notice the angle is off in this pic:
Also, because I bought my bumper cover from someone else who had decided to modify it by filling the bumper license plate holes in, I didn�t notice that the body shop made the area a little too thick, causing interference with the bumper frame structure, causing me to inadvertently CRACK the paint/ bodywork around the license plate area when I was trying to
fit the unit into place. My car is going to be re-painted and wrapped within the next 6 to 12 months, so although it�s something that kind of pisses me off, it isn�t the end of the world, and not very noticeable to anyone but me, so far.
The coolant system was burped and all areas were checked for leaks BEFORE I bolted everything back up cosmetically. Do not install the bumper cover until you�ve confirmed this. Procedures can be found in the Factory Service Manual:
Some things I found out along the way� The GT2 fender liner and the 996TT fender liner BOTH bolt up in the same locations. So YOU CAN SWAP the GT2 Fender liner into the 996TT fender-well and it will match up to the 996TT bumper cover, same bolt locations, and same edges line up. You WILL need the �air guides� to work in conjunction with the brake ducts in order to get enough airflow through the brake and wheel well area. This is critical because the GT2 fender liners do not have vented openings in them at the back of the radiators. Parts number 996-575-352-30 and 996-575-351-30 are the proper numbers for those air guides.
Below is the list of parts I ended up USING:
996-505-311-30-G2X Bumper Cover
996-505-563-30-01C Air Inlet
996-505-564-30-01C Air Inlet
996-505-561-30-01C Air Inlet
996-575-326-30 Bumper frame (front diffuser)
996-575-325-30 Bumper Air Duct
996-505-741-30-01C Bumper HID
996-505-742-30-01C Bumper HID
996-505-773-32 Spacer Panel (x2)
996-505-531-30 Retaining
996-575-321-30 Air Routing
996-575-322-30 Air Routing
996-504-195-30 Radiator Bracket (Upper)
996-504-679-31 Spacer Sleeve (x2)
996-504-413-30 Radiator Bracket (Lower)
996-575-141-30 Cooling Air Duct
996-504-123-90 Inner fender liner
996-504-124-90 inner Fender Liner
996-106-621-75 Center Radiator Hose (R)
996-106-625-75 Center Radiator Hose (L)
That list doesn't include small hardware like bolts/nuts/fasteners of any type. If you are not comfortable sourcing this stuff for yourself (I have an excellent source close by) then by all means order these when ordering your parts. In particular the bolts for the upper radiator spacer come to mind as they are over four inches in length and hard to locate.
Here is a pic of the left over water lines I did not use. There are two LARGE water hard lines not in the picture:
Here are shots of the final product:
Of the parts I bought, and the parts I used, I think there is a difference of about $500 worth of water lines there. I have $3200 in the first 8 parts on that list, and they were shipped to me already painted Basalt Black. Of the other parts on that list, the air guides and fender liners each cost about $175 at the time of purchase. The rest of the bits and pieces cost roughly $1200. I did not price the radiator brackets that sit at the lower corners (mentioned above in discussing angle issues) but suspect they will be $400 each, per another members quote.
Mike
Last edited by Mikelly; Aug 6, 2011 at 06:06 AM.
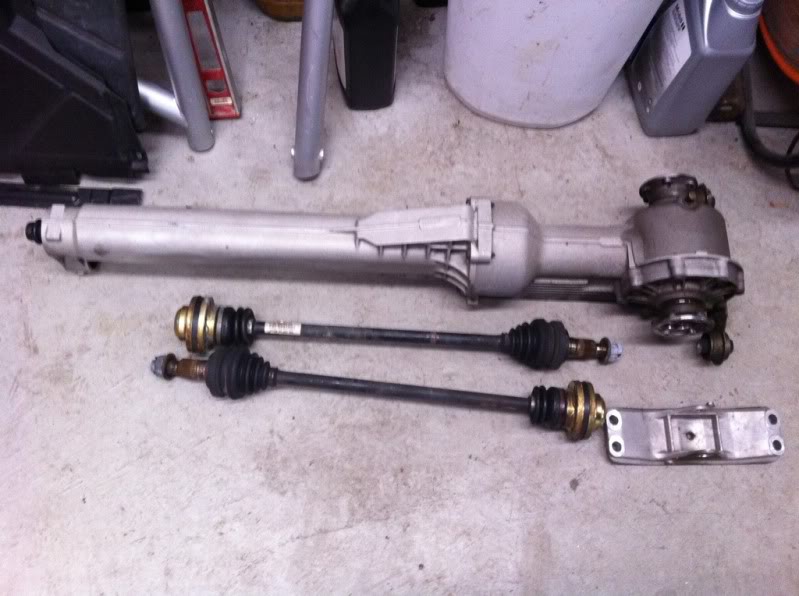
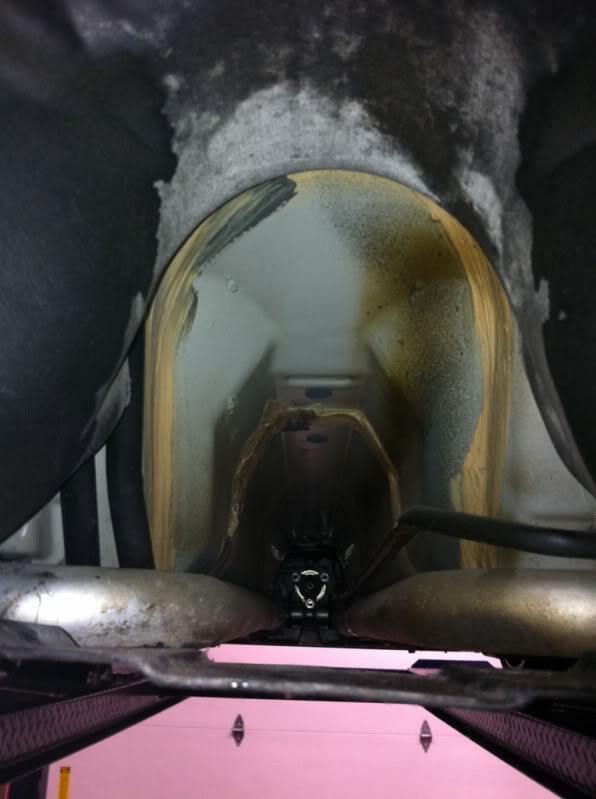
Here are a few pics of the hardware removed from the front drive system....Really was "simple" to do that whole removal...
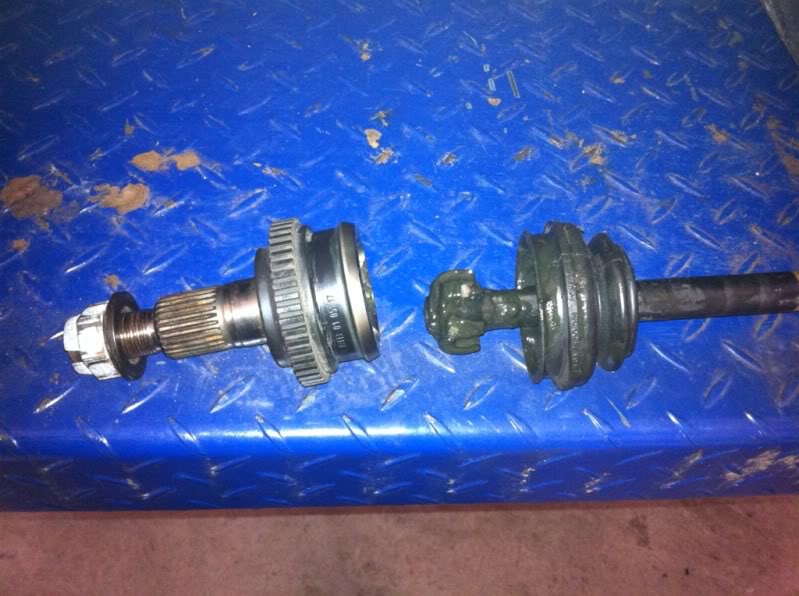
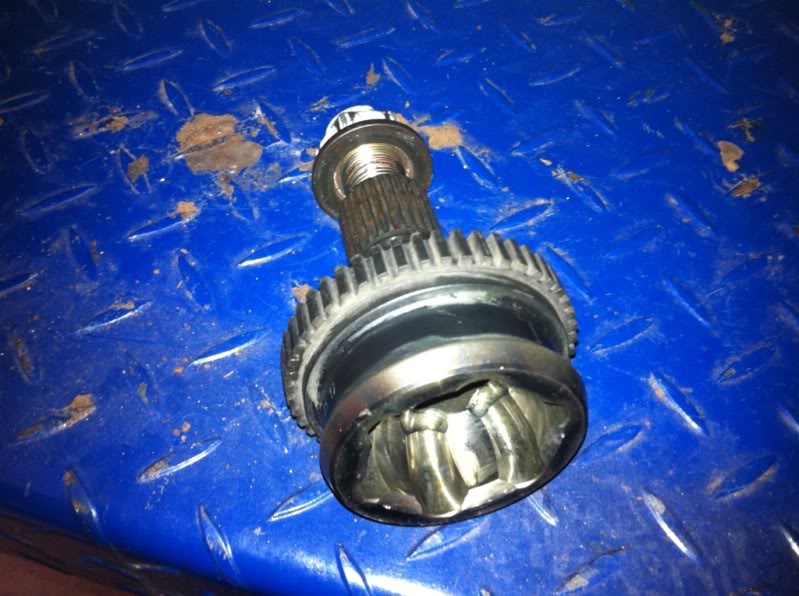
Here are pics of the pieces that need to be split so you can retain the Turbo hubs. Otherwise you'll have to buy GT2 hubs:
And here are the tools I used to cut the bearing cages out of the CV joint:
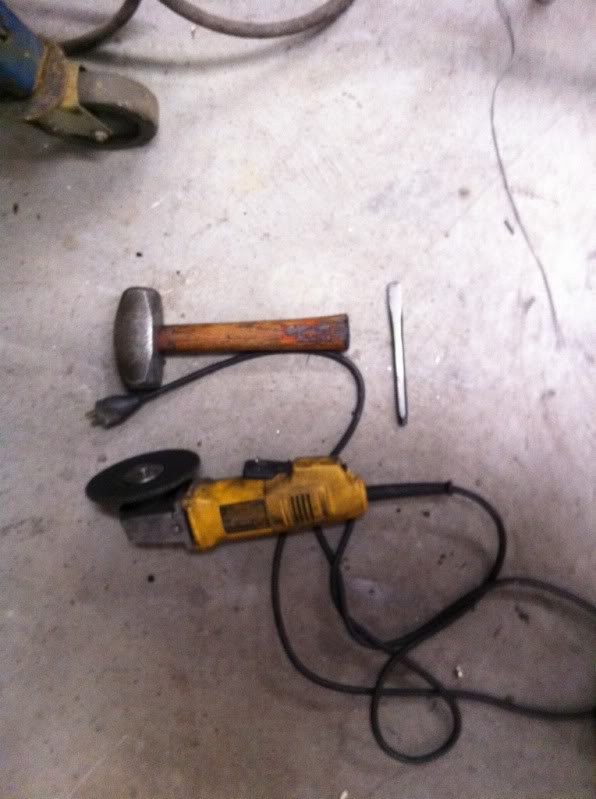
Simply pry off the clamp that holds the hoot in place, get the grease out (as much as you can), get the axle in a vice and grind the cage material between each of the 6 bearings. Took me less than 20 minutes to do both axles and less than 5 minutes to re-install... Actually took more time to clean up the residual grease that got on the tools and the vice, and the bench and the floor... and me... Stuff is nasty and gets everywhere... Yuck!
I'll be fitting a pump, lines, filter, and heat exchanger in there...

Mike
Here are pics of the pieces that need to be split so you can retain the Turbo hubs. Otherwise you'll have to buy GT2 hubs:
And here are the tools I used to cut the bearing cages out of the CV joint:
Simply pry off the clamp that holds the hoot in place, get the grease out (as much as you can), get the axle in a vice and grind the cage material between each of the 6 bearings. Took me less than 20 minutes to do both axles and less than 5 minutes to re-install... Actually took more time to clean up the residual grease that got on the tools and the vice, and the bench and the floor... and me... Stuff is nasty and gets everywhere... Yuck!
I'll be fitting a pump, lines, filter, and heat exchanger in there...
Mike

It's kinda ironic that I did this conversion the starting the day after my father inlaw died, and I'm sharing it here the day after my own father passed.
some time has passed since the conversion and swap to RWD, and I've had time to put about 1500 miles on the car, all on the street, and all mixing highway, Washington DC traffic congestion, and some spirited back road fun.
My car already has UMW's K16/24 turbos, along with their associated software, fuel and boost pressure management hardware, full suspension and brake upgrades for track duty, and the upgraded clutch and drivelilne from when the trans had to be rebuilt in Feb.2009!
The car is now much more lively. I was so surprised at how much drag the front axles put on the front wheels, even with the driveshaft removed. The car steers much lighter (partially because of the monoball suspension I'm sure) and overwhelms the PSM far sooner than it ever did before. The acceleration is much quicker and I'm finding myself "driving" the car more when I'm in this car, than before.
I've had zero mechanical issues with the conversion from a cooling standpoint, and the car has run troublefree for well over 4 months now. Anyone thinking about swapping to RWD only should think about going full out and ditching the front diff. It's the only way you'll truly remove the drag on the front axles... I'm guessing I picked up some significant torque and HP at the wheels by doing this modification alone.
Mike

Yea, the big issue is the cost of all the plastic bits in the ducting/fenderwell and the brackets. The bumper cover itself isn't that much more expensive than the traditional 996TT unit...
I love the look though, and wouldn't consider something that wasn't aerodynamically functional. Afterall, it's a Porsche, not some JDM poser!
Mike
I love the look though, and wouldn't consider something that wasn't aerodynamically functional. Afterall, it's a Porsche, not some JDM poser!
Mike
Registered User

Joined: Jan 2006
Posts: 531
From: Miami FL
Rep Power: 46

"< The car is now much more lively. I was so surprised at how much drag the front axles put on the front wheels, even with the driveshaft removed. The car steers much lighter (partially because of the monoball suspension I'm sure) and overwhelms the PSM far sooner than it ever did before. The acceleration is much quicker and I'm finding myself "driving" the car more when I'm in this car, than before. >"
-----------------------------------------
Mike, how much weight do you think you saved going RWD ?
-----------------------------------------
Mike, how much weight do you think you saved going RWD ?
Trending Topics
My car already had the rear wiper delete, rear GT2 wing, and some other mods to it, but when I put my track seats in, I lose about 100 pounds more from the weight of the heated power seats... The car lost about 75-80 pounds with the removal of the front drive and driveshaft.
Mike
Mike


Registered User

Joined: Mar 2009
Posts: 1,687
From: CA
Rep Power: 122

Nice nice nice nice.
Your car looks sooo much better now.
Also +1000 on diff and axles removal and joint splitting, that's how easy it's done and the driving pleasure/experience is the reward. Just removing the main shaft isn't going to bring that spirited, easy steered, less drag feeling that you just described.
Great writeup Mike!
Registered User
Joined: Jul 2010
Posts: 4,848
Rep Power: 457
Mike,
I'm assuming you are running some sort of a LSD as I'm assuming that's the only way you will get the power to the ground in the turns without the AWD?
I'm assuming you are running some sort of a LSD as I'm assuming that's the only way you will get the power to the ground in the turns without the AWD?
It's kinda ironic that I did this conversion the starting the day after my father inlaw died, and I'm sharing it here the day after my own father passed.
some time has passed since the conversion and swap to RWD, and I've had time to put about 1500 miles on the car, all on the street, and all mixing highway, Washington DC traffic congestion, and some spirited back road fun.
My car already has UMW's K16/24 turbos, along with their associated software, fuel and boost pressure management hardware, full suspension and brake upgrades for track duty, and the upgraded clutch and drivelilne from when the trans had to be rebuilt in Feb.2009!
The car is now much more lively. I was so surprised at how much drag the front axles put on the front wheels, even with the driveshaft removed. The car steers much lighter (partially because of the monoball suspension I'm sure) and overwhelms the PSM far sooner than it ever did before. The acceleration is much quicker and I'm finding myself "driving" the car more when I'm in this car, than before.
I've had zero mechanical issues with the conversion from a cooling standpoint, and the car has run troublefree for well over 4 months now. Anyone thinking about swapping to RWD only should think about going full out and ditching the front diff. It's the only way you'll truly remove the drag on the front axles... I'm guessing I picked up some significant torque and HP at the wheels by doing this modification alone.
Mike
some time has passed since the conversion and swap to RWD, and I've had time to put about 1500 miles on the car, all on the street, and all mixing highway, Washington DC traffic congestion, and some spirited back road fun.
My car already has UMW's K16/24 turbos, along with their associated software, fuel and boost pressure management hardware, full suspension and brake upgrades for track duty, and the upgraded clutch and drivelilne from when the trans had to be rebuilt in Feb.2009!
The car is now much more lively. I was so surprised at how much drag the front axles put on the front wheels, even with the driveshaft removed. The car steers much lighter (partially because of the monoball suspension I'm sure) and overwhelms the PSM far sooner than it ever did before. The acceleration is much quicker and I'm finding myself "driving" the car more when I'm in this car, than before.
I've had zero mechanical issues with the conversion from a cooling standpoint, and the car has run troublefree for well over 4 months now. Anyone thinking about swapping to RWD only should think about going full out and ditching the front diff. It's the only way you'll truly remove the drag on the front axles... I'm guessing I picked up some significant torque and HP at the wheels by doing this modification alone.
Mike
Back in Jan/Feb 2010 I had the trans rebuilt, along with the GT2 Clutch Hydraulics installed. We did a Guards LSD, along with the 997.2TT mainshaft, 1st/2nd and 5th gears. We replaced the brass syncros with new brass syncros in 1/2/6, along with steel syncros in 3/4/5. 5th gear is a cupcar gear that forces a shift into 6th a little sooner.
I'm installing heat exchanger, gear oil pump, and lines to deal with the added heat brought to the transaxle by the LSD. Anyone considering an LSD, just beware the heat. Talk to Matt M. and GT Gears and get an education before moving forward. Gear oil cooling should definitely be a part of your budget. Don't let anyone fool you.
Mike

great writeup !!
__________________
#TeamAIM
997TT SilverSpool - 210.8 mph 1/2 Mile WR Apr 2019, 9.2 @ 168 mph 1/4 Mile Manual World Record , 3.15 60-130 mph , 2.72 100-150 mph , 1400whp E85
996TT SpoolBus - 204.6 mph 1/2 Mile 996TT WR Aug 2018, 9.5 @ 154 mph, 3.23 60-130 mph, 2.5 100-150 mph Manual Porsche World Record, 1400whp E85
997TT SlowBerry - 205.0 mph 1/2 Mile WR Nov 2018, 9.7 @ 170 mph 1/4 Mile , 3.2 60-130 mph , 2.4 100-150 mph , 1420whp E85
ESMOTOR | DO88 | TPC DSC | SYVECS | COBB | IPD | KLINE | XONA | AMS | ID | ERP | SACHS | TURBOSMART | CSF | DODSON |
Registered User
Joined: Aug 2010
Posts: 160
From: San Diego, CA
Rep Power: 22
I've meant to ask. What are the advantages to the GT2 conversion? Do you get better cooling and thus better pulls or is it a mostly aesthetic thing?
What suspension are you running Mike? IIRC, you're running Motons right?
What suspension are you running Mike? IIRC, you're running Motons right?